JAGER PRO M.I.N.E. Manual de usuario

1

2
WARRANTY
Limited Warranty: JAGER PRO, LLC warrants the Product to be free from malfunctions
and defects in both materials and workmanship for one (1) year from the date of purchase
(“Warranty Period”). JAGER PRO, LLC will repair or replace, at its option, the Product if
it fails to function properly during the Warranty Period, subject to the conditions and/or
limitations stated herein. Such repair or replacement is your sole remedy under this Limited
Warranty.
Limitations: Limited Warranty service will not be provided unless the Product, returned in
the manner set forth below, is accompanied by a copy of your original dated sales invoice.
JAGER PRO, LLC reserves the right to require you to provide your original dated sales
invoice. Products purchased from non-authorized dealers may not qualify for warranty
coverage.
Repair & Service: Please contact our Camera Support department at 1-706-718-9789 (EXT
may be required prior to authorization for warranted repair services. If service is
recommended for your product, an RMA number and document will be provided. Additional
terms and conditions may apply. If it is determined that your product does not qualify for
warranty coverage, the following charges may or may not apply: Labor Hours, Parts,
Materials, Estimate Services, Shipping and Handling.
This Limited Warranty does not cover the following:
a. any defect in or damage to the Product that occurs due to mishandling of the Product;
b. any defect in or damage to the Product that occurs due to repair, modication, or other
similar activity after your purchase of the Product;
c. any defect in or damage to the Product that occurs due to the transport, dropping, shock,
or other similar activity after your purchase of the Product;
d. any defect in or damage to the Product that occurs due to careless or improper storage,
or improper use or maintenance of the Product;
e. any defect in or damage to the Product that occurs due to foreign objects such as dirt or
grime, sand, water or liquids entering the inside of the Product; and
f. any defect to the Product related to your failure to follow proper operating instructions
provided by JAGER PRO, LLC, claims made after the Warranty Period, or your failure to
follow the instructions set forth below with respect to return of the Product to JAGER PRO,
LLC.
All other express and implied warranties for the product, including the implied warranties of
merchantability and tness for a particular purpose are hereby disclaimed. JAGER PRO,
LLC expressly disclaims all warranties not stated in this warranty. Any implied warranties
that may be imposed by law are limited in duration to the terms of this express limited
warranty. Some jurisdictions do not allow the exclusion of implied warranties or limitations
on how long an implied warranty lasts, so the above exclusions or limitations may not
apply to you. In no event will JAGER PRO, LLC be liable to you, or any third party, for any
damages in excess of the purchase price of the product. In addition, JAGER PRO,LLC shall
in no event be liable to you, or any third party, for any direct or indirect damages or other
special, incidental, exemplary or consequential damages arising out of the use or inability to
use the product. Some jurisdictions do not allow the exclusion or limitation of incidental or
consequential damages for some products, so the exclusions or limitations may not apply to
you. This limited warranty gives you specic legal rights, and you may also have other rights
which may vary from jurisdiction to jurisdiction.
Notwithstanding any terms of this Limited Warranty to the contrary, no warranty coverage
shall be provided for a Product purchased from, through, or with the assistance or
involvement of any Internet auction web site. JAGER PRO, LLC reserves the right to modify
its warranties prospectively at any time, in its sole discretion.

3
TABLE OF CONTENTS
Camera Characteristics................................................ 04
Quick Start Programming............................................. 07
Main Menu Tabs............................................................08
Camera Tab.................................................................. 09
Trigger Tab....................................................................10
System Tab................................................................... 11
Wireless Tab................................................................. 12
Manually Sending Photos............................................. 15
SMS Command Codes................................................. 16
LOGIN Fail Corrective Action........................................17
Timing Camera Transmitter to Control Box Receiver....18
Camera Deployment.....................................................19
Care and Maintenance................................................. 21
Accessories.................................................................. 22
Purchasing a SIM Card.................................................23
Replenishing a SIM Card..............................................23
Glossary........................................................................24
SMS Command Code List............................................ 25

4
Front View
1
2
3
4
56
CAMERA CHARACTERISTICS
1. Antenna: Standard antenna shown receives cell tower signals. Our 5
decibel booster antenna is available as an accessory for operation in low
signal areas.
2. IR Illuminator: 44 infrared LEDs that illuminate the target area when
camera functions at night.
3. Camera Lens: The camera lens has a 52 degree eld of view with no
magnication. This enables users to observe a 20’ eld of view measured 15’
from the lens and a 32’ eld of view when measured 21’ from the lens.
4. PIR Sensor: Passive Infrared motion detector. Senses the presence of
a moving object which triggers the camera to take a photo or record a video.
5. Ambient Light Sensor: Detects surrounding light to automatically
control day and night camera functions. This sensor also emits a red,
blinking LED when the selector switch is moved to SETUP. The LED will
stop blinking within 10 seconds after the selector switch is moved from
SETUP to ON indicating the camera is operational and active.
6. Locking Latch: Secures the camera front housing to the main body
housing while providing a waterproof seal to internal components.
This manual is intended to visually guide users through the individual steps
to properly program, operate and maintain the 3G GSM version of our
JAGER PRO M.I.N.E™ and I.C.E.™ Cameras.

5
1. DC Port Plug: Waterproof seal to protect internal components when
external battery (optional equipment) is not in use.
2. Mounting Port: 1/4 x 20 internal threads for securing camera to a
T-Post mount. Only thread external devices two complete rotations into the
camera mounting port then tighten using the mount’s adjusting nut. Forcing
external threads to the bottom will damage mounting port and camera
housing.
3. USB Port Plug: Waterproof seal to protect internal components when
USB cable is not in use.
Bottom Outside View
12 3
1
6v DC External Battery

6
Inside View
1. Antenna Port: Attachment point to install various antennas depending
on local cellular strength. Our 5 db booster antenna is available as an
accessory for operation in low signal areas.
2. Display: Screen to observe menus, photos and settings.
3. Selector Switch: Used to enter into any of the three operating modes:
OFF, SETUP and ON.
4. Menu Button: Used to select various camera options.
5. Move Left Button: Moves from the highlighted area to a selection left.
6. Move Up Button: Moves from the highlighted area to a selection
above.
7. Move Right Button: Moves from the highlighted area to a selection
right.
8. Move Down Button: Moves from the highlighted area to a selection
below.
9. OK Button: Selects the highlighted item.
10. DC Port: 6 volt connection for external battery optional battery pack.
11. USB Port: Standard USB cable connection interface to transfer
information between the camera and a computer.
12. Battery Polarity Symbols: Located on the front of the battery tray.
Aids in 12 proper battery polarity and installation.
13. Playback Button: Allows user to view pictures on SD card.
14. Del Button: Deletes unwanted pictures, numbers, and letters.
7
3
4
2
6
5
8
9
1
10 11
12
13
14

7
Left Side View
1
2
1. SIM Card Port: Slot for receiving a cellular SIM card from GSM network
providers such as AT&T and T-Mobile.
2. SD Card Port: Slot for receiving an SD card. The camera has no
internal memory. An SD card smaller than 32GB must be used to store
photos, video and GSM data.
QUICK START PROGRAMMING
Begin programming the M.I.N.E™ Camera for operation by removing the
protective cap and installing the standard antenna onto the antenna jack.
Ensure the black rubber O-ring is not removed from the antenna jack
threads. Twist the antenna base snug but do not over tighten.
Unlock the full length locking latch to access the main body. Follow the
battery polarity symbols located on the front of the battery tray to properly
install 12 each batteries. We only recommend Energizer brand AA Lithium
batteries for the best performance in the eld. Alkaline or rechargeable AA
batteries will not operate high-tech equipment nearly as long.
The camera will function in emergency situations using only four AA Lithium
batteries in the two left columns. We recommend our 6 volt external power
supply for extended, long-term camera use in the eld. AA Lithium batteries
are still required for initial start-up until the camera housing is closed and the
6 volt external power supply cable is inserted into the camera battery port.
Insert an activated SIM card into the SIM card port with the notch located in
the top right-hand corner. A formatted SD card must be used for the camera
to function. Move the selector switch from OFF to SETUP.The camera will

8
MAIN MENU TABS
Press the MENU button to access the program display. The camera will
shut down after 3 minutes sitting idle to conserve battery power. Users must
move the selector switch to OFF then SETUP again to restart the camera
and access MENU.
Press the MENU button to access the program display. There are four main
menu tabs; CAMERA, TRIGGER, SYSTEM and WIRELESS. Press the
left or right buttons to change tabs. Press the up or down buttons to cycle
through the submenu settings of the highlighted green tab. Press left or right
to select items with green highlights to edit and view choices.
Press OK to save the new setting. Press up or down to view the next setting.
Press MENU and return to the top of the MENU tab before able to move left
or right to view or change another highlighted tab.
X
immediately power OFF after the logo is displayed.
The camera supports up to a 32 GB SD card. Ensure the SD card is not
locked and insert it into the SD card port. Move the selector switch from OFF
to SETUP. The screen will display “Searching Network” at the bottom center
of the screen. It usually takes 20 to 30 seconds for the camera to nd the
network. AT&T or T-Mobile will appear in the top center of the screen after
connecting to the network and the signal strength symbol will appear in the
top right.
9
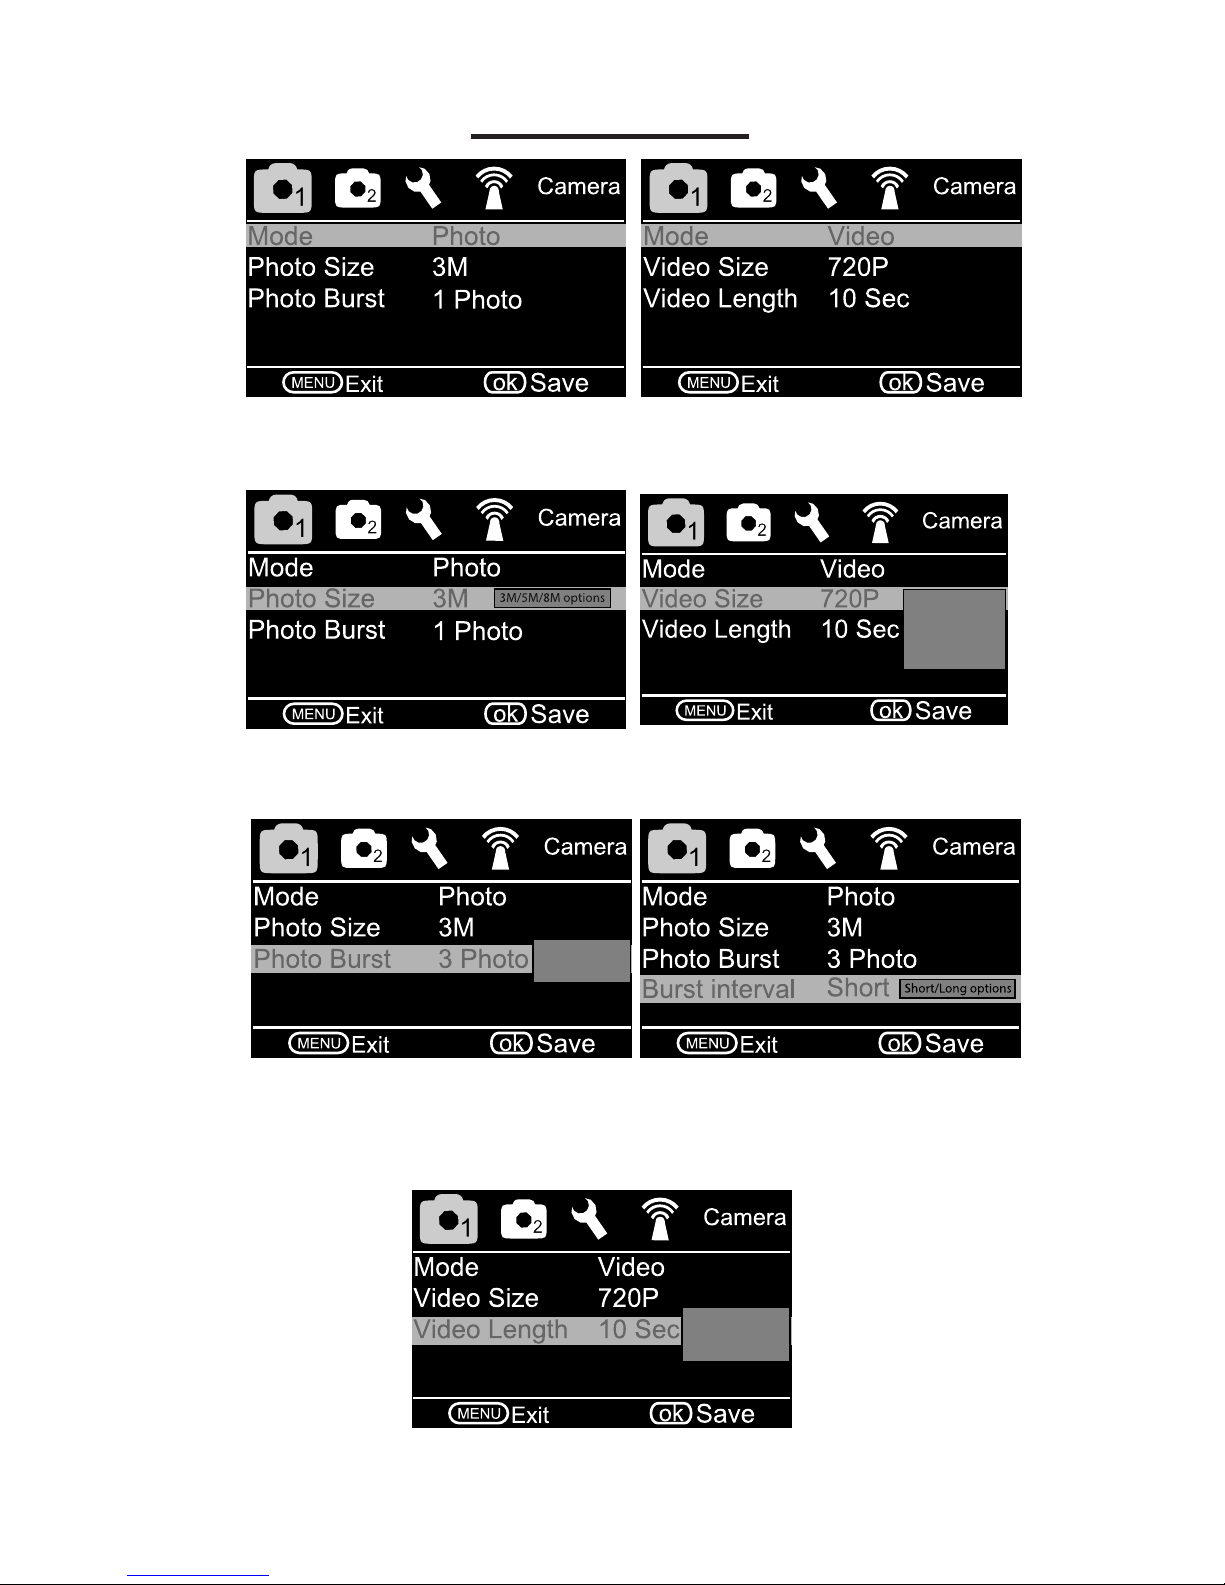
Camera Tab:
• Mode: Choose Photo or Video. (Recommend Photo for immediate text
information sent to phone.)
720p/WVGA
QVGA/1080p
options
• Photo Size: Choose the image size; 3MP, 5MP, or 8MP.
• Video Size: Choose the video size.
1/2/3 burst
option
• Photo Burst: Choose the number of pictures taken consecutively after
each triggering. (Recommend 1 Photo)
• Burst Interval: Choose between one or half second delay between
pictures.
1-30 sec video
length options
• Video Length: Choose how long the video will be in size between 1 and
30 seconds.

10
• Trigger Interval- The timeout period between PIR triggers for each
photo or video capture. We recommend a two minute trigger interval. A
one minute selection may not allow a photo to transmit via SMS in low signal
areas before the next PIR trigger. The photo is always saved on the SD card
but may not have time to send via SMS to your phone or email.
• Time Lapse
OFF: Camera triggers only during PIR event. (Recommend)
ON: Camera automatically triggers at selected intervals.
Trigger Tab:
• Sensitivity- Passive Infrared (PIR) Trigger Sensitivity
High: The most sensitive setting and will trigger camera operation when
any movement is detected.
Low: The least sensitive setting used when foliage, wind or shadows
trigger excessive photos.
Normal: Average sensitivity. (Recommended)
0-59 sec or1-60 min
option
Trigger interval and
Time Lapse disabled
when on
• Start - Stop
OFF: Camera triggers 24 hours per day.
ON: Camera only triggers between the START and STOP times
programmed. Could be used to avoid high trafc from non-target species
during specied times.
Off/High/Normal
Low options
Otros manuales para M.I.N.E.
4
Tabla de contenidos
Otros manuales de Cámara de exploración de JAGER PRO


