Zoom 4360 Manual de usuario
Quick Start
English............................................ 2
Español........................................... 9
Français......................................... 16
Português....................................... 24
Türkçe............................................ 31
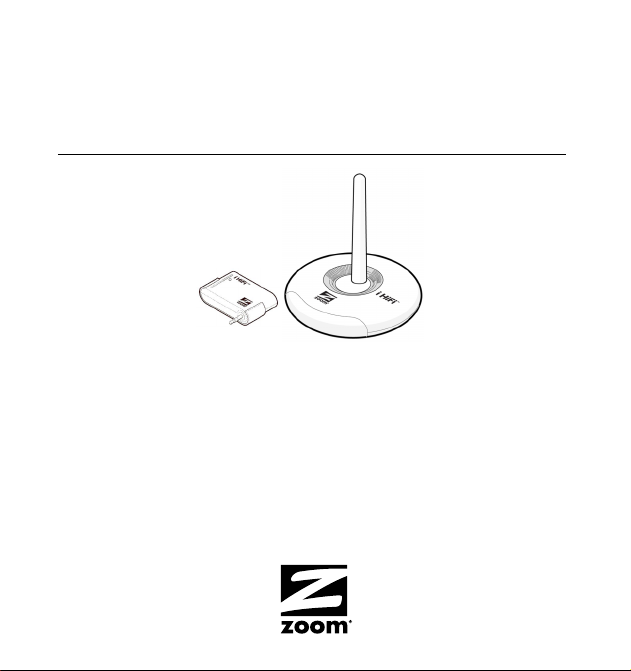
iHiFi UNIVERSAL
TRANSMITTER and RECEIVER

2
Using the Universal iHiFi Receiver and
Transmitter
We recommend that you first connect the Receiver to your audio system,
and then connect and use the Universal iHiFi Transmitter.
Connecting the iHiFi Receiver
1
11
1Choose the audio system you want to use. The audio system
must be a stereo, powered speakers, or other audio system that has
a 3.5 mm (1/8 inch) stereo jack input or RCA phono jack inputs.
There must be a place to plug in the Receiver’s power cube.
2
22
2Turn off the audio system.
3
33
3Plug the appropriate end of the iHiFi Receiver cable either into
an unused stereo jack input or into unused RCA phono jack
inputs of your audio system, whichever is convenient. Notice which
Power cable
Audio cable
iHiFi
Receiver

3
audio input you are using – AUXiliary input, CD, DVD, or something
else – because you'll need to press a button on your audio system to
select that audio source when you want to use the iHiFi.
4
44
4Plug the other end(s) of the Receiver cable into the appropriate
iHiFi Receiver jacks.
5
55
5Plug one end of the Receiver’s power cube cable into the
Receiver’s power jack, and then plug the power cube into an AC
outlet. We recommend an AC outlet that stays on even when your
audio system is off.
6
66
6Make sure the iHiFi Receiver power switch is ON.
7
77
7Turn on your audio system. Be sure to select whatever audio input
you used for your Bluetooth Receiver.
Now you’re ready to use your iHiFi Transmitter. (You can also use the
iHiFi Receiver with Zoom Bluetooth A2DP adapters for computers, as long
as the adapter’s “PIN code” or “Passkey” is set to 0000 or 1234.)

4
Using the Universal iHiFi Transmitter
The iHiFi Universal Transmitter plugs into the stereo headphone jack
of an iPod, MP3 player, MP3-enabled phone, CD player, computer
soundcard, satellite radio, or other audio device. You plug it into the jack
directly or, if necessary, using the short extension cable included with your
unit.
When you’re not using the Transmitter, you should switch it Off by
using the On/Off switch marked 1/0 (0 is Off). A light on the Transmitter
turns on when the Transmitter is on.
When the Transmitter is switched On and working, it converts the
music or other audio coming out of the headphone jack to a Bluetooth
Stereo headphone plug
USB cable
Mini USB jack
On/Off switch
Power
On li
g
ht
Extension cable
Velcro strips
Y cable
Connect
button

5
wireless signal that can be received by a “paired” iHiFi Receiver or other
compatible Bluetooth device, such as Bluetooth headphones.
The Transmitter automatically “pairs” with an iHiFi Receiver. (The
Transmitter can also pair with another Bluetooth device, such as Bluetooth
headphones, if that device has 0000 or 1234 as its “PIN code” or
“Passkey”). When you switch on the Transmitter the first time, it tries to
pair with an appropriate Bluetooth device that is nearby. The closer the
two devices are, the more likely a pairing occurs. If you’re using the
Transmitter with an iHiFi Receiver, for instance, you should switch the
Transmitter to On while it’s near the Receiver that’s already switched on.
After you switch on the Transmitter, its red and blue lights should
immediately start to flash to show that pairing has begun.If the lights don’t
both flash right after you switch on the Transmitter, press and hold the
Connect button that’s directly above the lights for 4-5 seconds until
flashing starts.
Pairing usually takes only about 10 seconds. However, successful pairing
can take up to 3 minutes if the two Bluetooth devices aren’t near each
other or if there are other wireless devices nearby. Each time the
Transmitter is switched on, it will try for 10 seconds to pair with the last
paired device. If the last paired device is not found (because, for instance,
it’s off), then the Transmitter will enter pairing mode and try to pair with
another Bluetooth device. If pairing doesn’t occur within 3 minutes, the
Transmitter enters Idle mode and stays in Idle mode until it’s powered on
again. If pairing does not occur, first power down the Receiver and switch
the Transmitter Off, then power up the Receiver, and then switch the
Transmitter back On near the Receiver.
Disconnection may occur if, for instance, the Transmitter gets too far away
from the Receiver. In that case the Transmitter automatically tries to
reconnect for 10 seconds. If it is unable to do so, the Transmitter enters

6
Idle mode and stays in Idle mode until it’s switched on after being switched
off.
When using the Transmitter, you will get your best sound if you play
your iPod or other audio device near maximum volume, and initially
adjust your stereo’s volume accordingly. Then you can vary the volume
using your audio device.
Your Transmitter may have a sliding plastic jacket. If you don’t have
an iPod Mini, you’ll probably want to remove this jacket by pulling it off the
Transmitter as shown below.
The iHiFi Universal Transmitter has a built-in rechargeable battery
that typically lets the Transmitter stay on for about 6 hours. Once the
Transmitter stops working, it takes about 2 hours to get fully charged. You
can charge the Transmitter in either of these ways:
•Plug the included Y cable into the end of your iHiFi Receiver’s power
cube cable. One of the loose ends then plugs into the iHiFi Receiver,
and the other loose end can be plugged into the Transmitter’s power
jack.

7
•Plug one end of the included USB cable into the USB port of a
computer, and plug the other end into the mini-USB jack of the
Transmitter.
The LED closest to the bottom of the Transmitter is On when the
Transmitter is charging, and Off when the Transmitter is fully charged. You
can use the Transmitter for transmitting audio during charging, if you’d
like. Once the Transmitter is fully charged, you will get best audio
performance if you disconnect the Transmitter from the cable used for
charging.
Included with the Transmitter are some Velcro®fasteners that you can use
to hold the Transmitter to your iPod or other audio device. The Velcro
works best if it is as far away from the headphone jack as possible,
but no part of the Velcro can be more than 3.75 cm (1.5 inches) from
the jack or it won’t line up with the Transmitter correctly.
We’ve included two strips of Velcro, one with 3 pieces of light gray Velcro
and the other with 3 pieces of white Velcro. You use one of each color,
and the extras will let you replace the Velcro if it starts to wear out. Make
sure you save the extra Velcro in case you need it.
Velcro pad

8
Peel off one piece of gray Velcro and stick it
on a clear, preferably flat area on the same
side of your iPod or other device as the
headphone jack. Remember, the further from
the jack the better, but it can’t be more than
3.75 cm (1.5 inches) from the jack. Now peel
off one piece of white Velcro from the other
strip, and carefully push the Velcro side (NOT
the sticky side) against the gray Velcro that
you already installed, so that the two pieces
stay together. Then plug in the Transmitter,
being careful that it's straight. Press it in place so that it pushes against
the sticky side of the white Velcro.When you first do this, you should leave
the Transmitter in place for at least one hour before pulling the Transmitter
and audio device apart. To be safe, we recommend that you leave them
attached overnight.
The top two LEDs on the Transmitter show you the mode it’s in.
Both LEDs off Idle
Both LEDs steady on Searching for last paired device
Red and blue LEDs alternating Pairing
Blue LED flashing twice every three seconds Paired and connected
Enjoy! Remember. . . You can put iHiFi Receivers in different rooms or
even different locations. This lets you use your iHiFi Universal Transmitter
as you move from place to place. And one iHiFi Receiver can be used with
different iHiFi Transmitters at different times, so consider getting iHiFi
Transmitters for all your favorite audio devices.

9
Como Usar el Receptor y el Transmisor iHiFi
Recomendamos que conectes primero el Receptor de tu sistema de audio
y que luego conectes el Transmisor iHiFi.
Como conectar el Receptor iHiFi
1
11
1Selecciona el sistema de audio que deseas usar. El sistema de
audio deberá ser estéreo, con parlantes u otro sistema de audio que
tenga una entrada de 3.5 mm (1/8 pulgadas) para enchufe estéreo o
entradas para enchufe telefónico RCA. Debe haber una toma para
conectar el cargador de corriente del Receptor.
2
22
2Apaga el sistema de audio.
3
33
3Conecta el extremo adecuado del cable del Receptor iHiFi ya
sea en una entrada para enchufe estéreo sin usar o en las
entradas para enchufe telefónico RCA sin usar, lo que sea más
conveniente. Recuerda la entrada de audio que estas usando –
entrada auxiliar, CD, DVD, o cualquier otra – porque necesitarás
Cable de audio
Cable de corriente
Receptor
iHiFi

10
oprimir un botón en tu sistema de audio para seleccionar la fuente de
sonido cuando desees utilizar el iHiFi.
4
44
4Conecta el otro extremo del cable del Receptor en el enchufe
adecuado del Receptor iHiFi.
5
55
5Conecta un extremo del cargador de corriente del Receptor en
el enchufe del Receptor, y luego conectar el cargador de
corriente en el tomacorriente AC. Recomendamos un
tomacorriente AC que permanezca encendido aun cuando tu sistema
de audio este apagado.
6
66
6Asegúrate de que el interruptor del Receptor iHiFi este
ENCENDIDO.
7
77
7Enciende tu sistema de audio. Asegúrate de seleccionar la entrada
de audio que usaste para tu Receptor Bluetooth.
Ahora estas listo para usar tu Transmisor iHiFi. (También podrás usar el
Receptor iHiFi con los adaptadores para computador Bluetooth A2DP de
Zoom, si el “Código PIN” del adaptador o “Clave” esta establecido en
0000 o 1234.)
Otros manuales para 4360
2
Este manual sirve para los siguientes modelos
1
Tabla de contenidos
Idiomas:
Otros manuales de Receptor de Zoom


