Zcom R1 Extender Manual de usuario

R1 Extender
Quick Installation Guide
V1.0 January 2009

Copyright
Copyright © 2008 all rights reserved. No part of this publication may be reproduced, adapted,
stored in a retrieval system, translated into any language, or transmitted in any form or by any
means without the written permission of the supplier.
About the Installation Guide
This Installation Guide is intended to guide professional installer to install the R1 Extender. It
includes procedures to assist you in avoiding unforeseen problems.
Conventions
This indicates a warning or caution that you have to abide.
This indicates an important note that you must pay attention to.
Note:
Warning:

Chapter 1 Introduction
Introduction
The R1 Extender is a high-performance outdoor-deployable wireless bridge that provides
wireless connectivity among multiple network locations. It supports Base Station, CPE, PTP
and PTMP connectivity. Moreover, the R1 Extender has a built-in 23dBi planar antenna that
can deliver up to a 40Km connection. With high throughput and long-distance transmission,
the R1 Extender is an ideal backhaul solution for Carriers, Service Providers and Enterprises!
Chapter 1 Introduction Page 3

Chapter 2 Preparation before Installation
This chapter describes safety precautions and product information you have to know and
check before installing R1 Extender.
Professional Installation Required
1. Please seek assistance from a professional installer who is well trained in the RF
installation and knowledgeable in the local regulations.
2. The R1 Extender is distributed through distributor and system installer with professional
technicians and will not be sold directly through retail store.
Safety Precautions
To keep you safe and install the hardware properly, please read and follow these safety
precautions.
1. If you are installing an antenna for the first time, for your safety as well as others’, please
seek assistance from a professional installer who has received safety training on the
hazards involved.
2. Keep safety as well as performance in mind when selecting your installation site,
especially where there are electric power and phone lines.
3. When installing your antenna, note the following:
♦Do not use a metal ladder;
♦Do not work on a wet or windy day;
♦Wear shoes with rubber soles and heels, rubber gloves, long sleeved shirt or jacket.
4. When the system is operational, avoid standing directly in front of the antenna. Strong RF
fields are present when the transmitter is on.
Chapter 2 Preparation before Installation Page 4

Product Package
The product package you have received should contain the following items. If any of them are
not included or damaged, please contact your local vendor for support.
R1 Extender with integrated 23dBi antenna ×1
Mounting Kit ×1
PoEInjector&Powercord ×1
GroundingWirewithScrew ×1
WaterProofRJ-45ConnectorKit ×1
QuickInstallationGuide ×1
ProductCD ×1
Note:
Product CD contains Management Tool, Quick Installation Guide and User
Manual!
Mounting Kit
Wall/Pole Mounting Bracket
1. T-Form Bracket ×1
2. Articulation Pole ×1
3. Pole Mount Bar ×1
Fasteners
4. M8×80 Screw ×2
M8×90 Screw ×1
5. M8Washer ×3
6. M8 Spring Washer ×3
7. M8Nut ×1
8. M5×16 Screw ×4
9. M5Washer ×4
Chapter 2 Preparation before Installation Page 5

10. Wood Screw ×4 (for Wall Mount)
11. Wall/Gyprock Plug ×4 (for Wall Mount)
Waterproof RJ-45 Connector Kit
1. Gland ×1
2. Sealing Nut ×1
3. Sealing ×1
Chapter 2 Preparation before Installation Page 6

Chapter 3 System Installation
Assemble the Mounting Bracket
1. Place the main bracket into the seating and use a spanner to fasten the bracket to the R1
Extender with M5×16 screws ⑧and M5 washers ⑨provided in the hardware packets;
2. Assemble the main bracket by placing articulation pole ②to the T-form bracket ①via a
M8×90 ④screw through the insertion axe and fix with the M8 washer ⑤, spring
washer ⑥and M8 nut⑦;
Chapter 3 System Installation Page 7
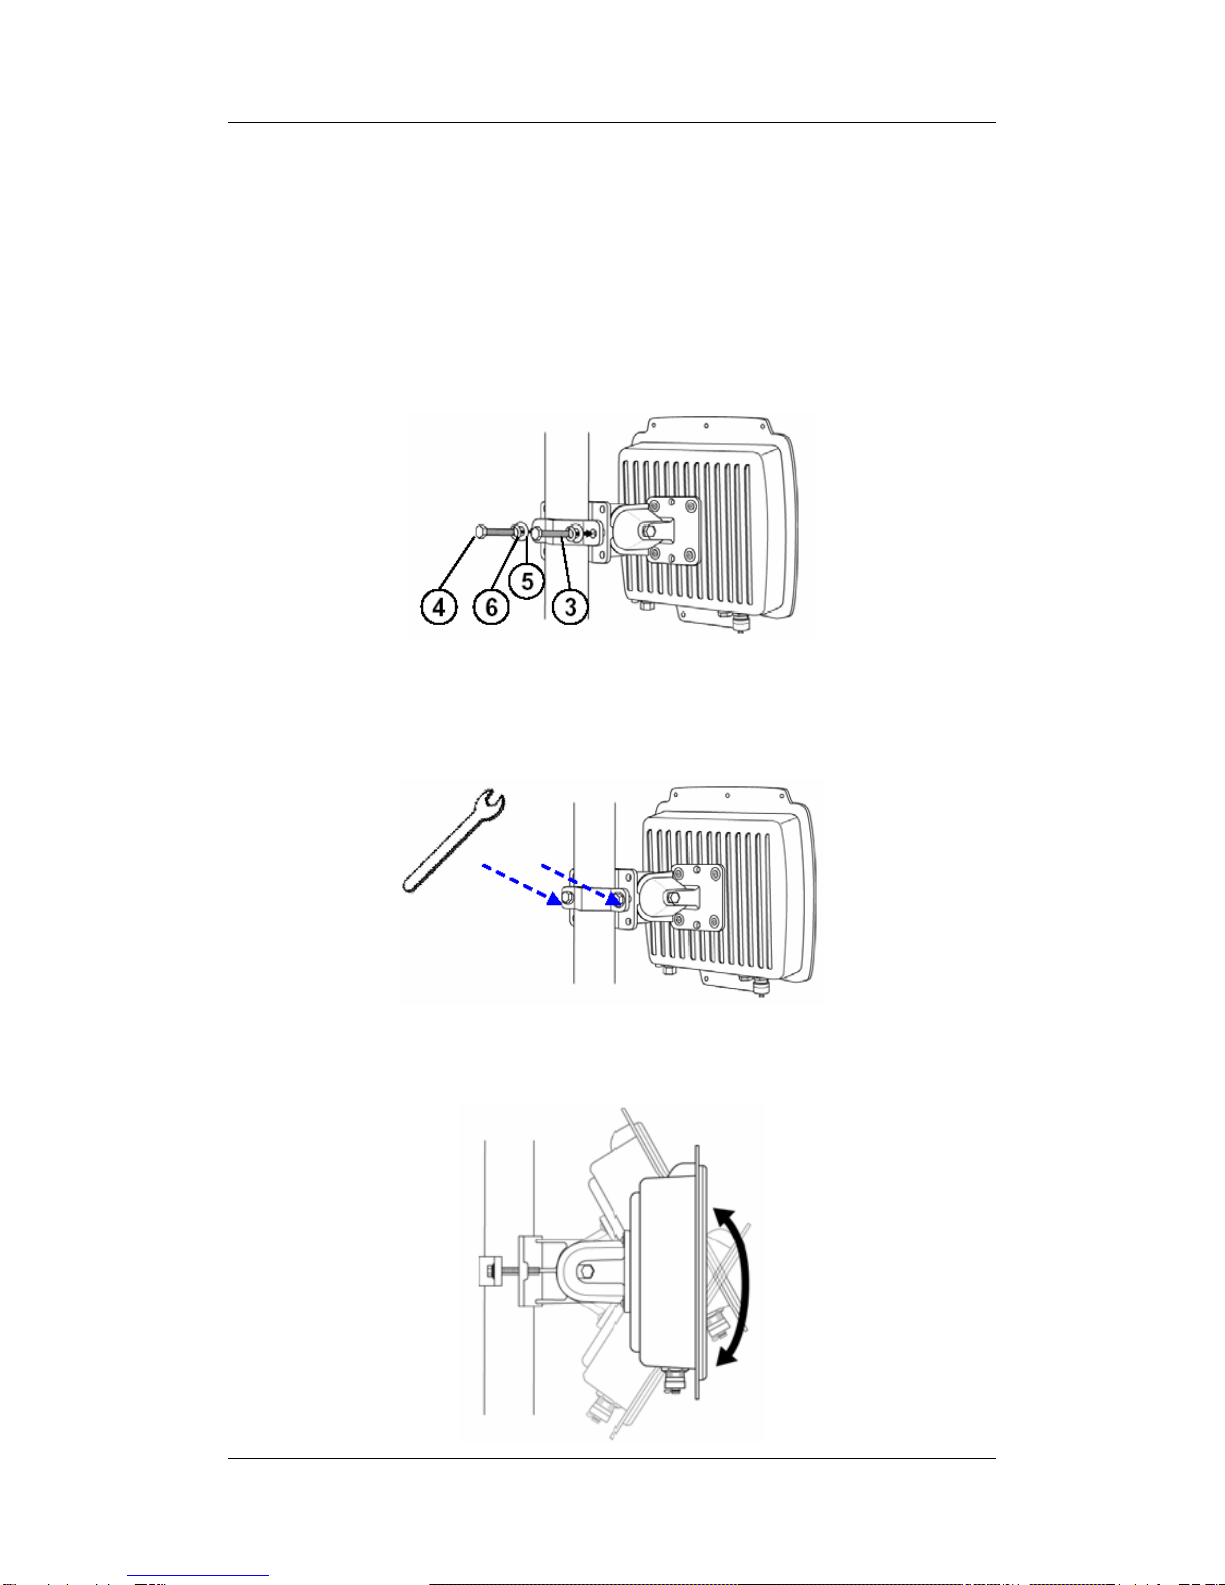
Pole Mounting
1. Install the main bracket and the pole mount bar ③over the top of the pole by
securing the drill holes of the pole mount bar to the main bracket ones and insert two
M8×80 ④screws, spring washers ⑥and washers ⑤through the drill holes and
main bracket;
2. Fasten two M8×80 screws ④and washers ⑤through the drill holes and main
bracket with a spanner;
3. Adjust the antenna for appropriate tilt / vertical orientation.
Chapter 3 System Installation Page 8

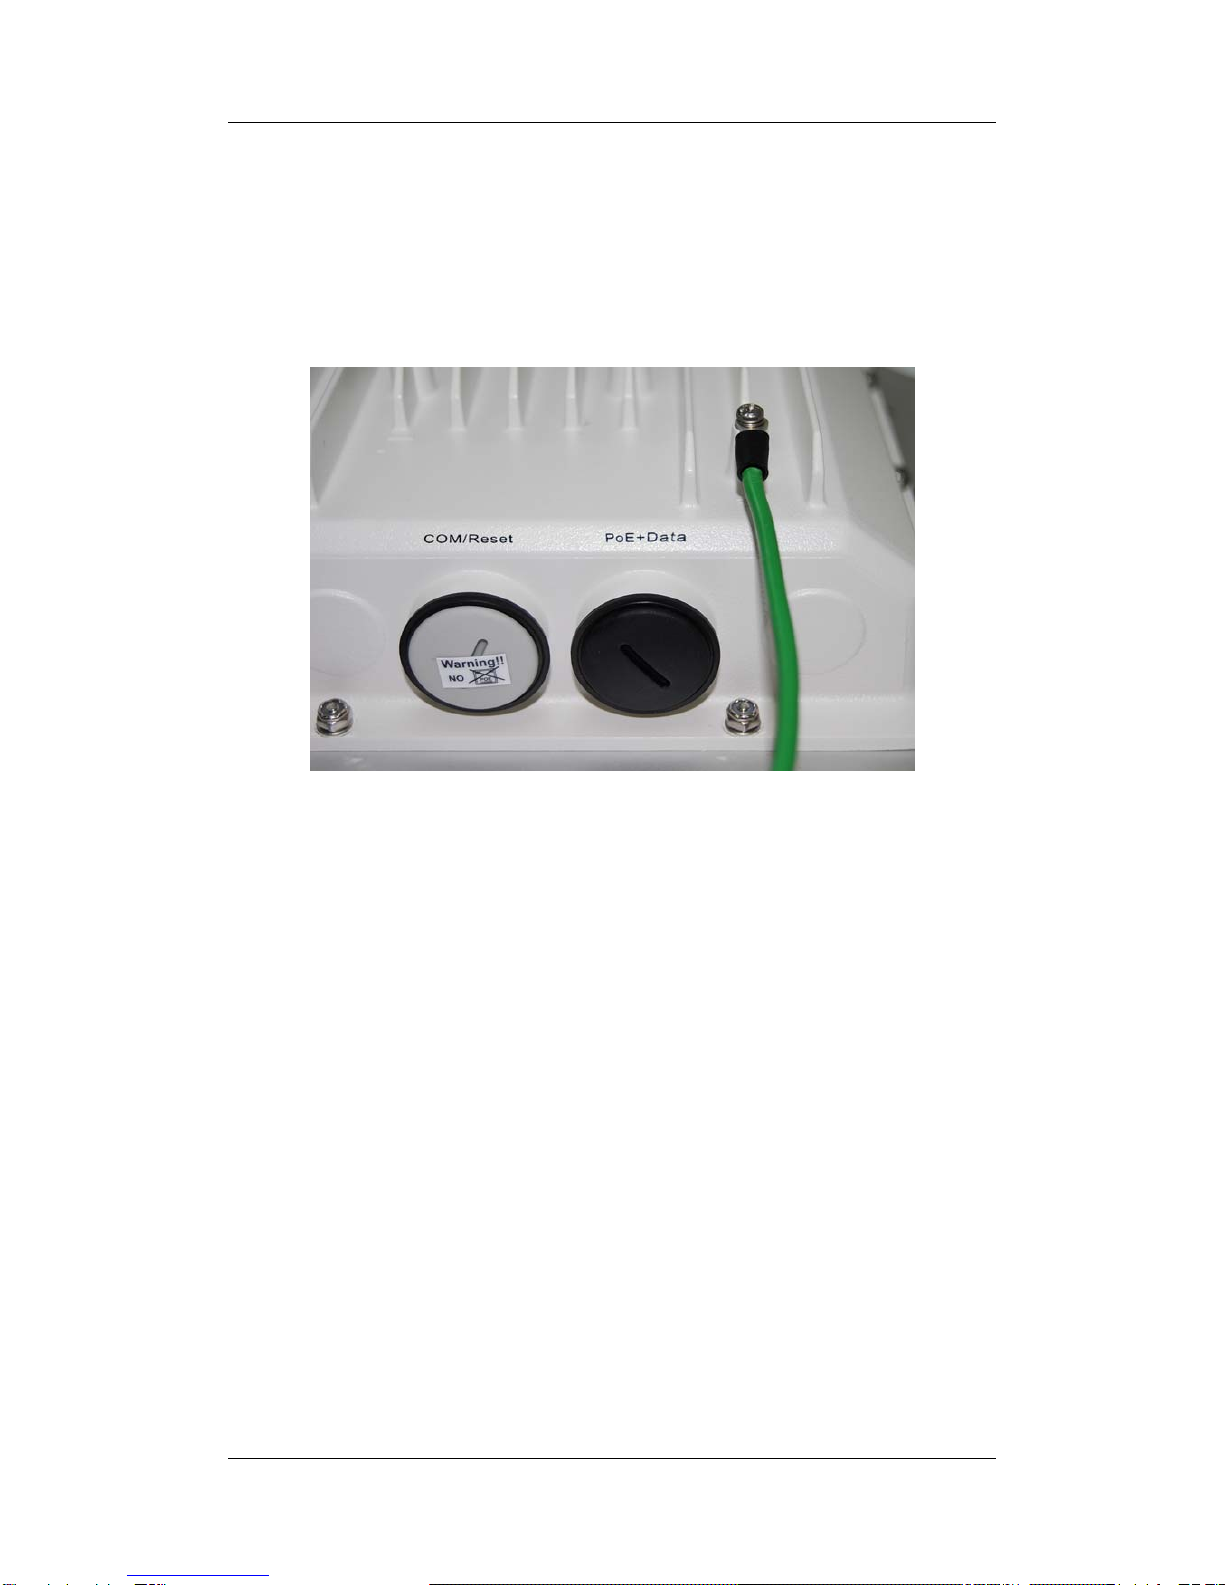
Connect Up
Before installing the Ethernet cable with a waterproof RJ-45 connector, it is recommended that
the Cat-5 RJ-45 coaxial cable be used for the bridge to power injector connections.
1. To connect to the hole labeled PoE+Data, open the black cover in advance by using a
coin or a slotted screwdriver and then screw in the body of the gland and tighten.
2. Slide the sealing nut to the RJ-45 cable from its middle breach and then insert the sealing
into the cable.
Slide the Sealing Nut from its Breach
3. Insert the RJ-45 connector and make sure that the locking tab snaps home.
R1 Extender RJ-45 Port
4. Screw the sealing on the gland and tighten.
Chapter 3 System Installation Page 9
Ground the wire
The R1 Extender is shipped with a grounding wire. The unit must be properly grounded to
protect against power surges. The grounding point can be found on the bottom of the unit. It is
supplied with an appropriate grounding lug for attachment to the ODU.
Power On
To power up the R1 Extender, follow the steps bellow:
1. Plug a user-supplied Cat-5 Ethernet cable from your wired LAN (or a computer) into the
power injector RJ-45 jack (DATA IN);
2. Plug a user-supplied Cat-5 Ethernet cable from the R1 Extender into the power injector
RJ-45 jack (P+DATA OUT);
3. Connect the power module to the power injector and plug the AC cord into an AC power
receptacle.
4. After being powered on, the device will send out the beep sound lasting about 1.5
seconds, informing you that the R1 Extender powered up! Wait for about 60 seconds the
system will be initialized and start working.
Chapter 3 System Installation Page 10
Otros manuales para R1 Extender
1
Tabla de contenidos
Otros manuales de Extensor de Zcom


