VMS Touring 600 Manual de usuario

quick start guide
TM
Touring 600

quick start guide
2
Introduction
The VMS Touring 600 navigates just as well in the outback as it does around town!
Ideal for exploring the outback, the Touring Series features three of Australia’s most
popular map collections.
The Gregory’s range of activity maps are ideal for locating points of interest and activi-
ties to see and do. Beautifully illustrated, the maps also provide useful information such
as the locations of fuel stations, camp sites and caravan parks.
The 4WD enthusiast keen on tackling rough tracks can switch to the iTOPO 1:250,000
scale topographic maps. This map collection covers the entire country and displays the
majority of 4x4 tracks.
Street navigation features the latest Where IS maps, the most trusted name in turn by
turn navigation. With spoken street names and easy to follow voice guidance the Tour-
ing 600 will get you to your destination in great time.
Other capabilities of the Touring 600 include the ability to display up to tow VMS camera
images. With optional camera kits available, this single device can function as a reverse
camera screen whilst also providing street and off road navigation.
Designed in Australia, the Touring 600 sets the benchmark for 4x4 Navigation!

TM
3
Contents
Introduction............................................................................................................ 1
PLEASE READ BEFORE OPERATING THE PRODUCT
Back up data from device...................................................................................... 4
Back up data from memory card........................................................................... 4
Restore data to device.......................................................................................... 4
Restore data to memory card............................................................................... 4
1. What’s in the Box............................................................................................................ 5
2. Device illustration............................................................................................................ 5
3. Prepare device for use
3.1 Inserting SD memory card.............................................................................. 6
3.2 Installing the device........................................................................................ 6
3.3 Power ON/OFF............................................................................................... 6
4. Device settings
4.1 Main menu...................................................................................................... 7
4.2 Date and time
4.2.1 Time.......................................................................................... 8
4.2.2 Date.......................................................................................... 8
4.2.3 Time zone................................................................................. 9
4.3 Calibrating the touchscreen and device information...................................... 9
4.4 Multimedia extras........................................................................................... 9
4.4.1 Photos...................................................................................... 10
4.4.2 Videos....................................................................................... 10
4.4.3 Music........................................................................................ 11
5. GPS console................................................................................................................... 12
6. Street navigation
6.1 Getting started................................................................................................ 12
6.2 Navigating to an address................................................................................ 13
6.3 On screen keyboard........................................................................................ 14
6.4 Map view......................................................................................................... 15
6.5 Extended user manual.................................................................................... 18
7. GPS Navigation User Guide......................................................................................... 18
8. Reverse Camera
8.1 Setup / 8.2 operation....................................................................................... 18
9. Safety information............................................................................................................ 19
10. Warranty information...................................................................................................... 20
11. Caring for your product.................................................................................................. 21
12. Software EULA.............................................................................................................. 22

quick start guide
4
IMPORTANT - BACK UP DATA FROM INTERNAL STORAGE ON THE DEVICE AND THE SD
CARD
Flash memory utilised in this product is of premium grade. However, data corruption may still occur.
To ensure data redundancy, we recommend backing up the data onto a computer.
• Back up the original data.
• Back up your own data.
BACK UP DATA FROM DEVICE INTERNAL STORAGE
• Power on the device.
• Connect the device to a PC with the supplied USB cable.
• Select “Connect to the PC” option on the device.
• In My Computer, the device will appear as a removable drive.
• Copy all data from the device to your PC hard drive.
BACK UP DATA FROM MEMORY CARD TO A COMPUTER
1. Insert SD memory card into a SD card reader on the PC.
2. InMyComputer,theSDcardwillappearasaremovabledrive.Foreasyidentication,allVMS
Touring SD cards are programmed to appear with a VMS icon.
3. Copy all data from the sd card to your PC hard drive.
PERFORM A RESTORE FROM YOUR BACK UP
RESTORE BACK UP DATA TO INTERNAL STORAGE
1. Power on the device.
2. Connect the device to the PC with the supplied USB cable.
3. Select Connect to the PC option on the device.
4. In My Computer, the device will appear as a removable drive.
5. Locateyourbackuplesandcopythemtothedeviceinternalstorage.Ensurethefolder
structures are exactly the same.
RESTORE BACK UP DATA TO MEMORY CARD
1. Insert SD memory card into a SD card reader on the PC.
2. In My Computer, the SD card will appear as a removable drive.
3. LocateyourbackuplesandcopythemtotheSDcard.Ensurethefolderstructuresare
exactly the same.
It is your responsibility to ensure that data is backed up on a regular basis. The data of the
device and memory card contain licensed les, navigation software and digital maps. If
data corruption occurs, you are able restore them using the methods above. VMS does not
provide warranty on data corruption.

TM
5
1. WHAT’S IN THE BOX
- 1 x VMS Touring Series GPS unit - 1 x 12-24V DC charger
- 1 x Windscreen suction cup mount - 1 x USB Cable
- 1 x Mounting bracket - 1 x DVD disk
- 1 x Stylus pen - 1 x Quick Start Guide
- 1 x 240V Charger
2. DEVICE ILLUSTRATION
1. Power button....................... Press & hold to turn on device
Press & hold for POWER OFF or Press for 1 sec & release for
SLEEP MODE
2. System Reset...................... Resets the entire system when system is non-responsive.
3. Camera input....................... Input for Reverse Camera cable.
4. USB charger........................ Car charger input, USB type.
5. LED indicator....................... Red when charging / green when fully charged.
6. Earphone jack (3.5mm)...... Audio output 3.5 mm earphone.
7. SD card slot........................ Suitable for 1 x SD or SDHC memory card (up to 16GB Class4).
8. Speaker............................... Audio output.
9. Stylus Pen........................... Stylus pen for improved touchscreen accuracy.
10. Mounting Bracket Holder... Location pins for mounting bracket.
11. LCD display....................... Touchscreen display.
Touring 600
RESET
TM
Global Position Syste
m
Model Serial No.
MADE IN
C
HINA
E
m
b
e
dd
e
d
Li
-po
l
ymer
B
attery :
3
.7V
1600
mAh
DC 5V
1
.
2
A-
2
A
Touring
600
1
10
2 8 9
11
4
5
7
6
3

quick start guide
6
3.1 INSERTING SD MEMORY CARD
Step 1: Remove sd card from its plastic holder.
Step 2: Locate the SD card slot on the right side of the DEVICE.
Step 3: Ensure orientation of the SD card is correct.
Step 4: Insert the SD card by sliding it gently into the slot completely. The card will click indicating
correct installation.
3.2 INSTALLING THE DEVICE
1. Select a suitable location to mount the GPS on your windscreen.
2. Clean & dry the suction cup and select the area of your windscreen.
3. Plug the Car Charger into the side of the GPS.
4. Attached the cradle to the suction cup mount.
5. Adjust the angle with the rotary clamp if necessary.
6. Place the suction cup on the windscreen and secure with rotary latch.
7. Place the bottom of the GPS on to the cradle and gently click the top of the GPS into the cradle.
8. Plug the car charger into a power outlet in your vehicle. Your unit should turn on automatically if it
is plugged in and your vehicle key is turned to ON/ACC.
3.3 POWER ON/OFF & SLEEP MODE
Power on: press and hold the power button until the device turns on.
Power off / Sleep: press the power button until the unit displays “POWER OFF”, or press the power
button for 1 sec then release, the message “SLEEP” will appear on the screen to indicate it’s gone
into sleep mode. During sleep mode, the device is not completely switched off and therefore the bat-
tery will continue to consume power.
Touring 600
Ca ut ion
Please note the orientation of
the sd card before inserting
TM
7
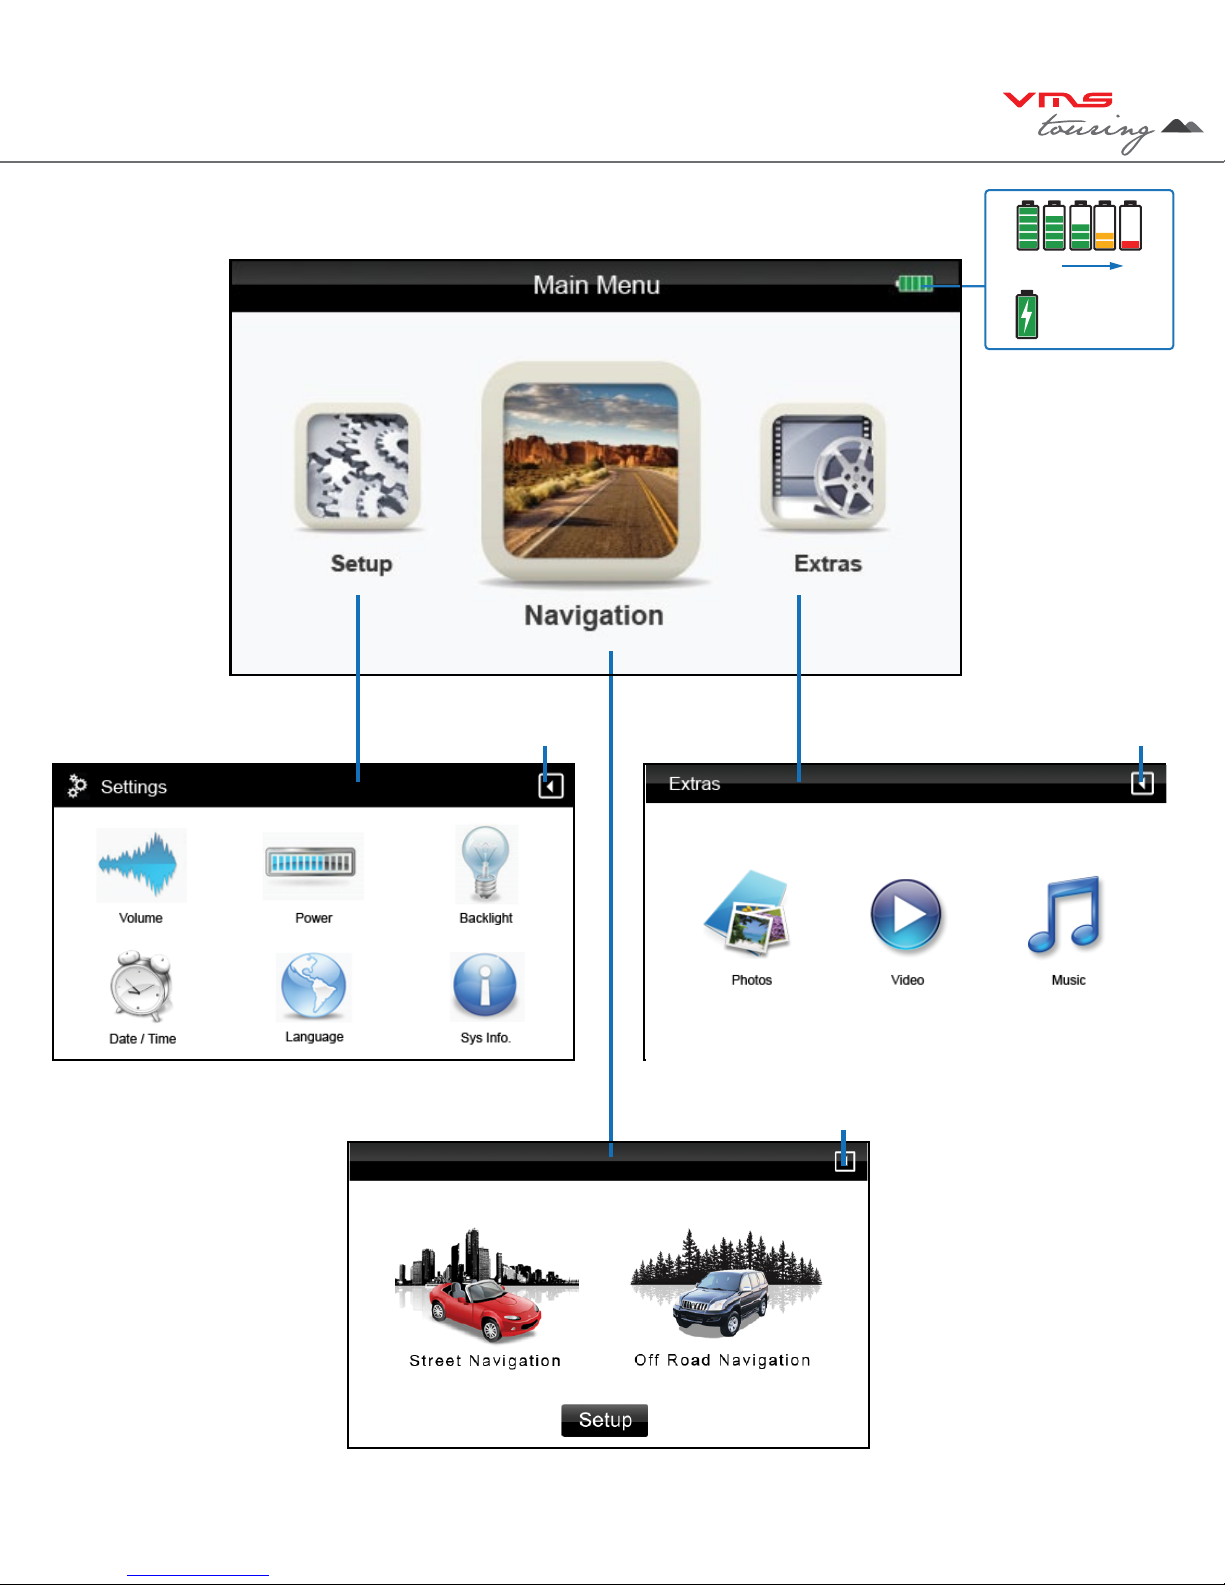
4.1 DEVICE MAIN MENU
Access the Setup menu Back Access the Extras menu
Access the GPS Console
100% 0%
Charging
Back
Back
TIP:
Each navigation
software has it’s own
settings. To access
software settings, refer
to the correspond-
ing software’s user
manual.

quick start guide
8
4.2 DEVICE DATE & TIME
Back to Main Menu
System Time zone /
Touch to enter time zone
settings
System Time / Touch to
enter time settings
System Date / Touch to
enter date settings
4.2.1 DEVICE TIME
+ or - hour toggle
Minutes Display
Hour Display
Back to Date & Time
Settings
+ or - min toggle
4.2.2 DEVICE DATE
+ or - month toggle
Day indicator
Year Indicator
+ or - year toggle
+ or - day toggle
Month Indicator
Back to Date & Time
Settings

TM
9
4.2.3 DEVICE TIME ZONE
Back to Date &Time
Settings
+ or - time zone toggle
Time zone Indicator
4.3 DEVICE INFORMATION and CALIBRATING THE TOUCHSCREEN
Reset GPS receiver
To calibrate the
touchscreen,
tap this button &
follow the on screen
instructions.
System Information Display
Back to Settings menu
Reset to factory settings
4.4 MULTIMEDIA EXTRAS
Back to Main Menu
Photo browser
Video browser
Music browser

quick start guide
10
4.4.1 PHOTO BROWSER
Files
Back to Main Menu
Scroll up or down
Browse
up one folder
4.4.1 PHOTO VIEWER
Photo Display Area
Zoom in or out of photo
Back to Main menu
Back to Photo Browser Menu
Next or Prev photo
Full screen mode /
rotate photo
4.4.2 VIDEO BROWSER
Back to Main Menu
Scroll up or down
Browse
up one folder
SD card content
Tabla de contenidos
Otros manuales de GPS de VMS

VMS
VMS Touring 500S Manual de usuario

VMS
VMS AVNC Manual de instrucciones

VMS
VMS Touring 430 Manual de usuario

VMS
VMS 3DX Manual de usuario

VMS
VMS TOURING 7000 SERIES Manual de instrucciones

VMS
VMS Touring 700HDs II Manual de usuario

VMS
VMS T7500 Manual de usuario

VMS
VMS TOURING 7500 SERIES Manual de instrucciones

VMS
VMS Touring X Series Manual de usuario


