timetac Evo Basic Manual de usuario

Evo Basic Time Clock
Getting started with the
www.timetac.com
Information Knowledge Base
support.timetac.com
The enterprise solution for
time tracking.

Welcome to the
Evo Basic Time Clock!
Index
Initial activation ...............................................................................................................4
Assembly and installation ..............................................................................................6
Network settings ..............................................................................................................6
Connection to LAN/Wi-Fi/mobile radio.......................................................................8
Time clock with RFID transponder.......................................................................16
Conguration of transponders.....................................................................................18
Tracking time with your time clock .............................................................................20
Deleting and reconguring transponders..................................................................22
Time clock with RFID transponder and ngerprint.....................................24
Conguration of transponders.....................................................................................26
Enroll ngerprints ...........................................................................................................28
Tracking time with your time clock .............................................................................30
Deleting ngerprints.......................................................................................................32
Deleting and reconguring transponders..................................................................34
Time clock settings and system settings...........................................................36
Network settings..............................................................................................................38
Adjusting display backlight and signal volume.........................................................40
Proximity and light sensors...........................................................................................42
Error diagnosis ................................................................................................................44
Error diagnosis with system settings...........................................................................46

We are happy to introduce you to the Evo Basic Time Clock and wish you a suc-
cessful start!
You have received your time clock. Follow these instructions in order to mount
and connect your time clock correctly.
More detailed settings can be found in the system menu. Open this menu by
touching the TimeTac logo 1for 3 seconds. Then, you will be asked to enter a
key. Your personal key is:
There are dierent kinds of time clocks that enable you to track time in various
ways. You have decided for a time clock in the following variant:
Transponder (RFID)
Transponder (RFID) & Fingerprint
The buttons that you can see on the start display depend on the presets that
have been set for you as well as on the time clock variant. In most cases, the fol-
lowing buttons appear 2: Arrival, Departure, Other, Info and Break. The button
BioKey Cong is only available when using a ngerprint time clock.
The functions of these buttons are explained in more detail within the single
chapters.
The time clock has been congured according to your requirements and there-
fore, should be compatible with your internal company network. Further infor-
mation on the conguration and on how to adjust it can be found in the chapter
Network settings (see p. 38).
Initial activation
1
2
4 5

Assembly and installation
The mounting 1 for the wall is already aixed to the time clock. With the aid of
the installation points 2on the mounting, you can mount the time clock to the
wall. Then, connect the power cable 3to a socket. If you wish to establish an
internet connection via LAN, you must also connect the LAN cable to the time
clock. More details on a connection via LAN can be found in the following chap-
ter. Then, hang the time clock on the wall and x it on the lower part by using the
included screw 4.
Network settings
Your company internal network requires the following settings:
• As DNS, 8.8.8.8 must be accessible so that the connection with the account is
possible.
• The following PORTs must be enabled in the network:
• 80 (HTTP Yes)
• 443 (HTTPS or Secure)
• 8000
• In the network, a DHCP server usually must be used for the allocation of the IP
and the default gateway must be present.
• To store a xed IP address, please check page 38.
For the default settings in the BIOS please check the infor-
mation on page 38.
i
2
1
4
3
6 7

Connection to LAN/Wi-Fi/mobile radio
Depending on the chosen time clock variant, you have dierent possibilities
to connect your time clock to the internet and the network. The standard time
clock uses LAN only. If you have ordered a time clock with Wi-Fi connection or
mobile radio, you can also establish an internet connection via these options.
Connection to LAN
Please connect the LAN cable 1to the device and the device's power cable 2
to a socket.
Connection to mobile radio
In order to establish an internet connection via mobile radio, a SIM card must be
inserted. Turn your time clock around as it is shown in the picture on the right-
hand side. Then, insert the SIM card into the slim slot 3. Please ensure, that the
contact area of the card is on the bottom side. Connect the power cable 2to
a socket.
Further on, you must open the communication settings of your time clock. Open
the menu by touching the TimeTac logo for 3 seconds. Then, tap on System set-
tings > Communication > Interrupt communication > Interface. Choose the
option MOBILE (whether you choose "GSM or "GPRS" depends on your mobile
service provider). Tap then on Mobile parameters > Enter PIN and enter the PIN
of your mobile network.
You can only connect your time clock to a mobile radio if
you have ordered a time clock in the respective variant.
i
Information on your mobile service provider and APN-
data is stored for you. Please contact our support team,
if any of these data changes.
i
13
2
8 9

Connection to Wi-Fi
Tap on the TimeTac logo for 3 seconds in order to open the menue. Then, tap
on system settings 1and enter your key (see page 4). Select the menu item
communication 2and tap then on Interrupt communication 3. The menu
item Interface 4allows you to change the internet settings from LAN to
Wi-Fi. The HTTP mode 5must be set to Secure. Now follow the instructions on
the next page.
You can only connect your time clock to Wi-Fi, if you have
ordered a time clock in the respective variant.
i
12
3
4
5
10 11

Open Wi-Fi Parameters 1. Here, the rst row shows you the name of the Wi-
Fi that you are connected with, provided that you are connected. Tap on New
Connection 2.
All available Wi-Fi sources 3are now displayed. Select one of these. In the case
of your preferred Wi-Fi not being displayed, swipe up and tap on Add Network.
Enter the name of the network in order to search for it directly. Select your pre-
ferred network and enter the password to access it. Conrm by tapping the enter
button 4. Move on to the instructions on the next page.
12
34
12 13

Optionally, you can now save this conguration. Select a free storage loca-
tion 1. Then, you will be asked if you wanted to use this conguration by de-
fault. Conrm by tapping on Yes, as this makes sense in most cases.
The menu item Edit Cong. allows you to adapt further settings, e.g. DHCP ser-
ver, IP address and gateways 2. Prior to conducting any changes, ensure that
DHCP is set to No.
The menu item Switch Cong. displays a list of congurations that you have al-
ready saved. Choose one of these in order to switch to that conguration 3.
Additionally, you can set the Auto-Conguration-Choice 4on Yes. This way,
the device connects automatically with the conguration that shows the best
connection.
Tap on Extended 5 in order to view further details to the Wi-Fi conguration
that you are connected with. You can delete this conguration by swiping up and
tapping on Delete Wi-Fi Congurations. Consequently, you are no longer con-
nected to this Wi-Fi source.
The menu items Edit Cong. and Switch Cong. can be
found in the Wi-Fi Parameters.
i
12
3 5
4
14 15
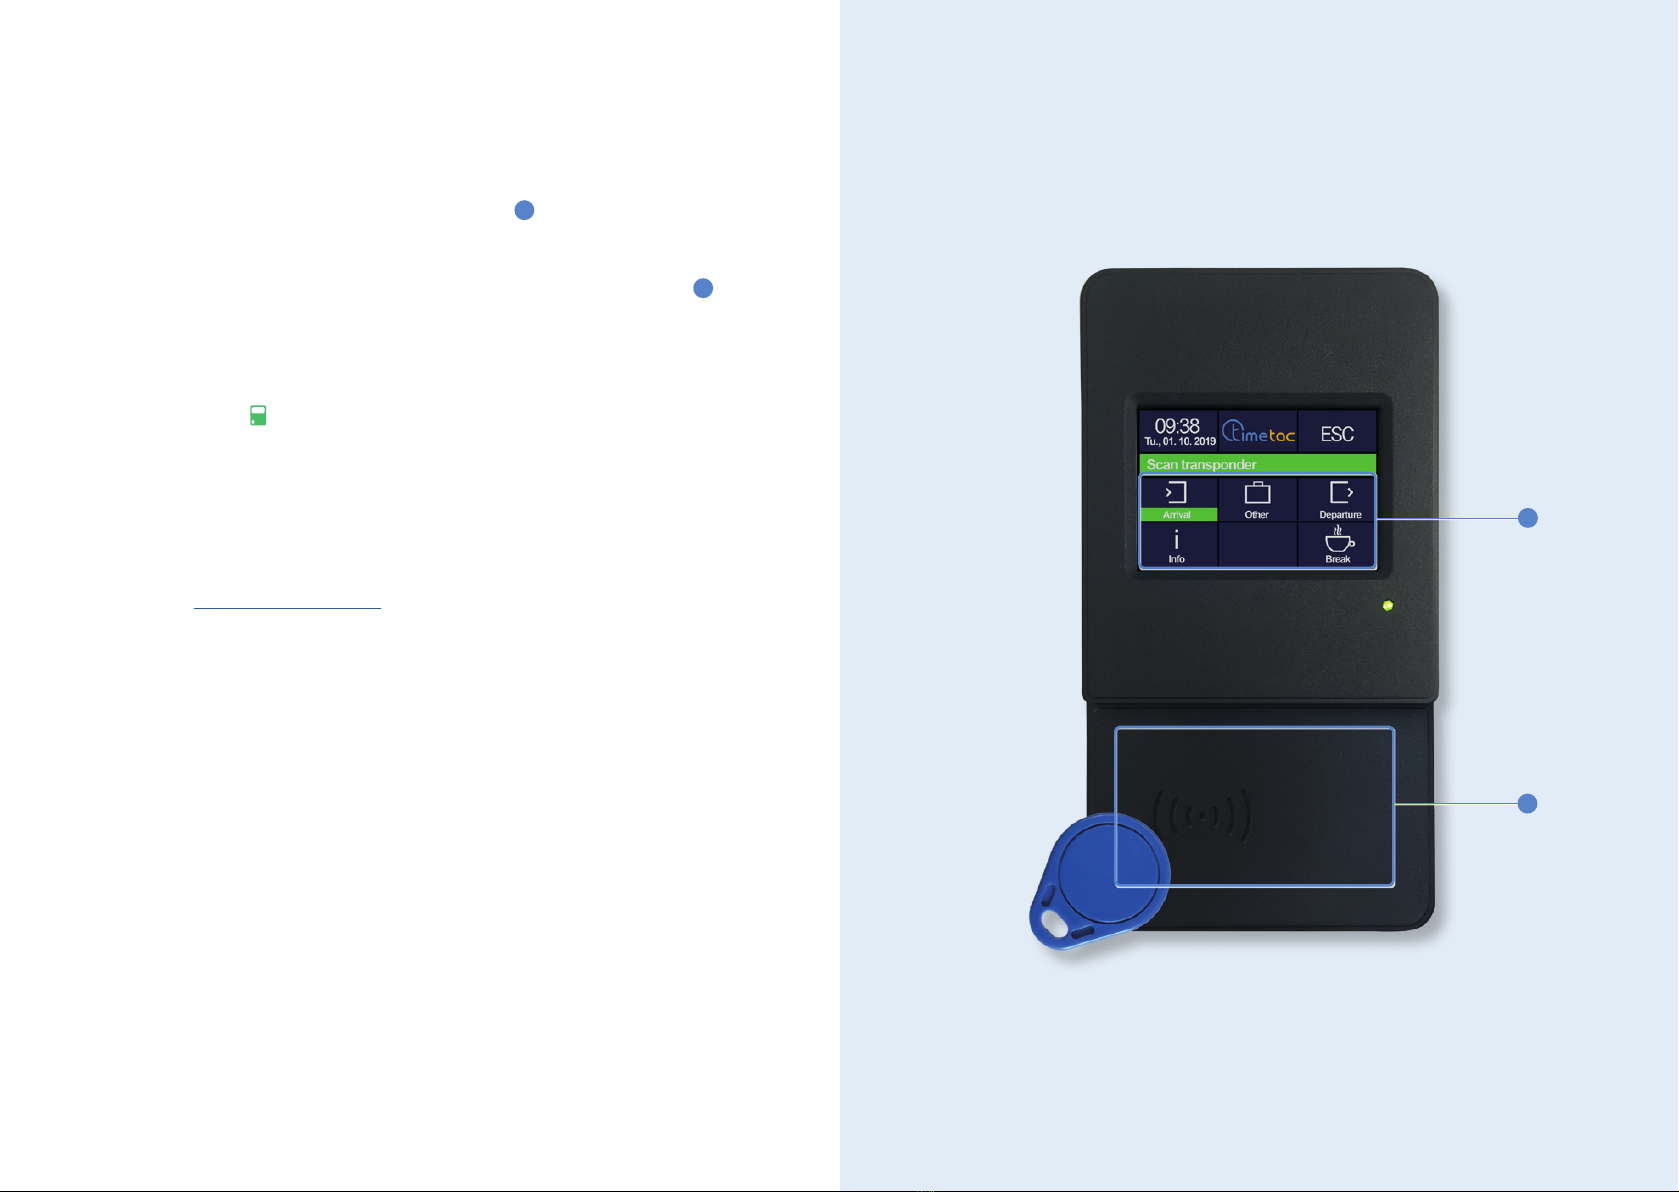
Time clock with RFID transponder
If you have ordered a time clock with RFID reader unit, timestamps can only
be registered per transponder. On the start display 1, you can view the buttons
Arrival, Departure, Other, Break and Info.
The transponder reader unit can be found in the lower part of the device 2.
Timestamps are immediately transferred to our server and can therefore be vie-
wed in the web browser as well as in the smartphone app. Within the web brow-
ser you can identify a timestamp, that has been registered via time clock, by the
time clock symbol that appears in the Timestamp List.
In the case of your time clock being oline, e.g. because of internal network
adjustments, timestamps are saved directly on the time clock. As soon as the
device is connected to the internet again, the data is transferred to the server.
If you use transponders by TimeTac, you can order further ones directly at Time-
Tac. Contact support@timetac.com.
2
1
2
16 17

Conguration of transponders
In order to enable your employees to track time via time clock, you must assign
them a personal transponder.
To read a transponder, select Departure on the display - the information "Scan
transponder" appears on the screen. Then, bring the unused transponder to the
reader unit. You receive the response "Data saved" 1.
Open your TimeTac account within the web browser to assign the newly stored
transponder to a user. Be aware of the fact that only a manager with Full Emp-
loyee Access can assign transponders. Click on Settings > User Settings > Time
Clock User Management in the le side bar.
Click on the refresh button 2in the top right corner. The previously stored trans-
ponder now appears with a unique transponder ID 3. Double click in the column
User of the row of the respective transponder ID. A dropdown menu 4opens.
Here, you can select the employee that the transponder shall be assigned to.
3
1
2
34
18 19
Tabla de contenidos
Otros manuales de Reloj de tiempo de timetac


Manuales populares de Reloj de tiempo de otras marcas


Easy Clocking
Easy Clocking XENIO 500 Manual

Amano
Amano MTX-15 Manual de usuario

LA CROSSE CLOCK
LA CROSSE CLOCK Harper 404-3450A Manual de usuario

Europa components
Europa components ET167DYD Manual de usuario

TONIN CASA
TONIN CASA Opaca circle Manual de usuario

CS TIMECLOCK
CS TIMECLOCK 2110 Manual de instrucciones