TAS 119223C Manual de usuario

Digital Trail Camera
Instruction Manual
Model#: 119223C
Lit# 93-0580/04-10

IMPORTANT NOTE
Congratulations on your purchase of one of the best trail cameras on the
market! Tasco is very proud of this little unit and we are sure you will be
pleased with it as well. We appreciate your business and want to earn
your trust. Please refer to the notes below and the instructions in this
manual to ensure that you are completely satised with this product.
If your Tasco Trail Cam does not seem to be functioning properly
or if you are having photo/video quality issues, please check the
Troubleshooting/FAQ section on pages 15-17.
Problems are often due to something simple that was overlooked, or
require only changing one setting to solve.
If your problem continues after trying the solutions in the
Troubleshooting/FAQ section, please call Tasco Customer Service at
(800) 423-3537. In Canada, call (800) 361-5702.
Tasco recommends using 4 Energizer® Alkaline “C”Cell batteries in
this Trail Cam to obtain maximum battery life.
Tasco recommends using SanDisk® SD and SDHC Cards
(up to 8GB capacity) in this Trail Cam.

3
Page Index
Introduction 4
Parts and Controls 5
Camera Setup 7
Setting the Year, Date & Time 7
Setting Camera/Video Mode and Resolution 8
Formatting SD Cards 8
Exiting the Setup Menu 9
Camera Operation 10
Mount the Camera 10
Test the Coverage Area 10
Secure the Camera 11
Viewing the Photos and Videos 12
Glossary 13
Specications 14
Troubleshooting/FAQ 15

4
INTRODUCTION
Congratulations on your purchase of the Tasco 119223C digital trail
camera. This trail camera is designed to record the activity of wildlife in
the outdoors with its still image and movie modes and weatherproof,
rugged construction.
Main Features:
1.3MP digital sensor•
Compact Size (177mm*137mm*52mm)•
Long Battery Life (Up to 90 Days)•
Trigger Time=1.6 second•
LCD Display•
Xenon Flash•
640*480 at 15 FPS Videos•
Supports up to 8 GB SD Card•
Date, Time & Moon Phase Imprint•
Auto Exposure•
Auto White Balance•
Power Supply: 4 “C” Cell batteries•
Weatherproof•
5
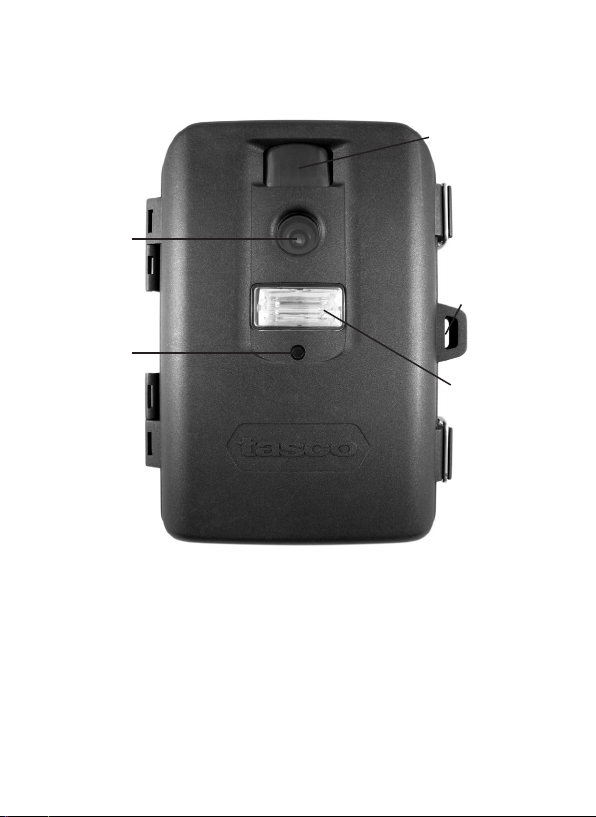
Parts and Controls Guide
Front of Camera
Camera
Lens
PIR Motion
Sensor
Xenon
Flash
Padlock
Hole
PIR
Indicator

6
Control Panel Detail
Parts and Controls Guide
Control Panel
(Front Opened)
Power
Button
LCD
Display
Battery
Compartment
USB Port
SD Card
Slot

7
CAMERA SETUP
Open the Cam by pulling out on the two latches on the right side. Install
4“C”cell batteries (at base of all batteries contacting springs), and insert
an SD card (not included, use any capacity from 16MB to 8GB. Do not
substitute MMC cards.) in the slot to the right of the 5 buttons as indicated
on the slot cover (upside down, with the notched corner of the card on
the left and metal contacts of the card facing the back of the slot). Press
the card down until you hear it click into place. If the Cam is turned on
without a card in place, it may not turn o-reset it by pulling one of the
batteries out partway, insert a new or empty SD card, and put the battery
back in place. Only remove or insert cards with power o.
1. Setting the Date, Year and Time
If you are using the camera for the rst time, you should set the date and
time so your photos will be“stamped” correctly.
Set Date and Year
Briey press the MENU button-the rst two digits of the year will•
ash, prompting you to enter the year.
Use the UP/DOWN buttons to set the current year (2010-2030), then•
press OK. Set the month the same way, and press OK again.
Set the month the same way, and press OK again. The display will•
then change to let you set the day, with only the last two digits
blinking.
Setup Icons- Display Guide
1. Date
2. Time
3. 4 Digit Display
4. Still Photo Mode /
Resolution
5. Video Mode
6. SD Card
6

8
Again use the UP/DOWN buttons to change the day if necessary•
and press OK.
To set the time, use UP/DOWN to set the hour and minute. The time•
display uses the 24 hr standard, so 2:00 PM is indicated as “1400”,
etc.
Note: The Date & Time setting will normally be retained for a few minutes
when the batteries are removed from the camera. However, you may need
to reset the Date & Time after replacing the batteries, if they have been
removed for a longer period of time.
2. Setting Camera/Video Mode and Resolution
This item allows you to select whether the camera takes still photos
(and select high or low resolution), or shoots video clips when the PIR is
triggered (Photo or Video Mode).
After the date and time have been set, press OK. You will see the•
camera icon and the word“Lo”will blink.
By pressing UP/DOWN, the camera will cycle between Lo resolution•
still photo, Hi resolution still photo, and movie (video) modes.
Choose the mode that you want and press OK.
The “Lo” setting will allow you to take lower resolution (1.3MP)•
images and therefore accumulate more images on your card while
the “HI” setting will give you high resolution (3.0MP via software
interpolation) images of better quality but fewer images can be
stored to the card.
In Movie mode a 14 second AVI le will be recorded to the SD Card•
each time the camera is triggered. The movie length is preset and
cannot be changed. There are no additional settings or options for
Video Mode.
3. Formatting SD Cards
Pressing OK again after the resolution options will go to the Format•
screen next. Formatting is recommended before you re-use an old
SD card, and is a quick way to erase all of the photos/videos after
CAMERA SETUP (continued)

9
CAMERA SETUP (continued)
you’ve saved any you wish to keep.
The display will read “FoNo”, with “No” and the SD card icon•
blinking. Press OK when “No” is ashing if you don’t want to format
the card.
To format the card, press either UP/DOWN button and the “Fo”•
portion will blink. Press OK and the display will change to“Y N”with
the SD card icon blinking.
“N” (NO) is the default, so pressing OK will cancel the formatting,•
then pressing and holding MENU will exit menu mode.
If you are certain that you want to format the card and DELETE all•
data and images on the card, then press either UP/DOWN button to
select “Y” (YES). With “Y” ashing, press OK- the display will briey
change to “SdFr”.
Exiting the Setup Menu
Press and hold MENU to exit Menu mode at any time once you have
nished changing any of the menu item settings or using one of the
menu options.
In normal operating mode, the display will only show the still photo or
movie clip icon in the lower left corner, an SD card icon on the lower right,
and one or more digits that indicate how many photo or movie les have
been stored on the card.

10
CAMERA OPERATION
Once your camera has been setup, you are ready to begin using it to
capture photos of wildlife activity in the area you choose to locate it. Just
follow these steps:
1. Mount the Camera
It is recommended that you mount the camera about 4 or 5 feet (1.2~1.5
meters) o the ground, with the camera pointed at a slight downward
angle. It’s best to avoid mounting the camera facing east or west as the
rising and setting of the sun could produce false triggers and overexposed
images. Clear branches and other debris away from the front of the
camera so as not to block the camera lens or PIR sensor.
To mount the camera in place, insert the strap through the strap slots on
the rear housing. Wrap the strap around the mounting surface. Aim the
camera at the area you wish to observe. Secure the strap and tighten the
buckle in order to secure the camera.
Make sure that both door latches are securely locked in place, to ensure
proper weather resistance.
2. Test the Camera
To test the camera operation, power on the camera and wave your hand
in front of the lens and PIR (passive infrared/motion) detector, while
looking at the LCD display. As long as events are being detected, a new
still photo or movie clip (as set in the menu) will be recorded every 30
seconds, indicated on the display by “SnAP”, then “SLP” (Sleep).
Note: in Video Mode, the display will stay on “SnAP” for the duration of each
video clip.
The red LED lamp (PIR Indicator) on the front of the camera can help you
determine how large an area is covered, as it will ash anytime an “event”
is detected while the camera is in MENU mode. To check the coverage
Tabla de contenidos
Otros manuales de Cámara de exploración de TAS

TAS
TAS 119259CW Manual de usuario

TAS
TAS 119422 Manual de usuario

TAS
TAS 119234 Manual de usuario

TAS
TAS Digital Trail Camera 119213C Manual de usuario

TAS
TAS 119270CW Manual de usuario

TAS
TAS 119203C Manual de usuario

TAS
TAS 119270CW Manual de usuario

TAS
TAS 119215 Manual de usuario

TAS
TAS DIGITALTRAIL 119215C Manual de usuario


