Synology VS60 Manual de usuario

VS60 User’s Guide
Firmware version 1.2-0132
VS6006212011

Table of Contents
TOC
2
3 Chapter 1: Getting Started with VS60
4 Package Contents
4 Hardware Specications
5 Software Specications
5 Operating Requirements
6 Appearance
7 LED Behavior
7 Safety Instructions
8 Chapter 2: Using VS60
8 Hardware Setup
10 Enabling VS60 on your Synology DiskStation
11 Live-view
11 More Functions
12 Snapshot
12 Start PTZ
13 Event Playback
15 Switch Resolution
15 Firmware Upgrade
16 Information
17 Chapter 3: Troubleshooting

CHAPTER
1
3
Congratulations on your purchase of Synology VS60. It is designed to expand the
exibility of your Surveillance Station.
By connecting an LCD monitor or TV with VS60, users can directly live-view the
IP cameras set up on their Synology DiskStation without a PC. Installing multiple
VS60s brings you the convenience of live-viewing the cameras as a screen wall.
This user’s guide will assist you with the installation and usage of your VS60.
Before reading further, ensure that you have at least one IP camera managed by
your Synology DiskStation. For information on how to set up an IP camera on your
Synology DiskStation, please check the user's guide of your Synology DiskStation.
Getting Started with VS60
USB Flash
Mouse
Serveillance Station
VS60
VGA
DiskStation
USB
Network

4 Chapter 1: Getting Started with VS60
Package Contents
Before installation, please check the package contents to verify that you have
received the items below.
Main Unit AC power adapter
2M RJ-45 LAN cable
User's Guide
Hardware Specications
USB 1 port in front, 1 port in rear
(For USB disk and mouse)
Video Output VGA x 1
Audio Output 3.5mm Stereo Audio Jack x 1
Size (HxWxD) (mm) 160x63x218 mm
Weight 0.78Kg
LAN 10/100BaseT
AC Input Power Voltage 100V to 240V AC
Power Frequency 50 / 60Hz, Single Phase
Operating Temperature 5°C ~ 35°C (40°F ~ 95°F)
Storage Temperature -10°C ~ 70°C (15°F ~ 155°F)
Relative Humidity 5% to 95% RH
Maximum Operating Altitude 10,000 feet
Certication FCC Class B, CE Class B

Chapter 1: Getting Started with VS60 5
Software Specications
Channel # 4, 6 or 9
Display Mode 2x2, 3x2 or 3x3 panels
Compression Formats MJPEG, MPEG-4, H.264
Decoding Throughput [MJPEG] MJPEG:
4,6 channel: 60FPS, D1
9 channel: 60 FPS, CIF
Decoding Throughput [MPEG4] MPEG4:
4,6 channel: 60FPS, D1
9 channel: 60 FPS, CIF
Decoding Throughput [H.264] H.264:
4,6 channel: 45FPS, D1
9 channel: 60 FPS, CIF
Maximum Camera Resolution 4,6 channel D1: (640x480 in VGA, 720x480 in
NTSC, 720x576 in PAL)
9 channel CIF: (320x240 in VGA, 352x240 in
NTSC, 352x288 in PAL)
Snapshot Yes (save to USB disk)
PTZ Yes (for PTZ cameras only)
Playback Event Timeline
Firmware Upgrade Yes (via USB disk)
Monitor Resolution 1280x768, 1024x768, 800x600
Operating Requirements
Synology DiskStation Recommend DSM 3.0-1337 and onwards to
support full features of VS60.
Supported IP cameras For the complete list of supported IP cameras,
please visit http://www.synology.com

6 Chapter 1: Getting Started with VS60
Front View Rear View
LED indicators
USB 2.0 port
LOCK button
POWER button
VGA port
AUDIO jack
USB 2.0 port
LAN port
RESET button
DC IN 5V port
Article Name Location Description
POWER button Front The POWER button is used to turn the Synology VS60 on or off.
LOCK button Front The LOCK button is used to prevent VS60 from paring with
other Synology DiskStations.
LED Indicator Front
The LED Indicators are used to display the status of the
system, network connection, and Lock function. For complete
details, please refer to the LED Behavior table below.
USB port Front &
Rear
The Synology VS60 offers 2 USB ports for both mouse plug-in
and USB ash drive connection*. One of the ports is located
on the front and the other on the rear.
VGA port Rear To connect the monitor’s VGA adapter to VS60.
AUDIO jack Rear The AUDIO jack is used to connect external speakers or
earphone to VS60 (for audio supported cameras).
LAN port Rear The LAN port is used to connect the LAN cable to VS60.
RESET button Rear The RESET button is used to restore the settings to the factory
default.
DC IN 5V port Rear The DC IN 5V port is used to connect the AC Power Adapter to
provide power to your Synology VS60.
Appearance

Chapter 1: Getting Started with VS60 7
LED Behavior
LED Behavior Description
POWER
Solid Blue System is ready
Flashing Blue System is starting up
Off The power is off
STATUS Solid Green Server is connected
Off Server is not connected
LAN Solid Green LAN is connected
Flashing Green LAN is active
LOCK
Solid Green Locked (Pairing is not allowed with Synology DiskStation)
Flashing Green Unlocked (Pairing is allowed with Synology DiskStation)
RESERVE Off No functionality (Reserved for future use)
Safety Instructions
To use your Synology product safely, please follow these instructions and warnings
at all time.
Keep away from direct sunlight and away from chemicals. Make sure
the environment does not experience abrupt changes in temperature
or humidity.
Keep Synology product upright. Do not lay it down horizontally.
Do not place the Synology product close to any liquid.
Before cleaning, unplug the power cord rst. Wipe Synology product
with damp paper towels. Do not use chemical or aerosol cleaners to
clean it.
Do not place the Synology product on a cart, table, or desk, which is
not stable to avoid the product from falling over.
The power cord must plug in to the right supply voltage. Make sure
that the supplied AC voltage is correct and stable.

2
8
Using VS60
Hardware Setup
1 Connect the AC power adapter to VS60, and the other end to the power outlet.
2 Use the LAN cable to connect VS60 to your switch/router/hub.
Chapter 2: Using VS60 9
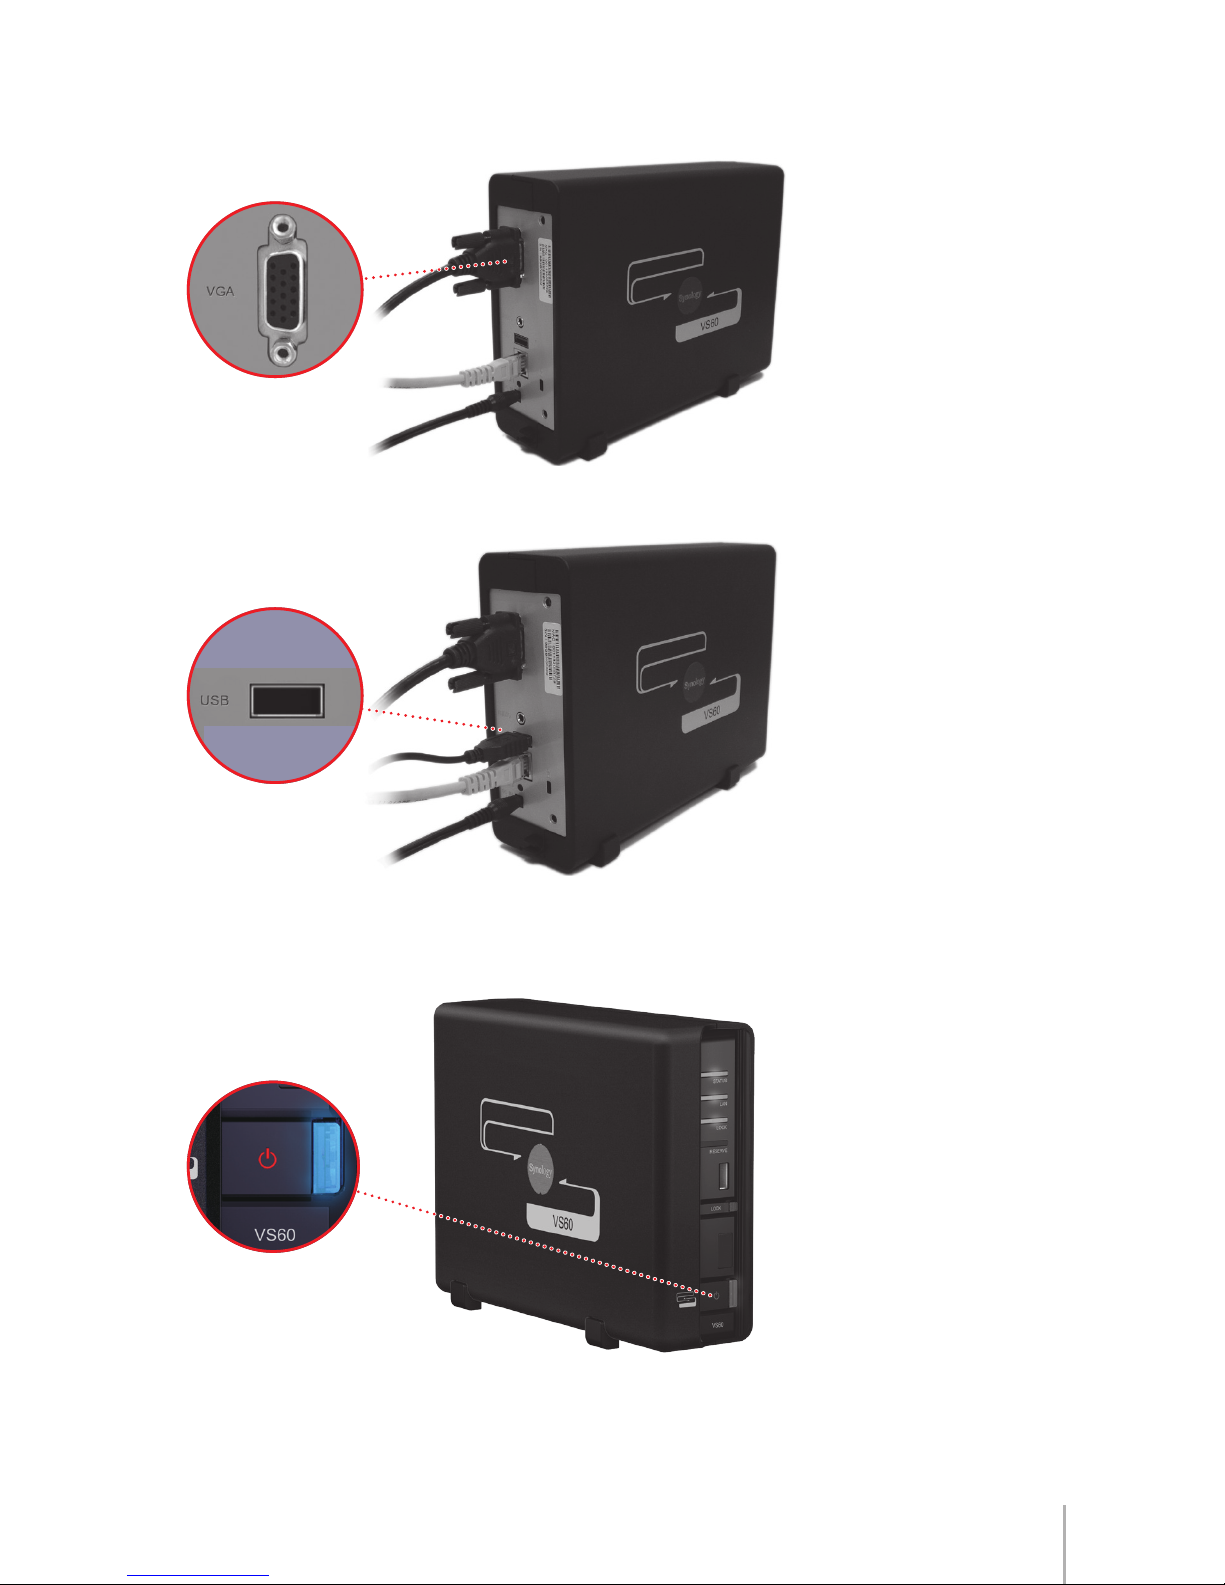
3 Connect your monitor's VGA cable to the VGA port on the back of VS60.
4 Connect the mouse to the USB port on the back of VS60.
5 Push the Power button on the front of your VS60. Your VS60 is now online and
ready to work with your DiskStation.

10 Chapter 2: Using VS60
Enabling VS60 on your Synology DiskStation
Before you start, make sure the DSM version of your DiskStation is 3.0-1337 or
later to support the full features of VS60. You can view your current DSM version
by going to Control Panel > DSM Update.
To update DSM, please visit: http://www.synology.com/support
To Enable VS60 on your Surveillance Station:
1 Enter Surveillance Station.
2 Click on the “Management” tab at the top.
3 Select "Advanced" option under System category.
4 Enable VS60 by checking “Enable VisualStation” checkbox.
5 Click on “Save” to save the changes. After conguration, "VisualStation" will
appear under the “Management” tab.
Tabla de contenidos
Otros manuales de Sistema de seguridad de Synology

Manuales populares de Sistema de seguridad de otras marcas


EDM
EDM Solution 6+6 Wireless-AE Manual de usuario

Highway Safety Group
Highway Safety Group EA401 Manual de usuario

Siren
Siren LED GSM Manual de usuario

Detection Systems
Detection Systems 7090i Instrucciones de montaje

Se-Kure Controls
Se-Kure Controls MicroMini SK-4841 Manual de usuario

Siemens
Siemens FDM273 Manual de usuario