Rytan RY456 Manual de usuario

INCORPORATED
RYTAN, INC. RESERVES THE RIGHT TO MAKE CHANGES WITHOUT NOTICE. PRICES MAY VARY FROM YOUR DISTRIBUTOR.
READ AND UNDERSTAND THIS OPERATORS MANUAL AND BECOME
FAMILIAR WITH YOUR NEW MACHINE BEFORE YOU START CUTTING KEYS.
Model RY456
OPERATORS MANUAL
Rytan Mode RY456 Semi-Automatic Key Dup icating Machine with 4-Way Jaws
for Cy inder Keys and Automotive Keys and Medeco
CLAMPS MORE KEYS
NEW CUTTER AND STYLUS CUTS GM AND KWIKSET TITAN KEYS
BUILT IN MICRO-ADJUST STYLUS
Rytan Products are Designed and Manufactured in the U.S.A.
RYTAN, INC. - 1648 W. 134th St. Gardena, CA 90249 (800) 447-9826 - (310) 212-6002
NEW 4-WAY JAWS
CLAMPS MORE KEYS
2-WAY
3-WAY
1-WAY
4-WAY
Wire Brush
Kit
INCLUDED!
RY20005 Complete
Carriage Assembly
ADD 380.00
Key Gauge Protector
INCLUDED!
KEY DUPLICATING
MACHINE w/Medeco Capacity
WITH 4-WAY JAWS
ADJUSTABLE STYLUS
.0005Accurate
(1 2 thousanth!)
INCLUDED!
NOW YOU CAN CUT KEYS LIKE GM AND KWIKSET
TITAN FIRST CUT WITH ONE SIDE STRAIGHT,
LIKE THE FACTORY!
NEW CUTTER RY20030 AND RY456276 STYLUS
CUTS MORE KEYS
STRAIGHT
RY39 Auxillary Lamp Kit
ADDITIONAL COST ADD
53.50

TABLE OF CONTENTS
1. INTRODUCTION
2. GETTING STARTED
3. SAFETY RULES
4. MOUNTING THE MACHINE
5. CUTTING STANDARD KEYS
6. CUTTING DEEP CUTS
7. VISE JAWS
. TOP SHOULDER GAUGING
9. CLAMPING KEYS
10. BEST and TIP GAUGING
11. RELEASING THE CARRIAGE
12. CUTTER SHAFT LOCK
13. REMOVING/REPLACING CUTTER
14. DEPTH ADJUSTMENT
15. SPACE ADJUSTMENT
16. KEY GAUGE ADJUSTMENT
17. CARRIAGE OVER TRAVEL ADJ.
1 . MAINTENANCE
19. TROUBLESHOOTING
20. CUSTOMER INFORMATION
21. WARRANTY
22. PARTS BREAKDOWN
2
....................3
....................3
....................3
....................4
....................5
....................5
....................6
....................7
....................
....................9
....................9
....................10
....................11
....................13
....................14
....................15
....................16
....................16
....................1
....................24
....................24
....................24

1. INTRODUCTION
Thank you for purchasing our American Made, Rytan, Inc., Model RY45 , universal key duplicating
machine. Your new key machine has been designed and built with heavy-duty components designed
for the most demanding shop and service vehicle use. As you become familiar with your new
machine you will find a new ease and confidence in key cutting. Discover the smooth and natural
interaction between machine and operator, resulting from careful design and placement of the
operating controls. We are confident you will profit greatly from this quality built versatile key
machine.
Your new RY45 key duplicating machine is made similar to the RY25 RAMM semi-automatic
key machine. The Stylus on the RY45 key machine is 100% adjustable to better than ½-thousanths
of an inch (0.0005), and can be re-set to 0 at any time.
Use your machine to cut standard cylinder keys and U.S. Foreign automobile keys and Medeco.
2. GETTING STARTED
Please take time now to read and understand this manual thoroughly before you start cutting keys.
Maintain this owners manual and review it often, and make it available to others who will use this
machine.
Do not attempt to operate this machine until you have read it thoroughly and understand completely
all instructions, rules, etc. contained in this manual. Failure to comply can result in accidents in-
volving fire, electric shock, or serious personal injury.
3. SAFETY RULES
A. Know your machine. Read the owners manual carefully. Learn its applications and
limitations as well as specific operational hazards peculiar to this machine.
B. Guard against electrical shock by preventing body contact with grounded surfaces. Examples:
Pipes and metal work tops.
C. Keep guards in place at all times.
D. Keep your work area clean. Cluttered areas and benches invite accidents.
E. Avoid dangerous environment. Dont use this machine in damp or wet locations. Keep
your work area well lit.
F. Keep children away. All visitors should be kept a safe distance from work area. Do not
let visitors contact machine or power cord.
G. Do not force the machine. It will do the job better and safer at the rate for which it was
designed. Always maintain a sharp cutter wheel on the machine.
H. Use the machine for what it was designed. Dont use the machine for anything but the key
blanks for which it was intended. Cutting steel keys is not recommended.
I. Wear proper apparel. For example: No loose clothing or jewelry to get caught in moving
parts. Operators without properly restrained long hair MUST NOT operate any type of machinery,
including key machines. Long hair can get caught in moving (rotating) machinery parts.
J. Use safety glasses. Flying chips, improperly secured key blanks and broken cutter wheel
teeth can injure the eye if not properly protected.
K. Dont abuse cord. Never yank cord to disconnect from receptacle. Keep cord from heat,
oil and sharp edges. Never remove the ground connection from the plug. If you use a two wore
adapter be sure to properly connect the ground wire. NEVER CUT OFF THE GROUND TERMINAL
FROM THE MACHINES POWER PLUG!
3

L. Secure keys properly in vises. Dont hold key head for support when cutting. If it doesnt
clamp properly, dont try to cut it!
M. Maintain a sharp cutter wheel. dull cutter wheel is not only inefficient but dangerous.
dull cutter wheel can produce excessive cutting force on a key blank and exceed the machines vise
jaws clamping force to a point where the key blank could be ripped out of the machine.
N. Disconnect machine. When not in use, during servicing, or when changing cutter wheel and
accessory brush always disconnect the machine form its electrical power source.
O. Remove servicing wrenches. Remove all service tools from the machine before turning it
on.
P. lways turn off machine. fter cutting a key, turn off the machine before removing a cut
key and clamping another fresh blank.
Q. lways lock carriage back. fter cutting a key, turn off the machine and lock the carriage
back to prevent accident or injury.
R. Outdoor use. When machine is used outdoors, use only extension cords suitable for outdoors
and that have a built-in third wire and ground terminal. NEVER CUT OFF THE GROUND TERMIN L
FROM THE M CHINES POWER PLUG!
S. Keep hands away from cutter and key blank. Keep hands away from rotating cutter. Do
not reach underneath or around cutter or key blank when cutter is rotating. Do not attempt to remove
key blank or key blank material while cutter is rotating.
T. Never use machine in an explosive atmosphere. For example, if your machine is in a service
vehicle with a fuel leak or spill, switching on the machine could ignite the fumes.
NOTE: FL MM BLE SOLVENT SPILL IN YOUR SHOP OR V N IS EQU LLY D NGEROUS!
U. Inspect machine cord periodically. If damaged, repair at once.
V. Keep hands dry, clean and free from oil and grease.
W. Stay alert. Watch what you are doing and use common sense. Do not operate machine when
you are tired.
X. Do not use machine if switch does not turn the machine ON and OFF.
Y. Drugs, lcohol, Medication. Do not operate machine while under the influence of drugs,
alcohol, or any medication.
Z. The operation of any key machine can result in foreign objects being thrown into the eyes,
which can result in severe eye damage. lways wear safety glasses or eye shields before commencing
key machine operation. We recommend wide vision safety mask for use over spectacles or standard
safety glasses.
. Save these instructions.
4. MOUNTING THE MACHINE
Drill two oversized ½ holes in your bench top to mount the machine. Use ½ 13 bolts from your
local hardware store. Carefully turn the machine up-side-down and measure the spacing of the two
tapped holes on the bottom of your machine (be careful not to set the machine on the power switch).
Turn the machine right-side-up and place the machine where you want it on your work bench. Mark
the bench and drill your holes.
4

5. CUTTING STANDARD KEYS
A. Most key clamping requirements use the standard jaw A configuration. Jaw requirements
- to make deeper cuts in small keys or to clamp other types of keys simply loosen the key clamp knob
a few extra turns and lift-and-turn the jaw assemblies from A to B to C to D.
B. Keys are always gauged with the full-function flip-up key gauges. We do not recommend
bottom shoulder gauging because key blank manufacturers do not always maintain a reliable correlation
between bottom and top shoulder positions on the key blanks they make.
C. Always remember to flip down your key gauges before cutting a key. Failure to do so will
prevent the key from being cut by the cutter wheel.
D. Always cut keys from Bow-to-Tip. NEVER MAKE YOUR FIRST CUT FROM TIP-TO-
BOW.
The RY456 is specifically designed to cut most cylinder keys U.S. and Foreign automotive keys and
Medeco by operating the machines stick-shift lever SMOOTHLY from Right-to-Left. The key will
be cut properly starting at the Bow and ending at the tip of the key. It is O.K. to make a cleanup cut
back to the bow of the key ONLY after the key has already been cut from Bow to tip.
NOTE: If an excessive amount of key blank material is removed on the cleanup cut (second cut) your
cutter may need replacing or re-sharpening. Rytan can sharpen your dull cutter.
6. CUTTING DEEP CUTS IN SMALL KEYS
A. Most key clamping requirements use the standard jaws A configuration. If you are making
deep cuts you may have to rotate to the B jaw configuration. You must loosen the painted key
clamping knobs a few turns turn the vise and retighten.
Make sure your vise jaws are clean (with no chips in the way) and as you secure the vise jaw on to
your key - be sure to push the key into the jaw firmly and make sure they remain flat and parallel into
the vise jaws when tightening the large painted key clamp knob.
When clamping keys in the jaws be sure to open the jaws ONLY enough to slide the key in place.
Please see elow for more Vise Jaw information.
B. Keys are always gauged with the full-function flip-up key gauges.
C. Always remember to Flip Down your key gauges before cutting a key. Failure to do so will
not cut the key.
D. Switch ON your machine and operate the stick-shift lever until the stylus is right over the
left edge of the first cut closest to the bow of the key gently press down on the carriage with the black
tear-drop hand then reach down and pull out the carriage release (small round black knob) and release
the carriage. You may ease up on the carriage and manipulate the carriage controls to make a smooth
gentle cut down the left edge of the first V cut in the key to the last cut on the tip of the key - cutting
all cuts on the key.
E. You may want to reverse the direction of the carriage and make a clean-up cut back to the
bow of the key.
F. Push down and lock back your carriage. Turn OFF the machine.
NOTE: CUTTING STEEL KEYS IS NOT RECOMMENDED.
Cutting steel keys will accelerate cutter wear. Some steel keys will ruin your cutter wheel with just
one pass.
NOTE: Some automotive presentation keys are made of Hardened Steel and can ruin the cutter wheel instantly!
Dont be fooled by the decorative Gold Brass or Silver plating on these keys.
5

Suggestion: Keep a small magnet near your key machine to identify steel keys. Before cutting a
steel key try filing a small groove where one of the deeper cuts will be made if the key wont file
easily it wont cut any better in your key machine and will most likely ruin your cutter!
. VISE JAWS
Choosing the correct vise jaw. For most key cutting work the jaws can remain in the standard A
configuration. In the standard configuration the entire throat of the jaws is used. Measuring from
the front faces of the A vise jaw and into the throat of the jaws you will measure .142. This
throat dimension of .142 is how much of the key is consumed by the vise jaws when the key is
clamped. Most keys are rarely cut deeper than .142 from the back edge of the key blade.
Some padlock keys and some General Motors keys have cuts deeper than .142 from the back edge
of the key blade. For these keys you can flip your vise jaws to B. Loosen the vise jaw a few turns,
flip the vise jaws to B and retighten the large painted knob. You must do both vise jaws for this
to work. Your B key machine vise jaws now have a throat of .105 to clamp the key.
CHANGING THE VISE JAW
Your new jaws can be rotated from the A jaws to B, C, or D vise jaws by just turning them.
VISE JAW REPLACEMENT
Either vise jaw assembly may be replaced at any time. Inspect your vise jaws for uneven clamping and
referencing surfaces. Replace when jaws appear worn. Accelerated wear occurs when you clamp double-
sided steel keys such as Volkswagen. Clamping pre 1984- ½ Ford double-sided keys too far to the right into
the vise jaws may cause wear to the left edges of both top and bottom vise jaws. The damage is due to the
wedged shaped milling of these keys as you approach the bow of the key. This can be observed if you open
the vises only enough to insert the key.
6
Fig.1
STANDARD A JAW
(0.142 deep) C JAW
(0.260 deep)
D JAW
(0.260 deep)
Fig.2
STANDARD B JAW
(0.105 deep)

VISE JAW REPLACEMENT
Vise jaws (cartridges) are replaced in pairs as an assembly, a matched set consisting of (one top jaw
and one bottom jaw), you will need two sets for your key machine. You will disassemble and re-
install the old plungers, springs, and screws. Or you can buy a complete set with the plunger, top
jaw, bottom jaw, screws and springs. imply drop the (cartridges) in place, you will need two
cartridges.
Coat all steel sliding surfaces with a light coating of grease when installing the vises.
8. TOP SHOULDER KEY GAUGING
tandard cylinder keys should always be top shoulder gauged. Use the machines full-function flip-
up key gauges. We do not recommend bottom shoulder gauging because key blank manufacturers
do not always maintain a reliable correlation between bottom and top shoulder positions on the key
blanks they make.
Always remember to flip DOWN your key gauges before cutting a key. Failure to do will prevent your key
machine from cutting the key.
7
Fig. 4
RY10054 Key Gauge
Protector (red)
RY10049Key Gauge Shaft
RY9278 Vi yl Cap (red)
Key Gauge
RY10050 Left-Ha d Key Gauge
RY10048 Right-Ha d Key Gauge
Key Vise K ob
(with) RY82
3-piece Thrust
Beari g Assy.
Top 4-way Jaw
Bottom 4-way Jaw
Fig.3
CLAMPS MORE KEYS
NEW 4-WAY VISES
A
B
C
D
RY20080 KNOB WITH SHAFT ASSY.
RY82 3-PC THRUST BEARING ASSY.
RY20089 TOP VISE, JAW 4-WAY
RY20047 BOTTON VISE, 4-WAY
RY20046 VISE PLUNGER
1. CLAMPING KEYS
Open the vise jaws only wide enough to slide the key in. With the key all the way into the throat
of the vise jaws - put your index finger against the key blade and with moderate for e against the
key in to the vise jaw, gently slide the key left and right a few times (about 1/8 will do) to seat
the key into the vise jaws. With the bottom shoulder of a standard ylinder key is about 1/32 away
from the edge of the vise jaws CLAMP the key with the key lamp knob ontinue pressing against
the blade of the key with your finger as you tighten the key lamp knob.
When both keys have been properly gauged and lamped in the vise jaws REMEMBER to flip down
the full-fun tion key gauges before attempting to ut the key. Failure to flip down the key gauges
will prevent you key ma hine from utting the key.
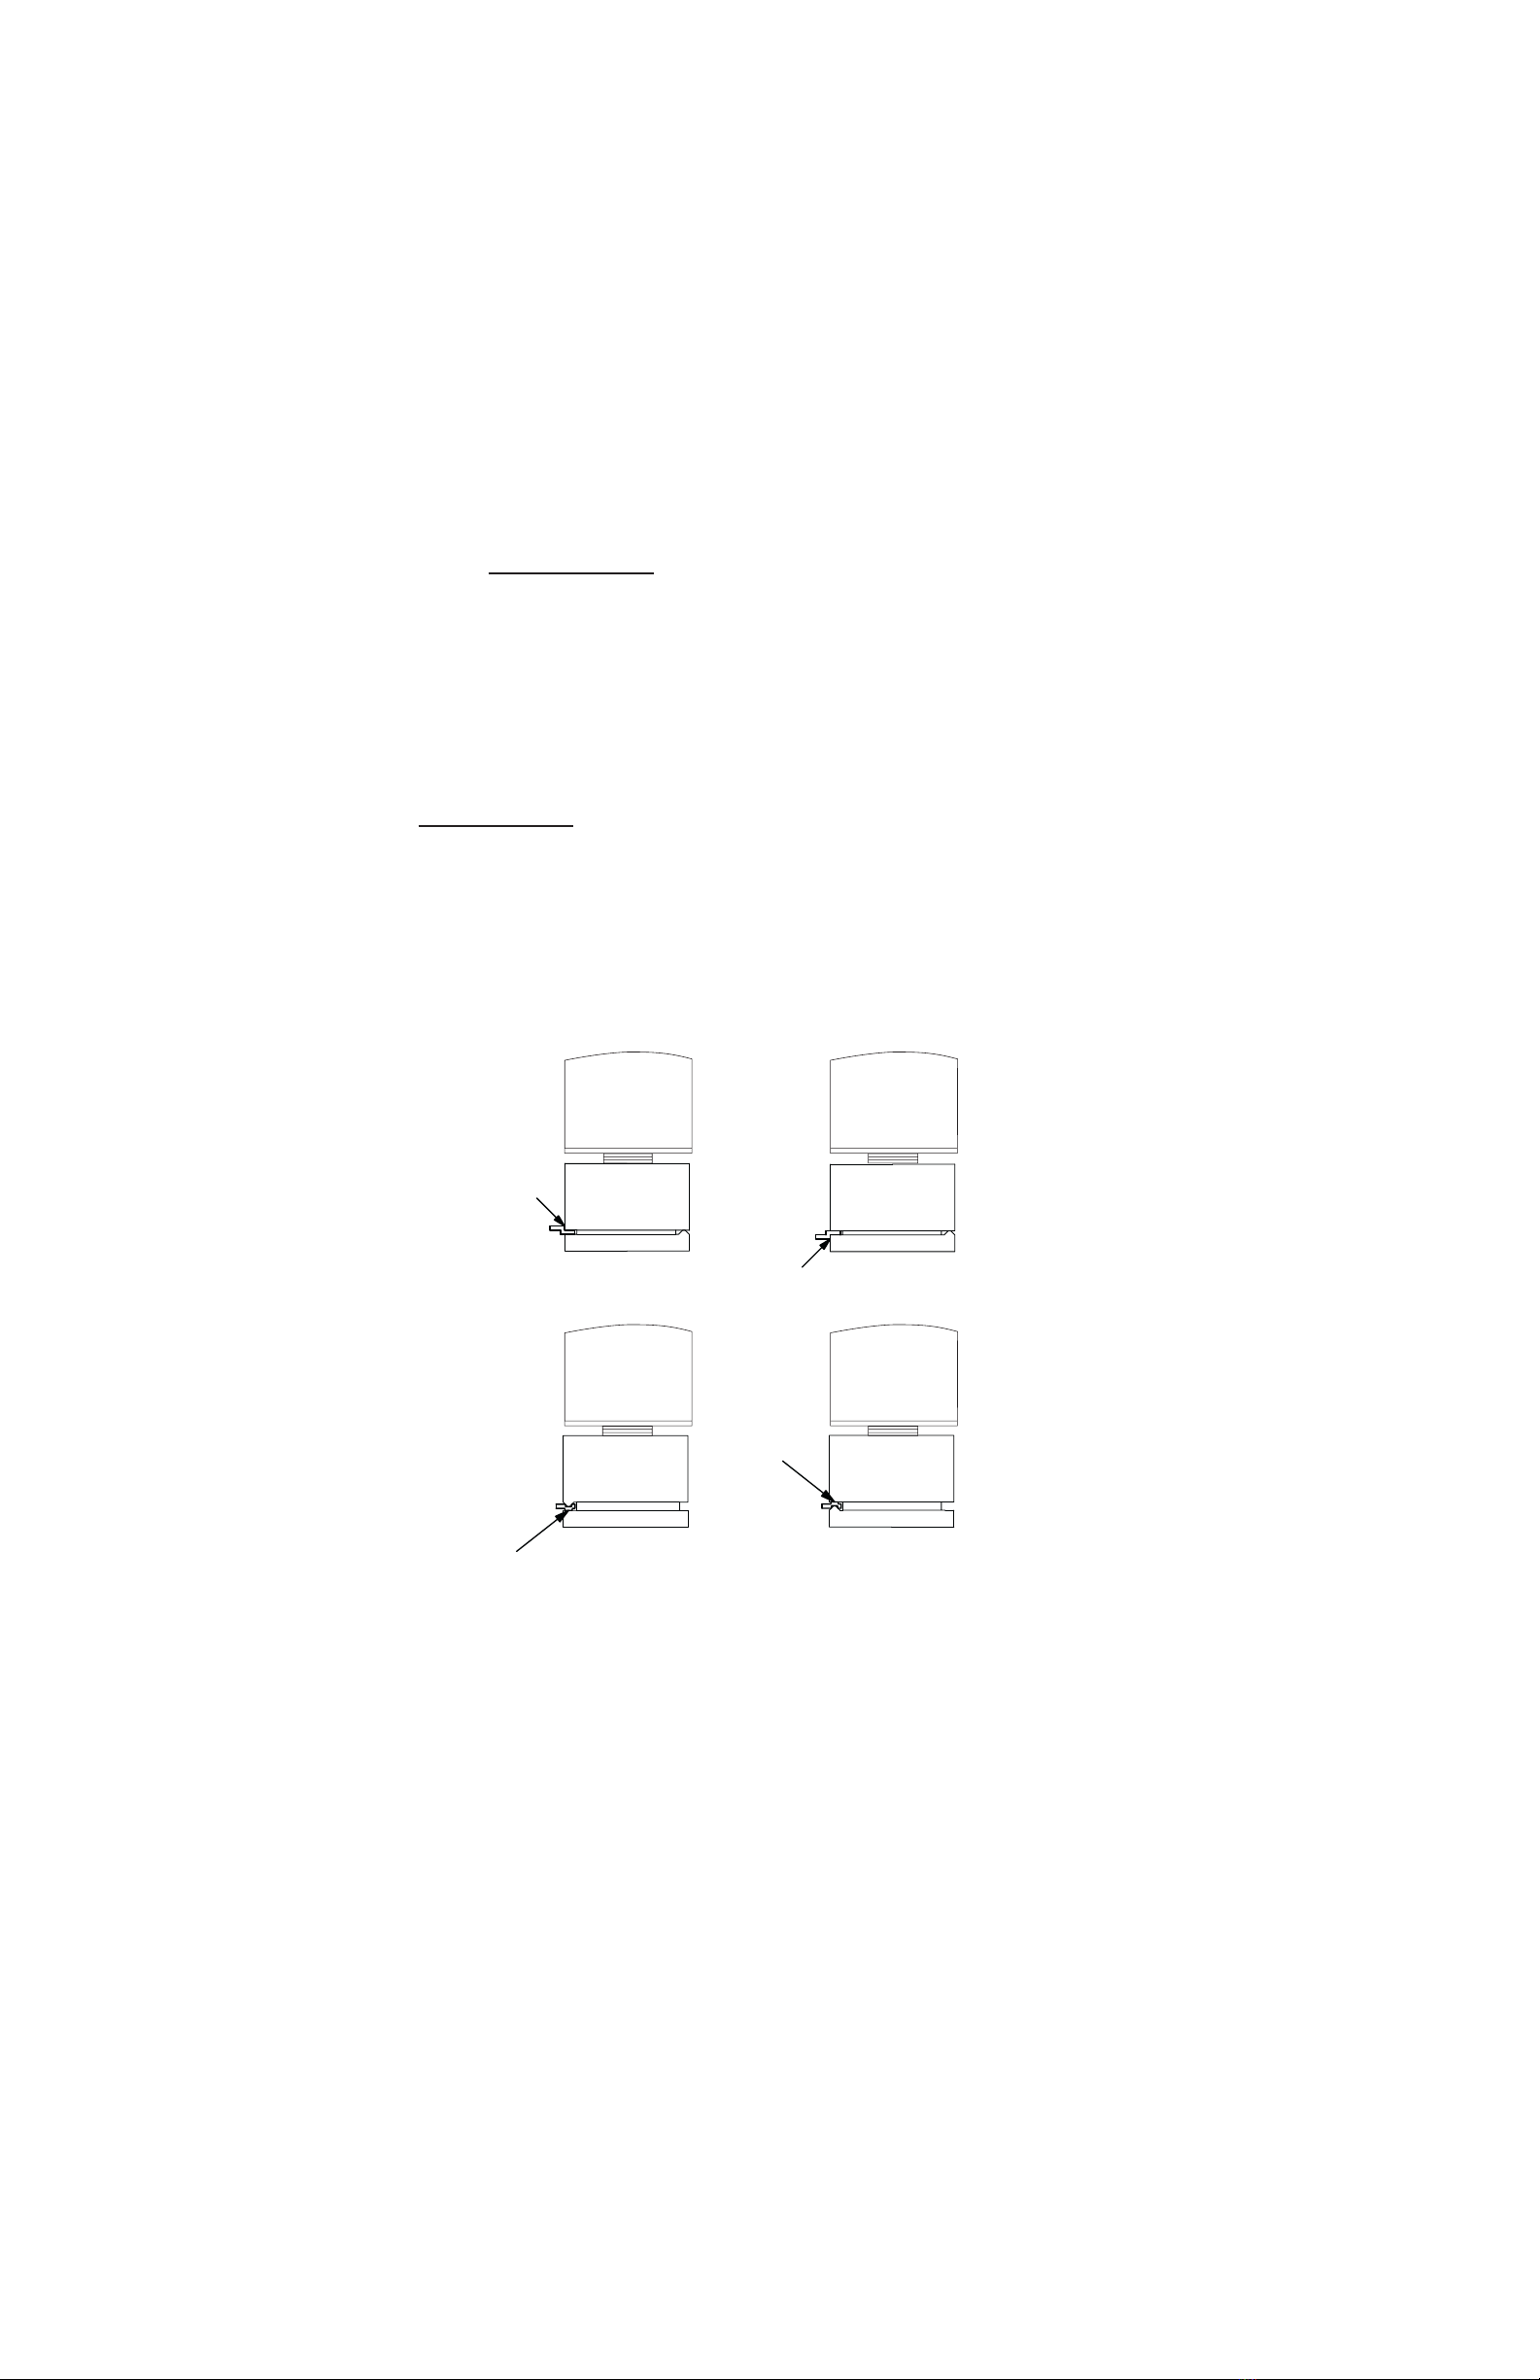
KEY CLAMPING . . . (Ford double-sided keys)
Keys su h as Ford double-sided ignition and door do not have a top shoulder to gauge from.
Open the vise jaws A vises ONLY enough to slide in the thinnest part of the key. (See Fig. 5 &
6) Slide in the key blank and allow the full thi kness ridge of the key to onta t the fa e of the
vise jaw.
Clamp the key into the vise jaws so that its uts are approximately entered in the vise jaws.
Ignition key ridge will onta t the fa e of the TOP vise jaw.
Door and trunk key ridge will onta t the fa e of the BOTTOM vise jaw. See Fig. 5 & 6 below..
Use vise jaw to cut Medeco.
Keys su h as Chi ago double sided and others should use vises D and C to lamp into the groove
near the enter of the blank. (See Fig. 7 & 8)
TIP OR BEHIND THE TIP KEY GAUGING.
Operate the full-fun tion key gauges by rotating the key gauge shaft toward you - then push to the right on
the key gauge shaft while ontinuing to rotate the key gauge until the key gauge aligns itself with the tip of
the key. Or behind the TIP as in Best keys.
8
BD
CA
AC
CA
Key must fit
against Top Jaw
Key must fit
against Bottom Jaw
Key ridge on
Bottom side
Key ridge on
Top side
Fig. 8
Fig. 7
Fig. 6
Fig. 5

Always remember to flip DOWN your key gauges before cutting a key. Failure to do so will prevent
the key from being cut.
1 . BEST AND FALCON (BEHIND THE TIP) KEY GAUGING
These keys must be gauged from a tip location that is behind the actual tip of the key. Position
the key in the vise so that the tip edge of the key is about 1/32 (or less) from the right edge of
the vise jaws. Operate the full function key gauges by rotating the key gauge shaft toward you -
then push to the right on the key gauge shaft while continuing to rotate the key gauge shaft until the
key gauge slides past the actual tip of the key. Slowly release the key gauge shaft and allow the key
gauge to rest on the tip location that is behind the actual tip of the key. See figure 11 and figure
12.
Always remember to flip DOWN your key gauges before cutting a key. Failure to do so will prevent
the key from being cut.
11. RELEASING THE CARRIAGE
For safety reasons - releasing the carriage requires two actions. With your right hand, push down
gently on the carriages large teardrop knob just enough to push the carriage down a small distance.
While holding the carriage down reach around with your thumb and index finger and grasp the small
round black knob and pull it out and hold it there. When the small round black knob is pulled out -
gently lift up on the carriage a small distance and THEN let go of the small round black knob and
continue positioning the carriage where you want it to be (you will want to move the carriage to the
beginning of the first cut nearest the bow of the key).
NOTE: You will not be able to pull the small black knob by itself to release the carriage. You must
push down on the carriage first then pull out the small black knob to release the carriage. Se
ALWAYS REMEMBER to flip down your key gauges before cutting a key. Failure to do so will
prevent the key from being cut.
PLEASE. . . DONT FORGET to turn off your key machine before removing a cut key and reloading
another key blank.
LOCK THE CARRIAGE BACK (after cutting a key). Push DOWN on the carriages large teardrop
knob until the carriage clicks into the locked position.
9
Fig. 10

SWITCH ON YOUR MACHINE
The power switch is located at the lower right, front of the machine. See figure 12.
To switch ON pull the power switch up.
To switch OFF push the power switch DOWN.
12. CUTTER SHAFT LOCK
To remove the cutter ou must lock the cutter and cutter shaft in position before using a 1 wrench
to remove the cutter.
10
New Cutter will cut
straight on left side
of key cut
Adjustable Stylus
(.0005) one half
thousanth INCH
NEW 4-WAY VISES
CLAMPS MORE KEYS
2-WAY
3-WAY
1-WAY
4-WAY
Power Switch
UP ON
Down off
CUT STRAIGHT
Cutter
Shaft
LOCK
Fig. 12
Fig. 11
New Cutter will cut
straight on left side
of key cut
Adjustable Stylus
(.0005) one half
thousanth INCH
NEW 4-WAY VISES
CLAMPS MORE KEYS
2-WAY
3-WAY
1-WAY
4-WAY
Power Switch
UP ON
Down off
CUT STRAIGHT
Tabla de contenidos
Otros manuales de Duplicadora de discos de Rytan


Manuales populares de Duplicadora de discos de otras marcas


Kanguru
Kanguru U2-DVDDUPE-S Manual de usuario

StarTech.com
StarTech.com 8STSATDUP11 Manual de usuario

DUPLO SEIKO CORPORATION
DUPLO SEIKO CORPORATION Duprinter DP-460 Manual de usuario

Addonics Technologies
Addonics Technologies UDFH7 Manual de usuario

Vinpower Digital
Vinpower Digital MiniLoader VDX-1 Manual de usuario

Addonics Technologies
Addonics Technologies CFASTD5 Manual de usuario