Rointe Connect Manual de usuario


2
CONTENTS
1. INTRODUCTION ...................................................................................................... 3
2. INSTALLATION ......................................................................................................... 3
3. REGISTRATION AND LOGIN ................................................................................... 4
3.1. First use ............................................................................................................ 4
3.2. Registration ...................................................................................................... 4
3.3. Login ................................................................................................................. 4
4. INSTALLATION ASSISTANT ..................................................................................... 5
5. CREATE A ZONE .......................................................................................................5
6. PAIRING ASSISTANT ................................................................................................ 6
6.1. Accessing the assistant .................................................................................. 6
6.2. Choosing the appropriate Wi-Fi network ..................................................... 6
6.3. Activate Pairing ................................................................................................ 8
6.4. Send the conguration to the device ........................................................... 8
6.5. Finish Pairing ................................................................................................... 9
7. MAIN SCREEN ........................................................................................................10
7.1. Installations ...................................................................................................10
7.2. General Thermostat .....................................................................................11
7.3. Edit Tari ........................................................................................................11
8. GENERAL SETTINGS ..............................................................................................12
9. ZONE CONTROL ....................................................................................................12
9.1. Programming .....................................................................................................13
9.2. Advanced options ..............................................................................................13
10. PRODUCT CONTROL ..........................................................................................14
10.1. Radiators and Towel rails ..........................................................................14
10.2. Water heaters .............................................................................................. 14
10.3. Alerts ............................................................................................................ 14
10.4. Edit product .................................................................................................15
10.5. Advanced Product Options ....................................................................... 16
10.6. Product details ............................................................................................ 17
11. ENVIRONMENTS .................................................................................................18
12. STATISTICS ........................................................................................................... 19
13. END USER LICENSE AGREEMENT (EULA) ..........................................................20
Rointe Connect app user manual
3
1. INTRODUCTION
Welcome to the Rointe Connect app user manual. Please read this manual
carefully, including the End User License Agreement.
Designed for easy operation by any type of user, the Rointe Connect app allows
you to control your connected Rointe heating products from your smartphone,
tablet or computer at any time and from any place. The Rointe Connect app oers
you multiple advantages when it comes to your heating:
• Temperature control by installation, zone or individually by product
• See the cost and consumption of your heating in real time
• Set custom spending limits
• Ability to lock individual products remotely
• Push notications concerning your connected products
• Automate actions and programming with the "Environments" feature
Rointe Connect is compatible with the following Rointe products: D Series radiators,
D Series towel rails, Rome Connected water heaters, CT.2 thermostat for underoor
heating and D Series water heaters (discontinued).
Please note if you using a computer you need to go to rointeconnect.com, create
an account and follow the instructions from the web application.
2. INSTALLATION
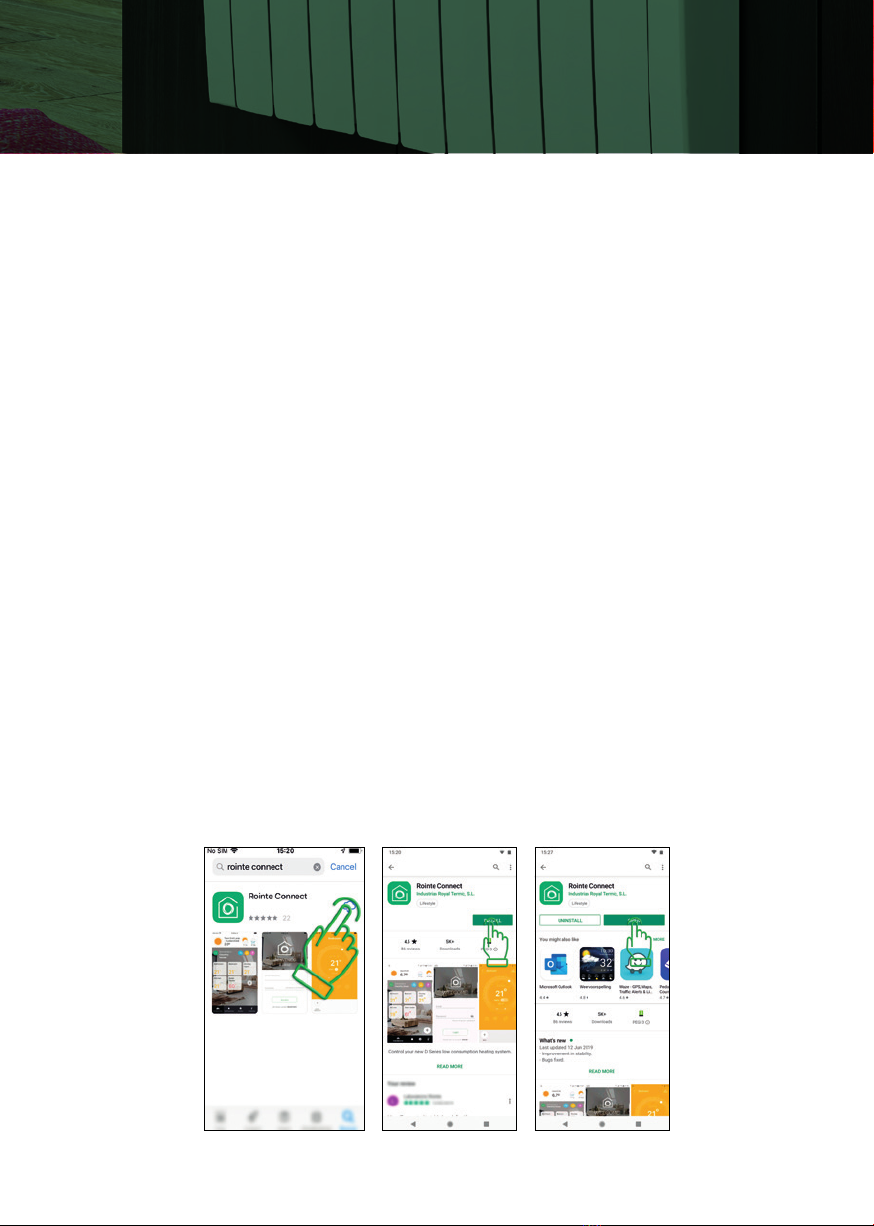
Access the App Store (iOS) or the Play Store (Android) on your smartphone or tablet.
Search for app “Rointe Connect”, click install and open once the app has installed.

4 · Rointe efficient heating
3. REGISTRATION AND LOGIN
3.1. First use
When you log in for the rst time, you must allow access to the location and allow
notications for the application to work properly.
3.2. Registration
To create an account, click on "Register". Fill in the data, accept the terms of service
and click on "Create account".
3.3. Login
Once you have created an account, please login using your email address and
password used when creating your account.

Rointe efficient heating · 5
Rointe Connect App user manual
4. INSTALLATION ASSISTANT
The Installation wizard appears when you login for the rst time. An installation
can be a house, oce etc. where your Rointe products are installed. You can create
zones and subzones in an installation to assign products to. Name your installation
and assign a location by searching in the map then press and hold over the location,
so the red marker appears. The blue one is your current location. Then set the hour,
currency, a background image (optional) and press continue.
5. CREATE A ZONE
Once an installation has been created, the Zone wizard appears. This also appears if
you press + from the main screen. A zone is a room / oor and can contain products
or unlimited sub-zones. For example, you can create a zone for "Ground oor" that
contains a "Living Room" sub-zone, or one zone to contain all products. Give your
zone a name and include the surface area (optional). Press "i" to calculate area.

6 · Rointe efficient heating
Click “Continue” to access the “Add device” or “Create sub-zone” wizard.
6. PAIRING ASSISTANT
6.1. Accessing the assistant
You can now pair a product in your zone. Access the Pairing wizard by going to your
zone/sub-zone and click on the "+" button to add a product. If you can’t see the “+”,
slide your nger to the left on the bottom of the screen. This happens when there
are already paired devices in the zone. Click on the product type you want to pair.
6.2. Choosing the appropriate Wi-Fi network
Please note that some of the wizard steps are dierent between iOS and Android
devices, so follow the steps depending on the device you use.
6.2.1. iOS Apple devices
Go to your Wi-Fi settings and choose the network you want to connect your Rointe
product to. It must be a 2.4GHz network.

Rointe efficient heating · 7
Rointe Connect App user manual
If your router generates 2.4GHz and 5GHz networks you should always use the
2.4GHz. Rointe products are not compatible with 5GHz networks. For example, if
you have two networks with the same name and one ends in 5G or plus, it should
not be used. Once connected to the Wi-Fi network, go back to the Rointe Connect
app, click on "Ready I'm connected", accept if it's the correct network and type the
password for your Wi-Fi network.
6.2.2. Android devices
Go to your Wi-Fi settings and choose the network you want to connect your Rointe
product to. It must be a 2.4GHz network.
If your router generates 2.4GHz and 5GHz networks you should always use the
2.4GHz. Rointe products are not compatible with 5GHz networks. For example, if
you have two networks with the same name and one ends in 5G or plus, it should
not be used. You'll be asked if it's the correct Wi-Fi network, press accept and type
the password for your Wi-Fi network (you can press the eye icon to see the password
as its typed).
8 · Rointe efficient heating
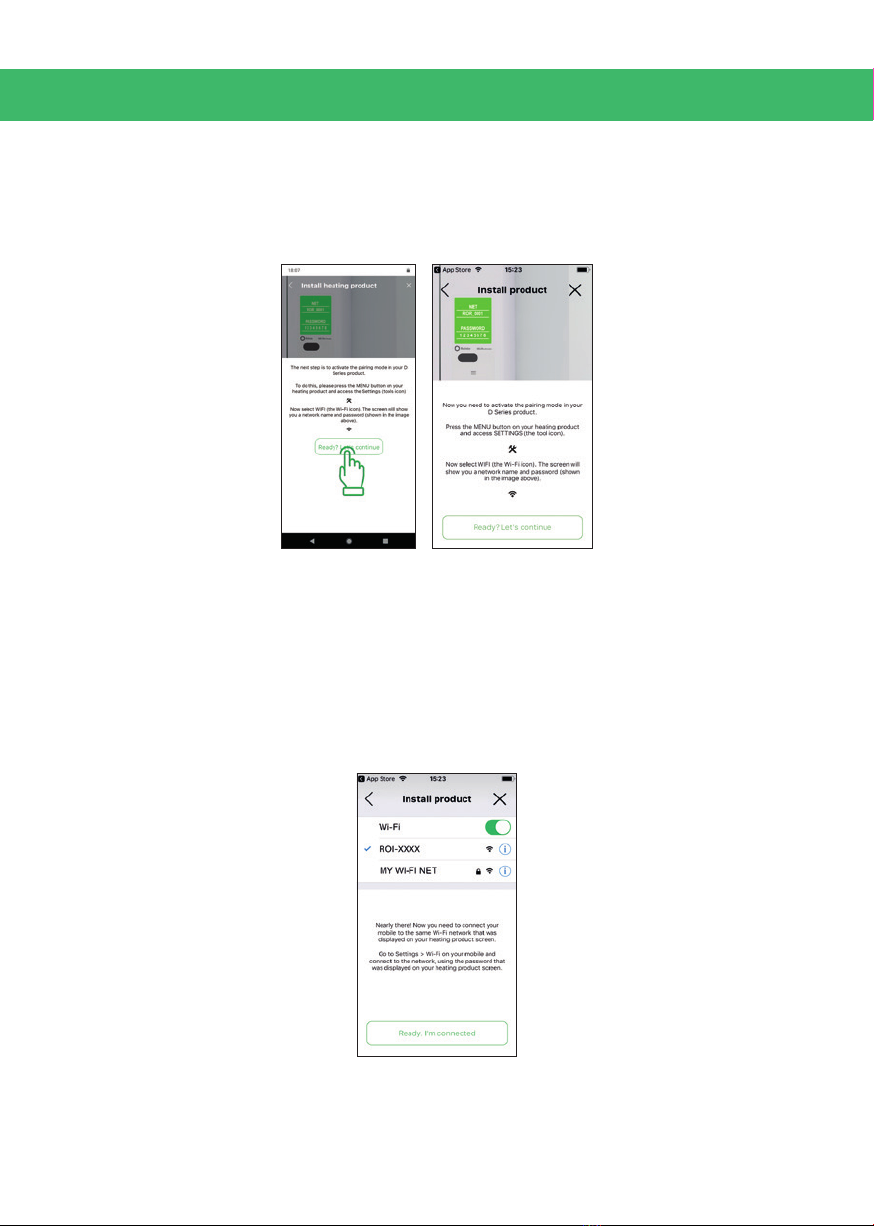
6.3. Activate Pairing mode
To activate the pairing mode in your Rointe product, press: Menu > Tools > Wi-Fi.
When the screen of the product shows the name of a Wi-Fi network and an 8 digit
password, go back to the Rointe Connect app and click on "Ready, let's continue".
6.4. Send the conguration to the device
6.4.1. iOS Apple devices
Now you need to return to the Wi-Fi settings of your smartphone or tablet and
connect to the Wi-Fi network generated by the Rointe product, (name begins with
ROI on the screen of your Rointe product, set up in step 6.3.) and enter the 8 digit
password (on the screen of your Rointe product, set up in step 6.3.). Return to the
Rointe Connect app and click on "Ready, I'm connected".

Rointe efficient heating · 9
Rointe Connect App user manual
6.4.2. Android devices
On this screen, you will see a list of networks generated by Rointe products. If none
appear, wait a few seconds or click on "Settings of your mobile". Check that the Wi-Fi
network of the Rointe product appears in the list and return to Rointe Connect app.
Click on the name of the Rointe product network and accept if it is correct.
6.5. Finish the Pairing wizard
Once the product has received the conguration, it will restart. You must wait for
the antenna icon to appear on the screen of the product. Once it appears, click on
"Check the conguration".

10 · Rointe efficient heating
7. MAIN SCREEN
The main screen of the app shows the zones you have created. Simply press on a
zone to access.
In the upper part of the screen you can see the weather forecast of the location you
established for the installation. Slide with your nger to see more days.
Click on / o, to turn o or on the entire installation (does not aect water heaters).
7.1. Installations
Click on the installations tab at the bottom of the screen to access all installations,
turn them o / on, create a new one, or edit / delete.
Tabla de contenidos
Otros manuales de Termostato de Rointe


Manuales populares de Termostato de otras marcas

EWELLY
EWELLY EW-181 Manual de usuario

Prolon
Prolon T1100 Instrucciones de instalación

Computherm
Computherm Q20 Manual de usuario

Heatmiser
Heatmiser neoStat Manual de usuario

Aube Technologies
Aube Technologies TH111GFCI-NP 240 VCA Manual de usuario

Mars
Mars HEAT CONTROLLER IR Wireless Thermostat Manual de usuario


