Quha Vido Manual de usuario

3
Quha Vido
User Manual

4
Getting to know your Quha Vido
Welcome to the Quha Vido external virtual keyboard and mouse. Before
you start using your Quha Vido, for the best user experience, please read
this manual carefully first.
Quha Vido is an external virtual keyboard and mouse. Quha Vido allows
you to use your computer more efficiently, since it frees up your screen
space as there is no need to display a virtual keyboard and mouse on your
computer screen. Using Quha Vido makes writing emails, browsing the
internet and working with your computer a whole new experience.
The easy and fast setup lets you decide where you want to place the Vido
display. You can use Quha Vido together with any wireless computer
mouse provided by other manufacturers, although using it in conjunction
with our Quha Zono wireless computer mouse gives you the best user
experience. With the help of its adjustable stand, you can place the Vido
display exactly how you want it and adjust the angle to your liking.
The Quha Vido display is powered from a USB cable.

5
In the sales box, you will find the following items:
• Quha Vido 7” USB monitor
• Protective cover for the monitor
• Adjustable stand with a thumbscrew for supporting the monitor
• Easel stand for supporting the monitor
• USB mini B cable with a Y connector
• Quha USB memory stick with the Quha Vido software to be installed to
your computer
• User manual
• Warranty card

6
The Quha Vido keys and parts
Rear of the monitor
1. Buttons for adjusting the display brightness.
2. Power On/Off button.
3. Kensington Security Slot, an anti-theft mechanism for fastening the mo-
nitor with a lock (not provided).
4. Three angled holes for inserting the easel stand (16, 30 and 45 degrees).
5. Location of the easel stand.
6. Stand fixing hole for the adjustable stand.
7. USB cable slot to insert the USB cable to connect the monitor and your
computer.

7
1. Protective cover for the monitor: always use this when you need to carry
the monitor with you to avoid scratching the display.
2. Easel stand. Use it if you don’t want to carry the adjustable stand with
you, for example, when travelling.
3. Thumbscrew. Use it to attach the adjustable stand to the monitor. You
can use an M4 screw, if you want to attach the monitor to an external
mount.
4. Adjustable stand.
8
Starting to use your Quha Vido
1. Start by removing the protective cover from the monitor. Remove the
cover by lifting it from either one of the short-sides of the display. Re-
move the plastic cover off the display.
2. Attach the monitor to the adjustable stand with the help of the
thumbscrew: place the stand onto the back of the monitor. Line up the
thumbscrew with the hole in the back of the monitor. Tighten the
thumbscrew.
You can adjust the height and the angle of the monitor.
3. Turn on your computer and check that your internet connection is wor-
king.
4. Connect the USB cable to a USB cable slot in the monitor and the other
end to the USB port of your computer.
Check that you use the correct connector
with the USB logo on it.

9
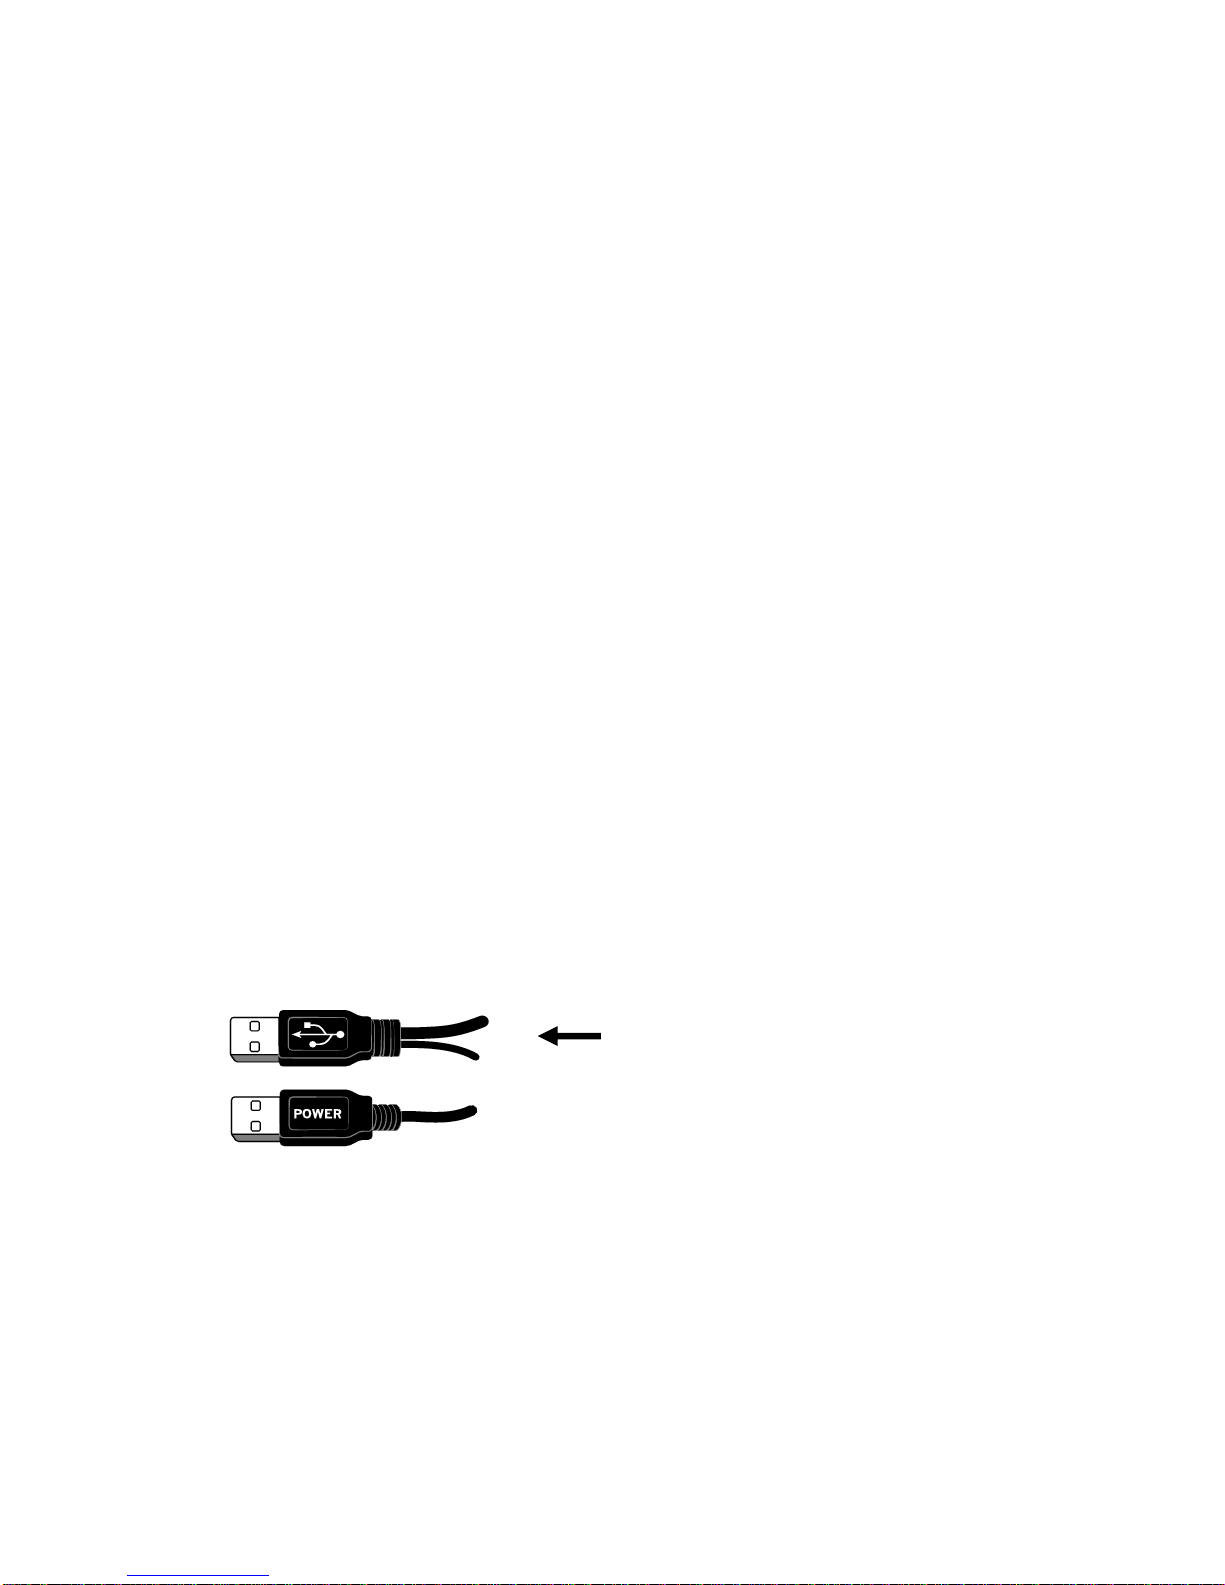
Note! There are two connectors on the USB cable. Normally, you only need
to use the one with the USB logo on it. You only need to use the other
connector (with the text POWER on it), in addition to the one with the USB
logo on it, if the USB port cannot supply enough power for the monitor to
operate properly.
Once you have connected the USB cable, the monitor is switched on
automatically. Be patient: depending on your internet connection, it may
take up to several minutes until the monitor powers up.
If you have Windows 10 on your computer, the required drivers are installed
automatically at this stage. With any other Windows version, if the monitor
does not start powering up, you may need to install the drivers by yourself:
you can find the driver files in the Quha USB memory stick.
Once the monitor powers up, you can see your desktop on the screen of your
Vido monitor and you are ready to install the Quha Vido software.

10
Installing the Quha Vido software
Next, you need to install the Quha Vido software onto your computer.
1. Insert the Quha USB memory stick into a USB port of your computer.
If the contents of the memory stick do not open up automatically, from
your computer’s Start Menu go to File Explorer and select the ”Quha”
drive.
2. Run a program called setup.exe. Both the virtual keyboard and mouse
software (Point-N-Click) are installed. Follow the instructions on your
computer screen.
3. The setup application window opens up on your computer screen.

11
Using the Quha Vido virtual keyboard and mouse
You can use the virtual keyboard the same way as a normal keyboard. Start
by choosing the best position for your Vido display which should be close to
your computer monitor. Use the adjustable stand to find the best level and
angle for your Vido display. From the setup application window, select the
display icon which shows your chosen location for your Vido display.
For example, if your Vido monitor is at
the right-side of your computer monitor
(see the picture above), select this display
icon from the setup application window
at your computer screen.

12
Now your virtual mouse cursor moves smoothly to the Vido display from
your computer screen and you can start using the virtual keyboard and
mouse. Once you have selected the correct display icon from the setup appli-
cation window, you can close it by clicking the x in the top-right corner.
When you start writing with the virtual keyboard, first move your virtual
mouse cursor onto your computer screen and click the area where you want
to start typing. Then move your virtual mouse cursor onto the Vido virtual
keyboard and start clicking the keyboard buttons you want to use. For using
the virtual mouse, see the list of mouse icons further in this user manual.
On your Vido display, you can also see the window for the virtual mouse
(Point-N-Click). You can select from the icons what you want to do next
with the mouse. You can find further instructions for using the virtual mouse
on the Point-N-Click web site: http://www.polital.com/pnc/
The virtual computer mouse icons from top to bottom are:
1. Left-click
2. Right-click
3. Dragging and scrolling
4. Double-click
5. Pause/deactivate
6. Settings
Tabla de contenidos


