PROTENT 5000 Manual de usuario

MANUAL
PRO-TENT 5000
Pro-Tent 5000 4 x 4 / 6 x 4 / 8 x 4 m

Important points to note
• Pro-Tent tent systems have been designed for temporary
outdoor use to provide protection from sun and rain.
• Do not use Pro-Tent tent systems in extreme weather
such as storms, snowfall or hail.
In windy conditions, the Pro-Tent tent systems must be
secured using the included tensioning kit and/or original
Pro-Tent weight plates. For further information see pages
14/15.
• Pro-Tent tent systems should not be exposed to extreme
weather conditions such as storms, snowfall or hail. In wind
and rain, the Pro-Tent tent systems must be secured with
our weight plates and/or tensioning ropes and tent pegs.
• Bear in mind that the colouring of the synthetic fabric may
fade over time as a result of UV radiation.
• Never fold up the fabric roof when it is damp. It is bestto lay
it loosely over the frame in a dry room.
• Pro-Tent tent systems have been released for delivery by our
quality assurance department and marked "awless in work-
manship and function". If you still have reason to complain
about this product, please contact your local sales oce
immediately.
Product warranty
We grant a 5-year warranty, starting from the day of sale for
the folding construction of the Pro-Tent tent systems. During
this time, our warranty covers the following (upon presenta-
tion of the purchase receipt):
• The free replacement of defective parts due to quality
defects on the part of the manufacturer, including labour
Further claims within warranty processing with the Pro-Tent
tent systems cannot be asserted. Defects that occur as a
result of not complying with these instructions are excluded
from the warranty in all cases.
AREAS OF APPLICATION
2
PRO-TENT 5000

a) 1 aluminium frame
b) 1 carrier bag
c) 2 wheels for mounting on the bag
d) 1 Torx key
e) 1 adapter bar pliers
f) 1 assembly instructions
g) 1 tensioning set
Remove the wheels from the storage compartment. Screw the wheels into the angle plate on both sides as far
as they will go in the thread.
WHEEL ASSEMBLY
SCOPE OF DELIVERY
a) c)b)
d)
e)
Video transport bag
33
PRO-TENT 5000

Important: The Pro-Tent folding tent should be assem-
bled by two people. Many steps should be carried out at the
same time.This generally applies to the entire assembly and
dismantling process.
Step 1:
Openthebuckle at the bottom of the bag. Open the zip of the transport bag,
which is now accessible, as far as it will
go. Use your foot to push the wheels
and the angle plate mounted on them
away from the frame.
Remove the bag from the side of the
frame and store it safely until you need
it again.
Grasp the frame on the outer proles.
Lift the frame slightly. Open the frame by stepping backwards and spreading
your arms at the same time.
ASSEMBLY
Assembly video
It is best to always
grasp the frame on the
shorter side of the tent -
i.e. on the 3m side of a
6 x 3m tent.
TIP
4
ASSEMBLY

Step 2:
Hold the frame below the middle pivot point by the cross
struts.This is the optimal handling position for opening the
frame. Lift the frame slightly and open it by stepping back
only so far that the gable pole extends about 10 cm.
When positioning
the fabric roof, the
gable pole should only
be extended by
about 10 cm.
TIP
Tensioning
loops
The corners of the fabric roof
are easily recognisable by the
sewn-on tensioning loops. After
the rst assembly, the roof can
remain in place. However, never
store the tent in the transport
bag when it is damp.
TIP
Step 3:
Throw over and x the four corners of the fabric roof to
the outer legs.
55
ASSEMBLY

Step 4:
Fasten the velcro straps on the inside of the roof corners
tightly underneath the plastic connector around the leg.
Make sure that the reinforcement ap is placed symmetrically
and without creases around the leg beforehand.
Step 5:
Fixing the roof gable to the protection cover: Push the recess/
slot on the fabric sleeve through the tongue on the prole
cover.Tighten the sleeve rmly using the velcro strap.
6
ASSEMBLY

Step 6:
Grasp the frame again below the middle pivot point at the
cross struts, lift slightly and open the frame by stepping
backwards until the roof begins to stretch.
Schritt 7:
To engage the roof struts, the plastic gliders must be pushed out over the top push buttons of the corner legs.This also applies
to the centre legs of the 8x4 m frame.
Upper
push button
Plastic
glider
TIP: One person pushes the gable upwards as far as possi-
ble (1) to relieve the roof strut strucure (for 6x4 m or 8x4 m
frames, choose the nearest gable to the leg to be locked).
Ideally, the plastic glider should come to rest just below the
push button.
Now the second person stands with one foot on the foot
of the folding tent and pushes the roof strut near the plastic
glider upwards with both hands (2) until the push button
under the plastic glider engages (3).
1. 2. 3.
77
ASSEMBLY

Step 8:
Easy tightening of the fabric roof by using the velcro straps.
To do this, pull the roof panel down a little rst.
Extend the leg: To do this, raise
the leg slightly and only then
pull it out with your foot.
TIP
Schritt 9:
Now pull out all the legs to the end position (3). For the tent
sizes 4x4m, 6x4m and 8x4m of the Pro-Tent 5000 series, the
transport position (1) must rst be released (press the push
button spring and pull out the lower leg).
Functional explanation of how to engage the legs
Transport position
(Starting position for push button spring in the lower
leg - only on tent sizes 4x4m, 6x4m and 8x4m of the
Pro-Tent 5000 series)
1.
Push button spring in the upper leg
(locking of the gliders)
Height compensation
(30 mm) for uneven terrain
2.
End position3.
1.
2.
3.
8
ASSEMBLY
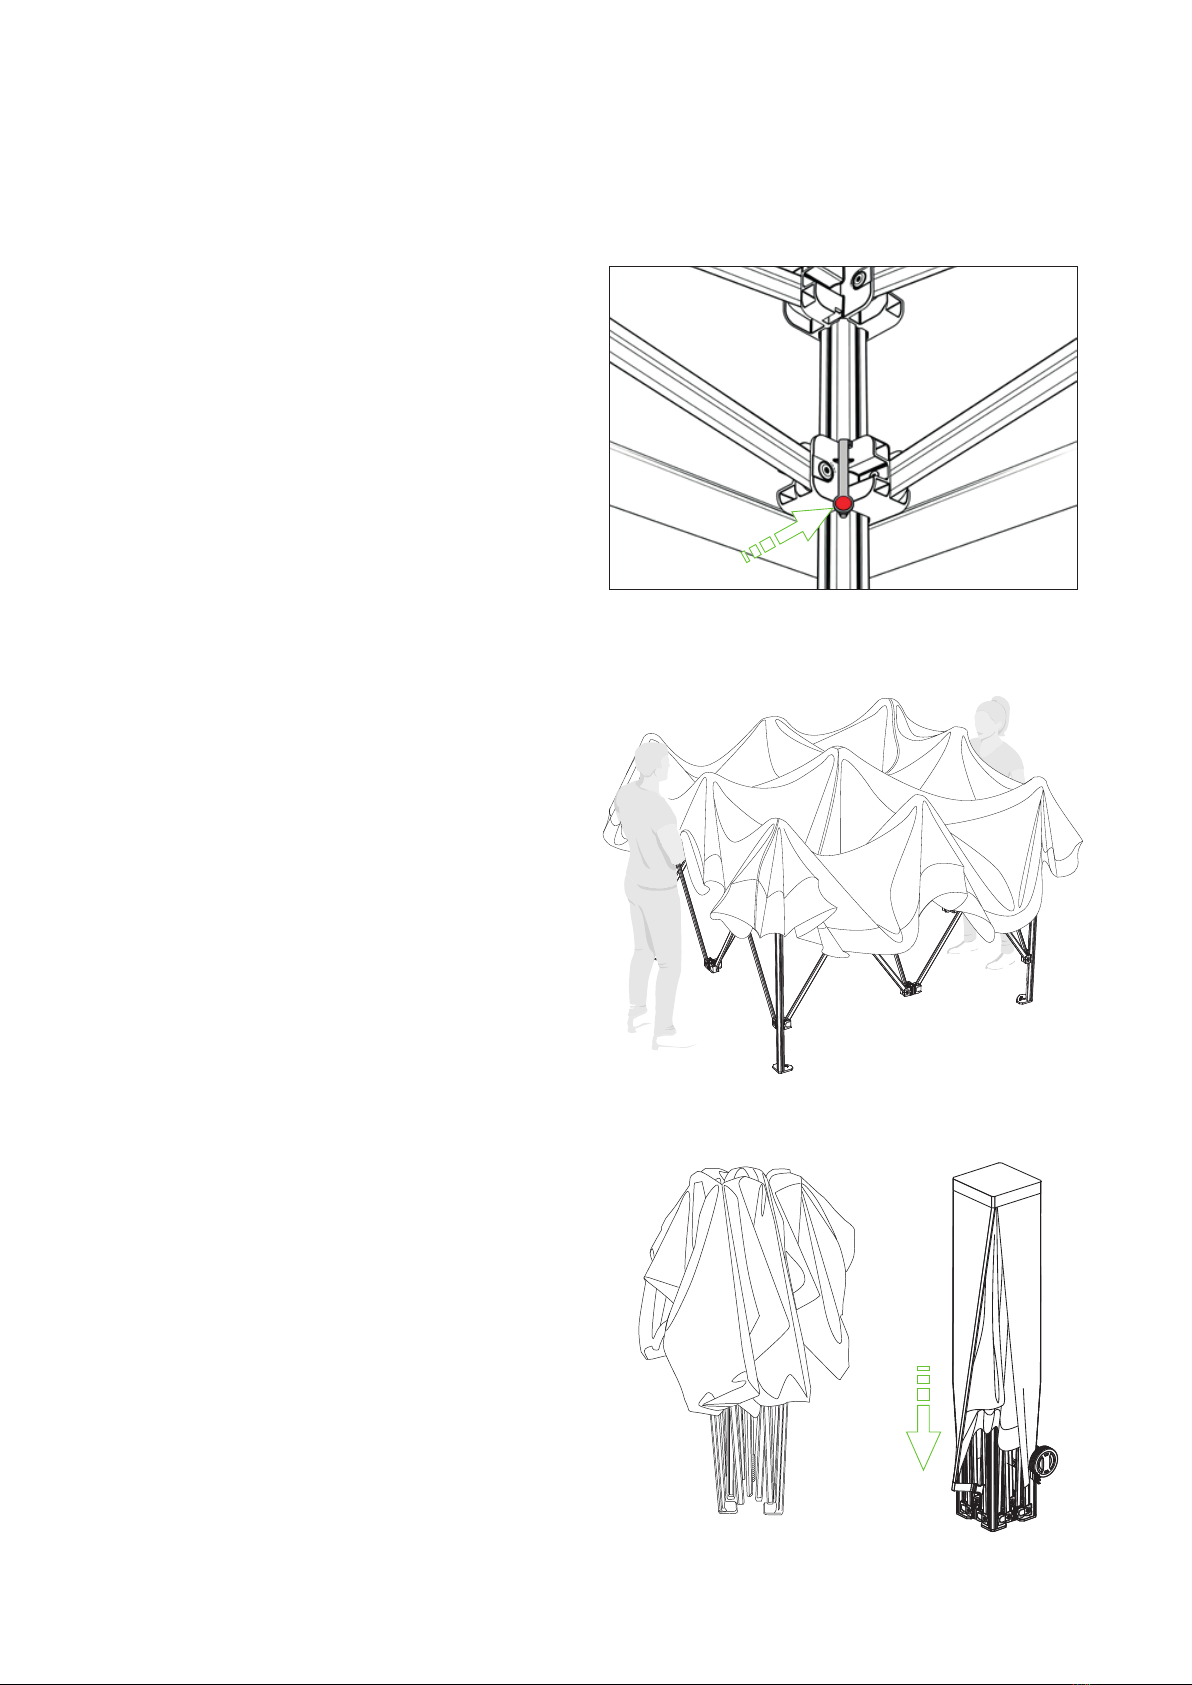
DISMANTLING
1. Loosen all velcro straps on the roof panel. For the tent sizes
4x4m, 6x4m and 8x4m of the Pro-Tent 5000 series, rst
retract the legs to the transport position.
2. Press the red push button release below the plastic gliders
on each leg.This unlocks the roof frame.
3. Release the push button and retract the legs.
4. Grasp the frame above the middle pivot point on the roof
proles, lift slightly and push together again by stepping
forward but do not close completely to prevent jamming.
For the above-mentioned sizes of the Pro-Tent 5000 series,
rst only push until the gliders on the legs rest on the
lower press button springs. Also press these locking bolts
for complete retraction.
5. Push the frame together completely at the upper corners.
6. The frame can now be stowed in the mobile transport bag
together with the roof, which should be smoothed out á
little beforehand. To do this, open the bag completely and
place it sideways over the frame with the fabric roof. Pull
the bag down and slide the angle plate between the
wheels under the plastic gliders of the frame.Then close
the zip and the buckle. Finally the belt must be pulled tight
to ensure safe transportation.
Push button release
99
DISMANTLING

SIDE WALLS
3. Slide two adapter strips over the
piping cord on each of the outer two
fabric sections.
Note: In addition to the side wall, four adapter strips (a) are in-
cluded in each carrying bag - 2 per lower leg.The grooves of the
upper leg are continued downwards with the adapter strips. In
this way, the piping cord sewn into the outside of the side wall
is securely guided and held from top to bottom in the leg.
a)
1.
2.
3.
2. Open zips as far as possible. Pull the
two outer, narrow pieces of fabric
into the groove of the upper legs
and velcro them to the inner roof
panel at the top.
Side wall
1. Attach the side wall horizontally
between the two legs to the inner
roof panel.
Video assembly
side wall
10
ACCESSORIES/SIDE WALLS
Tabla de contenidos
Otros manuales de Carpa de PROTENT


