point pro Series Manual de usuario

Oil Filled Radiator
POOH2009
Instruction Manual
This product is only suitable for well insulated
spaces or occasional use.
Dette produktet er kun egnet for godt isolert
mellomrom eller tilfeldig bruk.
Tämä tuote soveltuu vain hyvin eristetty tiloihin
tai satunnainen käyttö.
Dette produkt er kun egnet til velisolerede
mellemrum eller lejlighedsvis brug.
Denna produkt är endast avsedd för väl
isolerade utrymmen eller tillfällig användning.
2

3
Instrucation Manual – English ........................ page 4 - 12
Bruksanvisning – Svenska ........................ sida 40- 48
Brugervejledning – Dansk ........................ side 31 - 39
Bruksanvisning – Norsk ........................ side 13 - 21
Käyttöopas – Suomi ........................ sivu 22 - 30
GBNOFIDKSE

4
SAFETY INSTRUCTION
1. Warning: In order to avoid overheating, do not cover the
heater.
2. If the mains power cable is damaged, it must be replaced by
the manufacturer or its service agent or a similarly qualied
person in order to avoid a hazard.
3. This appliance can be used by children aged from 8 years and
above and persons with reduced physical, sensory or mental
capabilities or lack of experience and knowledge if they have
been given supervision or instruction concerning use of the
appliance in a safe way and understand the hazards involved.
Children shall not play with the appliance. Cleaning and user
maintenance shall not be made by children without
supervision.
4. The heater must not be located immediately below a mains
power socket.
5. Do not use this heater in the immediate surroundings of a
bath, a shower or a swimming pool.
6. Children of less than 3 years should be kept away unless
continuously supervised.
Children aged from 3 years and less than 8 years shall only
switch on/o the appliance provided that it has been placed or
installed in its intended normal operating position and they
have been given supervision or instruction concerning use of
the appliance in a safe way and understand the hazards
involved. Children aged from 3 years and less than 8 years
shall not plug in, regulate and clean the appliance or perform
user maintenance.

5
GB
7. CAUTION — Some parts of this product can become very hot
and cause burns. Particular attention has to be given where
children and vulnerable people are present.
8. This heater is lled with a precise quantity of special oil.
Repairs requiring opening of oil-container are only to be made
by the manufacturer or his service agent who should be
contacted if there is an oil leak. When scrapping the heater,
follow the regulations concerning the disposal of oil.

6
PART FIGURE
Caster assembly
Display window
Control button
Fin
Air outlet
Expand the casters
outwards
Warning: Avoid to overturn,expand the four casters outwards into place.
Use of oil lled radiator
[Installation of the caster assembly]
1.Place the heater body inversely with the
bottom facing upwards.
2.Expand the four casters outwards into
place.

7
GB
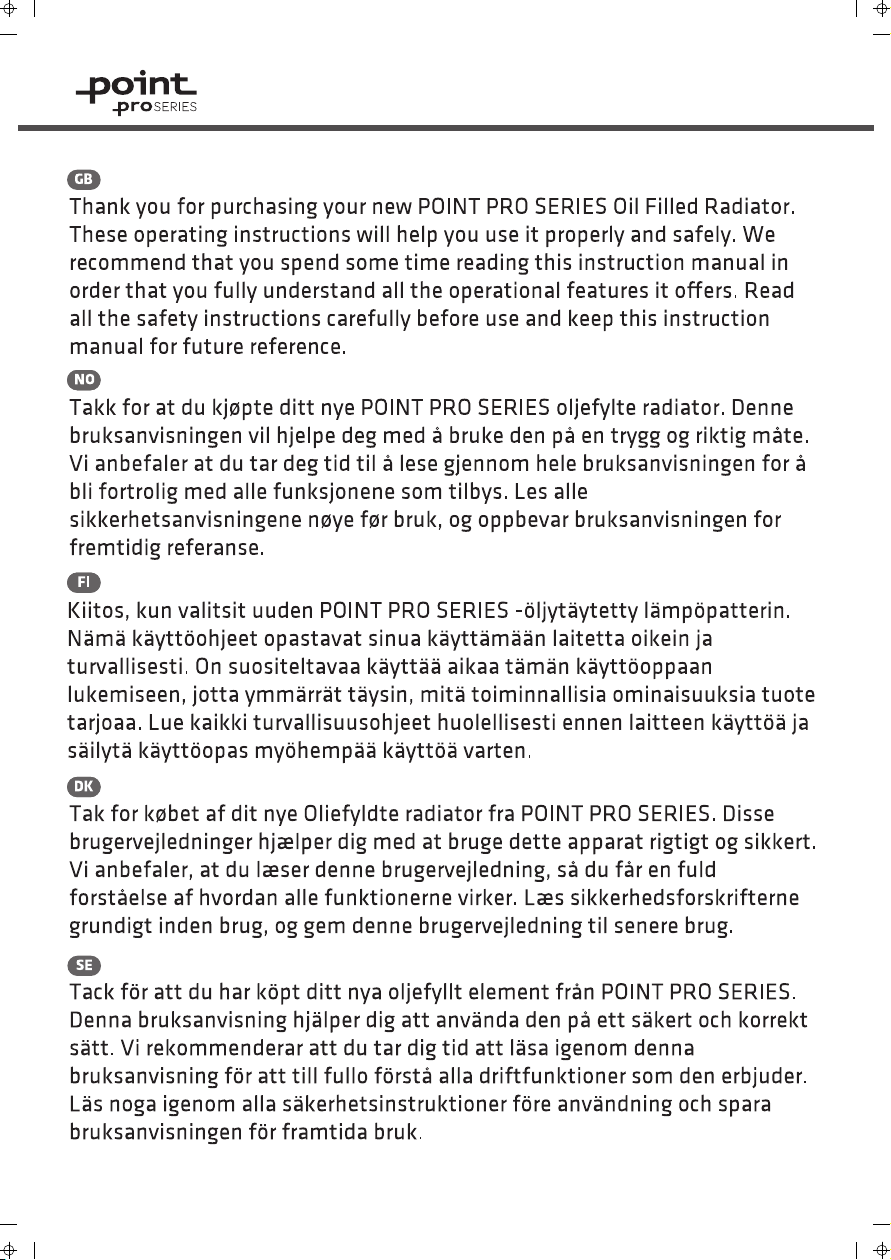
<Temperature Setting>: Under the working status, press and hold the “ ” key
or “ ” key to set the temperature, press and hold the “ ” key or the “ ” key
to quickly set the temperature; after setting the temperature, have
non-operation for 5 seconds, exit the temperature setting screen. After the
initial use or memory clear, the whole machine runs according to the factory
settings. The default setting temperature is 35° C and the gear position is
high-end.
<Scheduled work>: Tap the timer key “ ”in standby mode to enter the
scheduled work setting screen. Press “ ” key or “ ”key to set the scheduled
time, press “ ” key or “ ”key for along time to quickly set the scheduled time,
and the scheduled time will reach the working status of the machine. The
buzzer will ring with along beep.
<Scheduling standby>: Under the working status, press the timer key “ ” to
enter the scheduling standby setting screen. Press “ ”key or “ ” key to set
the scheduling time, press “ ”key or “ ”key for along time to quickly set the
scheduling time, and the scheduling time is in the standby state to the
machine.
A: The scope of scheduling is for 0~24 hours, and press “ ”key or “ ”key each
time to increase or decrease 1 hour. When the set value is 0H, press the “ ”key
to set the time for 24H. When the set value is 24H, press the " " key, and the
setting time is 0H. When the set value is 0H, the scheduling is canceled. When
the set value is not 0H, the scheduling is started.Set the appointment time,
press the timing key “ ”key or "MODE" key, or without operation for 5
seconds, exit scheduling mode.
B: If the scheduling time is set, press the standby key “ ”to enter the standby
state and cancel the scheduling.
C: After the scheduling is started, press the scheduling key “ ”to check the
remaining time of the appointment and reset the scheduling time. During the
scheduled time, the machine is shut down or started up under temperature
control, and the scheduled time is always normal, and free from down time.
During the scheduled time, it is cleared incase of power failure.
[Inspection before start]
1.The mains power cable should not be damaged or fractured.
2.Check that the rated current of the mains power socket is in line with the
requirements and is equipped with a safety grounding device before use;
otherwise, replace the socket.
[Operating Instructions]
<Work/Standby>: Plug in the power, the buzzer will “beep” for along time, press
the standby key “ ” to enter the high-grade heating working state, and then
press the standby key “ ” to enter the standby state.
<Gear selection>: For work status, press “MODE” key to select one of the work
modes such as high gear, medium gear, low gear and energy saving gear.
OPERATING INSTRUCTION
8
<Child Lock Function>: During operation and in standby mode, press " " and
"MODE" for 3 seconds to turn on the child lock function.
During operation and in standby mode, press " " and "MODE" simultaneously for
3 seconds to turn o the child lock function.
Remarks:
1. When child lock function is in eect during standby mode, all operations are
invalid (except releasing the child lock).
<Memory function>:When turning on the heater again it will operate with the
previous setting used before the last standby.
Note: After a power failure, the child lock function is turned o and will need to
be turned on again.
<Safety protection function>: When the indoor ambient temperature exceeds
50°C under the standby or working state, all outputs are turned o, the buzzer
prompts 10 long beeps, the digital screen displays "FF" and ashes at 1 Hz for 75
seconds. As long as there is protection, even if the ambient temperature is less
than 50°C, the running or operation can not be resumed, and the operation can
only be performed after the power is turned o and on again.
<Shut down>: Under the working state, press the standby key " " on the
control
panel to enter the standby state, unplug the mains power cable, wait for the
whole
machine to cool, and place the heater stably.
[Note]
To use the machine for the rst time or to re-insert the socket, pay attention to
check whether the plug and the socket are tted well.
<Inspection method>
Insert the mains power plug into the socket and start for use; after about half an
hour, turn o and pull out the plug. Check whether the plug pins are hot; replace
the socket if so (more than about 50 °C) to avoid burning the plug or even
causing a re caused by overheating of the socket due to poor contact.
: decrease
: Standby key
increase
: Timer key
: Mode key
9
GB
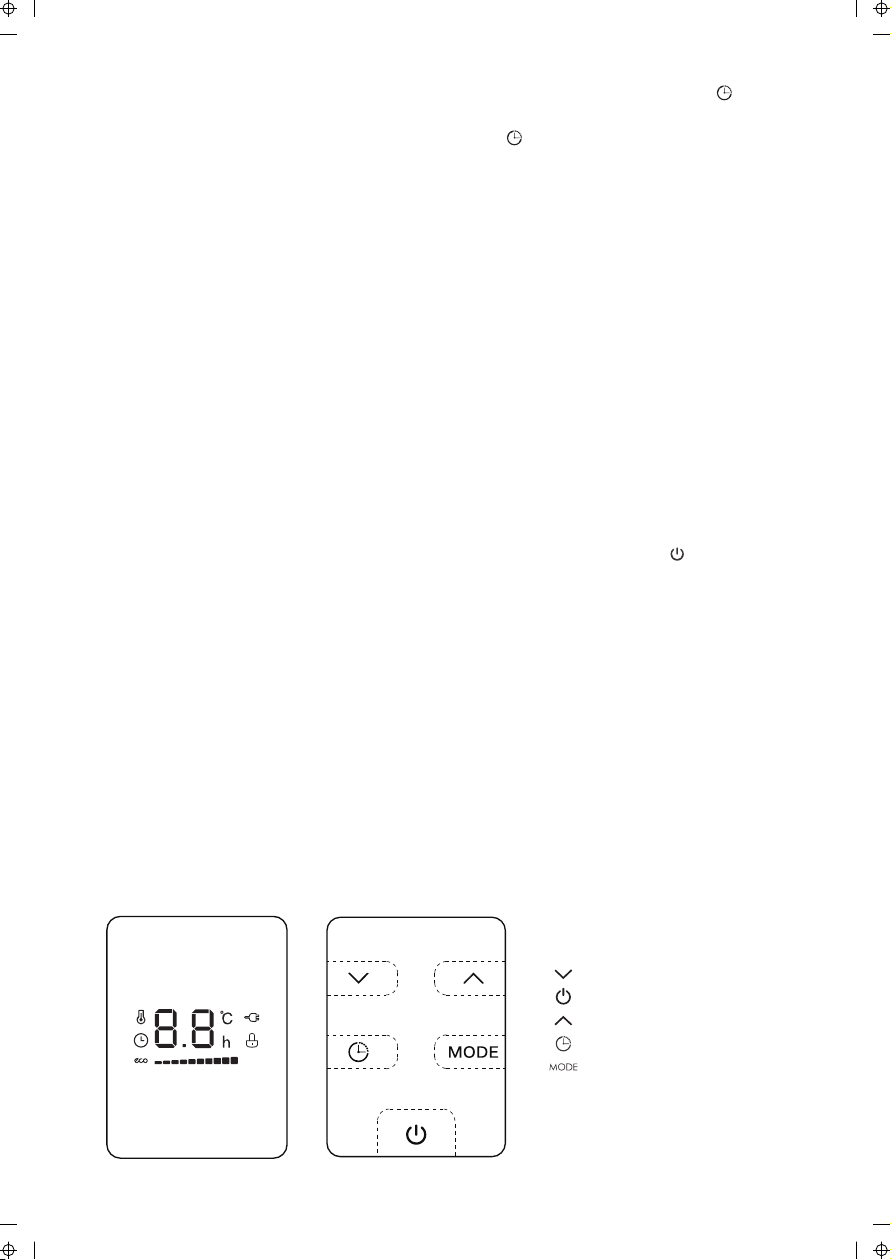
USING THE REMOTE CONTROL
Instructions for remote-control unit button function are basically consistent with
the operation panel of the body, and the remote-control unit cannot control the
combination key.
Timer key
Model key
Standby key
increase
decrease

10
Appendix:
Table 2: Information requirements for electric local space heaters
Model identifier(s): POOH2009
Item
Symbol
Value
Unit
Item
Unit
Heat output
- - -
Type of heat input, for electric
storage local space heaters only
(select one)
N/A
Nominal heat
output
P nom
kW
manual heat charge control, with
integrated thermostat
[no]
Minimum
heat output
(indicative)
P min
kW
manual heat charge control with room
and/or outdoor temperature feedback
[no]
Maximum
continuous
heat output
P
max,c
kW
electronic heat charge control with
room and/or
outdoor temperature feedback
[no]
Auxiliary
electricity
consumption
- - kW
fan assisted heat output
[no]
At nominal
heat output
el max
N/A
kW
Type of heat output/room
temperature control (select one)
-
At minimum
heat output
el min
N/A
kW
single stage heat output and no room
temperature control
[no]
In standby
mode
el SB
standby mode:
0,0005
kW
Two or more manual stages, no room
temperature control
[no]
with mechanic thermostat room
temperature control
[no]
with electronic room temperature
control
[no]
electronic room temperature control
plus day timer
[yes]
electronic room temperature control
plus week timer
[no]
Other control options (multiple
selections possible)
N/A
room temperature control, with
presence detection
[no]
room temperature control, with open
window detection
[no]
with distance control option
[no]
with adaptive start control
[no]
with working time limitation
[no]
with black bulb sensor
[no]
Contact details
PO Box 523, N-1471 Lørenskog, Norway
2.0
2.0
0.8
Otros manuales para pro Series
29
Este manual sirve para los siguientes modelos
1
Tabla de contenidos
Idiomas:
Otros manuales de Calentador de point


Manuales populares de Calentador de otras marcas


Empire Heating Systems
Empire Heating Systems WCC65 Manual de usuario

Wetekom
Wetekom 92 86 43 Manual de usuario

Desa
Desa SPC170-F Manual de usuario

Watlow
Watlow Watrod Electric Tubular Heaters Manual de usuario

Haverland
Haverland ECO-DRY GPS Series Manual de lista de piezas

Stelpro
Stelpro ASILVC2060 Series Manual de usuario