Onvif V972D Manual de usuario

www.hitron.co.kr
QUICK GUIDE
2MP Network Camera
Please read this manual thoroughly before use, and keep it handy for future reference.

2
WARNING
TO REDUCE THE RISK OF FIRE OR ELECTRIC SHOCK, DO NOT INSERTANY METALLIC OBJECT
THROUGH THE VENTILATION GRILLS OR OTHER OPENINGS ON THE EQUIPMENT.
CAUTION
EXPLANATION OF GRAPHICAL SYMBOLS
The lightning flash with arrowhead symbol, within an equilateral triangle, is intended to alert the user to the
presence of uninsulated "dangerous voltage" within the product’s enclosure that may be of sufficient magnitude
to constitute a risk of electric shock.
The exclamation point within an equilateral triangle is intended to alert the user to the presence of important
operating and maintenance (servicing) instructions in the literature accompanying the appliance.
PRECAUTIONS
Safety -------------------------------------- Installation -------------------------------
Should any liquid or solid object fall into the cabinet,
unplug the unit and have it checked by the qualified
personnel before operating it any further.
Unplug the unit from the wall outlet if it is not going to
be used for several days or more. To disconnect the
cord, pull it out by the plug. Never pull the cord itself.
Allow adequate air circulation to prevent internal heat
build-up. Do not place the unit on surfaces (rugs,
blankets, etc.) or near materials (curtains, draperies)
that may block the ventilation holes.
Height and vertical linearity controls located at the rear
panel are for special adjustments by qualified
personnel only.
Before installation, carefully read the manual to ensure
correct operation and setup, heeding all warnings and
instructions.
Do not install the device near any heat sources such as
radiators, heat registers, stoves, or other equipment
(including amplifiers) that produce heat.
Only use attachments/accessories specified by the
manufacturer.
Do not install the device in a place where it is exposed
to gas or oil.
Cleaning ---------------------------------
Clean the unit with a slightly damp soft cloth.
Use a mild household detergent. Never use strong
solvents such as thinner or benzene as they might
damage the finish of the unit.
Retain the original carton and packing materials for
safe transport of this unit in the future.

3
FCC COMPLIANCE STATEMENT
INFORMATION TO THE USER:THIS EQUIPMENT HAS BEEN TESTED AND FOUND TO
COMPLY WITH THE LIMITS FOR A CLASS A DIGITAL DEVICE, PURSUANT TO PART 15 OF THE FCC
RULES. THESE LIMITS ARE DESIGNED TO PROVIDE REASONABLE PROTECTION AGAINST HARMFUL
INTERFERENCE WHEN THE EQUIPMENT IS OPERATED IN A COMMERCIAL ENVIRONMENT. THIS
EQUIPMENT GENERATES, USES, AND CAN RADIATE RADIO FREQUENCY ENERGY AND IF NOT
INSTALLED AND USED IN ACCORDANCE WITH THE INSTRUCTION MANUAL, MAY CAUSE HARMFUL
INTERFERENCE TO RADIO COMMUNICATIONS.
CAUTION:CHANGES OR MODIFICATIONS NOT EXPRESSLY APPROVED BY THE PARTY
RESPONSIBLE FOR COMPLIANCE COULD VOID THE USER'S AUTHORITY TO OPERATE THE
EQUIPMENT.
THIS CLASS A DIGITALAPPARATUS COMPLIES WITH CANADIAN ICES-003.
CET APPAREIL NUMÉRIQUE DE LA CLASSE A EST CONFORME À LA NORME NMB-003 DU CANADA.
CE COMPLIANCE STATEMENT
WARNING: This is a Class A product. In a domestic environment this product may cause radio
interference in which case the user may be required to take adequate measures.

4
IMPORTANT SAFETY INSTRUCTIONS
1. Read these instructions.
2. Keep these instructions.
3. Heed all warnings.
4. Follow all instructions.
5. Do not use this apparatus near water.
6. Clean only with dry cloth.
7. Do not block any ventilation openings. Install in accordance with the manufacturer’s instructions.
8. Do not install near any heat sources such as radiators, heat registers, stoves, or other apparatus
(including amplifiers) that produce heat.
9. Do not defeat the safety purpose of the polarized or grounding-type plug. A polarized plug has two
blades with one wider than the other. A grounding type plug has two blades and a third grounding
prong. The wide blade or the third prong is provided for your safety. If the provided plug does not fit
into your outlet, consult an electrician for replacement of the obsolete outlet.
10. Protect the power cord from being walked on or pinched particularly at plugs, convenience receptacles,
and the point where they exit from the apparatus.
11. Only use attachments/accessories specified by the manufacturer.
12. Use only with the cart, stand, tripod, bracket, or table specified
by the manufacturer, or sold with the apparatus. When a cart is used,
use caution when moving the cart/apparatus combination to avoid
injury from tip-over.
13. Unplug this apparatus during lightning storms or when unused
for long periods of time.
14. Refer all servicing to qualified service personnel. Servicing is
required when the apparatus has been damaged in any way, such as power-supply cord or plug is
damaged, liquid has been spilled or objects have fallen into the apparatus, the apparatus has been
exposed to rain or moisture, does not operate normally, or has been dropped.
15. CAUTION – THESE SERVICING INSTRUCTIONS ARE FOR USE BY QUALIFIED
SERVICE PERSONNEL ONLY. TO REDUCE THE RISK OF ELECTRIC SHOCK DO NOT
PERFORM ANY SERVICING OTHER THAN THAT CONTAINED IN THE OPERATING
INSTRUCTIONS UNLESS YOU ARE QUALIFIED TO DO SO.
16. Use satisfy clause 2.5 of IEC60950-1/UL60950-1 or Certified/Listed Class 2 power
source only.
17. ITE is to be connected only to PoE networks without routing to the outside plant.

5
1. Description
The information in this manual provides quick installation and setup procedures for the IP Camera Domes.
These units should only be installed by a qualified technician using approved materials in conformance with
federal, state, and local codes. Read these instructions thoroughly before beginning an installation. Always
refer to Vicon’s website to assure you have the most up-to-date manual, www.vicon-security.com.
The IP Camera Domes is designed for demanding security installations. It offers a number of fixed network
camera versions that deliver crisp clear images to fit any installation need; models with IR illuminators are
available. The IP cameras are fully compatible with all ViconNet® systems; its ONVIF certification provides an
open-platform for integration into other video management systems.
The housing is designed for easy installation. PoE eliminates the need for power cables, providing a cost-
effective method of installation. The IP camera features an auto iris lens that adapts to changing outdoor
lighting; the true day/night camera includes a removable IR cut filter. The camera dome is IP66 rated with a
vandal-proof casing that withstands rain, dust and vandalism. It provides 3-axis adjustment. The alarm input
and alarm output can be used to connect various third party devices, such as door sensors and alarm bells.
1.1 Components
The system comes with the following components:
Camera unit Installation CD Installation Guide T emplate Sheet Acc essory Kit
Check your package to make sure that you received the complete system, including all components shown
above.

6
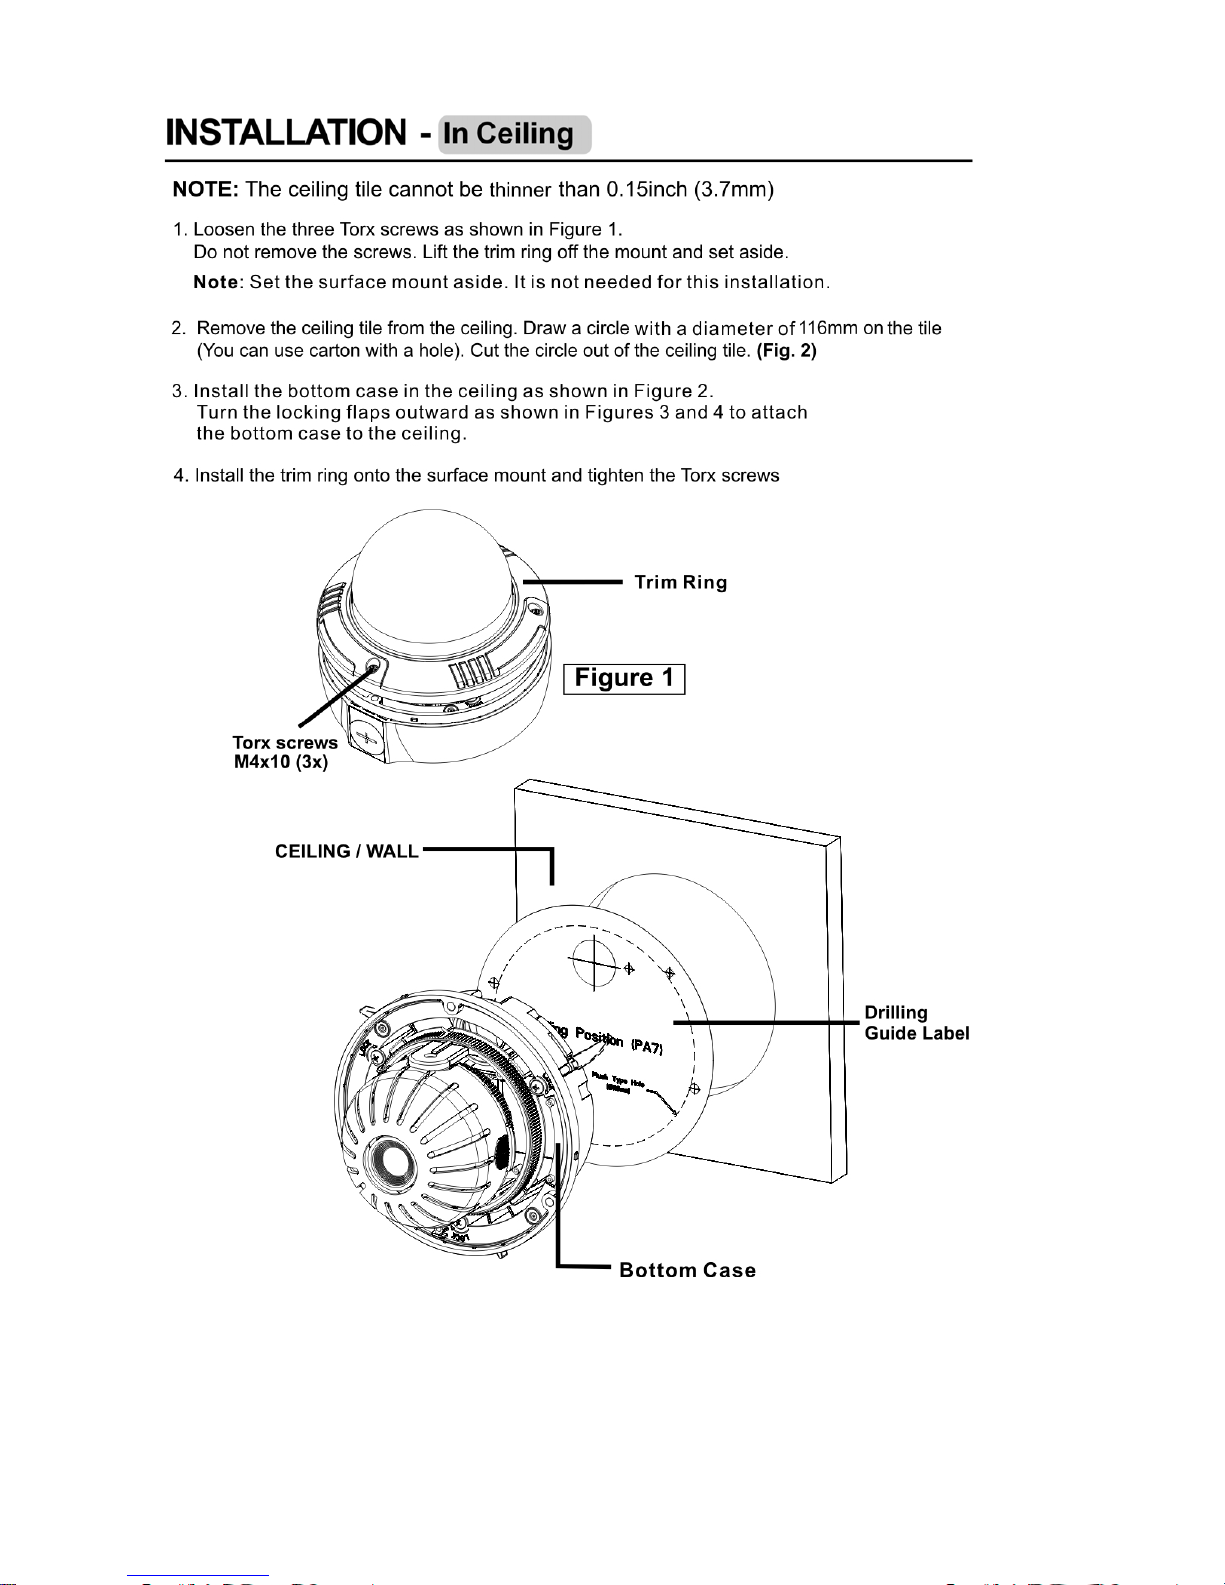
2. Installation
For the network camera to operate, it is necessary to connect a network cable for data transmission and power
connection from supplied power adapter. Depending on operation methods, it is possible to also connect an
alarm cable.
2.1 Overview
Unpacking and Inspection
All Vicon equipment is tested and inspected before leaving the factory. It is the carrier responsibility to deliver
the equipment in the same condition as it left the factory.
Inspection for Visible Damage
Immediately inspect the cartons upon delivery. Make a note of any visible damage on all copies of the carrier’s
freight bill.
Make sure the carrier’s agent (the person making the delivery) signs the note on all copies of the bill. If the
agent does not have claim forms, contract the carrier’s office.
Inspection for Concealed Damage
As soon as possible after delivery, unpack the unit and inspect it for concealed damage. Do not discard the
carton or packing materials. If the unit is damaged, contact the carrier immediately and request forms for filing
a damage claim. Make arrangements for a representative of the carrier to inspect the damaged equipment.
If the equipment must be returned for repair, follow the Shipping Instructions at the end of this manual.
Mounting the Unit
Select a location for the installation of the camera. Be sure the area around the selected location is clear of
obstacles (such as steel beams, headers, pipes, electrical wiring, etc.) which would interfere with the mounting
of the camera and that the location can support the weight of the unit. Video and power cables must be routed
to the installation location.
Caution: Do not attach these units to drywall surfaces and do not install mounting screws into the end grain
of wood.

7
Note: Failure to thoroughly coat threads will result in moisture entering the housing and eventual failure of the
unit.

8
Note: For outdoor installations, Vicon recomm ends that th e vent plug should only be used if fogging
conditions exi st. Addition ally, if the side cable acce ss hole i s used , the b ase must be m ounted so the
hole is pointed directly downward.
9

10
Tabla de contenidos
Otros manuales de Cámara de seguridad de Onvif

Onvif
Onvif KNC-p3BR28V12IR Guía del usuario

Onvif
Onvif Vista VK2-12MPX360EXTIR Manual de usuario

Onvif
Onvif CDIH100 Manual de usuario

Onvif
Onvif IPPTZ-EL2MPL30X-AT Manual de usuario

Onvif
Onvif IPID-TP2MPIR50L2812-W Manual de usuario

Onvif
Onvif IPSDV12XW Manual de usuario

Onvif
Onvif CM260IR-IP Manual de usuario

Onvif
Onvif CDI12H360VIW Manual de usuario

Onvif
Onvif IPVD3TI Manual de usuario

Onvif
Onvif Sharx Security HTNC4403DM Manual de usuario


