Miles RAMPAGE Manual de usuario

OWNERS MANUAL
For the latest version of this Owners Manual visit:
MILESPOWER.COM/MANUAL
Other forms of protective gear; such as knee pads, elbow
pads, and wrist guards are highly recommended.
ALWAYS obey and check the local road rules in your area
for where you can ride, and do not ride on busy roads with
line markings.
ALWAYS respect pedestrians.
DO NOT ride the board if you are under the inuence of
drugs or alcohol.
DO NOT ride the board in wet/rainy conditions. While
the motors are water resistant, the board may slide from
under your feet causing injury.
DO NOT ride the board in poor visibility conditions.
TAMPERING with the boards electronics will void your
warrant.
ALWAYS wear a helmet and other safety equipment
when riding the board. These can reduce your chance of
serious injury or death in an accident.
DO NOT RIDE YOUR BOARD UNTIL YOU HAVE
READ ALL OF THE FOLLOWING INFORMATION

CONTENTS
SAFETY 1
POWER & CHARGING 2
RAMPAGE COMPONENTS 3
RAMPAGE REMOTE 4
CONNECTING THE REMOTE 5
USING THE REMOTE (1/2) 6
USING THE REMOTE (2/2) 7
THE BASICS 8
MAINTENANCE 9
ADJUSTING YOUR RIDE 9
BATTERY SAFETY (1/2) 10
BATTERY SAFETY (2/2) 11
WARRANTY 12

1
AT ANY MOMENT, YOUR BOARD CAN LOSE POWER
DUE TO REASONS SUCH AS RADIO INTERFERENCE, DRAINED BATTERIES,
ACCIDENTAL RELEASE OF THE THROTTLE, AND OTHER FACTORS.
Be careful with the throttle. To make the board responsive and fun, we’ve
increased the throttle sensitivity. This higher sensitivity means fast or sudden
inputs (quick acceleration or breaking) can easily cause you to fall off. Start off
slow when riding in faster speed modes.
HILLS AND HIGH SPEED CAN BE VERY DANGEROUS as high speed
crashes can cause serious injuries. Even if you’re an experienced rider, take
caution at all times.
HIGH SPEED MOTOR VECHICLES CAN KILL OR MAIM YOU. Maintain
awareness of your surroundings while riding at all times. Assume other vehicles
can’t see you. Know your local laws governing the use of your board in public.
ONLY RIDE THE RAMPAGE AT SPEEDS AND ON HILLS WHERE YOU’D BE
COMFORTABLE WITHOUT POWER AND BRAKES.
Safety Power & Charging
WARNING

2
Power & Charging
Before using the board, you must fully charge the battery.
1. Connect the supplied micro USB able to your remote and fully charge it with
any device that supports USB charging.
2. The remote battery level will be displayed in the top left corner of the screen.
3. When the battery icon is full and stops ashing, the battery is fully charged.
Red – Board is charging
Green – Board Battery is full
TIP: Disconnect the wall charger from you
board once it is fully charged to help extend the
batteries life.
Using the wall charger provided, plug in your
Rampage.
The charging port (1) is located underneath the
deck on the back-left portion of the battery pack.
Remove the safety cap that prevents water and
dust from entering the port and plug in the board.
Charging can take some time, so it is best to place your board on charge after
any ride, this will keep the battery fully charged and ready whenever you are.
The charging block has a battery indication light so you know when it is full.

3
Rampage Components Rampage REMOTE
1 Front Wheels
5 Back Wheels
2Battery
3Power Button
4Charging Port

4
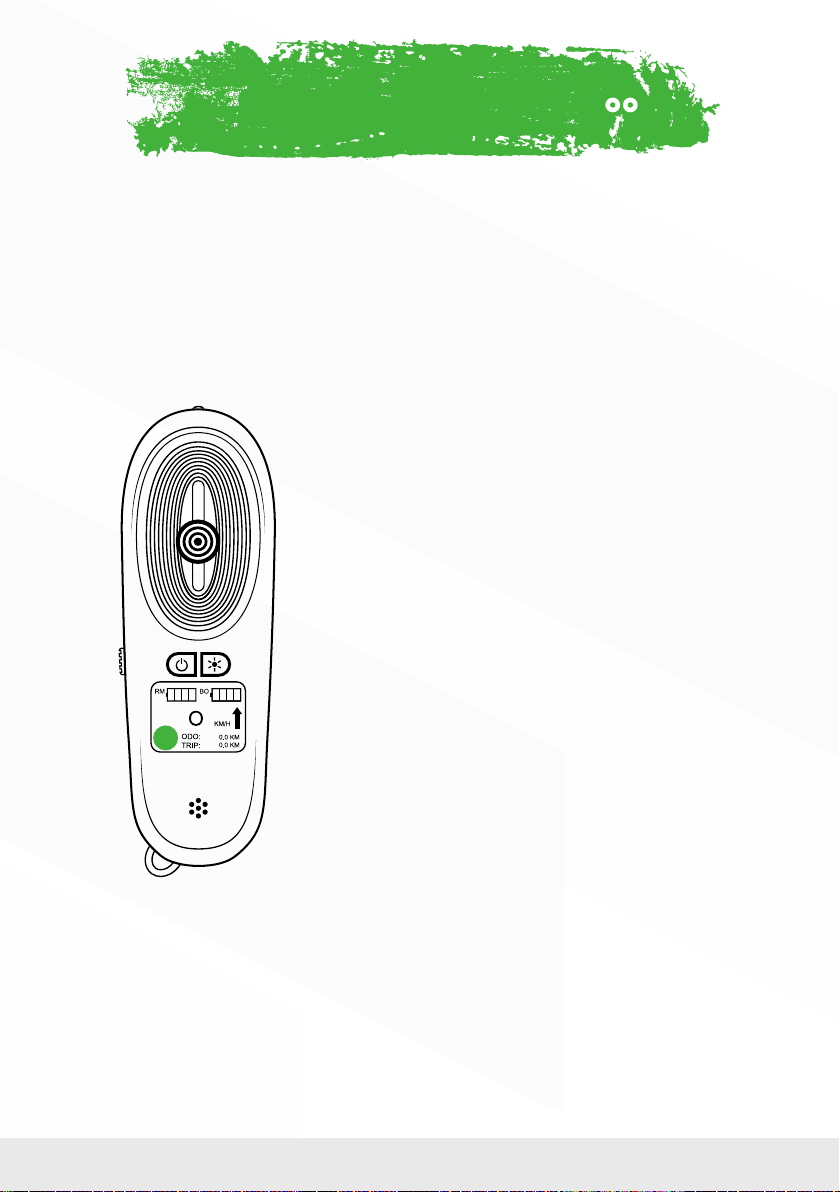
Rampage REMOTE
1Throttle
2Speed Mode
3Power Button
4Charging Port
5Accelerate
6Brake
7Forward/Reverse
8LED Light
9Remote Battery
10 Current Speed
11 Speed Mode
12 Rampage Battery
13 Forward/Reverse
14 Odometer
15 Tripmeter
1
2*
3
4
7
6
5
8
mi
mi
9
10
11*
12
13
14*
15*
2* Double press to enable Led Light
11* Speed Mode - 1) Beginner 2) Intermediate 3) Expert
15* Odometer - shows the total number of miles throughout the life of the board
16* Tripmeter - resets each time the remote is powered on and off

5
CONNECTING THE REMOTE
Powering on the Board
Powering on the Remote
Pairing/Syncing
First Power on both the board and the remote.
If they are not synced, follow these steps:
1. Press the orange on/off button located on the underside of the battery
towards the back of the board. The button will blink red when it has been
turned on.
2. To turn the board off, just press and hold this button again until the light stops
blinking.
1. Press and hold the on/off button on the remote for 2-3 seconds. The remote
will vibrate once and the LCD screen will display the Rampage logo and then
the operation screen.
2. To turn the remote off, press and hold the power button again for 2-3
seconds. The remote will vibrate once and then power off.
1. Make sure both the board and remote have been powered off.
2. On the board, Press and Hold the power button for 6-7 seconds. The red light
on the power button will begin ashing rapidly to show it is ready to be paired.
3. Press and hold the power button on the remote for 6-7 seconds.
4. The remote will display a message that says: “Remote paired OK”.
USING THE REMOTE

6
CONNECTING THE REMOTE
How to accelerate
SLOWLY push the thumb throttle forward and the board will begin
to move. Similar to the gas pedal in a car, the further the throttle
is pushed, the more power will be supplied to the motors and the
faster you will accelerate.
TIP: Positioning your feet in a wide stance can give you more stability. When
accelerating, bending the front knee to appropriately shift your weight forward can
help counteract the acceleration forces to keep you balanced.
How to Brake
GENTLY pull the thumb throttle backwards to begin slowing down.
The further backwards the throttle goes, the stronger the breaking
will be.
TIP: When braking, bending the rear knee to appropriately shift your weight
backwards can help counteract the deceleration forces to keep you balanced.
Reverse Function
This function can only be enabled when the board is at a
COMPLETE STOP
While the board is at a standstill, ick the switch on the left side towards the bottom
of the remote to go in reverse. Once you have backed up, come to a complete stop
and switch it back into its forward position to disable reverse.
USING THE REMOTE
7
Changing speeds – Level 1, 2, & 3
With the board and remote both turned on, your current speed mode setting will
be displayed in a circle in the lower left corner of the remote:
Speed 1
Perfect for beginners or rst-time riders. The board
accelerates slowly with minimal torque and has a
slower top speed.
Speed 2
Great for cruising on longer rides that have little incline.
There is more torque than speed setting 1 so you will
accelerate quicker and reach a higher top speed but
may have difculty going up really steep hills.
Speed 3
For the Professional. This speed setting offers the most
torque and will have you accelerating to top speed
quickly. Best for off-roading and hill climbing. Use with
EXTREME CAUTION.
To adjust the speed, simply click/press the Speed button on the remote. Each time
you press it the LCD will display which setting you are in.
THE BASICSUSING THE REMOTE
Tabla de contenidos
Otros manuales de Patineta y longboard de Miles


