GROM Audio VLINE LEX7T/8T Manual de usuario

INSTALLATION
MANUAL
www.gromaudio.com
www.gromaudio.com/support.html
LEX7T/8T

CONTENTS
Package contents......................................................................................................3
CHAPTER 1 — INSTALLATION. ...................................................................3
1.1 Before Installation 3
1.2 Tools 3
1.3 Vehicle Installation 3
1.4 Safety Guidelines & Appropriate Use 4
Connect supplied Display Harness Cable to factory Display. ...........................5
Connect VLine Interface cable to Factory Head unit. ......................................5
Connecting to VLine............................................................................................6
Using Factory Microphone. .................................................................................6
Routing the GPS Antenna. ...................................................................................7
Mounting the VLine Module. ............................................................................ 8
Understanding VLine Ports. ................................................................................9
CHAPTER 2— GETTING STARTED. ........................................................... 10
2.1 Initializing.........................................................................................................10
Important steps to perform after installation...................................................10
2.2 Functions..........................................................................................................11
SUPPORT. .......................................................................................................13
WARRANTY. ....................................................................................................13
EIGHTEEN MONTH (18) LIMITED WARRANTY
GRANT OF LICENSE. ........................................................................................14
OPERATIONAL WARNING AND SAFETY INSTRUCTIONS. ............................15

3
1.1 Before Installation
Before starting work with any wiring, please wait 90 seconds after turning the
Ignition to the OFF position and disconnecting the negative (-) terminal of the
battery. This is to ensure that no SRS airbags faults are triggered during the
installation when disassembling the vehicle’s panels and wiring connections
for the VLINE module installation.
Please review the entire manual to familiarize yourself of the VLINE module
and the installation requirements before installing the unit and using it.
1.2 Tools
Have tools ready for disassembling the dashboard panels to remove the
stereo.
Some basic tools will be required for stereo removal and installation, Plastic
prying tools, Phillips head screwdriver,10mm socket and ratchet. Additional
tools may be required depending on vehicle and installation preference.
1.3 Vehicle Installation
Each model vehicle disasembles differently. The removal of the stereo and
CHAPTER 1 — INSTALLATION
PACKAGE CONTENTS
GROM-VLINE SYSTEM
GVMF Video Display
Cable
MFCLEX7T RES
Power Interface
Cable
USB Extension cable
VLine module
GPS Antenna

wiring installation requires special technical skills and experience. If you do
not feel comfortable doing the installation please consult with your local
car audio shop or installation professional for instructions or assistance if
necessary.
Carefully remove the factory Stereo and Display out of the dash cavity with
proper tools.
It may be necessary to disconnect items surrounding the stereo and display
to remove them and gain access to the back of the stereo to make your
connections.
1.4 Safety Guidelines & Appropriate Use
By using VLine you agree:
• to operate VLine only when there are safe driving conditions;
• to follow any applicable state and traffic laws;
• to keep an eye on the road at all time while driving;
• do not attempt to play video (such as YouTube) on a display while the
vehicle is in motion;
• do not use VLine without running the engine for the extended period of
time as it can drain the battery.
Do not use Vline in a manner that would distract the driver or that may
otherwise cause injury or death to vehicle occupants or bystanders.
IT IS ILLEGAL IN MOST STATES OF THE UNITED STATES AND MAY BE ILLEGAL
IN OTHER JURISDICTIONS FOR ANY TELEVISION OR OTHER VIDEO DISPLAY,
STREAM, TRANSMISSION OR BROADCAST TO BE VISIBLE TO THE DRIVER
WHILE THE VEHICLE IS IN MOTION. YOU AGREE NOT TO USE ANY VISUAL
COMPONENT OF VLine WHILE IN CONTROL OF A MOVING VEHICLE WHERE
DOING SO WOULD BE ILLEGAL OR DANGEROUS TO VEHICLE OCCUPANTS OR
BYSTANDERS. DOING OTHERWISE CAN LEAD TO SERIOUS INJURY OR DEATH
TO YOU AND OTHERS. PLEASE FIND A SAFE PLACE TO PARK AND ENGAGE
THE PARKING BRAKE BEFORE VIEWING ANY VIDEO DISPLAYS, STREAMS,
TRANSMISSION, OR BROADCAST AVAILABLE THROUGH VLINE.
4

5
Connect supplied video cable GVMF to factory display
Locate BLUE display port on rear of the car stereo display.
If the port is empty, plug in supplied video cable (GVMF) into port and leave
female portion of cable with nothing attached.
If there is cable plugged in, disconnect that cable (typically blue in color). then
plug in supplied Y cable and reconnect disconnected cable into female plug of
the supplied GVMF cable.
Make sure to connect the GVMF video cable to the back of the factory display,
and not to the back of the stereo. If you will connect the GVMF cable to the
back of the stereo, the VLine will not show up on the screen!
Warning:Do not pinch or hard bend the GVMF video cable, as it will affect the
video signal. Make sure there are no hard bends near the GVMF cable connect-
or to the VLine, and allow enough space around it.
Connect VLine Interface cable to the factory headunit
Locate 59-pin and 16-pin connectors at the back of the stereo, as shown on the
illustration below. Unplug what is connected and plug in supplied power inter-
face cable (MCFLEX7T) into both 59-pin and 16-pin on the back of the stereo.
Connect what was unplugged into the female portion of the harness. See the
illustration on the next page.
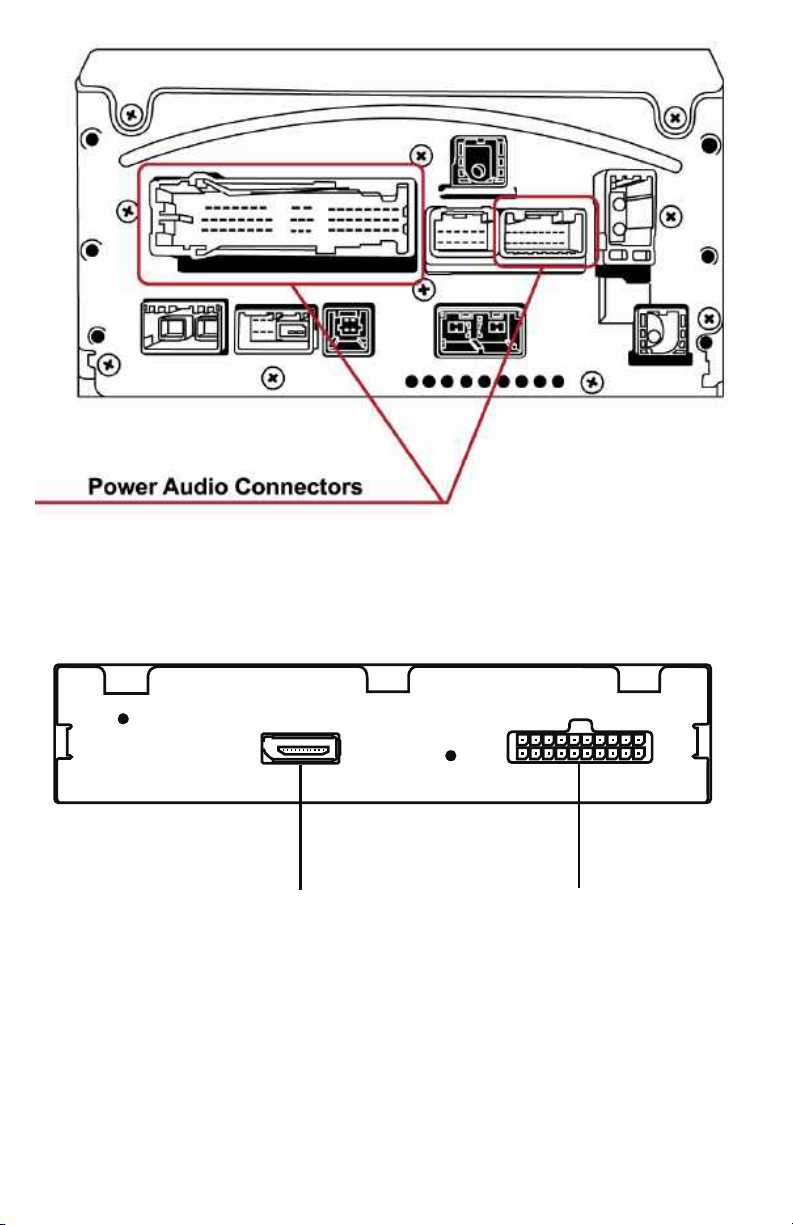
6
Display Harness Power Audio Harness
Connecting to VLine
Route the unused end of GVMF and MCFLEX7T Cable to the VLine module
and connect them to the correctly labeled ports.
Display Harness Power Audio Harness
Using factory microphone
VLine will use factory microphone for its operation. Connect 3.5mm
male connector from Power Interface Cable (MFCLEX7T)to the
microphone port of VLine (see p. 9 for reference).
There are no any additional steps needed to connect or operate VLine
with the vehicle factory microphone. Simply follow to the guidelines in the
User Manual.

7
Routing the GPS antenna
The GPS Antenna module is magnetic as well as supplied with double sided
tape.
It can be mounted to the top of dashboard or to outside of vehicle whichever
you prefer. Route to desired location. We recommend mounting it inside of
the vehicle on the passenger side of the dashboard,as shown below.
Plug GPS antenna into Camera AV port of VLine unit.
If you need to use VAUX RCA cable, carefully disconnect GPS antenna
from small molex extension, and plug VAUX cable instead, per the
instructions. Do not break GPS antenna when unplugging it from
molex extension.
Adjusting the microphone gain for CarPlay® or AAuto®
1. Go to VLine home screen, tap on three horisontal lines in the upper left
corner of the screen. You will get into Settings Menu.
2. While in Settings, scroll down to the bottom of the screen.
3. Hit AUTO on screen to automatically adjust the microphone gain.
4. Follow to the instructions on the screen and adjust microphone gain.
We usually recommend setting the microphone gain to 45.
8
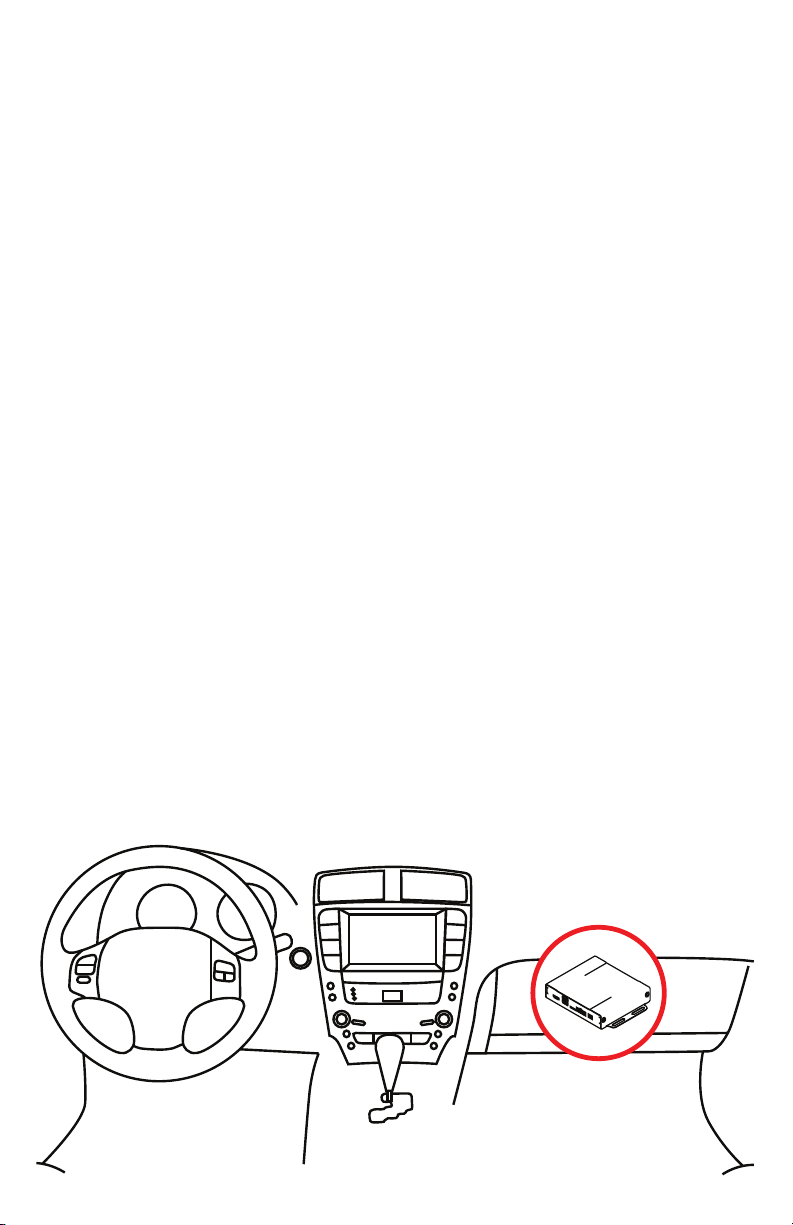
Mounting the VLine Module
Mount the VLine main module in an easily accessible location, such as the
glove compartment, for easy access to the USB ports and to upgrade firmware
on the VLine module. Do not leave the unit inside the dashboard, as it can
damage the unit and its Bluetooth antenna and affect the Bluetooth / Wifi
reception.
TestingVLine Operation
Test VLine operation before mounting the dashboard back.
WARNING:Make sure to reconnect all unplugged connectors back to the
vehicle before cycling the ignition.Cycle the ignition and press MEDIA button
to enter AUX mode to enter VLine mode.
If VLine appears on the screen, and all factory functions such as climate
controls, reverse camera, AF/FM stereo, are working, you can mount the
dash board back.
Installation Troubleshooting
1. There is no VLine on the display, or the display is black.
Check the GVMF cable to enure you connected it at the back of the LCD
display, and not at the back of the stereo. Make sure you reconnected the
originally connected display cable back to the VLine GVMF female end.
2. The display is “flashing” or “flickering”.
Make sure there are no hard bends in the GVMF video cable, and it is installed
away from the metal parts in the vehicle. Try to re-route the GVMF cable.
9
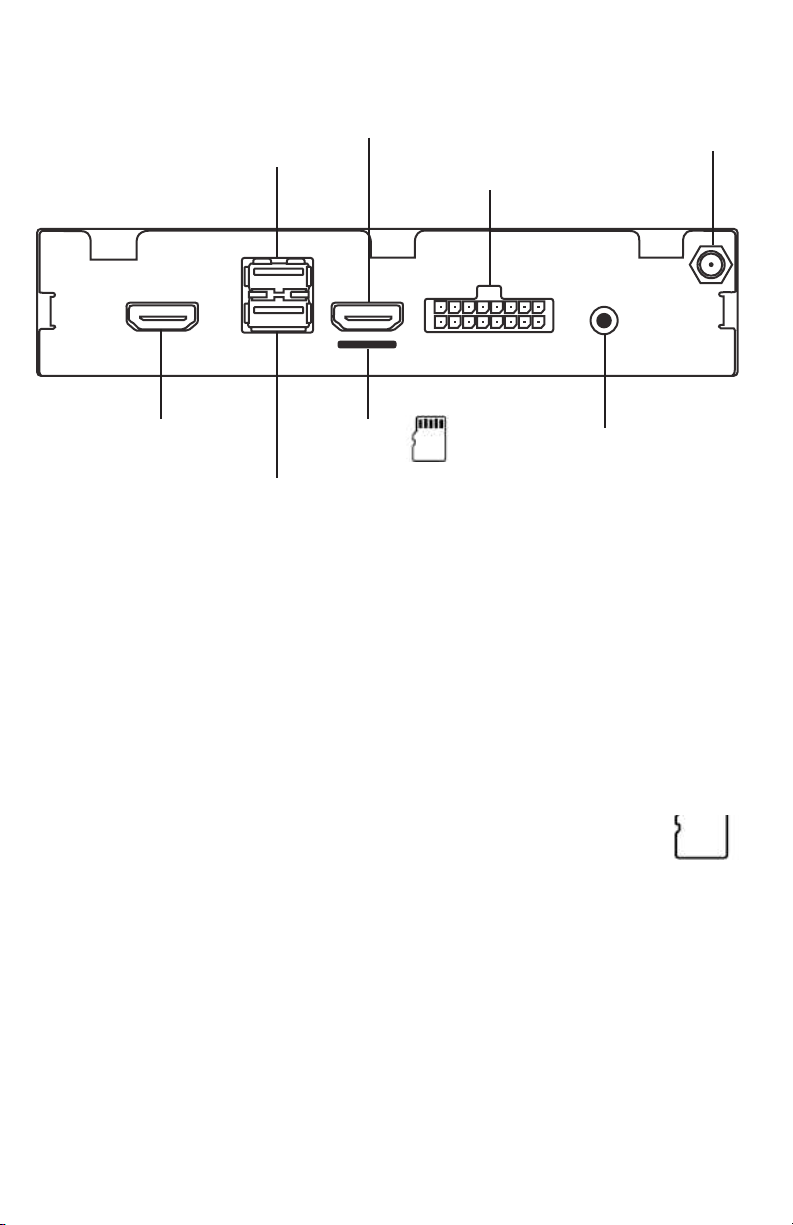
USB1
iPhone connection
Any other USB device (Keyboard / Mouse)
USB2
USB flash drive
Any USB device (Android, Keyboard / Mouse)
MicroSD
Insert microSD card (*pin side up) to increase storage space for
Vline (up to 128GB supported). The microSD should be formatted
FAT32. File system format exFAT and NTFS are not supported.
HDMI IN
HDMI input connection to connect external video sources.
(add plugin to Dashlinq Launcher to use feature)
HDMI OUT
HDMI Output connection to connect external displays. The HDMI
Output will match the VLine’s video feed and resolution, be sure
your external display can handle those properly.
MIC
Microphone input, connect 3.5mm mono microphone.
Understanding VLine ports
HDMI IN
HDMI Input MicroSD Card
(Pin side up*)
Pin Side Up
HDMA
Output
GPS / AV / Camera
Input
WiFi / Bluetooth
Antenna
Microphone
USB2
OTG/USB storage
MIC
CAMERA AV1
HDMI OUT
USB 2
USB 1
USB1
iPhone

10
2.1 Initializing
After connecting the VLine module to the stereo, an ignition cycle will have
to be performed for the stereo to discover Vline and allow Vline to self
configure.
To INITIALIZE:
1. Put ignition switch to “ACC” or “ON” position
2. Wait up to 5 seconds
3. Put ignition switch to OFF”position
4. Wait 1 minute
5. Turn ignition switch back to ACC”or ON”position
6. Press the MEDIA button and enter AUX mode of the stereo, to get to
VLine mode.
CHAPTER 2 — GETTING STARTED
IMPORTANT STEPS TO PERFORM AFTER THE INSTALLATION!
Turning OFF Auto Screen Change in Factory Settings
In order for VLINE mode to function properly, the “Auto Screen Change”
option in the Lexus infotainment system needs to be turned “OFF”.
If this function is not turned off, while using VLine the image will switch
automatically to factory GUI screens on its own after 10-15 seconds have
passed.
Toturn thisfunction OFF:
1. Press MENU button > then go into SETUP > select GENERAL
2. Scroll down until you see option line AUTO SCREEN CHANGE.
3. Select OFF for AUTO SCREEN CHANGE. Make sure to hit SAVE.
Tabla de contenidos
Otros manuales de Electrónica del automóvil de GROM Audio

GROM Audio
GROM Audio VLINE LEX6 Manual de usuario

GROM Audio
GROM Audio LEX5VL1 Manual de usuario

GROM Audio
GROM Audio NIS9VL1 Manual de usuario

GROM Audio
GROM Audio VLine VL1 Manual de usuario

GROM Audio
GROM Audio VLINE TOY6 Manual

GROM Audio
GROM Audio VLINE LEX4 Manual de usuario

GROM Audio
GROM Audio VLINE TOY6 Manual de usuario

GROM Audio
GROM Audio VLINE LEX9T Manual de usuario

GROM Audio
GROM Audio VLINE LEX6RT Manual de usuario

GROM Audio
GROM Audio VLINE LEX7 Manual de usuario


