Forte F24DWS250SS Manual de usuario

Installation Manual
24 Inch Stainless Steel Dishwasher
F24DWS250SS

CONTENT
CONTENT
1
PREPARE HOT WATER LINE AND POWER CORD HOLE.......................................................... 9
STEP 1 - HANDLEBAR ASSEMBLY............................................................................................10
STEP 2 - CHECK DOOR BALANCE............................................................................................10
STEP 3 - INSERT DRAIN HOSE AND POWER CORD THROUGH CABINET...............................11
STEP 4 - SLIDE DISHWASHER PARTIALLY INTO CABINET.......................................................11
STEP 5 - POSITION DISHWASHER UNDER COUNTERTOP.......................................................12
STEP 6 - LEVEL DISHWASHER...................................................................................................1 2
STEP 7 - FIXATION OF DISHWASHER........................................................................................13
STEP 8 - CONNECT DRAIN LINE................................................................................................14
STEP 9 - CONNECT POWER SUPPLY........................................................................................15
STEP 10 - PRE-TEST CHECKLIST..............................................................................................16
STEP 11 - DISHWASHER WET TEST..........................................................................................17
STEP 12 - LITERATURE..............................................................................................................17
INSTALLATION.............................................................................................................................9
IMPORTANT SAFETY INSTRUCTIONS...................................................................................... 2
INSTALLATION PREPARATION .................................................................................................5
PREPARE DISHWASHER...................................................................................................5
PREPARE AND ROUTE THE ELECTRICAL SUPPLY...................................................................7
PREPARE HOT WATER LINE AND POWER CORD HOLE.......................................................... 8

IMPORTANTSAFETY INSTRUCTIONS
IMPORTANT SAFETY INSTRUCTIONS
2
Please read these instructions completely and carefully.
BEFORE YOU BEGIN
IMPORTANT— Observeallgoverningcodesandordinances.
IMPORTANT— The dishwasher must be installed to allow for future
removal from the enclosure if service is required. If you received a
damaged dishwasher, you should immediately contact your dealer or
builder.
FOR YOUR SARETY
Note to Installer - Be sure to leave these instructions for the
consumer's and local inspector'suse.
Note to Consumer-Keep these instructions with your Owner’s
Manual for future reference.
Skill Level -Installation of this dishwasher requires basic mechani-
cal and electrical skills. Proper installation is the responsibility of
the installer. Product failure due to improper installation is not
covered under the Appliance Warranty.
Read and observe all CAUTIONS and WARNINGS shown through-
out these instructions. While performing installations described in this
booklet, gloves, safety glasses or goggles should be worn.
;VYLK\JL[OLYPZRVMLSLJ[YPJHSZOVJRэYLVYPUQ\Y`[VWLYZVUZ
the installer must ensure that the dishwasher is completely
enclosed at the time of installation.
Electrical Shock Hazard
WARNING

INSTALLATION REQUIREMENTS
INSTALLATION REQUIREMENTS
3
Gather the required tools and parts before starting installation.
4- ST4*26
Thread Seal Tape
Waste Tee
Phillips Head
Screwdriver
(KQ\Z[HISL
Wrench
Carpenters
Square
Level Measuring Tape Flashlight
Hand Shut-Off Valve Coupler
Screw Type house Clamps
TOOLS AND PARTS Materials for New Installations Only:
PARTS SUPPLIED
-V\Y7OPSSPWZюH[OLHK^VVKZJYL^ZSVUN[VZLJ\YL
dishwasher to underside of countertop (in literature package).
Waste tee for house plumbing, if applicable
Hand shut-off valve
Coupler for extending drain line, if applicable
Tools you will need:
Phillips head screwdriver
(KQ\Z[HISL^YLUJO
Level
Carpenters square
Measuring tape
Flashlight
Materials you will need:
Thread seal tape
6ULϪϪZJYL^[`WLJSHTWMVYJVUULJ[PUN[V^HZ[L[LL

IINSTALLATION REQUIREMENTS
INSTALLATION REQUIREMENTS
4
Tubing Cutter Drill and Bits Hole Saw Set
For New Installations Only:
Tubing cutter
Drill and appropriate bits
Hole saw set
INSTALLATION PREPARATION
INSTALLATION PREPARATION
6
DRAIN PREPARATION
Do local codes or ordinances require an air gap?
Will waste tee or disposer connection be less than 18" above the
юVVY&
>PSSPUZ[HSSH[PVUOH]LHKYHPUSVVWSLZZ[OHUHIV]LюVVY&
The type of drain installation depends on answers to the following
questions:
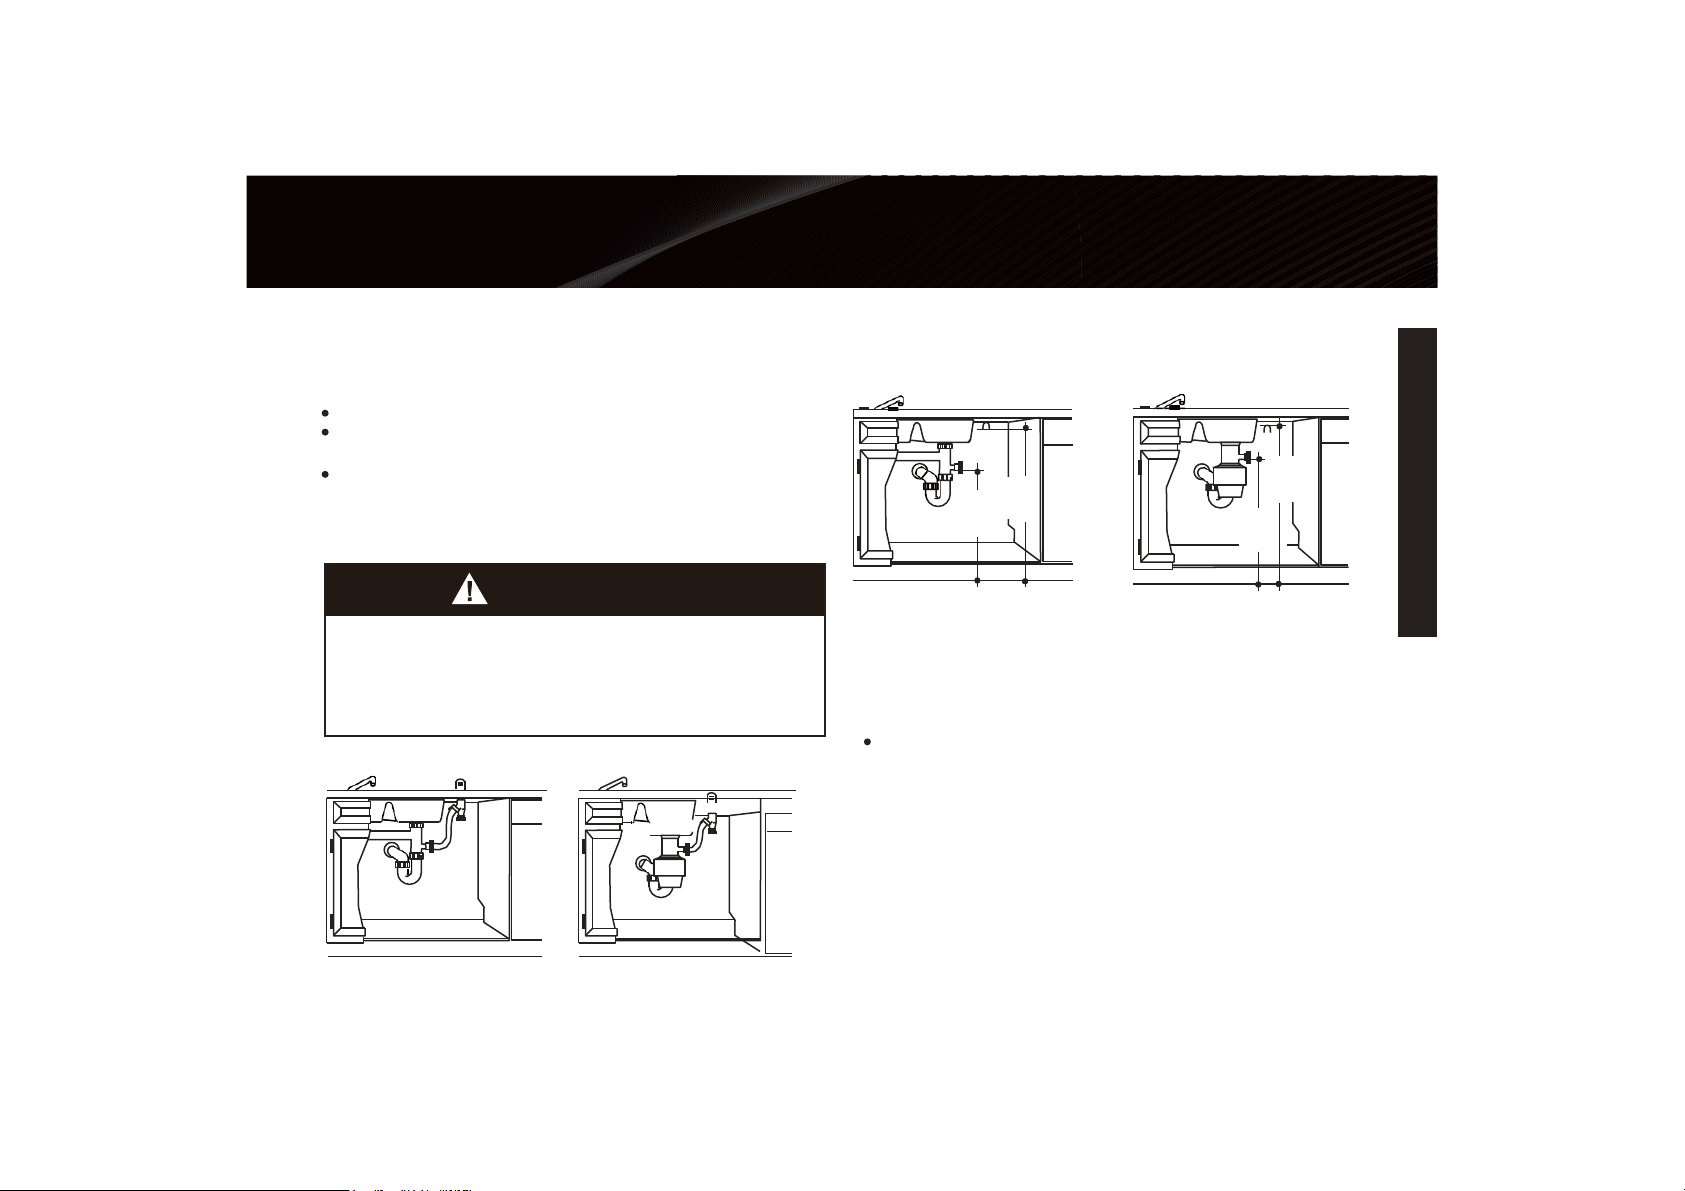
CABINET PREPARATION
Drill a 1-1.5'’dia. hole in the cabinet wall within the shaded areas
shown in Figure A for the drain hose connection. The hole should
be smooth with no sharp edges.
If the answer to ANY of the 3 questions above is YES, Method 1
MUST be used. Otherwise either Method 1 or Method 2 may be used.
Figure C or Figure D.
Figure B
Figure C
Method 1 -Air Gap with Waste Tee or Disposer
Method 2 -High Drain with Waste Tee or Disposer Provide a method
to attach drain hose to underside of countertop.
Install waste tee or disposer and air gap according to manufacturer’s
instructions.
An air gap MUST BE USED if the drain hose is connected to
^HZ[L[LLVYKPZWVZLYSV^LY[OHUHIV]L[OLюVVY
Failure to provide the proper drain connection height with air
gap or 32" minimum, high drain loop will result in improper
draining of the dishwasher.
CAUTION:
32"
32"
18"
Min.
Min.
Min.
18"
Min.

INSTALLATION PREPARATION
7
INSTALLATION PREPARATION
PREPARE AND ROUTE THE ELECTRICAL
You Must Have:
120-voit, 60Hz, AC-only,12-amp, fused electrical supply.
We Recommend:
A time-delay fuse or circuit breaker.
A separate circuit.
For power cord connections, install a 3-prong grounding type
receptacle. The power-supply receptacle for the appliance shall
ILPUZ[HSSLKPUHJHIPUL[VYVUH^HSSHKQHJLU[[V[OL\UKLYJV\U[-
er space in which the appliance is to be installed.
Connecting Dishwasher with A Power Cord:
Power cord must plug into a grounded 3 prong outlet, located in
the cabinet next to the dishwasher opening. Outlet must meet all
local codes and ordinances.
Electrical Connection to Dishwasher
Electrical connection is on the right front of dishwasher.
Figure E
NOTE: A grounded 3 prong outlet is required inside a cabinet next
to the dishwasher cabinet opening.
SUPPLY
The improper connection of the equipment grounding conductor
can result in a risk of electric shock.
*OLJR^P[OHX\HSPэLKLSLJ[YPJPHUVYZLY]PJLYLWYLZLU[H[P]LPM`V\
are in doubt that the appliance is properly grounded.
Electrical Shock Hazard
WARNING 1-1" Dia.
Hole (Max.)

PREPARE HOT WATER LINE AND POWER
INSTALLATION PREPARATION
INSTALLATION PREPARATION
8
CORD HOLE
Water Line Connection
Turn off the water supply.
Install a hand shut-off valve in an accessible location, such
as under the sink. (Optional, but strongly recommended
and may be required by local codes.)
*VUULJ[VULLUKVMPUSL[SPULH[V[OLPUJO-/;IHUK
connect to the dishwasher.
Run the other end of the inlet line through the hole in the
JHIPUL[0M[OLZO\[VMM]HS]LPZPUJO0+[OLPUSL[SPUL
can be directly connected to the shut-off valve.
(KQ\Z[^H[LYOLH[LYMVYА[VА[LTWLYH[\YL
Flush water line to clean out debris.
The hot water supply line pressure must be 6-145 PSI.
Figure F
;OLSPULTH`LU[LYMYVTLP[OLYZPKLYLHYVYюVVY^P[OPU[OLZOHKLK
area shown in Figure F.
,HJOJ\[HUHKKP[PVUHSKPHOVSL[VHJJVTTVKH[L
the water line and the power cord.
Shut-off
Valve
+PH
Hole
+PH
Hole
Hot
Cabinet Face
AB

9
INSTALLATION
INSTALLATION
PREPARE HOT WATER LINE AND
POWER CORD HOLE
Water Line Connection
Turn off the water supply.
Install a hand shut-off valve in an accessible location, such
as under the sink. (Optional, but strongly recommended
and may be required by local codes.)
Connect one end of inlet line(a) to the 3/4-inch FHT(b)and
connect to the dishwasher.
Run the other end of the inlet line through the hole in the
cabinet. If the shut-off valve is 3/8 inch I.D, the inlet line
can be directly connected to the shut-off valve.
(KQ\Z[^H[LYOLH[LYMVYА[VА[LTWLYH[\YL-S\ZO
water line to clean out debris.
;OLOV[^H[LYZ\WWS`SPULWYLZZ\YLT\Z[IL7:0
;OLSPULTH`LU[LYMYVTLP[OLYZPKLYLHYVYюVVY^P[OPU[OLZOHKLK
area shown in Figure F.
,HJOJ\[HUHKKP[PVUHSKPHOVSL[VHJJVTTVKH[L
the water line and the power cord.
Figure F
Shut-off
Valve
+PH
Hole
+PH
Hole
Hot
Cabinet Face
AB
Opening the door will cause the dishwasher to tip forward. Do
not open the door until you are ready to install the dishwasher.
If it is necessary to open the door, hold the top of the
dishwasher securely with one hand and hold the door with the
other hand.
CAUTION:

After placed the panel on the dishwasher, please try open and
close the door to test the balance to check out whether
the door can remain a same place. If not, please adjusting the
screw in the direction of clockwise or counterclockwise to
※This step is only applicable to the W60C4A411B
model.
STEP 1 - HANDLEBAR ASSEMBLY
INSTALLATION
10
INSTALLATION
BEFORE YOU BEGIN
STEP 2 - CHECK DOOR BALANCE
Use a hex wrench to install the outside door handle,
※This step is only applicable to the W60C4A411B model.
Figure G
Figure H
Hexagon wrench-M6
+
-
Haxtun tools
CR-V 4mm
3~7KG
30°~90°
balance
Otros manuales para F24DWS250SS
1
Tabla de contenidos
Otros manuales de Lavavajillas de Forte

Forte
Forte F24DWS450PR Manual de usuario

Forte
Forte F24DWS650PR Manual de usuario

Forte
Forte F18DWS450PR Manual de usuario

Forte
Forte F24DWS250SS Manual de usuario

Forte
Forte F18DWS450PR Manual de usuario

Forte
Forte 250 Series Manual de usuario

Forte
Forte F24DWS450PR Manual de usuario

Forte
Forte F18DWS250SS Manual de usuario

Forte
Forte F24DWS450PR Manual de usuario

Forte
Forte F24DWS650PR Manual de usuario


