●Open the box
●Remove cardboard and foam
●Place your Khosi on the cross bars of
yourcar
●Centre Khosi on top of your car
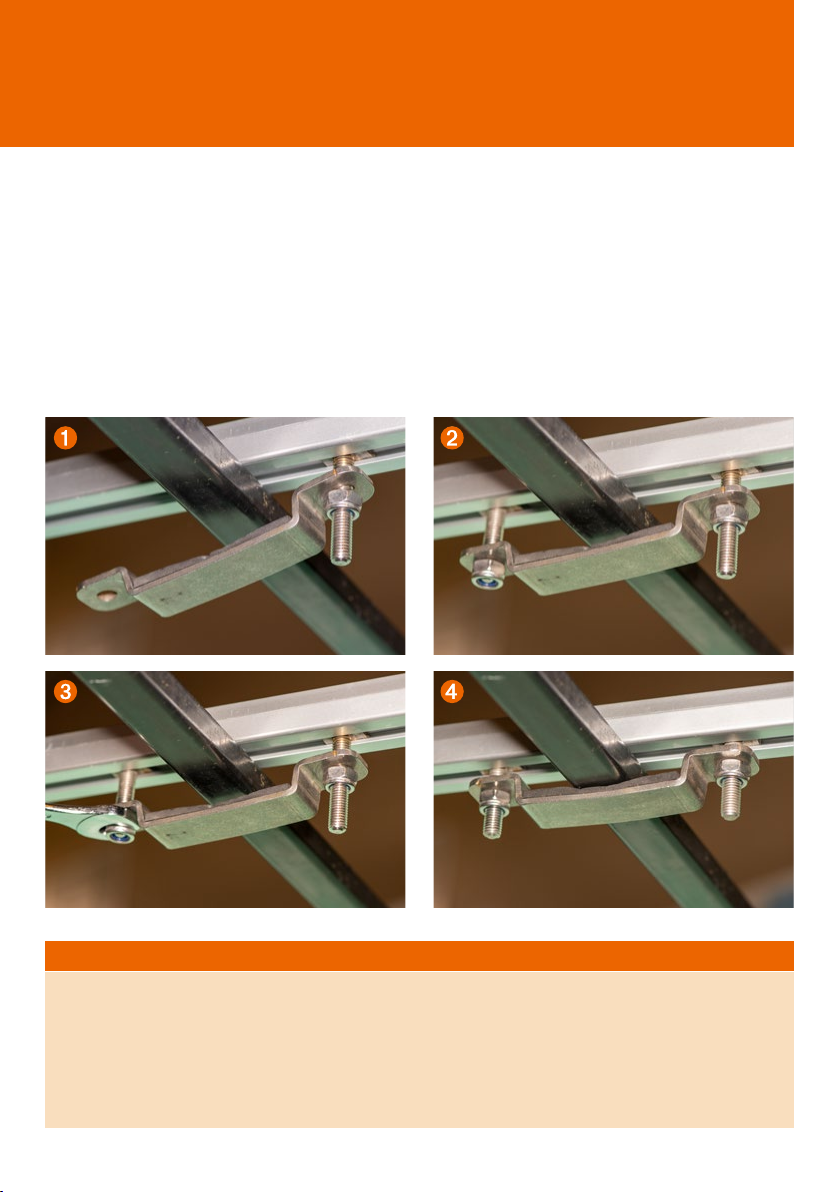
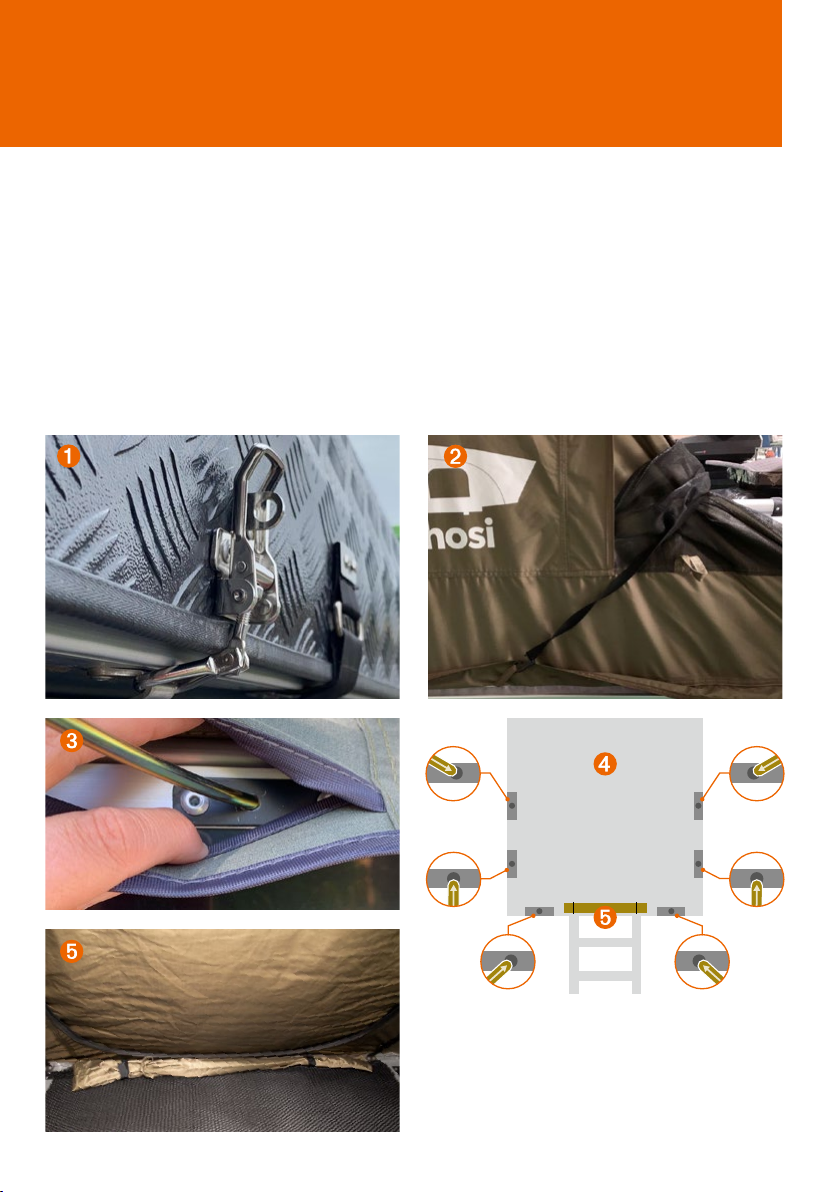
●Insert two square-head bolts or sliders
into the front of the rail
➊Li the tent and slide over the cross bar
➋
Insert second bolt
●Step and repeat for the back of the rail
➌ Add the brackets to the bolts
➍ Connect the nuts but not too tight yet
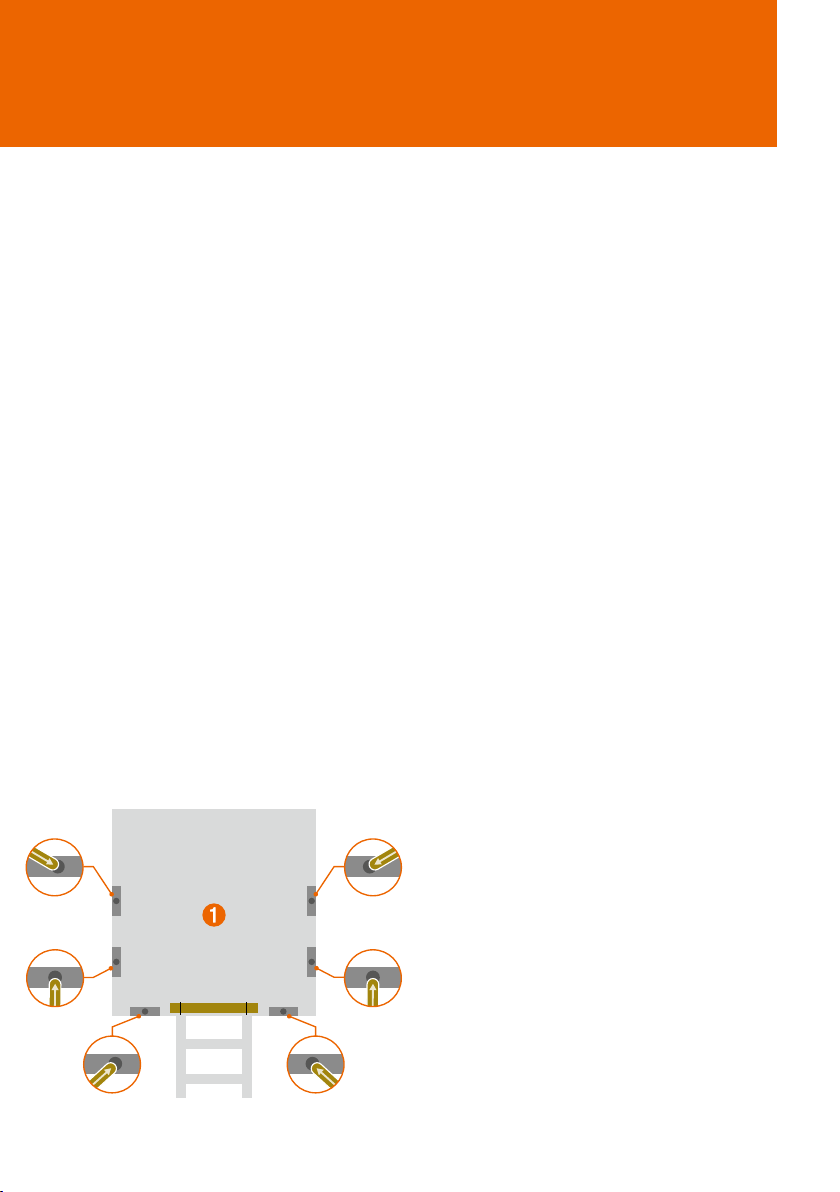
●Check if tent is centred properly
●Use the spanner to tighten the nuts,
frontfirst
●Then tighten the nuts on the back of
therail
IMPORTANT
● Tighten the two bolts simultaneously per crossbar
● Don’t tighten too far,
● The bracket needs to stay horizontal and shouldn’t bend
● Double check all bolts
● Check again aer the first 100 kms of driving
● Repeat regularly
● Keep all screws and bolts clean and serviced with WD40
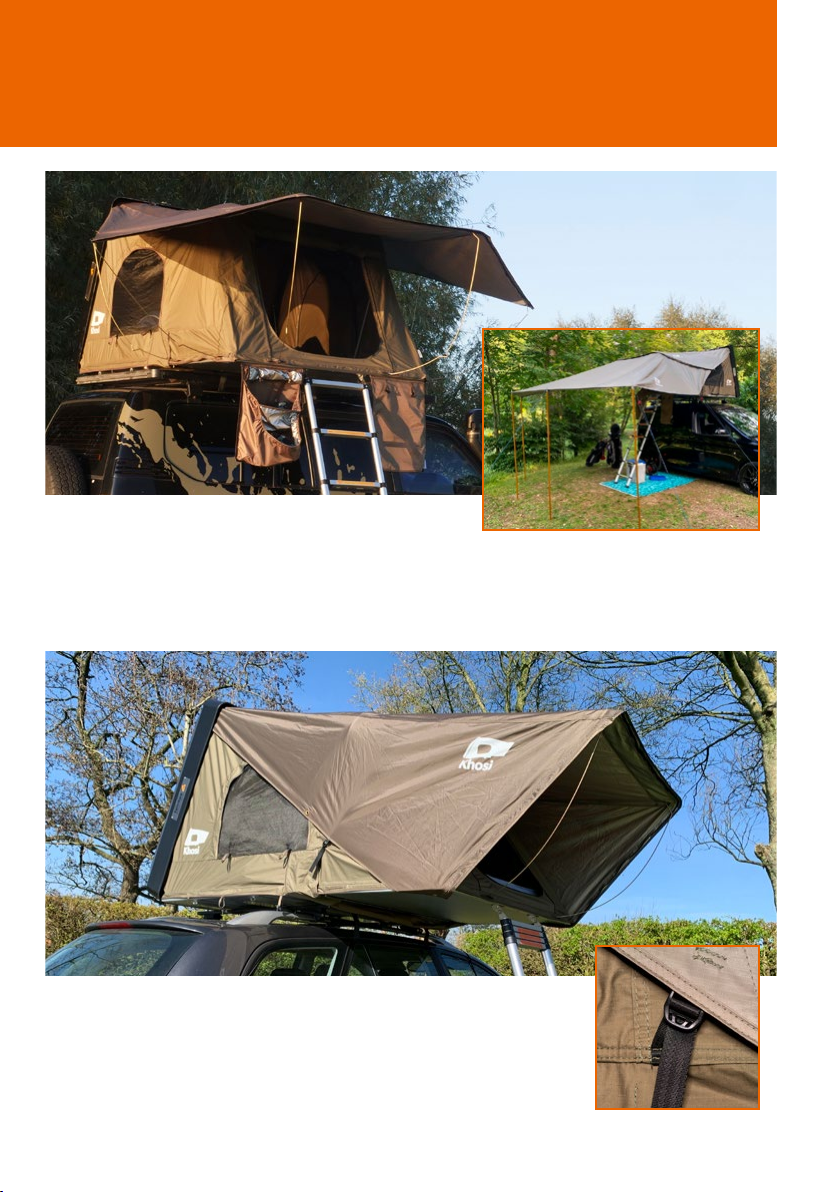
●The fly tarp needs to be set up for easy
access into the tent by using at least 2
flexible poles, one to the right and one
to the le of the entrance
●Climb halfway up the ladder, insert the
flexible poles horizontally into the holes
on both sides of the ladder, through the
small ‘envelopes’ in the fabric
●The hook of the flexible poles should
belooking down, hold the pole with
one hand
●Use the other hand to grab the corner of
the fly tarp and insert the pole into the
O-ring overhead in both corners of the
flytarp
●Connect the tips of the fly tarp, by
velcro, to the bottom of the extension
floor or
➊Continue with the (2 per side) remainder
of the flex poles to position the fly tarp
inthe open mode by following the
previous steps again on both sides of
thetent. Please note that some holes are
horizontal but the poles need to be
entered at an angle
Closing the hardshell tent
DON’T FORGET! Remove the two lock
rods from your gas struts inside the tent
otherwise the tent can not be closed
●Remove your sleeping bags and pillows
from the tent
●Using the ladder, push the extension
floor back up and let drop onto the main
floorboard
●Shorten the ladder and put the ladder
back in the original position, cover by
the protection shield
●Take the elastic band from the far le
ofthe outside of the tent, over the tent
and connect to the same loop on the
right of the tent, this will help when
pulling the tent shut
●Pull the black nylon strap down which is
attached to the shell and will close the
tent
●Tuck the fabric sticking out into the tent
on both sides and the front, don’t
forgetto also push the nylon strap under
the shell
●Use the velcro straps to tighten the shell,
once closed use the reinforced straps to
secure the tent
●If you have difficulties closing the shell,
you may have le too much bedding in
the tent. In this case, remove the
bedding and try again
●Use your flat hand on top of the shell to
pull the shell down. Don’t pull at the
locks or rubber band
Getting started How to mount your rooop tent Opening your hardshell tent
Setting up your bedroom
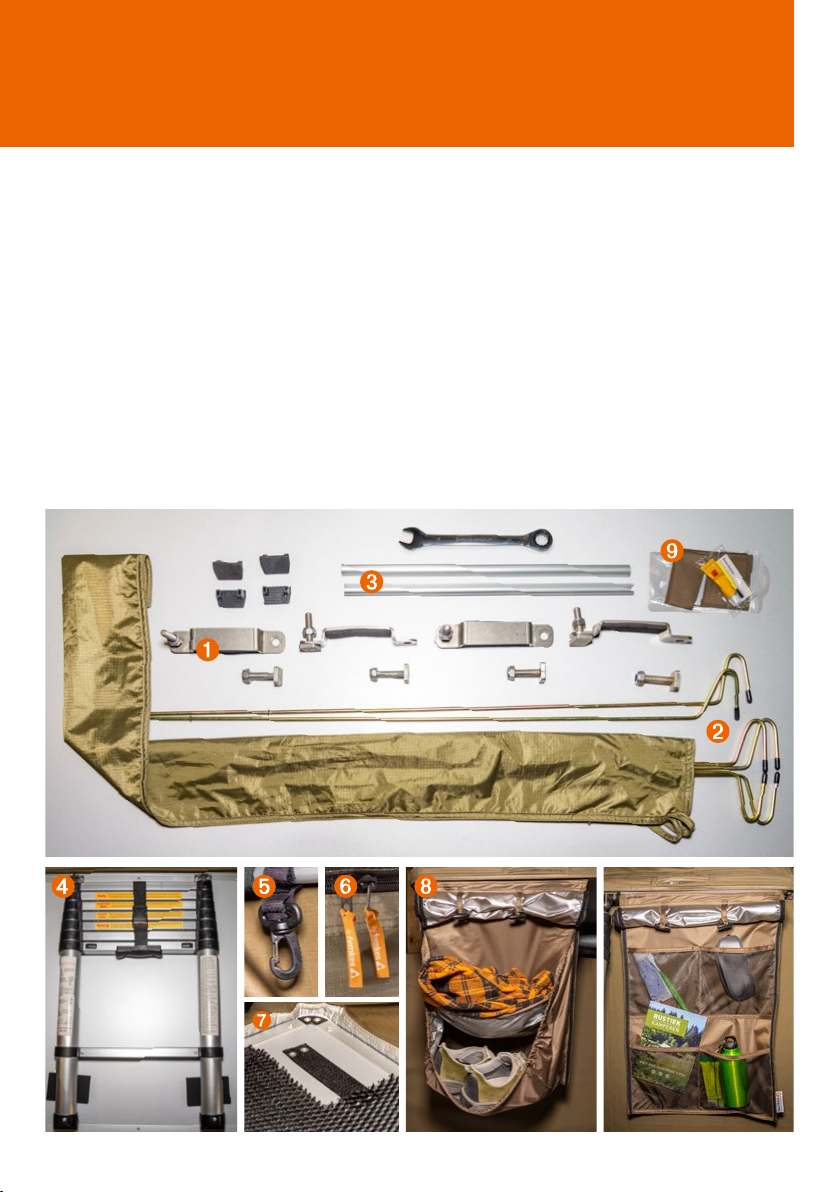
Congratulations, you’ve bought a femkes rooent! Please check the
following items are included when opening your box:
➊Mounting set, 4 bolts + self locking nuts,
U-shape bars and a spanner
➋
6 flexible poles to set up the fly tarp
(flytarp can be fully removed by a zipper)
➌ 2 gas strut lock rods (to secure the gas
strut from closing whilst in the tent)
➍ Standard 2.3 m ladder with horizontal
steps for easy access (2.6 m ladder
optional per request)
➎ Hook inside to hang your romantic lamp
➏
Original ‘by femkes’ zipper pullers,
forcoldhands
➐
3d mesh underneath the mattress for
better ventilation + velcro to secure the
mattress
➑
Bags for shoes, accessories and your
roadmaps
➒
Repair kit
●Unlock the velcro straps
●Unlock the reinforced straps
●Push up the shell (the gas struts make
thiseasy)
●Reach up and grab the bottom step of
theladder
●Roll up the protection shield of the
ladder
●Undo the velcro strap (first time only)
●Pull out the ladder all the way
●Push down the fully extended ladder
●The lever will open the extension floor
ofthe tent
●Walk backwards and wait for the
extension floor to be in a horizontal
position
●Securely install the ladder to the
rightheight
OPERATION OF THE LADDER
CAUTION! Failure to properly secure the
ladder could cause serious injury. Read the
next steps carefully before attempting to use
the ladder.
● Once the floor is in the right position, push
the ladder back to the original short size
● Depending on the height of your car, hold
3-4 rungs at the top and pull out the bottom
rungs until they reach the ground
● If you have a low car, you might need to
hold 5 rungs. If you are on a high car, you
only might need to hold 2 rung or less
● It is also possible to lock the steps by half
arung
● Make sure the ladder is placed on even,
solid ground. Do not install the ladder on
uneven or sandy/muddy ground
● Place the ladder firmly at an approximate
70degrees angle
● The ladder needs to support the extension
floor including you, when climbing in- and
sleeping in the tent. The extension floor can
be slightly higher than the main floor
● The ladder should not be installed and used
in a vertical position, always at a slight angle
for better support
● Before entering the tent, check if every rung
is secured. Use two hands to climb up, one
step at the time