Eaton Paramount Enclosure Manual de usuario

Eaton®Data Center Racks


1. Product Overview
In today's world, network equipment is one of the most important investments a business can make. How you store
and protect this equipment is just as crucial. With constant technological changes, an enclosure must not only be
flexible, but must be able to protect your long-term investment. The right choice, is simply, Paramount.
Paramount, the indisputable industry leader, is compatible with virtually all major servers, both tower-style and rack-
mount equipment. It can safely store 2,200 lbs. of equipment and provides user-friendly cable management within the
cabinet, cabinet-to-cabinet, and raised via floor or overhead access.
Split rear doors provide easier access and maneuverability in data center environments. Offered in both standard per-
forated and fan door designs (both 120V and 208V), Paramount provides a level of cooling that will give you peace
of mind. When coupled with a very broad range of enclosure accessories, power distribution, switches, and monitor-
ing products, Paramount provides a platform that you can depend on to support your business.
Paramount Features
Multi-vendor server compatibility
Integrated cable management
40, 44 or 51U rack space
Three widths - 24", 30" and 48"
Computer grade ventilation
Split rear doors (perforated or fan)
2,200 lb. static load
Standard to advanced security options
Segmented bays for co-location applications
Tool-less adjustable rack-mount rails
Field-reversible doors
NuGrey, Black, Two-tone, or Custom Colors
Custom configurations
Lifetime warranty
1
Pub Num: MN159002EN rev1.0
Paramount Enclosure
Installation Guide

2. Important Safety Information
WARNING SYMBOLS
This WARNING! Symbol calls attention to a procedure or practice which, if not adhered to, could result in
personal injury. Do not proceed beyond a WARNING sign until the indicated requirements are fully under-
stood and met.
This symbol calls attention to important clarifying point of information which will help insure a successful
installation.
Failure to adhere to the following warnings may cause personal injury or damage to your
enclosure rack.
1. WARNING! Paramount Enclosure components can be very heavy. It is recommended that several
people take part in the unpacking process. When lifting Paramount components or electronic equip-
ment, there should be at least one person for every 40 lbs. of weight to be lifted.
2. WARNING! The enclosure rack must be stabilized before installing any roll-out type accessory com-
ponent or electronic device into the rack. Failure to stabilize the rack before installing equipment may
cause the enclosure to tip over.
3. WARNING! Load the heaviest electronic devices and accessory components into the enclosure rack
first, and place them near the bottom of the enclosure to prevent the enclosure from becoming top-heavy.
4. WARNING! Never extend a roll-out type electronic device or accessory component from an enclosure
rack that is supported by casters. Doing so may cause the enclosure to tip over. If your cabinet is sup-
ported by casters, refer to the instructions on stabilization methods.
5. WARNING! Never extend more than one roll-out type electronic device or accessory from a stabilized
enclosure rack at a time. Doing so may cause a stabilized enclosure rack to tip over.
6. WARNING! Do not sit, stand, or climb on any extended roll-out type electronic device or accessory.
7. WARNING! To reduce the risk of overload, do not load any Power Distribution Unit (PDU) with more
than 80 percent of its rated amperage capacity.
8. WARNING! There must be an uninteruptable safety earth ground from the main power source to the
Power Distribution Unit’s (PDU) power cord set. Whenever it is likely that ground has been impaired,
disconnect the PDU’s power cord until the ground has been restored.
WARNINGS!
2
Pub Num: MN159002EN rev1.0
Paramount Enclosure
Installation Guide

3. Installation Overview
Factory Assembled Enclosures
Paramount Enclosures are usually shipped as fully configured and assembled cabinets, ready for installation into
your data center. Only a few simple steps are required to prepare the cabinet for the installation of your electronic
equipment. If you are preparing factory assembled units, many of the procedures in this manual will not apply to
your installation.
Follow the steps in the “Unpacking a Factory Assembled Enclosure” and “Setting Up Factory Assembled Enclo-
sures”. After your enclosures have been positioned, stabilized and ganged, refer to the
“Field Assembled Components” section for any additional accessories that may require installation.
Field Assembled Enclosures
To meet the needs of some users, Wright Line may ship the Paramount Enclosure Frames in a partially disassembled
state, requiring additional field assembly procedures. Refer to the “Field Assembled Enclosure Frames” section
and the “Field Assembled Components” section for frame and accessory assembly instructions.
After you have completed the frame and accessory assembly, return to the “Setting Up Factory Assembled Enclo-
sures” section for instructions on stabilizing and ganging the enclosures.
Contents of This Packet
In addition to the Installation Manual, this packet contains a 1-3/8” wrench and a 5/32” allen wrench. Use the 1-3/8”
wrench to adjust the enclosure’s leveling feet. Use the 5/32” allen wrench to assemble “knock-down” style enclosure
frames.
1-3/8” Wrench
5/32” Allen Wrench
3
Pub Num: MN159002EN rev1.0
Paramount Enclosure
Installation Guide

4
Fasteners and Hardware
#54348
1/4”-20 x 1/2” Hex
Washer Head Screw
#82031
#10-32 x 1/2” Phillips
Pan Head Screw
#87398
1/4”-20 x 5/8” Button
Head Cap Screw
#18209
1/4”-20 Self Locking Nut
#62152
5/16”-18 Self Locking
#81645
1/4”-20 x 1.00”
#59103
#10 x 3/4” Phillips Pan
Head Wood Screw
#82555
#10 x 1/2” Philips Flat
Head Self-Tapping Screw
#55617
#10-24 x 1/2” Phillips
Pan Head Screw
#66714
#10-24 x 3/8” Phillips
Pan Head Thread
Forming Screw
#53956
1/4”-20 x 3/4” Pan
Head Machine Screw
#87442
#10-32 x 5/8” Screw
w/Nylon Washer
#84397
#10-32 Clip Nut
#2232X
Hole Plug
#86425
15/16”-18 x 1/2” Button
Head Cap Screw
#18242
#10-24 Self Locking Nut
Pub Num: MN159002EN rev1.0
Paramount Enclosure
Installation Guide

5
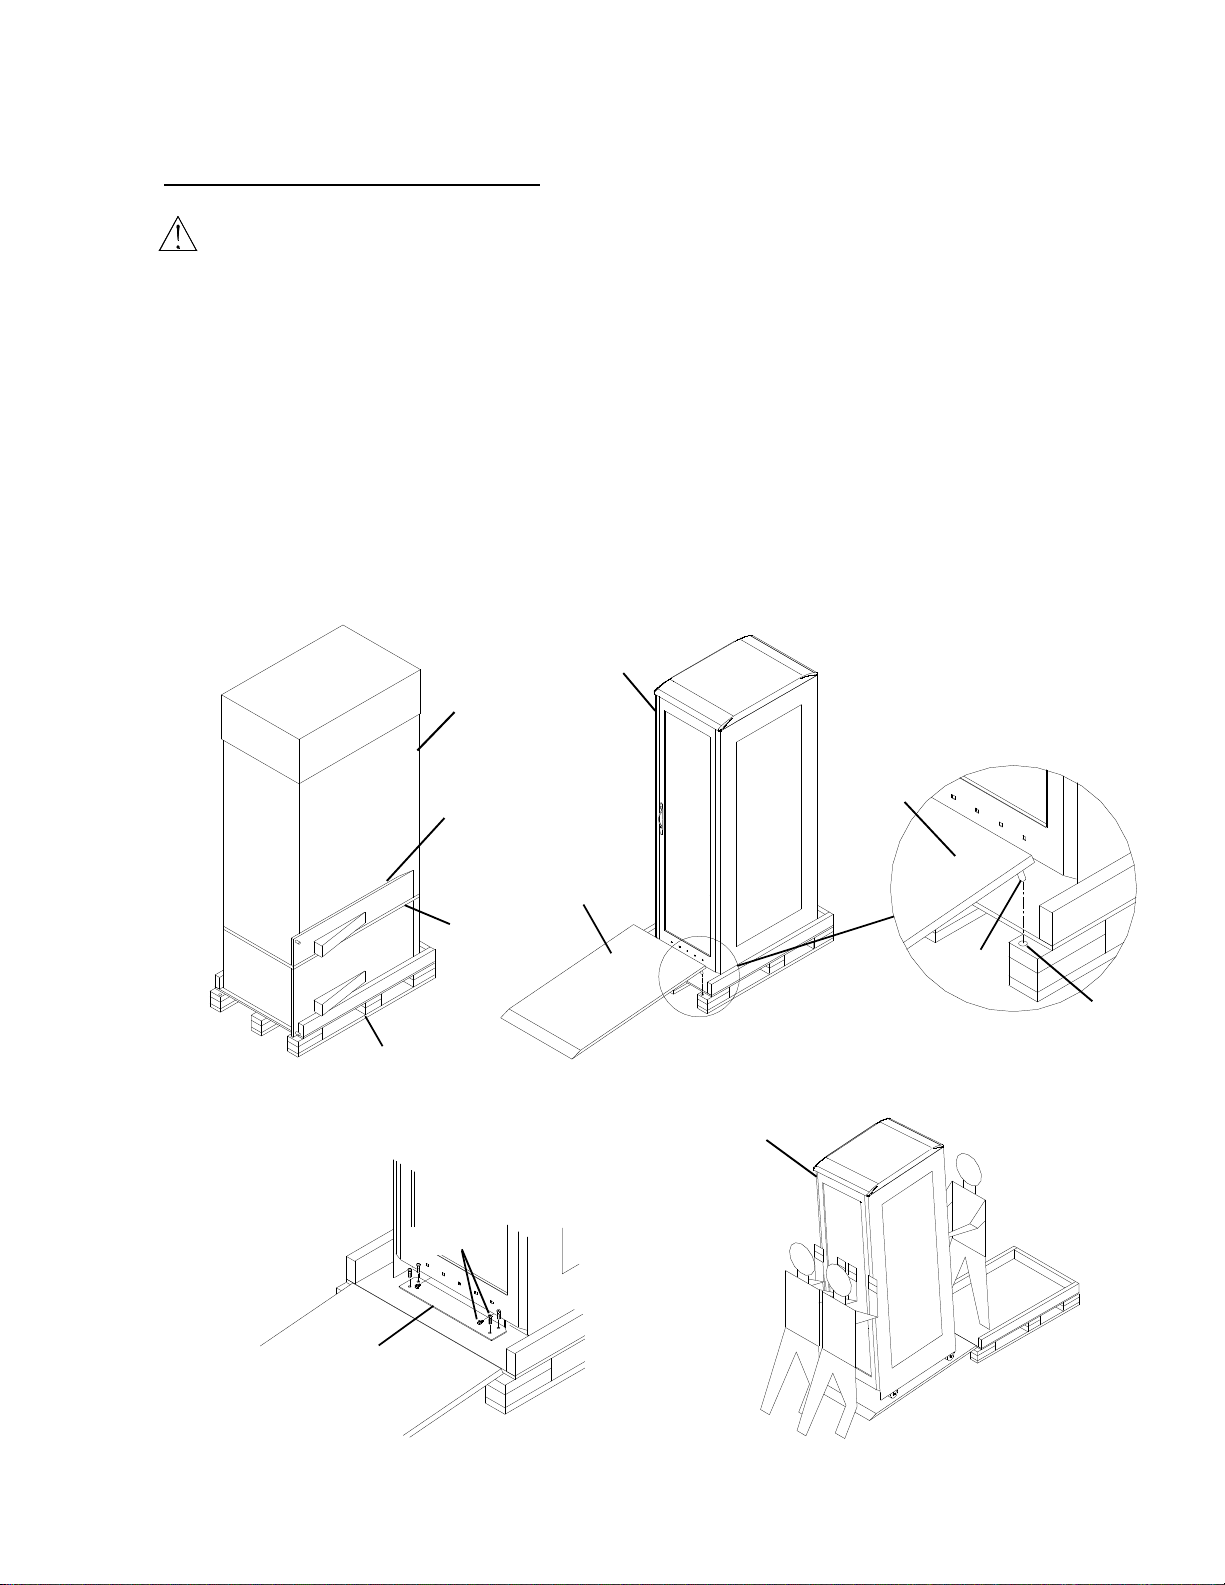
4. Unpacking a Factory Assembled Enclosure
WARNING! Use two or more people to unpack and de-skid an enclosure. The shipping weight of the
enclosure can range from 200 to 500 pounds, depending on the size and configuration of the enclosure.
Use extreme caution in the de-skidding process to ensure safety.
If a Paramount enclosure is to be populated with electronic equipment and then re- shipped to another
location, the use of a Heavy Duty Pallet is recommended. The standard shipping pallet
shown below is intended for the shipment of an empty enclosure.
STANDARD SHIPPING PALLET
1. Immediately inspect all shipping containers for evidence of physical damage.
If a shipping container is damaged, immediately contact your Wright Line sales representative and request the
carrier’s agent to be present when the unit is opened. Keep all of the contents and packaging material for the
agent’s inspection.
2. Carefully remove the packaging material. Cut the plastic wrap along one of the corrugated corner protectors to
avoid damage to the unit.
3. If this unit has a ramp built into the pallet, remove the ramp by lifting it upward out of the slots in the pallet. See
figure 4-1.
4. Place the ramp into the open end of the pallet. Make sure that the beveled edge of the ramp is resting on the floor.
See figure 4-2.
5. Use two or more people to move the enclosure off of the pallet. Do not push on the center of doors or side pan-
els. See figure 4-2.
6. Do not use a “walking” method – pushing side-to-side on the enclosure – to move it to its final position. Always
transport an un-packaged unit with a two-wheel dolly. Use blankets or cardboard to protest the surfaces of the
enclosure.
Figure 4-1Figure 4-2
Ramp
Enclosure
Shipping pallet Ramp
Bevel
Pub Num: MN159002EN rev1.0
Paramount Enclosure
Installation Guide
6
HEAVY DUTY SHIPPING PALLET
WARNING! An enclosure that is going to be populated with electronic equipment and then reshipped
on the heavy duty pallet should be specified to have casters. Do not attempt to move a loaded enclosure
off of the heavy duty pallet unless the enclosure is equipped with casters.
1. Immediately inspect all shipping containers for evidence of physical damage.
If a shipping container is damaged, immediately contact your Wright Line sales representative and request
the carrier’s agent to be present when the unit is opened. Keep all of the contents and packaging material for
the agent’s inspection.
2. If this unit has a ramp built into the pallet, remove the strap that holds the ramp in place. Save the strap for re-
use if the enclosure is going to be reshipped on the heavy duty pallet.
3. Carefully remove the corrugated packaging material. Avoid damaging the packaging material if the enclosure is
going to be reshipped on the heavy duty pallet.
4. Place the ramp fittings into the holes in the front edge of the pallet.
5. Remove the shipping brackets from the front and rear of the enclosure. A 3/8” and 9/16” wrench is required.
5. Use two or more people to roll the enclosure off of the pallet. Do not push on the center of doors or side pan-
els.
Band
Ramp
Corrugated
packaging
Heavy duty
pallet
Ramp
Pin
Hole
Figure 4-3
Enclosure
Figure 4-4
Figure 4-5 Figure 4-6
Shipping
bracket
Screws
Enclosure
Ramp
Pub Num: MN159002EN rev1.0
Paramount Enclosure
Installation Guide

Figure 4-7
7
UNPACKING A FACTORY ASSEMBLED PTOC ENCLOSURE
1. Follow the unpacking and de-skidding instructions in the “Standard Shipping Pallet” section.
2. To allow the PTOC enclosure to be rolled off of the shipping pallet, the rear PTOC frame is attached in a
shipping position. The shipping position of the rear PTOC frame is approximately 1” higher than the normal
functional position of the frame.
3. Unlock and open the rear door. Locate the six screws that attach the rear PTOC frame to the enclosure frame.
Loosen the six screws to allow the rear frame to drop down to the functional position. Then re-tighten the
screws. See figure 4-7.
PTOC frame
Screw
Move down
Pub Num: MN159002EN rev1.0
Paramount Enclosure
Installation Guide

8
5. Site Requirements For Standard Enclosures
Enclosure Space Requirements
Select a location for the enclosure that will provide adequate room for opening doors and side panels, and
operating and servicing slide-out electronic products. The enclosure must be positioned so that there is un-
restricted air movement for all ventilated surfaces.
Enclosure Dimensions
Enclosure heights: 77.00”, 84.00” and 96.00”
Enclosure width:
24” wide rack: 24.00”
30” wide rack: 30.00”
48” wide rack: 48.00 inches
(no additional width is gained when ganging racks together)
Side Panels: add .56” (9/16”) to the enclosure width for each Side Panel
Enclosure frame depths without doors: 34.50” and 39.25” (excluding trim)
Enclosure depth with doors: 40.06” and 44.80” (includes door handles)
Floor Loads
Each enclosure bay, when loaded to its maximum capacity, can weigh up to 2500 lbs. (The actual weight can
vary somewhat, depending on the actual component selection.) Each enclosure bay is supported on four
leveling glides. Each glide has a floor contact area of 1.1 square inch.
WARNING: IT IS THE CUSTOMER’S RESPONSIBILITY TO ENSURE THAT THE FLOOR HAS A
STRUCTURAL LOAD CAPACITY THAT WILL SAFELY BEAR THE WEIGHT OF THE PARAMOUNT
ENCLOSURE SYSTEM.
Pub Num: MN159002EN rev1.0
Paramount Enclosure
Installation Guide
Tabla de contenidos
Otros manuales de Rack y soporte de Eaton

Eaton
Eaton Series NRX Manual

Eaton
Eaton xStorage Home Guía de inicio rápido

Eaton
Eaton ALL-PRO WPFLD-TRN Manual de usuario

Eaton
Eaton PDI Universal Manual de usuario

Eaton
Eaton KA146W5 Manual de instrucciones

Eaton
Eaton 9E1000IR Instrucciones de montaje

Eaton
Eaton AMT Vari-Depth Manual

Eaton
Eaton Powerware Series Manual de usuario

Eaton
Eaton RE 2 Manual de usuario

Eaton
Eaton TRIPP LITE Series Manual de usuario


