dji OSMO POCKET 3 Manual de usuario

2023.10v1.0
User Manual

2 ©0000 大疆创新 版权所有
Searching for Keywords
Search for keywords such as “battery” and “install” to nd a topic. If you are using Adobe
Acrobat Reader to read this document, press Ctrl+F on Windows or Command+F on Mac
to begin a search.
Navigating to a Topic
View a complete list of topics in the table of contents. Click on a topic to navigate to that
section.
Printing this Document
This document supports high resolution printing.
This document is copyrighted by DJI with all rights reserved. Unless otherwise authorized by
DJI, you are not eligible to use or allow others to use the document or any part of the document
by reproducing, transferring or selling the document. Users should only refer to this document
and the content thereof as instructions to operate DJI UAV. The document should not be used
for other purposes.

DJI Osmo Pocket 3 User Manual
© 2023 DJI All Rights Reserved. 3
Using this Manual
Legends
Important Hints and Tips
Read Before Use
Read the following documents before using DJITM Osmo Pocket 3.
1. Safety Guidelines
2. Quick Start Guide
3. User Manual
It is recommended to watch all the tutorial videos on the ocial DJI website or in the DJI Mimo
app and read the safety guidelines before using for the rst time. Make sure to review the Quick
Start Guide and refer to this User Manual for more information.
Download DJI Mimo App and Watch the Tutorial Videos
Scan the QR code to download the DJI Mimo App and watch the tutorial videos.
https://s.dji.com/guide68
DJI Mimo App
DJI Store App
Android 8.0 or aboveiOS 12.0 or above

4 © 2023 DJI All Rights Reserved.
Using this Manual 3
Legends 3
Read Before Use 3
Download DJI Mimo App and Watch the Tutorial Videos 3
Introduction 5
Overview 5
Accessories 6
Using for the First Time 9
Inserting the microSD Card 9
Powering on 9
Activation 10
Charging the Battery 11
Basic Operations 12
Button Features 12
Operating the Touchscreen 13
Status LED 20
Using the Product 20
Setting the Shooting Mode 20
Selecting the Gimbal Mode 22
Using ActiveTrack 23
Using the Smart Gimbal Mode 23
Transferring Files 25
Webcam Mode 25
Microphone Connection 26
DJI Mimo App 30
Downloading the DJI Mimo App 30
Connecting to the DJI Mimo App 31
DJI Mimo App Home Screen 31
Camera View 32
Maintenance 33
Firmware Update 33
Storing 33
Usage Notices 35
Optional Accessories (Not Included) 35
Specifications 37
Contents

DJI Osmo Pocket 3 User Manual
© 2023 DJI All Rights Reserved. 5
Introduction
DJI Osmo Pocket 3 is a handheld gimbal camera with three-axis mechanical stabilization, which
is capable of shooting stable and smooth videos in various scenarios. The 1-inch CMOS sensor
ensures low-noise, high-quality footage in high-contrast environments. In addition, the 10-bit
D-Log M color mode provides a more comfortable color perception and a larger dynamic range,
which is convenient for post-production color correction.
The rotatable touchscreen of Osmo Pocket 3 allows users to check the live view of the camera,
rotate to start recording, tap to adjust the settings, and can also be used to switch between
horizontal and vertical shooting modes. Osmo Pocket 3 adopts a built-in three-mic array, which
can effectively reduce wind noise and record stereo sound. It also supports the connection
of external mics and monitoring earphones. Users can enjoy more with a variety of optional
accessories such as Osmo Pocket 3 Handle With 1/4″ Thread, Osmo Pocket 3 Battery Handle,
Osmo Mini Tripod, and Osmo Pocket 3 Wide-Angle Lens.
Overview
1. Camera
2. Pan Motor
3. Microphones*
4. Rotatable Touchscreen
5. Speaker
2
1
33
14
13
12
4
5
6
7
8
910
3
15
11
6. Status LED
7. 5D Joystick
8. microSD Card Slot
9. Quick-Release Slot I
10. USB-C Port
11. Shutter/Record Button
12. Quick-Release Slot II
13. Lanyard Hole
14. Tilt Motor
15. Roll Motor
* For better audio quality, DO NOT block the microphones when recording video.

DJI Osmo Pocket 3 User Manual
6 © 2023 DJI All Rights Reserved.
Accessories
Osmo Pocket 3 Handle With 1/4″ Thread
The Osmo Pocket 3 Handle With 1/4″ Thread (hereinafter referred to as “handle”) makes it
more comfortable to hold when recording.* When mounting, connect the handle to the USB-C
port at the bottom of Osmo Pocket 3. The USB-C port on the rear of the handle can be used
for charging, or connecting external audio devices such as wired digital headphones, wired
microphones, and the wireless microphone receiver.
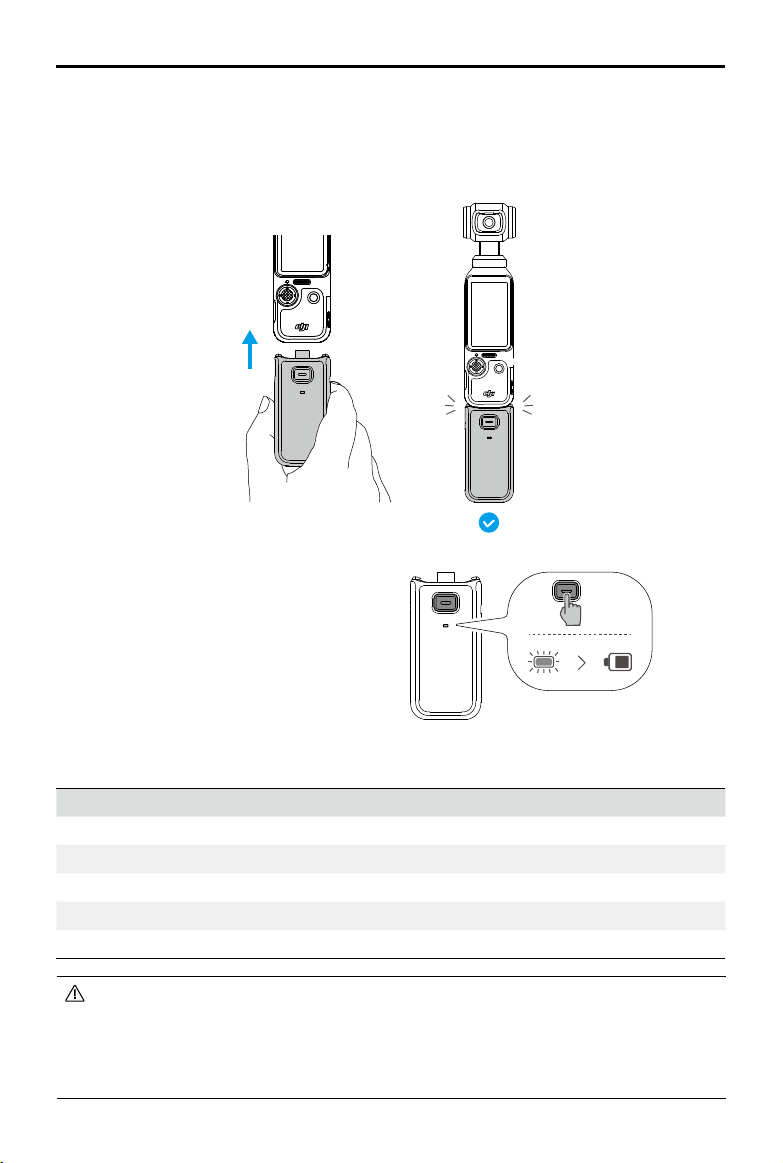
Osmo Pocket 3 Battery Handle
The Osmo Pocket 3 Battery Handle (hereinafter referred to as "battery handle") has a built-in
950mAh battery, which can greatly extend the operating time when connected to Osmo Pocket
3. When mounting, connect the battery handle to the USB-C port at the bottom of Osmo Pocket
* Hold Osmo Pocket 3 as shown in the illustration. After shooting high-specication videos for an extended
period, the upper part of the product may become hot. DO NOT hold too high to avoid high temperatures.
When detaching, press and hold the release button on the handle and unplug the handle.
2
1
DJI Osmo Pocket 3 User Manual
© 2023 DJI All Rights Reserved. 7
When detaching, press and hold the release
button on the battery handle and unplug
the handle. After the battery handle is
detached, press the release button once to
check the battery level using the status LED.
Status LED Battery Level
Solid red for 3 s and turns o 0% - 19%
Solid yellow for 3 s and turns o 20% - 49%
Solid green for 3 s and turns o 50% - 100%
Blinks green Charging
O Fully Charged
• Make sure the battery handle has power when used with external audio devices.
• Make sure the battery handle is properly insulated to prevent re hazards. DO NOT
drop or strike the battery handle.
• It is recommended to use the DJI 65W Portable Charger or DJI 30W USB-C Charger (not
included) to charge the battery handle.
950 mAh
×1
3. Make sure the battery handle is rmly attached and the clips on the two sides are locked into
place. Once mounted, the power level of the battery handle can be checked on the rotatable
touchscreen. The USB-C port on the rear of the battery handle can be used for charging or
connecting external audio devices such as wired digital headphones, wired microphones, or the
wireless microphone receiver.

DJI Osmo Pocket 3 User Manual
8 © 2023 DJI All Rights Reserved.
• With the wide-angle lens attached, the camera will face in the same direction as the
touchscreen when powered off. In this state, the handheld gimbal camera can be
stored in the Osmo Pocket 3 Protective Cover directly. The wide-angle lens can also be
detached and stored in the dedicated storage location in the Osmo Pocket 3 Protective
Cover.
• The wide-angle lens is a small object. Keep it away from children to avoid swallowing.
• Keep the camera lens and both sides of the wide-angle lens clean. Dust or sand may
scratch the lens and result in the wide-angle lens falling o.
Osmo Mini Tripod
Both the handle and battery handle have a 1/4" screw hole at the bottom, which can be used
to install the Osmo Mini Tripod. The mini tripod enables the Osmo Pocket 3 to stand on a at
surface and shoot footage from a xed position.
Osmo Pocket 3 Wide-Angle Lens
Attach the magnetic Osmo Pocket 3 Wide-Angle Lens to the camera as shown to achieve a wider
shooting angle with 108° FOV and 15mm equivalent focal length.
• If foreign object is obstructing the USB-C port, use an air blower, soft brush, or other
tools to clean the USB-C port and remove the foreign object. Note to sweep from the
inside of the port to the outside.
• The battery handle is not waterproof. DO NOT drop it in water or spill any liquid on
the handle.
• Discharge the battery handle to 50% battery level if it is not used for 10 days or more
in order to extend the battery life.

DJI Osmo Pocket 3 User Manual
© 2023 DJI All Rights Reserved. 9
1
2
Using for the First Time
Inserting the microSD Card
The footage shot on Osmo Pocket 3 can only be stored on a microSD card (not included). A
UHS-I Speed Grade 3 rating microSD card is required due to the fast reading and writing speeds
necessary for high-resolution video data. Refer to the recommended microSD card list in the
Specications section for more information.
Insert the microSD card into the microSD card slot as shown. To remove the microSD card,
gently push the microSD card to partially eject it.
The photos and videos can be transferred to a mobile device or computer. Refer to the
Transferring Files section for more information.
Powering on
Rotate the touchscreen clockwise or press the Shutter/Record button to power on the Osmo
Pocket 3. If the Screen Rotate & Capture function has been enabled from the control menu, the

DJI Osmo Pocket 3 User Manual
10 © 2023 DJI All Rights Reserved.
• The rotate screen to power o function can be congured as follows:
1. Swipe down from the top of the screen to enter the control menu.
2. Tap the settings icon.
3. Scroll down and tap Rotate screen to power o. Then select Now, 2s, or Never.
a. When Now is selected, the camera will power o immediately after you rotate
the touchscreen counterclockwise.
b. When 2s is selected, after rotating the touchscreen, a prompt will be displayed
asking whether to continue shooting. If you do not select within 2 seconds, the
camera will power o.
c. When Never is selected, the camera will continue to shoot after rotating the
screen.
Activation
Make sure to activate the camera using DJI Mimo before rst use. Follow the steps below to
activate:
1. Rotate the touchscreen clockwise or press the Shutter/Record button to power on the
camera.
2. Enable Wi-Fi and Bluetooth on the mobile device.
3. Launch DJI Mimo on the mobile device, tap to connect to the camera, and then follow the
instructions to activate the camera.
Osmo Pocket 3 will start capturing footage as soon as you rotate the touchscreen and power on
the camera. The shooting mode is subject to the users selection in the Screen Rotate & Capture
function settings. After shooting, the camera will automatically power off if left idle for two
seconds. Alternatively, users can press the Shutter/Record button for one second or rotate the
touchscreen counterclockwise to power o the camera.
ON
Otros manuales para OSMO POCKET 3
1
Tabla de contenidos
Otros manuales de Cámara de acción de dji

dji
dji OSMO ACTION Manual de usuario

dji
dji OSMO ACTION Manual de usuario

dji
dji OSMO+ Manual de usuario

dji
dji Zenmuse Zenmuse Manual de usuario

dji
dji OSMO ACTION 3 Manual de usuario

dji
dji OSMO+ Manual de usuario

dji
dji ACTION 2 Manual de usuario

dji
dji Osmo Pocket Manual de usuario

dji
dji Osmo Pocket Manual de usuario

dji
dji Zenmuse XT Manual de usuario


