AnkerMake M5 Manual de usuario

M5
USER MANUAL
5X Faster, Extra Intelligent.
AnkerMake M5 FDM 3D Printer
V01_EN
Anker Innovations Limited. All rights reserved. AnkerMake and AnkerMake Logo are
trademarks of Anker Innovations Limited, registered in the United States and other
countries. All other trademarks are the property of their respective owners.
Product Name: AnkerMake M5
Model: V8111

0201
Important Safety Instructions
• The power cord shall be connected to socket-outlet with earthing
connection.
• The power supply should be installed near the equipment, and the socket-
outlet must be easily accessible.
• Only use the power cord provided by the manufacturer. Using unauthorized
power cords may cause danger and violate the authorization of the product
and the guarantee.
• The power cord plug is considered as the disconnect device. Once
unplugged, the product is considered to be disconnected from the power
source.
• Do not use the device in an environment where the temperature is too high
or low. Never expose the device to strong sunshine or wet environments.
• The suitable temperature range for the product and its accessories is 59 ℉-
95 ℉/ 15℃-35℃.
• It is recommended to operate the device in an environment with a
temperature that ranges from 59 ℉/15℃to 77 ℉/25℃.
• When operating, place the device in an environment that has a normal
room temperature and good ventilation.
• This equipment is not suitable for use in locations where children are likely to
be present. This equipment is not intended for use by children.
CAUTION - Moving parts. Keep body parts away from moving parts.
CAUTION - Hot parts. Do not touch.
•Do not use the product in any way other than described herein in order to
avoid personal injury or property damage.
•User should comply with the laws and regulations of his/her corresponding
country and region where the equipment is located (used), abide by
professional ethics, pay attention to safety obligations, and strictly
prohibit the use of our products or equipment for any illegal purposes. Our
company will not be responsible for any violators' legal liability under any
circumstances.
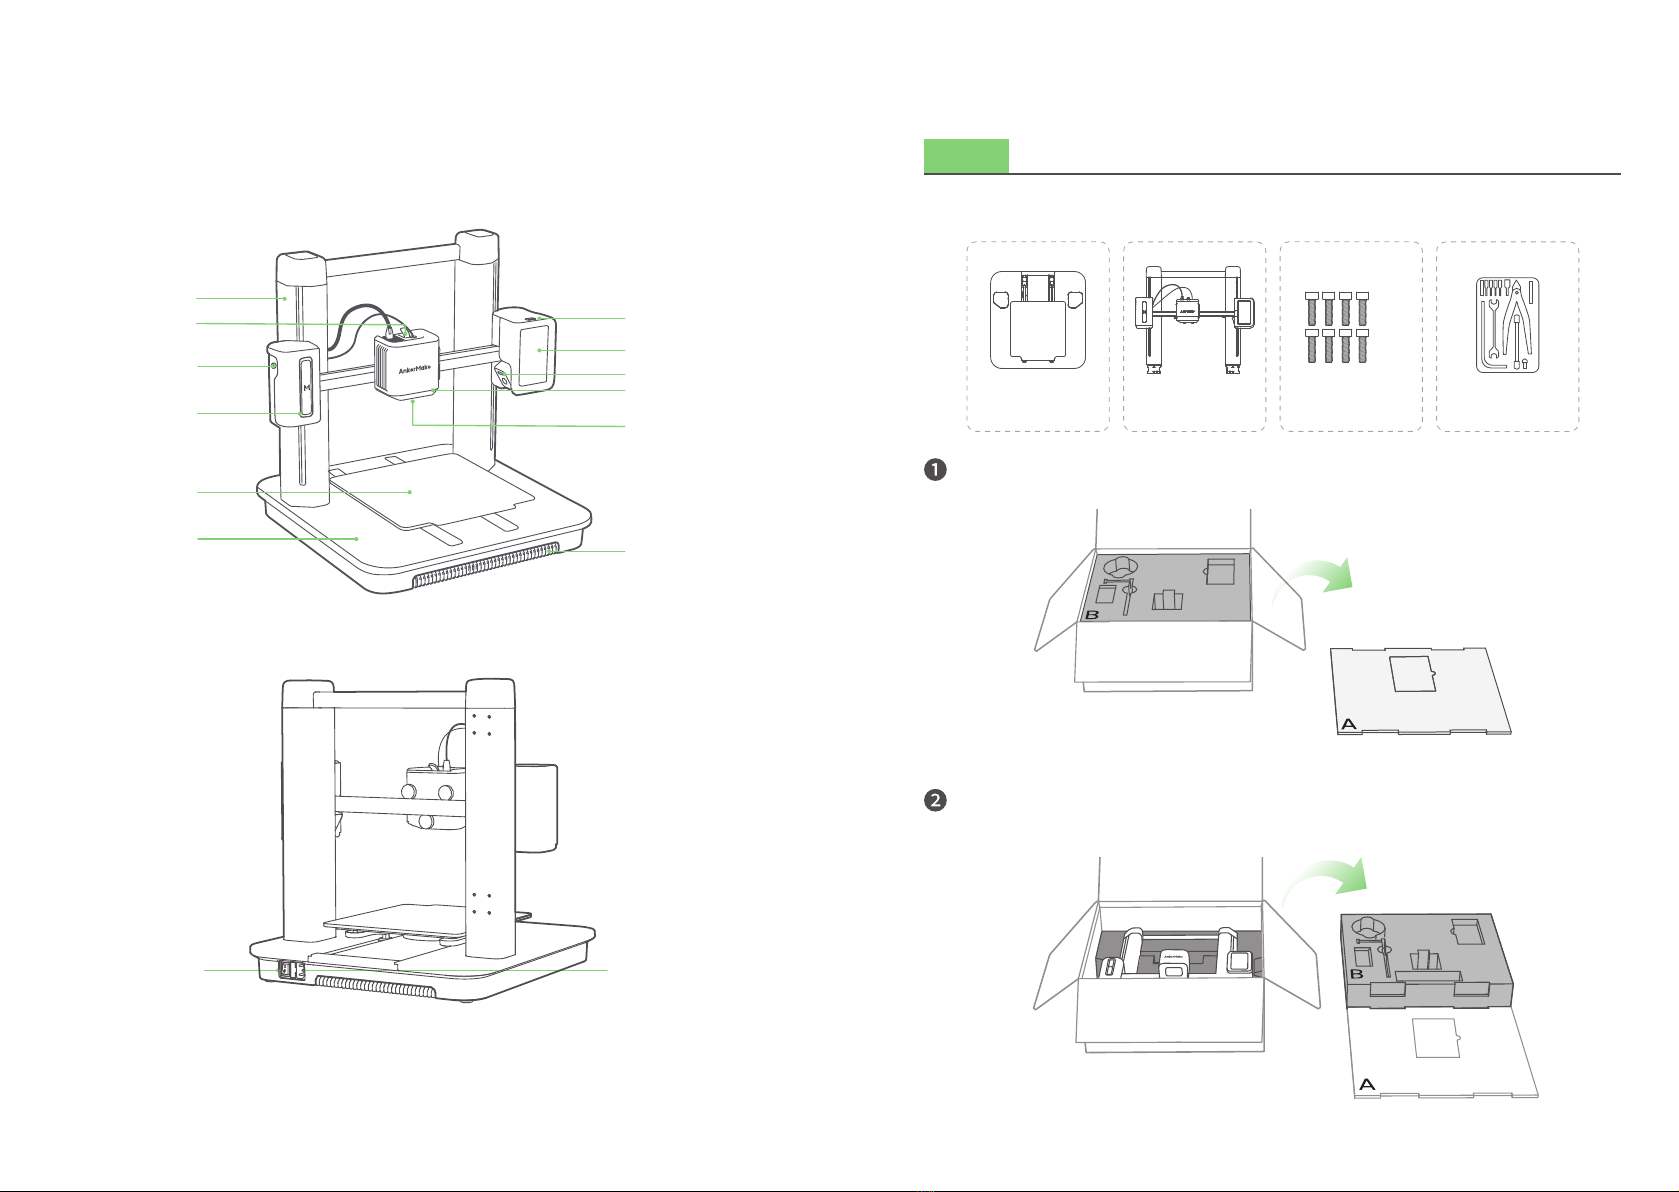
What's in the Box
Check if all items below are included while unboxing. If anything is missing,
please contact our customer service.
M4
M5
M2.5
Platform
Screws Power Cord Filament Toolbox
Gantry Frame Filament Holder
The power cord plug may vary by country or region.
0403
At a Glance
USB-C Port
Touch Screen
Camera
Extruder
Nozzle
Power Socket
Indicator Light
PTFE Feeding Tube
Extruder Clip
Gantry Frame
Platform
PEI Plate
Power Switch
Ventilation Holes
Assembling the Printer
Step 1. Installing Gantry Frame
What You Need
M5
Open the box, then place the foam cover (A) on a at, stable surface.
Take out all the accessories in the foam (B), then place the foam (B) next to the
foam cover (A) as support.
Platform Screws ToolboxGantry Frame

0605
Take out the gantry frame with its packaging foam (C) and place it on the foam (B).
Move the gantry frame as shown below.
Detach the bottom cover from the platform.
Route the USB-C cables through the holes, then insert the two supports of the gantry
frame into the base holes.
Fasten 8 screws into the platform to rmly x the gantry frame.
M5×8

0807
Step 2. Wiring
What You Need
M2.5
Connect the motor wires and make sure that the connector's pin side is facing
outside.
Screws Toolbox
Connect and secure the USB-C cables with screws.
M2.5×4
Put the bottom cover back onto the platform.
Make sure to rmly secure the USB-C
cables with screws.

1009
Step 3. Installing Filament Holder
What You Need
M4
Secure the lament holder with screws.
M4×4
Option 1
Option 2
ScrewsFilament Holder Toolbox
Step 4. Connecting to Power
What You Need
Check if the voltage (115V for the USA, Canada and Japan; 230V for the EU) matches
and remove the foam from the platform.
Visit ankermake.com/support to learn how to switch voltages.
Connect the printer to a power outlet with the power cord, then switch on the
printer. The power light will turn steady red.
①
②
Follow instructions on the touch screen to complete the initial setup.
Power Cord

1211
Leveling Heatbed
The heatbed calibration is the most important step for successful printing as it ensures
part adhesion on the rst layer. Ideally, the distance between the nozzle and the
heatbed is constant, but it varies at different positions, which could cause warping on
prints or even a complete failure.
Tear off the protective lms on the touch screen.
On the touch screen, follow the onscreen instructions to complete the leveling and
other operations.
Avoid moving the printer during the auto-leveling process.
You can tap Skip, but make sure to level the heatbed before the rst use.
Please set up the system in the AnkerMake app while waiting for leveling to nish.
Steady Green: Working

1413
AnkerMake App
The AnkerMake app enables you to try the best of this 3D printer and enhances your
experience.
• The app will update from time to time.
Functions Description
Bluetooth Connection Connects the 3D printer to your phone via Bluetooth.
Multi-Terminal Connection Connects the 3D printer to Wi-Fi to enable remote wireless
operation.
Device Sharing Share the 3D printer with others (Up to 2 persons).
Remote Controls Remotely control the 3D printer, including remote printing,
temperature adjustment during printing, network switch, renaming,
and more.
Remote Printing Remotely operate the printing work, enable one-key printing or
remotely print the local les.
Live Video Streams live video.
Time-Lapse Video Synthesizes time-lapse short video using photos taken during
printing.
AI Monitoring Intelligently monitors the printing process for error conditions.
Warning Sending Sends warning messages during printing.
Download and install the AnkerMake app from App Store (iOS devices) or Google
Play (Android devices).
ankermake
When you sign up for an account, you are requested to choose your country or region.
Add device. Make sure your phone's Bluetooth is enabled and close to your
AnkerMake M5.
Add AnkerMake M5 from the device list and enter the PIN code that is displayed on
the printer's touch screen.

1615
Connect your AnkerMake M5 to Wi-Fi and rename it.
• Any Wi-Fi that needs authentication is not supported like the public Wi-Fi in airports,
subways, hotels, etc. It only supports 2.4GHz network.
Now access the home page of AnkerMake M5.
Loading Filament
Place the lament onto the holder.
Straighten the lament at least 0.78 inches
/ 2 cm and cut the tip of the lament at a 45°
angle.
45°

1817
Insert the lament. Then press and hold the extruder clip while continuing to insert
the lament. Stop when you feel some resistance.
On the touch screen, tap Control > Extrude > Load. Wait until lament ows out of
the nozzle, then tap Stop.
Indicator Light* Description
Flashing Orange Slowly Heating Up
Fading Green Repeatedly Printing
Flashing Red Alert
Steady Green Normal
Installing the AnkerMake Slicer
For the best printing experience, download and install the AnkerMake Slicer to your
computer from
ankermake.com/software
The AI recognition capabilities will be not available when the printer works with
other 3D slicer software, such as Cura.
When you sign up for an account, you are requested to choose your country or
region.
Otros manuales para M5
1
Tabla de contenidos
Otros manuales de Impresora 3D de AnkerMake


