ZKTeco FaceDepot 4A Manual de usuario

Quick Start Guide
Version: 1.0
Due to regular upgrades of systems and products, ZKTeco could not guarantee exact consistency between
the actual product and the written information in this manual.
FaceDepot 4A

1
Overview
Speaker
USB
Camera
Fingerprint Sensor
Card Reading Area
Near-infrared Flash
Front
Bottom
32.4mm
Top
193mm
100mm
Rear
Side
Indicator Light
Reset
SIM
Note:
Remove the back cover of the device, you can set the SIM card and back-up
battery by yourself.
2.
Not all products have the function with , the real product shall prevail.
4.
1. When verification is successful, the indicator light turns green, and when
verification fails, the indicator light turns red.
To ensure the accuracy of fingerprint recognition, please remove the fingerprint
sensor protective film before using your fingerprint.
3.

2
ALARM+
ALARM-
NC
COM
NO
SEN
GND
BUT
AUX
GND
485A
485B
GND
TXD
RXD
GND
WD0-OUT
INWD0
INWD1
GND
12V-OUT
WD1-OUT
GND
GND
Power In
Alarm
Network
RS485 & RS232
WiegandLock, Door Sensor,
Exit Button & Auxiliary Input
Standalone Installation
TCP/IP
Alarm Smoke
Detector
Lock
Exit Button
Door Sensor
Card
Reader
Printer
ZKBio Access IVS
ZKBio Time
4G
Connection Cables
Click on [COMM.] > [Ethernet] > [IP Address] , input the IP address and click on [OK].
Note: In LAN, the IP addresses of the server (PC) and the device must be in the
same network segment when connecting to the ZKBio Access IVS/ZKBio
Time software.
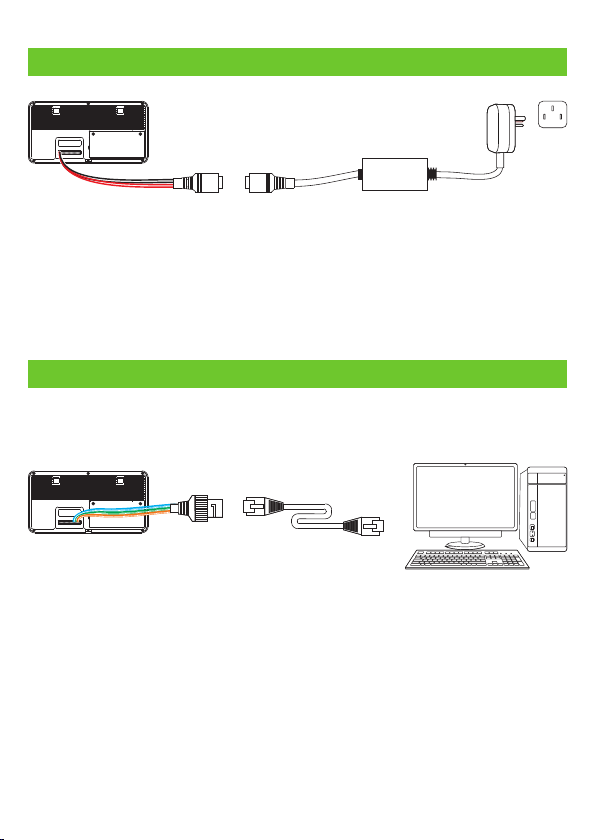
Recommended power supply
12V ± 10%, at least 3,000mA.
To share the power with other devices, use a power supply with higher current
ratings.
2.
1.
3
Power Connection
AC Adapter
DC 12 3A
Ethernet Connection
Connect the device and computer software over an Ethernet cable. As shown in the
example below:
IP address: 192.168.1.130
Subnet mask: 255.255.255.0
ZKBio Access IVS
ZKBio Time
Default IP address: 192.168.1.201
Subnet mask: 255.255.255.0

4
RS485 and RS232 Connection
The RS485 and the RS232 lets user connect to multiple readers to the device. The RS232
and RS485 can be connected to the terminal, as shown in the figure below.
Printer
RS232
485A
RS485
Reader
485B
GND
TXD
RXD
GND
Door Sensor, Exit Button & Auxiliary Connection
Door Sensor
ExitButton
Smoke Detector
-
-
-
SEN
GND
BUT
AUX
GND
NO
COM
Detector
Power
Alarm Connection
-
-
-
Alarm
Power
ALARM+
ALARM-

1)Device not sharing power with the lock 2)Device sharing power with the lock
NC
AUX
BUT
GND
SEN
NO
COM
Normally Closed Lock
DC12V
FR107
Maximum 30V 3A input.
GND
+12V
DC12V
DC12V
FR107
GND
+12V
Normally Closed Lock
Do not reverse the polarity.
GND
NC
AUX
BUT
GND
SEN
NO
COM
GND
5
Lock Relay Connection
The system supports both Normally Opened Lock and Normally Closed Lock.
The NO Lock (normally opened when powered) is connected with 'NO1' and
'COM' terminals, and the NC Lock (normally closed when powered) is connected
with 'NC1' and 'COM' terminals. The power can be shared with the lock or can be
used separately for the lock, as shown in the example with NC Lock below:

6
When there is no super administrator set in the device, click on to enter the menu.
Add a new user and set User Role to Super Admin, then the system will request for the
administrator’s verification before entering the menu. It is recommended to register a
super administrator initially for security purposes.
User Registration
Click on > [ ] > [ ] to register a new user. The options include User Mgt. New User
entering the user ID and Name, setting User Role and Access Control Role, registering
Face, Fingerprint, Card and Password.
Method 1: Register on the Device
L
L
485A
485B
GND
Wiegand Connection
Wiegand card reader connects to the top 4 pins of the wiegand terminal and the last
two pins are used by the Access controller, as shown in the following figure. It sends the
credentials to the device via wiegand communication.
WD0-OUT
GND
12V-OUT
WD1-OUT
INWD0
INWD1
Access Controller
Wiegand Reader

7
L
Method 2: Registering on ZKBio Time Software
Please set the IP address and cloud service server address on the device.
Click [Device] > [Device] > [Add] to add the device to the software. It can
automatically be added when the device's server address and port are set.
1.
Register on the PC
Personnel AttendanceDevice Access Control Payroll Visitor Meeting MTD System
Data
Log
Mobile App
Configurations
Device
Device Name
Serial Number
Area
Registration Device
Request Heartbeat
Device IP
Timezone
Attendance Device
Transfer Mode
Etc/GMT +3
Yes
Real-Time
No
10 Seconds
Confirm Cancel
Device
Device
Device Command
Message
Add

Once the ZKBio Time software is installed, the users could enroll their face via a browser
application on their own mobile phone.
Click [Device] > [Data] > [Bio-Photo] > [QR Code] scan the QR code to enroll user
face.
Register on the Phone
For more details, please refer to the ZKBio Time User Manual.
Click [Personnel] > [Employee] > [Employee] > [Add] to register users in the software.
2.
Synchronize personnel on the software to the devices in the corresponding area.
3.
In the personnel list, select an employee(s) and click [More] > [Resynchronize to
device] to access the confirmation interface for synchronizing.
4.
Note: Before registering a person's face, you need to register the information about the
user on ZKBio Time software in advance. As, personnel ID, name and phone number,
etc.
8

Method 3: Register on ZKBio Access IVS Software
Please set the IP address and cloud service server address in the Comm. Menu option
on the device.
Click [Attendance] > [Attendance Device] > [Authorized Device] to search the
device on the software. When an appropriate server address and port is set on the
device, the searched devices are displayed automatically.
1.
Click [Add] in operation column, a new window will pop-up. Select Icon type, Area,
and Add to Level from each dropdowns and click [OK] to add the device.
2.
Click [Personnel] > [Person] > [New] and fill in all the required fields to register a
new users in the software.
3.
Click [Attendance] > [Attendance Device] > [Device Control] > [Synchronize
Software Data to the Device] to synchronize all the data to the device including
the new users.
4.
For more details, please refer to the ZKBio Access IVS User Manual.
Register on the PC
9
Otros manuales para FaceDepot 4A
1
Tabla de contenidos
Otros manuales de Cámara digital de ZKTeco


