Wyrestorm Synergy SYN-TOUCH10 Manual de usuario

INT: +44 (0) 1793 230 343 | US: 844.280.WYRE (9973)
support@wyrestorm.com
Copyright © 2023 WyreStorm ProAV Corporation | wyrestorm.com
Sygma Cloud Monitoring User Guide | 230706
USER MANUAL
SYN-TOUCH10
V1.0

INT: +44 (0) 1793 230 343 | US: 844.280.WYRE (9973)
Copyright © 2023 WyreStorm ProAV Corporation | wyrestorm.com
SYN-TOUCH10 User Manual | 230904 1
Introduction
Tailored for single-room applications, this touchpad presents a seamless solution for intuitive control of devices in
conference rooms. By utilizing a preloaded conguration le, you can effortlessly manage connected devices,
enhancing your conferencing experience.
User Manual Purpose
This user manual provides step-by-step instructions for conguring the SYN-TOUCH10 using the Synergy Touch App.
The Synergy Touch App is compatible with Windows, MacOS, and Android. This guide will specically focus on the
Windows version.
Creating a Conguration File
To initiate the process of crafting your conguration le and personalized graphical user interface, you must rst
download the Synergy Touch App designed for your specic platform. The installation les can be accessed on the
Wyrestorm website within the SYN-TOUCH10 download section.
Upon downloading and installing the software, you will be greeted by the following welcome screen:
Located at the upper section of the welcome screen is the Toolbar, which provides access to various functions. Below
is a description of each button on the toolbar:
INT: +44 (0) 1793 230 343 | US: 844.280.WYRE (9973)
Copyright © 2023 WyreStorm ProAV Corporation | wyrestorm.com
SYN-TOUCH10 User Manual | 230904 2
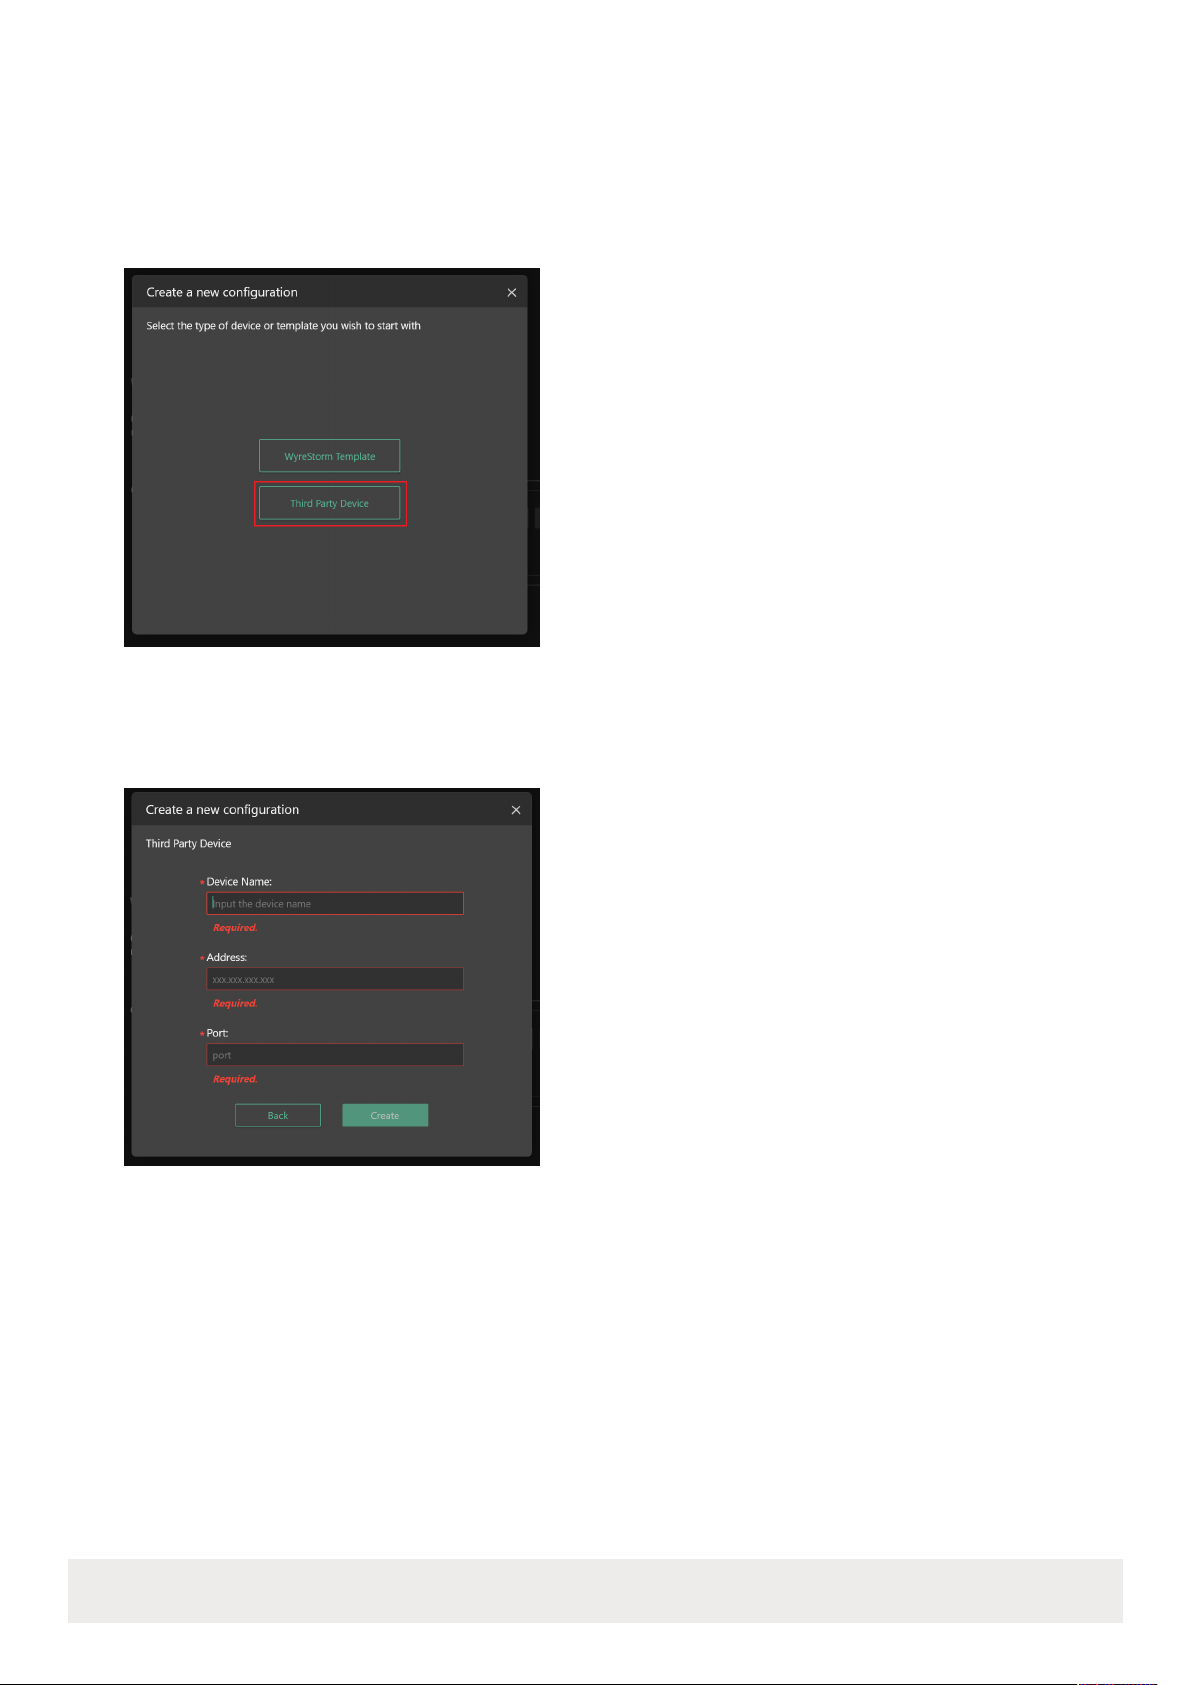
Let's click on the "Create a new conguration le" button to initiate the creation of a new conguration project. Here, you
can also choose the specic type of device you wish to control. If your target device belongs to the Wyrestorm product
range, please opt for the Wyrestorm template, which is available for download on the Wyrestorm website. However, if
you intend to tailor functions for devices from other manufacturers, select the "Third Party Device" option. For the
purpose of this guide, we will choose the "Third Party Device" option for instructional demonstration.
In the subsequent window, please ll out the provided form, paying particular attention to the mandatory elds denoted
by red asterisks. After ensuring all necessary information is provided, proceed to click on the "Create" button. This
action will result in the successful creation of an empty conguration project.

INT: +44 (0) 1793 230 343 | US: 844.280.WYRE (9973)
Copyright © 2023 WyreStorm ProAV Corporation | wyrestorm.com
SYN-TOUCH10 User Manual | 230904 3
Creating Conguration Items
Once you have successfully created the new Conguration File, it's time to begin incorporating Conguration Items into
your project. At the moment the project is empty, and you can see two different areas. The column to the left is the
Layout List, where you can switch between different layouts, or edit, delete or sort a layout. The area to the right
displays the selected layout. You can add, edit, delete, copy, paste, split or drag a Button here. In preview mode, you can
also directly test any button to verify its functionality, we will cover that part later.
To proceed, navigate to the left-hand side and nd the "Add" button. Clicking on this button will provide you with the
option to select either a new layout or a new button, based on your requirements. Given that no layouts have been
chosen thus far, only the "Layout" option is available currently.
Choose your desired layout, and then proceed to input the essential information related to the selected layout. Below
you can nd more information about required elds.

INT: +44 (0) 1793 230 343 | US: 844.280.WYRE (9973)
Copyright © 2023 WyreStorm ProAV Corporation | wyrestorm.com
SYN-TOUCH10 User Manual | 230904 4
Now you can see the layout in the Layout list that we just created, and it’s active. When you move the mouse over the
Tab, you will see the two buttons which you can click to edit or delete the layout.
On the right-hand side, you will notice the currently selected layout name along with the designated spaces for buttons
or placeholders. By clicking on any vacant placeholder space, you can add a new button to that specic location.
There are different types of buttons you can add:
Set only Button: This is the most common button type used to send commands to the target device.
Get only Button: This button type allows you to retrieve information or check the status of a device.
Set & Get Button: This button enables you to send a command and receive a response related to the command sent.
Src & Sink Button: This type of button is particularly useful for matrix switching scenarios. It can be congured to
receive responses about which source/input is currently linked to an output/display.
All in One: A button to implement commands of all buttons in one layout with one click. For example, a button to run
commands for turning off display and muting microphone sequentially.
For this example we will select Set only Button and congure it to increase the volume on Wyrestorm APO-VX20-UC:

INT: +44 (0) 1793 230 343 | US: 844.280.WYRE (9973)
Copyright © 2023 WyreStorm ProAV Corporation | wyrestorm.com
SYN-TOUCH10 User Manual | 230904 5
Once you've supplied a name for the button, proceed to select a suitable icon for it. Then, choose the specic device to
which you intend to send commands. Following this, dene the command itself. Once these steps are completed, click
the "Save" button. This action will result in the button being showcased within the workspace for your conguration
project.
When you move the mouse over the Button, the corresponding options will appear: Edit , Delete , Copy ,
Paste , Split , and Recover . You can also hold down a Button and drag it to another location.
In order to test our conguration we can press Preview icon on the top toolbar .
When in preview mode, the screen will resemble the actual appearance on the TouchPad device. In this mode, you have
the ability to directly click on each button to validate their real-world functionality. This provides a way to ensure that the
buttons are behaving as intended and performing their designated actions accurately.
To exit the preview mode and go back to Edit Mode click Preview icon again.
Finally, once you're condent that all editing and verication tasks have been completed, proceed to export the
conguration project le . Copy the generated le to the root directory of your SD card or USB flash drive. Next,
insert the SD card or USB flash drive into the TouchPad device. Upon doing so, relaunch the Synergy Touch Application
on the TouchPad. The device will then be congured with the uploaded settings, allowing you to make use of the newly
dened functionalities.
Exploring Button Types
Within this section, we will thoroughly examine each type of button and explore some of their advanced functionalities.
By the end of this section, you will have a complete grasp of the various button types and their capabilities.
Six types of buttons are provided: Set only, Get only, Set & Get, Src & Sink, Matrix and All in One.
Set only Button
The Set only Button is a button that sends commands to a target device only and does not care about the response. It
is able to send specied commands to corresponding devices one by one. It is mostly used to send conguration or
action commands to one or more target devices.
Button Name: This is the label that will be displayed on the button.
Surname: An alternate or brief identier that appears on the button.
Icon: The graphic symbol exhibited on the button. If no icon is
necessary, you can leave this eld empty.
Long Press Interval: The long press function permits continuous
command transmission to a device at a specic interval. Here, you can
set the time gap between sending successive commands to the target
device during prolonged button presses. The acceptable range for the
value is 0 to 2 seconds. If the default value of 0 is retained, the long
press functionality will be deactivated.
Device: Choose the target device to which the command is directed.
You can append or revise devices using the Device Management dialog,
accessible through the toolbar.
Command: Input the command content to be dispatched to the
intended device.
Delay: Determine the duration between pressing the button and the
moment the command is dispatched.

INT: +44 (0) 1793 230 343 | US: 844.280.WYRE (9973)
Copyright © 2023 WyreStorm ProAV Corporation | wyrestorm.com
SYN-TOUCH10 User Manual | 230904 6
Get only Button
The Get only Button serves the purpose of fetching information from the target device and organizing it into designated
message text. This text is then presented on the Synergy Touch interface. This type of button is particularly valuable for
showcasing instructive prompts, such as guidance on connecting to or engaging with the target device.
Device: This is where you select the intended device for sending
commands. Devices can be added or modied through the Device
Management dialog, accessible from the toolbar.
Button Name: Designate the text label to be presented on the button.
Message: Upon pressing the button, a window emerges at the button
location, and the text provided here is showcased within the window. It's
important to note that you can use placeholders (like $GO1, $GO2, …,
$GO(n), etc.) here. These placeholders can temporarily replace the
actual response content from the "Command" section below. For
instance, $GO1 stands for the response of Command 1, $GO2
corresponds to the response of Command 2, and so forth.
Command: Specify the command content to be dispatched to the target
device. You can dene multiple commands, which will be dispatched
one after the other in a sequence to the target device. The real response
of each command will be substituted by the placeholders $GO1, $GO2, …
in the "Message" eld described above. Test: Click this button to verify
whether the command was successfully sent.
Icon: Dene the icon that appears on the button. If you prefer not to
display an icon, you can leave this eld empty.
Background: This refers to the background image of the popup window
where the content specied in the "Message" eld is displayed.
Example:
In this instance, we will illustrate the process of creating a button to
retrieve information related to Miracast casting for the Video Bar APO-
VX20-UC. Specically, we will provide details about the device name and
the access code.
To begin, we must identify the suitable API commands that we'll be
transmitting. To obtain the device name of the APO-VX20-UC, we will use
the command "gbcong -s name." Similarly, for the access code, the
command to use is "gbcong -s access-code."

INT: +44 (0) 1793 230 343 | US: 844.280.WYRE (9973)
Copyright © 2023 WyreStorm ProAV Corporation | wyrestorm.com
SYN-TOUCH10 User Manual | 230904 7
The end result will mirror the image displayed below:
Set & Get Button
The Set and Get Button functions by adjusting the status of the designated device and subsequently updating its icon
to reflect the most current state. This button type is particularly suitable for scenarios tied to device states, such as
determining if a microphone is muted or active.
With each press of the button, it initiates a two-step process. First, it transmits a "Set Command" to the device, followed
by a "Get Command" to retrieve the latest status from the target device. If the actual response aligns with an "Expected
Result" for a particular status, the corresponding icon for that status is displayed. However, if no Expected Result is
matched, the icon designated for "Unmatched Status" is showcased. This button is adept at handling situations where
device status changes need to be tracked and displayed in real time.
A maximum of 5 states are supported. You can click the button to add a new status or click the button to
remove one.
Device: Here, you can select the intended target device for the commands to be transmitted. New devices or
modications can be managed through the Device Management dialog, accessible from the toolbar.
Button Name: This represents the label that will be showcased on the button.
Get Command: The instruction utilized to retrieve the current status.
Icon for Unmatched Status: This is the default icon displayed when there is no corresponding status match.
Set Command: A command employed to set a particular state.

INT: +44 (0) 1793 230 343 | US: 844.280.WYRE (9973)
Copyright © 2023 WyreStorm ProAV Corporation | wyrestorm.com
SYN-TOUCH10 User Manual | 230904 8
Expected Result: Specify the anticipated response that matches the desired status. This should align with the actual
response after transmitting the Set Command, followed by the Get Command.
Delay: Determine the time interval between pressing the button and the command being sent.
Icon for Status: This icon is presented when the actual response from the Get command coincides with the Expected
Result for that specic status.
Example:
In this example, our objective is to facilitate the toggling between muting and unmuting the microphone of the APO-
VX20-UC Video Bar. We will also verify whether the action effectively alters the state.
For muting and unmuting the microphone on the APO-VX20-UC Video Bar, the commands are as follows:
Mute Command: "gbcong --mic-mute y"
Unmute Command: "gbcong --mic-mute n"
To retrieve the current microphone status, we will use the command Get Microphone Status Command: "gbcong -s
mic-mute"
With the appropriate commands in hand, we can proceed to input them in the designated dialog boxes, as
demonstrated below:
This example outlines the process of setting up the button to toggle the microphone status for the APO-VX20-UC Video
Bar and ensuring the successful execution of the desired action.

INT: +44 (0) 1793 230 343 | US: 844.280.WYRE (9973)
Copyright © 2023 WyreStorm ProAV Corporation | wyrestorm.com
SYN-TOUCH10 User Manual | 230904 9
Src & Sink Button
The Src & Sink Button is a special button for matrix paring.
It has two roles, Source and Sink.
• For the Source role, it is responsible for providing a Value and a Color.
• For the Sink role, it is responsible for interacting with the target device with the Value obtained from a Source button,
and then determining the association relationshi with the Source. When the association relationship is established, it
will display the Color held by the Source button.
Source role:
• Role: The role of the button.
• Button Name: Denes the label that will be presented on the button.
• Icon: The icon displayed on the button. If not needed, you can leave this eld blank.
• Value: This parameter represents the source and is transferred to a Sink button when activated subsequently.
• Color of Button: When a Sink button becomes associated with a Source button, the border color of the Sink button
mirrors the Color held by the Source button.
Sink role:
• Device: Choose the target device for command transmission. Devices can be added or adjusted via the Device
Management dialog, accessed from the toolbar.
• Set Command: The command sent to establish an association with a Source button. The "$SRC" wildcard stands in
for the variable data obtained from the Value eld of the Source button.
• Set Null Command (Optional): If a Sink button is pressed without activating a Source button rst, this command
undoes the previously established association. If not congured, the association cannot be undone.
• Get Command: After issuing the Set Command or Set Null Command, this command checks if the association has
been established. The "$SRC" wildcard can also be used in this command.
• Expected Result: The anticipated response upon sending the Get Command. Successful association is conrmed
only when the Expected Result aligns with the actual response.
Otros manuales para Synergy SYN-TOUCH10
2
Tabla de contenidos
Otros manuales de Pantalla táctil de Wyrestorm

Manuales populares de Pantalla táctil de otras marcas

Elecro Engineering
Elecro Engineering Poolsmart Plus Instrucciones de instalación

Johnson Controls
Johnson Controls IQ4 HUB Manual de usuario

Elo TouchSystems
Elo TouchSystems ET2270L Manual de usuario

Elo TouchSystems
Elo TouchSystems ET1002L Manual de usuario

Elo TouchSystems
Elo TouchSystems 3201L Manual de usuario

Duratec
Duratec S15 Manual de usuario


