Worx WG605 Manual de usuario

Electric Pressure Washer EN
Laveuse à pression électrique F
Lavadora a presión eléctrica ES
P07
P11
P16
WG605

6
14
11
18
19
16
15
17
7
1
2
345
810
9
13
12

1
2
1
2
1
2
A1 A2
C1 C2
B1 B2
20

E
D
D
G1
F
D
C3 C4
21
22
1
2
1
2
G2 H1
21
2
1
I
H2
J
1
2
3
K1

K2 K3
D
LM
23

Electric Pressure Washer EN
7
GENERAL SAFETY WARNINGS
WARNING Read all safety warnings and all
instructions.
Failure to follow the warnings and
instructions may result in electric shock, fire and/or serious
injury.
Save all warnings and instructions for future refer-
ence.
This appliance is not intended for use by persons (including
children) with reduced physical, sensory or mental capabili-
ties, or lack of experience and knowledge, unless they have
been given supervision or instruction concerning use of the
appliance by a person responsible for their safety.
Children should be supervised to ensure that they do not
play with the appliance.
If the supply cord is damaged, it must be replaced by the
manufacturer, its service agent or similarly qualified persons
in order to avoid a hazard.
WARNING: This product can expose you to
chemicals including lead and Di(2-ethylhexyl)
phthalate (DEHP) which are known to the State of
California to cause cancer and birth defects or
other reproductive harm. For more information go
to www.P65Warnings.ca.gov.
IMPORTANT SAFETY INSTRUCTIONS
WARNING – When using this product basic
precautions should always be
followed,including the following:
1. Read all the instructions before using the product.
2. To reduce the risk of injury, close supervision is
necessary when a product is used near children.
3. Know how to stop the product and bleed pressures
quickly. Be thoroughly familiar with the controls.
4. Stay alert – watch what you are doing.
5. Do not operate the product when fatigued or under
the influence of alcohol or drugs.
6. Keep operating area clear of all persons.
7. Do not overreach or stand on unstable support.
Keep good footing and balance at all times.
8. Follow the maintenance instructions specified in
the manual.
9. This Product Is Provided With A Ground Fault
Circuit Interrupter Built Into The Power Cord or
Plug. If Replacement Of The Ground Fault Circuit
Interrupter Or Cord Is Needed, Use Only Identical
Replacement Parts.
10. WARNING – Risk of eye injury. Spray can
splash back or propel objects. Always wear
properly rated eye protection such as safety
goggles or face shield while spraying. (Safety
glasses do not provide full protection.)
SAVE THESE INSTRUCTIONS
GROUND FAULT CIRCUIT IN
TERRUPTER PROTECTION
This pressure washer is provided with a ground-fault
circuit-interrupter (GFCI) built into the plug or the
power-supply cord. This device provides additional
protection from the risk of electric shock. Should
replacement of the ground-fault circuit-interrupter or
cord become necessary, use only identical replacement
parts.
SERVICING OF A DOUBLE-INSULATED APPLIANCE
In a double-insulated product, two systems of insula-
tion are provided instead of grounding. No grounding
means is provided on a double-insulated product, nor
should a means for grounding be added to the product.
Servicing a double-insulated product requires extreme
care and knowledge of the system, and should be done
only by qualified service personnel. Replacement parts
for a double-insulated product must be identical to the
parts they replace.
EXTENSION CORDS
WARNING: Inadequate extension cords can be
dangerous.
If the appliance cord is equipped with a GFCI, do not use
extension cords. If the appliance cord is not equipped
with a GFCI, the appliance and any extension cord used
should be connected only to a GFCI-protected power
source.
1. Use only extension cords that have grounding-type
plugs and female cord connectors that accept the
plug from the product.
2. Use only extension cords that are intended for out-
door use. These extension cords are identified on
the packaging or on the cord by a marking “Accept-
able for use with outdoor appliances; store indoors
while not in use.”
3. Use only extension cords having an electrical rating
not less than the rating of the product.
4. Do not use a damaged extension cord. Examine ex
tension cord before using and replace if damaged.
5. Do not abuse extension cord and do not yank on a
cord to disconnect.
6. Keep cord away from heat and sharp edges.
7. Always disconnect the extension cord from the
receptacle before disconnecting the product from
the extension cord.
WARNING – To reduce the risk of electrocution, use
only a GFCI-protected extension cord or plug into
GFCI outlet. Keep all connections dry and off the
ground. Do not touch plug with wet hands.
ADDITIONAL SAFETY WARN
INGS
1. The electric supply connection shall be made by a quali-
fied electrician and comply with IEC 60364-1.
It is recommended that the electric supply to this ap-
pliance should include either a residual current device
that will interrupt the supply if the leakage current to
earth exceeds 30 mA for 30 ms or a device that will
prove the earth circuit.
2. WARNING: This appliance has been designed for use
with the cleaning agent supplied or recommended by

8
Electric Pressure Washer EN
the manufacturer. The use of other cleaning agents or
chemicals may adversely affect the safety of the appli-
ance.
3. WARNING: Do not use the appliance within range of
persons unless they wear protective clothing.
4. WARNING: High pressure jets can be dangerous if sub-
ject to misuse. The jet must not be directed at persons,
live electrical equipment or the appliance itself.
5. Do not direct the jet against yourself or others in order
to clean clothes or foot-wear.
6. Disconnect from the electrical power supply before
carrying out user maintenance.
7. High pressure cleaners shall not be used by children or
untrained personnel.
8. To ensure appliance safety, use only original spare parts
from the manufacturer or approved by the
manufacturer.
9. WARNING: High pressure hoses, fittings and couplings
are important for the safety of the appliance. Use only
hoses, fittings and couplings recommended by the
manufacturer.
10. Do not use the appliance if a supply cord or important
parts of the appliance are damaged, e.g. safety devices,
high pressure hoses, trigger gun.
11. Water that has flown through backflow preventers is
considered to be non-potable.
SYMBOLS
Read the manual
Before any work on the machine itself,
pull the mains plug from the socket
outlet.
Warning
Lock
Unlock
Warning: Do not direct the jet at per-
sons, animals and electrical equipment.
Double insulation
COMPONENT LIST
1. CARRY HANDLE
2. SOAP TANK CAP
3. SOAP TANK
4. WAND HOLDER
5. WATER PUMP
6. POWER CORD
7. WATER INLET
8. ONBOARD NOZZLE STORAGE
9. ON OFF SWITCH
10. LANCE HOLDER
11. HIGH PRESSURE HOSE
12. TURBO NOZZLE
13. NOZZLE40,SOAP
14. RECLOGGING NEEDLE
15 LOCKOUT
16. TRIGGER
17. WAND
18. LANCE
19. NOZZLE COUPLER
20. RESET BUTTON SEE FIG. F
21. TEST BUTTON SEE FIG. F
22. ORING SEE FIG. A1
23. POWER CORD CLIPSEE FIG. M
Not all the accessories illustrated or described are
included in standard delivery.
TECHNICAL DATA
WG605
Rated current 13 A
Rated pressure 1800 psi (124 bar)
Rated water flow rate 1.2 gpm
Soap tank capacity
0.6 Gal (2.3 L)

Electric Pressure Washer EN
9
Power cord length 35 ft (10.5 m)
Protection class /ll
Machinery weight 17.2 lbs (7.8 kg)
ACCESSORIES
WG605
40°Nozzle 1
Soap Nozzle 1
Turbo Nozzle 1
20ft Hose 1
Declogging needle 1
We recommend that you purchase your accessories listed
in the above list from the same store that sold you the tool.
Refer to the accessory packaging for further details. Store
personnel can assist you and offer advice.
OPERATING INSTRUCTIONS
NOTE: Before using the tool, read the instruction
book carefully.
INTENDED USE
The electric high pressure washer is intended for residen-
tial cleaning projects-from porch to patio, driveways and
decks, boats, pavers, bricks, BBQs and more.
ASSEMBLY & OPERATION
ACTION FIGURE
ASSEMBLY
Attach the lance to the wand.
Note: when attaching, align the
two projections on the lance with
the grooves on the wand.
See Fig. A1 ,A2
Attach the wand holder
See Fig. B1 B2
Screw& Unscrew the high
pressure hose
Note: Make sure the hose is
tightly connected.
Note: For convenience of
unscrewing the hose, please
pull the trigger to drain water
from wand when operation is
completed and switch is in “O”
position.
See Fig.
C1,C2,C3,C4
Attach the garden hose
Connect one end of the home
garden hose (not supplied) to
the adapter and another end to
waterspout.
See Fig. D
OPERATION
Extension cord
It is not recommended to use
the extension cord. If neces-
sary, ensure the plug and ex-
tension cord connection is on
an elevated surface that does
not contact the water area.
See Fig.E
GFCI plug test
Press “test”, the light will be out.
Press “reset”, the power regains
and the light will illuminate.
Note: To keep good operation
of GFCI, please implement it
once a month.
See Fig. F
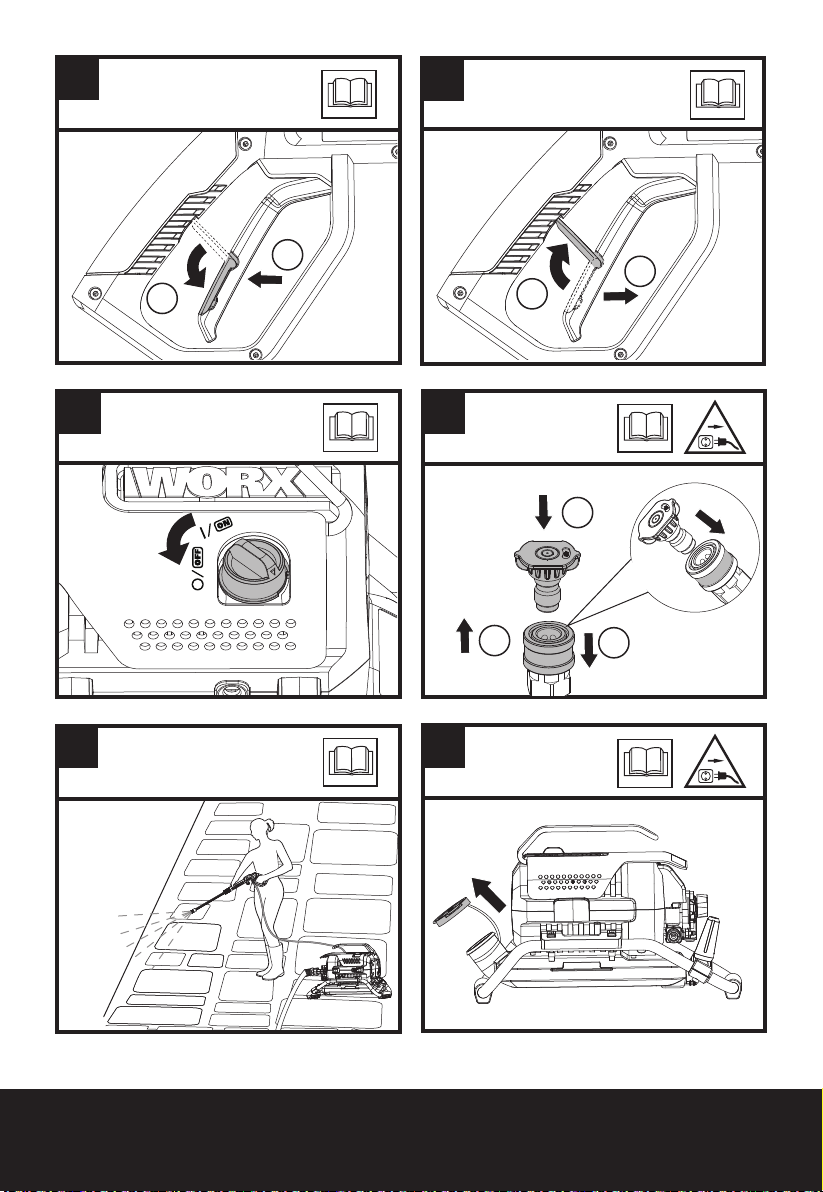
STARTSTOP
Turn on the water supply tap.
Connect the washer to the power
supply and turn the switch to
“I”position. Then press trigger
Note: Before pressing trigger,
Push the lock-out down into
the trigger.
WARNING: Do not start
the machine without
connecting and
turning on the water supply
because it may cause damage
to high pressure seals and
reduce the service life of
pump.
See Fig. G1,G2
Release the trigger and turn the
switch to “O”position. Turn Off
the water supply tap
Note: When not in use, Push
the lock-out up until it clicks
into the slot.
See Fig.H1,H2
Select the right nozzles
Select the suitable nozzle for
different cleaning jobs.
Nozzle 400(white) is applicable
for cleaning on wooden and
other soft objects .
Turbo nozzle is applicable for
cleaning concrete, bricks and
masonry.
The soap nozzle is applicable for
soaping while other nozzles can-
not be used to do it.
WARNING: Do not
change the nozzle
pattern when the tool
is powered on.
See Fig.I

111010
Electric Pressure Washer EN
Cleaning
Begin with the nozzle 1-2ft away
from the surface and approach
with caution until it reaches the
desired position for overly close
spray may do harm to surface.
WARNING: Do not
connect the machine to
water supplies that are
dirty, rusty, muddy, or corrosive.
(Including window cleaning
liquids, plant foods, or fertilizers
etc.)
See Fig. J
Add and use detergent
Install the soap nozzle before
operation.
Note: If necessary, use a funnel
(not supplied)to prevent ac-
cidental overflows of detergent
outside of the tank.
See Fig. K1, K2, K3
MAINTENANCE
Remove plug from the socket before carrying out
any adjustment, servicing or maintenance.
Inspect the product for damaged or worn parts before each
use. Do not operate it if you find damaged or worn parts.
Contact your supplier or the manufacturer for replacement
parts.
Power cord maintenance
If the supply cord is damaged, it must be replaced by the
manufacturer, its service agent or similarly qualified persons
in order to avoid a hazard
Pump maintenance
Inspect the pump frequently whether any leaking occurs
around the pump seal. If leaking occurs, please contact
service center for repair.
Nozzle maintenance
Remove the nozzle from the lance, then remove any
possible obstructions using the included declogging needle
(See Fig. L).Then use a garden hose to rinse the nozzle by
backwashing
WARNING
Any other servicing should be performed
by an authorized service representative.
STORAGE
1. Disconnect the water source. Turn on the pressure
washers for a few seconds until the remaining water
flows out. Then turn it off quickly.
2. Unplug the power supply and wind power cord on the
lance holder. (See Fig.M)
3. Disconnect the high pressure hose and the garden hose
(not supplied) .Then wind high pressure hose on the
tool. Insert the Wand and lance separately into the Wand
Holder and lance holder. (See Fig. M)
4. Store in a frost free area with a temperature above
0
°C
(32
°
F).
TROUBLESHOOTING
Symptom Possible causes Solution
Machine does not start
when the switch is in”
I”position.
Power cord is not plugged in. Plug in power cord.
Socket is defective
.
Check or replace plug, socket, fuses.
GFCI is triggered. Press reset on GFCI plug.
Machine pressure is
not consistent. Pump is faulty. Contact service center .
Air in line. Remove the nozzle, turn on the machine for a while and
install the nozzle back.
Water inlet adapter is clogged
or dirty. Remove the adapter, rinse it with water and put is back.
The pressure of the
pump is not adequate Water supply is Insufficient. Open water source completely.
Water supply is restricted. Check If the water hose kinks or leaks.
Diameter of garden hose is too
small. Replace with right garden hose .
Leak or kick in hose . Replace hose or untie kinks in hose.
No detergent Wrong nozzle is attached Attach the soap nozzle
Lance leaks O-ring needs to be replaced(See
Fig. A1) . Replace o-ring .If the problem is not solved ,contact service
center to buy a new lance.
Otros manuales para WG605
1
Tabla de contenidos
Idiomas:
Otros manuales de Hidrolavadora de Worx

Worx
Worx WG600E Manual de instalación

Worx
Worx WG602 Manual de usuario

Worx
Worx WG607 Manual de usuario

Worx
Worx WG602 Manual de usuario

Worx
Worx WG606E Manual de instalación

Worx
Worx HYDROSHOT ULTRA Manual de usuario

Worx
Worx HydroShot WG629.1 Manual de usuario

Worx
Worx WG603E Manual de instalación

Worx
Worx HYDROSHOT WG620 Manual de usuario

Worx
Worx HYDROSHOT WG620E Manual de instalación


