Wildcat MINIBMX Manual de usuario

1
Assembly Instructions |Maintenance
MINIBMX
USER GUIDE

Thanks for choosing Wildcat and congratulations
on your purchase, you have chosen wisely!
Wildcat is a stand-alone product offering on the global market; It
is the result of almost a decade of specialised development and
manufacture of high-end MiniBMX products designed by riders, for
riders. Nothing else comes close.
Before you start assembling your new Wildcat MiniBMX, please take
the time to read this instruction manual carefully and familiarise
yourself with the maintenance guide to ensure you get the best out
of your ride for years to come.
We strongly recommend your new Wildcat is assembled
by a professional.
YOU’LL NEED THE FOLLOWING BASIC TOOLS FOR ASSEMBLY:
15mm spanner for pedals & axle nuts
Allen Keys: 1.5 / 3 / 4 / 5 / 6mm
Scissors or a craft knife
Bike pump
OTHER TOOLS THAT COME IN HANDY FOR TYRE CHANGES, BRAKE ADJUSTMENT ETC
Strong
screwdriver
Large wrench,
or 32mm + 40mm
spanner
Plyers with
cutting edge 17mm spanner
for axle spacers

WILDCAT MINIBMX USER GUIDE 1
CONTENTS
ASSEMBLY
Out of the box - OG & OG-PRO 2
OG Front Wheel Assembly 3
Pedals 4
Brakes: Part 1 5
Seat 5
Handle Bars 6
Bar alignment / Head Parts 7
Brakes: Part 2 8
Cranks: 1 piece & 3 Piece 10
Tyre inflation 11
CHANGING & BALANCING TYRES
Turbo Wheels 12
Cross Wheels 16
MAINTENANCE: IMPORTANT! 20
WARRANTY 21

2
ASSEMBLY
1A
OG-PRO: Open the box and take out the
contents. Your Wildcat should look as pictured,
seat should be sitting loose in the frame.
You should have:
- Main MiniBMX assembly
- Bars with grips and brake lever
- Seat
- Pedals + brake cable ties
2
Carefully remove all protection using a knife or
scissors, taking care not to scratch the paintwork.
For OG front wheel assembly follow 3-8.
To continue with OG-PRO assembly skip to 9.
OUT OF THE BOX
1B
OG: Open the box and take out the contents.
Your Wildcat should look as pictured, seat should
be sitting loose in the frame.
You should have:
- Main MiniBMX assembly
- Front wheel (tyre on rim set + hub assembly
which you’ll need to assemble)
- Bars with grips and brake lever
- Seat
- Pedals + brake cable ties
Disc brake version
WILDCAT MINIBMX USER GUIDE 3
7
Place bike upside down, insert assembled wheel
axle into the fork dropouts. Wind the axle nuts in by
hand at first. IMPORTANT: ensure the keyed washers
insert into the triangle holes on the dropouts.
4
Flip over, then push down firmly on the wheel
against the floor to correctly seat the hub in the
rim assembly.
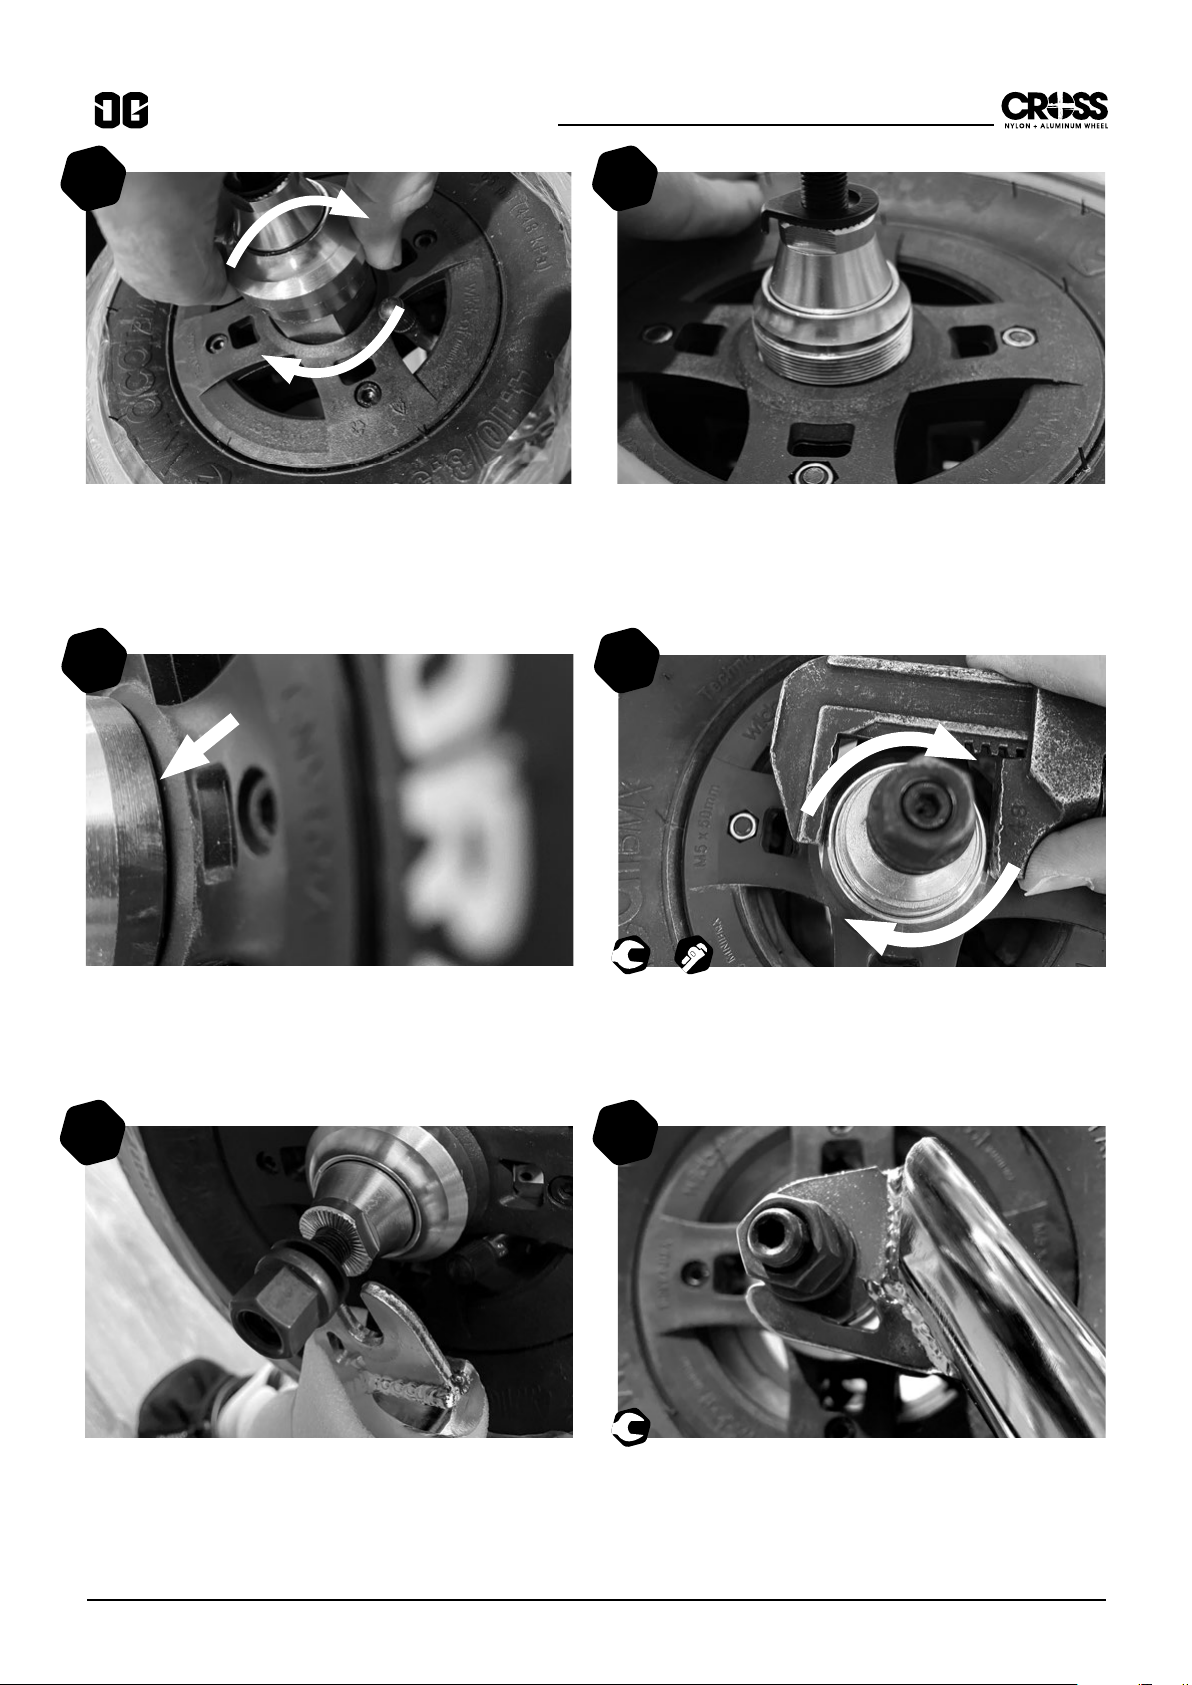
3
Wind the collar off the hub. Insert the hub
assembly into the rim, valve side up (It will only fit
one way). You will need to rotate back and forth
as you push inwards to clear the inner flanges.
5
Flip back and check the hub has seated hard
against the rim assembly.
6
Wind the collar on by hand until it is against rim
assembly. Using a wrench or spanner gently
tighten 1/8 - 1/4 turn to ensure the hub is seated
firmly with no play. CAUTION: Do not over-tighten.
40 OR
8
Once they are positioned correctly, fully tighten
the axle nuts with a 15mm spanner.
15
FRONT WHEEL ASSEMBLY

4
9
Pedals are marked ‘L’ & ‘R’ on the end of each
spindle. OG has a 1 piece crank and 1/2” thread
pedals, OG-PRO has a 3 piece crank with 9/16”
pedals.
NOTE: ‘L’ & ‘R’ are opposite thread to each other
so it is important to install on the correct side
to prevent cross-threading. This is not covered
by warranty.
10
Carefully insert the ‘L’ pedal on the left side and
start to wind in by hand. Then using your 15mm
spanner, (remember it is reverse thread! turn
anti-
clockwise
)and tighten. Make sure you do it up
nice and tight, loose pedals destroy thread fast!
Then repeat with the ‘R’ pedal on the right side,
so turn
clockwise
and secure tightly.
PEDALS
15

WILDCAT MINIBMX USER GUIDE 5
12
View down the back of the disc. Align the brake
and tighten down B) the 2 x hex bolts with a 5mm
allen key. Ensure there is enough clearance both
sides so the disc does not rub. If there isn’t enough
clearance, the inside brake pad can be adjusted
back by removing the rear wheel to access
the 5mm hex adjuster on the back of the brake
closest to the wheel.
We’ll come back and hook up the brake once
the handle bars are on.
13
Position the seat at the desired height, and
tighten the clamp using a 4mm allen key.
Ensure the seat is aligned with the frame.
NOTE: Do not exceed the max height marking on
the back of the seat post.
11
Next step is aligning the brakes. This is easiest to
do before you fit the bars. Sit in a chair with the
rear wheel in your lap, front wheel on the ground.
This gives you a clear look down the back of
the disc. A) First loosen the cable clamp off with
a 5mm allen key. B) These are the hex bolts to
tighten the brake down once aligned.
B
B
BRAKES PART 1
B
Seat
a
14
If you have a Pivotal seat, the seat angle can be
adjusted with a 6mm allen key, through the slit on
the top of the seat. Simply loosen, rotate to the
desired position and tighten.
5 5
4 6
Skip these steps if your Wildcat is brakeless!

6
16
Insert the 4 x bolts, ensuring the bars stay centred
in the stem.
17
Lightly tighten down two diagonally opposite until
it begins to pinch on the bars. Then rotate the
bars up and tighten slightly more to hold them in
place.
15
Undo the 4 x bolts with a 6mm allen key and
remove the stem plate. Ensuring all contact
surfaces are clean from grease or dust, place
the bars centred in the stem with the brake lever
to the right side, and hang them down in front.
HANDLE BARS
18
Check from the side to ensure the stem plate is
parallel with the stem, the gap both sides should
be equal. If not, back off the low side and slightly
tighten the other.
6
6

WILDCAT MINIBMX USER GUIDE 7
BAR ALIGNMENT / HEAD PARTS
20
NOTE: Stem bolts need to be tight! Work around
the bolts a few times to ensure it is securely
tightened down. Each time you tighten one bolt
it will allow you to get another partial turn on the
other bolts. A lot of force is put through the stem
when riding due to the amount of leverage on
the bars, you don’t want them to move!
19
Once you’re happy the bars are in the correct
position and the plate is level, work diagonally
opposite and tighten down each bolt.
21
First check if there is any play in the fork assembly.
You must also check the pinch bolts are secure.
However if the bars are out of alignment with the
front wheel, simply loosen the pinch bolts B) both
sides at the rear of the stem.
To tighten the fork assembly / head parts, with the
pinch bolts loose simply tighten A) the 5mm hex
bolt on top of the stem.
22
Once the bars are correctly aligned with
the wheel and there is no play in the head
parts / forks (bars must still turn freely),
secure the pinch bolts tightly with
a 6mm allen key.
B
AB
6
6
5 6

8
24
Squeeze the lever to expose the cable clip and
insert the round cable head as shown.
25
Align the slots in the cable adjuster A)
23
On the brake lever, loosen the hex clamp bolt
with a 4mm allen key, position on the handle
bars to suit and tighten.
A
BRAKES PART 2
26
Place the cable into the slot as shown.
27
Tighten the cable adjuster barrels against the
lever, ensuring to misalign the slots to prevent the
cable escaping.
28
On the brake, pull the cable so the cable tube
seats in both the lever on the handle and on the
brake unit.
4
5
Skip these steps if your Wildcat is brakeless!
Tabla de contenidos
Otros manuales de Bicicleta de Wildcat


