Wetrans TI8910W Manual de usuario

User manual
IP Wireless / Wired Camera
NIGHT VISION & REMOTE PAN/TILT ROTATE
User Manual

User manual
Contents
1 WELCOME..................................................................................................................-1-
1.1 Features................................................................................................................-1-
1.2 Packing list...........................................................................................................-2-
1.3 Product view.........................................................................................................-2-
1.3.1 Front View......................................................................................................-2-
1.3.2 Rear Panel......................................................................................................-3-
1,4 PC System Requirements....................................................................................-4-
1.5 Hardware Instruction............................................................................................-4-
1.6 Software installation.............................................................................................-5-
2 SOFTWARE OPERATION.......................................................................................... -6-
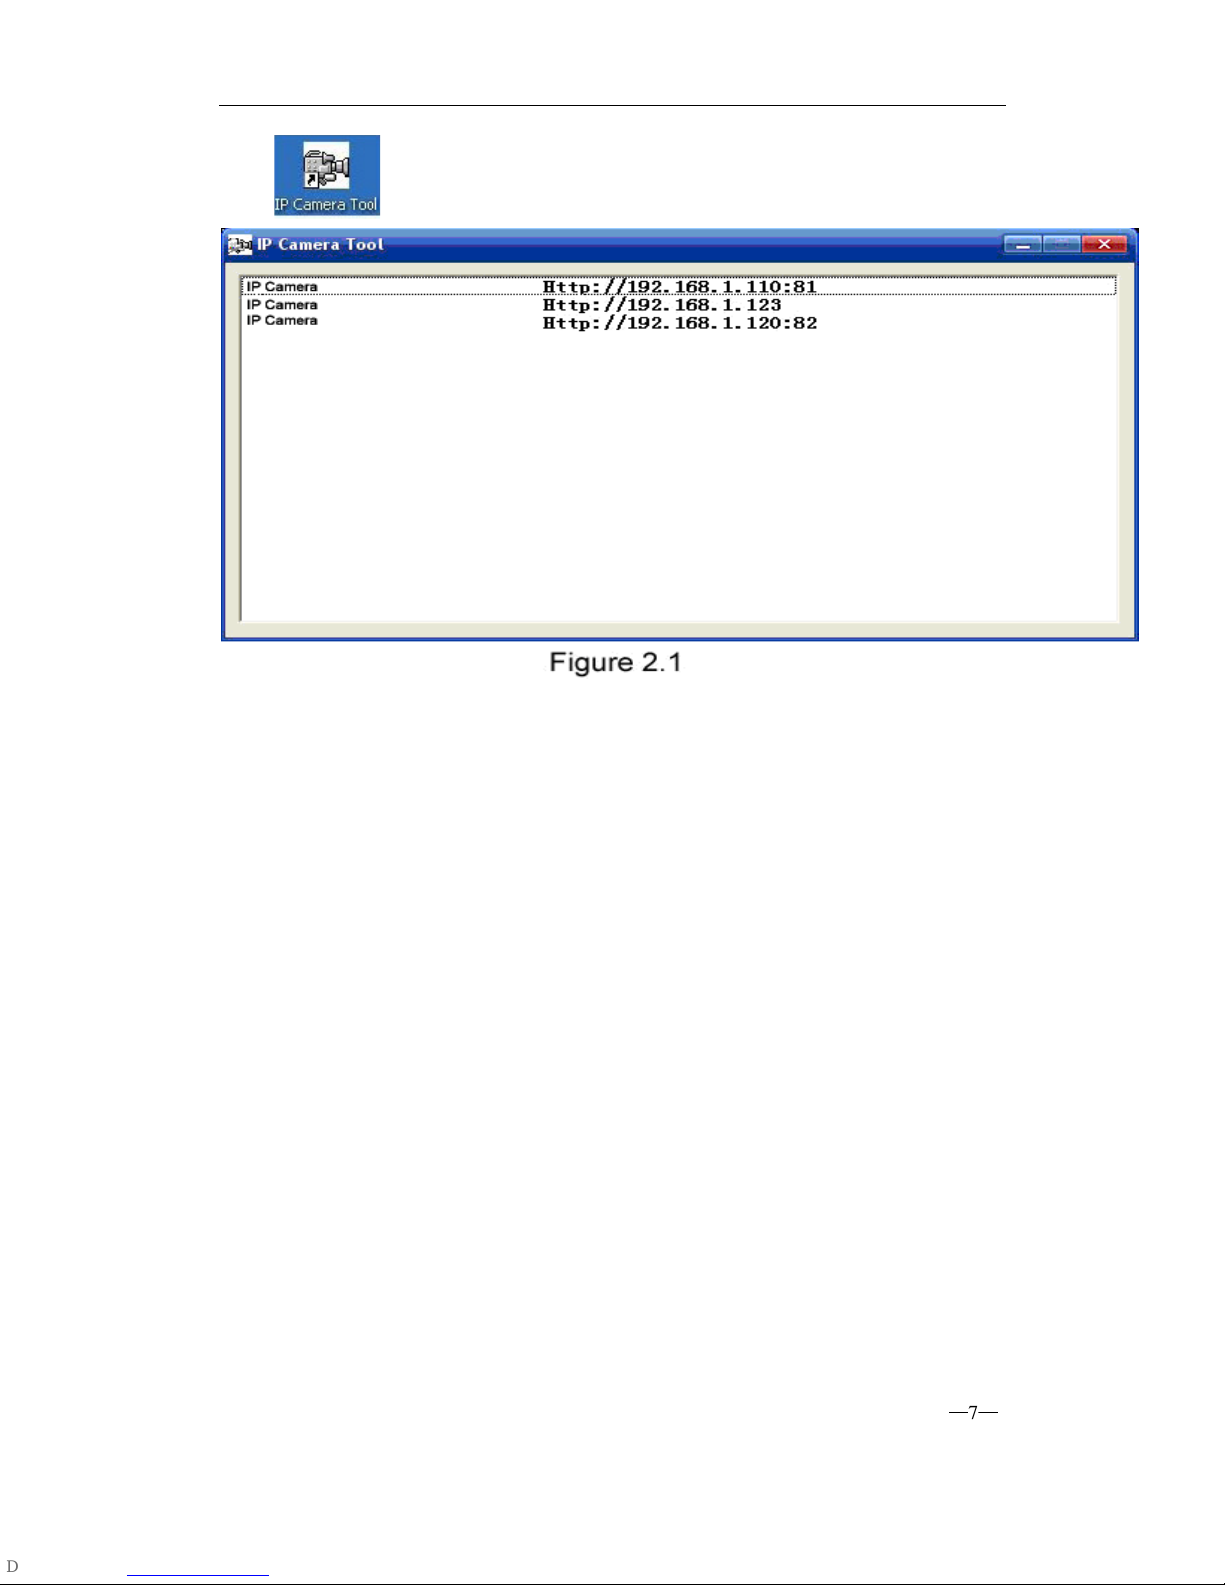
2.1 IP Camera Tool......................................................................................................-6-
2.2 Camera Login......................................................................................................-10-
2.3 ActiveX Mode (For WEB Browser)………………………...……………………….-11-
2.3.1 For Visitor.................................................................................................. -11-
2.3.2 For operator...............................................................................................-12-
2.3.3 For Administrator..................................................................................... -13-
2.3.3.1 Multi-Device Settings.....................................................................-13-
2.3.3.2 Network Settings............................................................................-16-
2.3.3.3 Other Service Settings.................................................................. -19-
2.3.3.4 System…………..............................................................................-23-
2.4
Server Push Mode
…………......................................................................... -28-
2.5
Sign in mobile phone
…………....................................................................-29-
3 HOW TO USE............................................................................................................-29-
3.1 Step by step to use............................................................................................-29-
3.2 Setting WIFI of IP Camera.................................................................................-30-
3.3 Connected to the Internet through ADSL directly.......................................... -31-
3.4 Using a router to access the Internet ..............................................................-32-
3,5 Static IP user.......................................................................................................-32-
3.6 How to use DDNS...............................................................................................-33-
4 APPENDIX.................................................................................................................-34-
4.1 Frequently Asked Questions.............................................................................-34-
4.1.1 I have forgotten the administrator username and/or password..................-34-
4.1.2 IP Address configuration.................................................................................-35-
4.1.3 Network Configuration....................................................................................-35-
4.1.4 No pictures Problems with Active X Controller.............................................-35-
4.1.5 Problem with network bandwidth…………………………………………... …. -36-
4.1.6 For example: Register procedure from a DDNS web …………………...…...-36-
4.1.7 Why pop-up the prompt fall to connect to the device……………..…….…...-38-
4.2 Default Parameters…………………….……………………………………..............-39-
4.3 Specification.........................................................................................................-39-
5 OBTAINING TECHNICAL SUPPORT........................................................................-39-

User manual
1 WELCOME
This model IP Camera is an integrated wireless IP Camera solution. It combines a high quality
digital Video Camera with network connectivity and a powerful web server to bring clear to
your Desktop from anywhere on your local network or over the Internet.
The basic function of it is transmitting remote video on IP network. The high
Quality video image can be transmitted with 30fps speed on the LAN/WAN by using
MJPEG hardware compression technology.
This is based on the TCP/IP standard. There is a WEB server inside which could Support
Internet Explore. Therefore the management and maintenance of your device become more
simply by using network to achieve the remote configuration, start-up and upgrade firmware.
You can use this IP CAMERA to monitor some special places such as your home and your
office. Also controlling and managing images are simple by clicking the website through The
network.
NOTE: you can use the IP Camera Step by Step (details:3.1).
Features
Powerful high-speed video protocol processor
High-sensitivity 1/4 CMOS sensor
Picture Total 300k Pixels
Video Frame Rate:30fps(QVGA), 15fps(VGA)
Resolution:640 x 480(VGA), 320 x 240(QVGA)
Light Frequency:50Hz, 60Hz or Outdoor
Optimized MJPEG video compression for transmission
Multi-level users management and passwords definition
Embedded Web Server for users to visit by IE
Support wireless network (WiFi/802.11/b/g)mobile
Supporting Dynamic IP(DDNS)and UPNP LAN and Internet(ADSL, Cable Modem)
Giving alarm in cause of motion detection
Supporting image snapshot
Support multiple network protocols
:
HTTP
,
TCP/IP
,
UDP
,
STMP
,
DDNS
,
SNTP
,
DHCP
,
FTP
Support remote system update
—
1
—

User manual
Advanced Features
Multi-Protocol support and Transportation
IP CAMERA supports Multi-Protocol such as TCP/IP, SMTP and HTTP. Sending the image
to your mailbox automatically when the IP CAMERA is triggered.
Video Image PTZ function
Users can control the camera direction on the video image.
Motion Detection
Your may use the internal Motion Detection function or external sensor to trigger
images Recording and transportation. Alarm sensor input/output.
The detection sensor sends an alarm and records by itself when there is a fire or
accident. A message as an email is sending to you by this sensor,(The input/output
discreteness can be chosen)
DDNS support
Using it in the condition which including ADSL and IP change often is more convenient,
because IP CAMERA provides dynamic DNS function.
Advanced User Management
Only allowing authorized users access to real-time images of IP Camera.
1.2 Packing List
Untie the packing and checking the items contained against the following list;
Wireless IP Camera 1
Wi-Fi Antenna 1
DC Power Supply 1
CD 1
Network Cable 1
Mounting bracket 1
NOTE:
Contact us immediately in the case of any damaged or short of contents.
1.3 Product views
1.3.1 Front view
Figure1.1
—
2
—

User manual
1 Sensitive Hole
2 Infrared LED
3 LENS CMOS sensor with fixed focus lens.
4 Network Indicator LED if there is network activity, the LED will blink.
5 Mic
6 Antenna
1.3.2 Rear panel
I/O PINS: 1 Output(+5V) 2 Output 3 Alam input 4 Input (GND)
I/O PINS: 1 Input (GND) 2 Alam input 3 Output A 4 Output B
I/O PINS: 1 Output A 2 Output B 3 Alam input 4 Input (GND)
—
3
—

User manual
LAN: RJ-45/10-100 Base T
DC5V: 5V Power supply
RESET BUTTON:press and hold down the RESET BUTTON (Figure 1.3 under pan)
for 5 Seconds .Release the power button and IP Camera will be reset back to the
factory default Parameter.
1.4 PC System Requirements
System configuration requirements :( Example for view four IP Camera)
CPU: 2.06GHZ or above Memory: 256M or above
Network Card: 10M or above Display Card:64M or above memory
Recommendable Operating system: Window2000 or Window XP or Vista
1.5 Hardware Instruction
Follow the steps below to set up your camera hardware. Make sure to follow each
step carefully to ensure that the camera operates properly
1) Plug the network cable into the camera and then into your Cable/DSL router.
—
4
—

User manual
2) Plug the power adapter into the camera and then into the power outlet.
1.6 Software installation
Software installation is the key to the successful use of this product.
1 Open the CD, find the software as instruction;
2 Double click setup.exe and install the software as instruction.
3 Only click next, you will complete the software installation.
—
5
—

User manual
The computer restarts upon installation completion and an icon appears
on the Desktop automatically.
NOTE: Before installing and using the product, please read the following precautions
carefully and make sure they are fully understood.
Use only the power adapter attached with the product .Use of unauthorized power
adapter may cause damage to your IP Camera.
Do not touches the lenses of the IP Camera at will .The optimum focus range has
been set before the IP Camera is delivered out of the factory. If you turn the lens, it
may cause incorrect focus and vague images.
Do not turn the Pan/Tilt by force for it may cause damage to internal components of
the Pan/Tilt.
IP Camera terminal shall be installed in an indoor environment.
For firmware upgrading or connection with an external, refer to detailed instructions
contained in the CD.
2 SOFTWARE OPERATION
2.1
IP Camera Tool
When the Device has been mounted properly, you can double click the Icon “IP Camera
—
6
—

User manual
Tool” and a dialog box as Figure 2.1 will pop up.
Note: The software searches IP Servers automatically over LAN.
There are 3 cases:
1 No IP Cameras found within LAN. After about 1 minute search, the Result Field will
show “not found IP Server” and the program shut automatically.
2 IP Cameras have been installed within LAN. All the IP Cameras will be listed and the
total number is displayed in the result field as shown in Figure 2.1
3 The IP Cameras installed within LAN do not share the same subnet with the monitoring
PC. A prompt as shown in result field (prompt: Subnet doesn’t match, double click to
change!).
Click the left mouse button to choose the prompt and click the right mouse, choose
Network Configuration to set the IP address of the Camera to the same subnet as LAN.
Five Options
Choose the IP Camera list and Click right mouse, there are five options ,Basic Properties,
Network Configuration, Upgrade Firmware ,Refresh Camera List ,Flush Arp Buffer.
—
7
—

User manual
Basic Properties
There are some device information in the Basic Properties, such as Device
ID,System Firmware Version, Web UI Version.
Network Configuration
In this page, you can configure the Network parameter.
—
8
—
Este manual sirve para los siguientes modelos
2
Tabla de contenidos


