Vosonic VP5500 Manual de usuario

VP5500
User’s Guide
Rev.B

Part Number: 845550002001
Thank you for purchasing Vosonic VP5500.
1.Before using Vosonic VP5500, you will have to
----------------------------------------------------------------------
1-1 Charge the battery :
Battery Level
Low Battery : (Red)
Charging :
Full Battery : (Green)
1-2. Keep VP5500 plugged into the AC
adapter/charge while connected to your
computer.
1-3. Make sure the HDD has already partition or
format as FAT system.
1-4. Check www.vosonic.com to download the
update firmware that we offer new functions
and improved features.
Enjoy your VP5500
The Vosonic Team
Dear Customer
3

CAUTION
Under no circumstances should you try to repair the system
yourself, as this will invalidate the warranty. Do not open the
system as there is risk of electrical shock.
FCC Certifications
This equipment has been tested and found to comply with the limits
for a Class B digital device, pursuant to Part 15 of the FCC Rules.
These limits are designed to provide reasonable protection against
harmful interference in a residential installation.
This equipment generates, uses and can radiate radio frequency
energy and, if not installed and used in accordance with the
instructions, may cause harmful interference to radio
communications.
However, there is no guarantee that interference will not occur in a
particular installation. If this equipment does cause harmful
interference to radio or television reception, which can be
determined by turning the equipment off and on, the user is
encouraged to try to correct the interference by one or more of the
following measures:
• Reorient or relocate the receiving antenna.
• Increase the separation between the equipment and receiver.
• Connect the equipment into an outlet on a circuit different from
that to which the receiver is connected.
• Consult the dealer or an experienced technician for help.
3

IMPORTANT WARRANTY INFORMATION
yTo reduce the risk of fire or shock hazard, do not expose
this equipment to rain, any liquid or moisture.
yVosonic shall have no obligation to repair, replace or refund
until the customer returns the defective product to Vosonic.
yThe repairs and replacement service will not apply to
PRODUCT units that were misused, repaired without
authorization ort by other reasons beyond the range of
intended use.
yAny replacement product may be either new or like –new,
provided that it has functionality at least equal to that of the
product being replaced.
yVosonic is not responsible for any data stored on returned
products, please backup any data prior to shipping the unit.
yThe limited warranty for accessories (included battery ) is
only valid for 6 months from the date of purchasing..
y
A
ll OUT OF WARRANTY repairs maybe subject to a normal
repair fee. Please contact your dealer or Vosonic for current
charges.
Package Checklist
yMain unit
yMini 5 Pins USB Cable
yLeather Bag
yEnglish user's guide
yPower Adapter (100-240V auto switched )
4

Photo viewer
JPEG: Baseline YUV
TIFF: 1 and 8 bits grayscale, 8 bits indexed-color,
8 and 16 bits true color
BMP: Monochrome, 8 bits indexed-color, RGB,
RLE8
GIF
RAW:Check the supported models at www.vosonic.com
Support Memory
Card Interfaces
Hard Disk Size 2.5” Hard Disk ( SATA Interface)
Hard Disk
Capacity 40G ~ 250G
Display 3.5” TFT LCD ,320x240 pixels , Backlight
Adjustable
Interface USB 2.0
Power supplier
5V/2.5A DC IN, Li-ion 3.7V 1900 mAh battery
(NP-100 compatible)
*The Li-ion rechargeable battery can be recharged
approx.500 times.
*The times of backup will subject to the Hard
Drive/ memory card / Files type.
*The battery life may vary with use.
Dimensions
(WxLxH) 13.5x7.5x2.2mm (Lx W x H)
Weight 290g (included 2.5” HDD & battery pack)
Specifications
Compact Flash Card
Memory Stick® (MS)
SD High Capacity (SDHC)
Secure Digital Card (SD)
MultiMedia Card (MMC)
Mini-SD (with adapter)
RS-MMC (with adapter)
MS Duo (with adapter),
MS Pro Duo (with adapter).

without driver
Linux kernal 2.4 above without driver
Mac OS 10.0.1 above without driver
Note: VP5500 doesn't support Windows 2000 SP1 ,
SP2 , please upgrade to SP3 or above.
Please visit our web site to download the most recent manual and software.
Battery life may vary with use.
The VP5500 may not read the RAW created with camera models other than
above.
6
System OS
Windows XP and Windows 2000 SP3 above
R R
Windows Vista
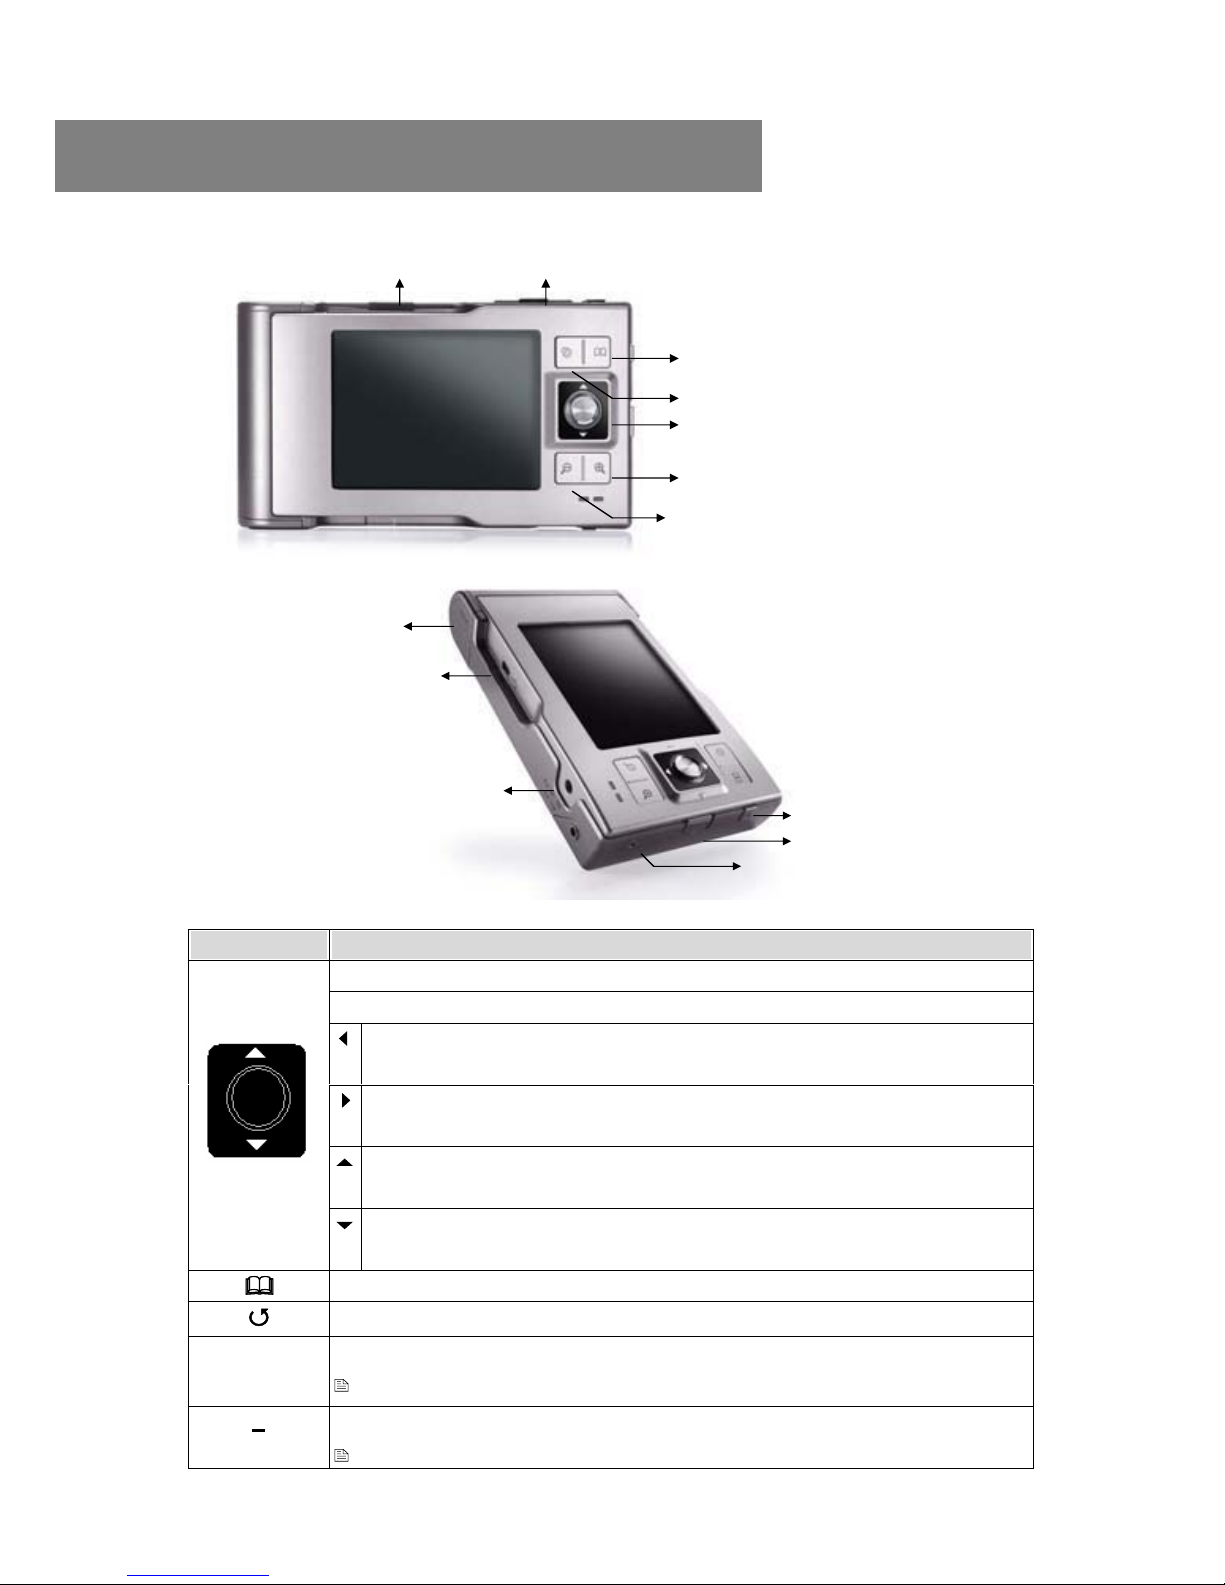
MENU
ESC
JoyStick
Allows you to zoom out the photo
Allows you to zoom in the photo
Power
Power Button Lock
RESET
USB port:
Insert USB cord mini jack
DC In : Insert AC adapter jack
Battery Compartment
Compact Flash
Memory Stick / Memory Stick Pro ,
MMC/SD card slot
2. Overview of Panels & Keys
keypad Function Description
Enter : takes you to execute the current selection
Rotate: This function will effect under Photo Playback Mode.
Direction icon: Use JoyStick button to move cursor on
the screen.
Direction icon: Use JoyStick button to move cursor on
the screen.
Direction icon : Use JoyStick button to move cursor
on the screen.
JoyStick Direction icon : Use JoyStick button to move cursor
on the screen.
[MENU] Play modes & system setting selection
[ESC] Takes you go back to previous mode
+
Allows you to zoom in the photo
This function will effect under Photo Playback Mode.
Allows you to zoom out the photo
This function will effect under Photo Playback Mode.
7

Windows Me and Windows XP HomeEdition and Professional
Edition, Win2000 Professional Service Pack 3 above users do not
need to install any drivers .Windows will automatically detect your
device as following figure.
* Right-click on ‘My Computer’ select ‘Properties’, and then look in the
tab labeled ‘General’. It should say “Service Pack 1” or higher.
3. Using the VP5500
3-1. Starting up
1) Charge the batteries
Before using for the first time, charge the batteries for a full
4hours.
2) Power On /Off
Press the Power button
The green light will go on and the operating system will boot up.
To shut off the unit, long press the power button for 2 seconds.
3) Computer connection
Windows XP or higher
8
R R
R

3-2 . USB CONNECTION :
When VP5500 begins connecting to the computer,
the USB mode will appear on the screen.
Mac OS X
Your OS X version must have Mass Storage device support.
The Vosonic will be automatically recognized as mass storage device
(Hard Drive) and mounted on the desktop.
You can now use Vosonic like any other external hard drive.
During file transfer in the PC mode
DO NOT :
1. Plug out the USB cable
2. Remove memory card(s) from the card slot,
otherwise, there may be a chance of lost or corrupt
data.
*To avoid any low battery, it is recommended to kept
it plugged into the AC adapter / charger.
*Do not use USB ports repeated through peripherals
(such as keyboards) or with un-powered USB hubs.
9
R

Note: For Windows XP users, to safely disconnect the VP5500 from
computer, click on the system tray remove icon
and wait until you get a message
saying tha you can safely unplug the device before
disconnecting the USB cable.
3-3. Downloading or Editing the files on PC:
Power on the VP5500
Connect the VP5500 and PC with the provided USB cable
Double Click the " My computer" icon , the operating
system will display 3 icons identifying the media type
correspondingly. (see Computer connection)
You can then read ,write,copy ,delete and remove data on
the PC.
Note:
-The VP5500 uses the FAT file system, the maximum size
of a single file is usually limited to 2G.
- If you plan on to download a file over 2G , you might can
create an extra NTFS partition for that , however, you
cannot see the NTFS partition on the VP5500
stand –alone mode.
Learn more about your partitioning and formatting options, please
link to http://support.microsoft.com/kb/313348/en-us
10
Tabla de contenidos
Otros manuales de Cámara digital de Vosonic


