Viavito BigBounce Manual de usuario

Owner’s Manual
Table Tennis Table
OUTDOOR
BigBounce
www.viavito.com
R
02 www.viavito.com
Congratulations
on purchasing your
very own Viavito
BigBounce table
tennis table.
Manual Contents
You have chosen a high-quality, safe and
innovative product, and we are certain it
will keep you entertained for hours.
Please take the time to read this owner’s
manual as it will help you to get the most
out of your new piece of equipment.
For more information, or if you require
any assistance please email us at
support@viavito.com
All Viavito products are manufactured
in accordance with the latest safety
regulations. Our table tennis tables
undergo series of quality control tests
during the manufacturing process.
Safety Standards:
The table conforms to the following
standard: EVS-EN 14468-1:2015
(Class D).
Safety Information 03
Warnings 04
Assembly Instructions 05/04
Before you Begin 05
Contents Checklist 06
Assembly 07/12
Folding and Unfolding 13
Customer Support 14/15
Contact Information 14
Manufacturer’s Warranty 15
Technical Information 16
Parts List 16
R

03www.viavito.com
Safety Information
• Prior to assembly or use, please take the
time to read this owner’s manual carefully
as it will help you to get the most out of
your equipment.
• These instructions contain important
information about the table tennis table
and provide safe and correct assembly, use
and maintenance.
IMPORTANT SAFETY NOTICE:
01 Retain this manual for future
reference.
02 Only use the table after it has been
fully assembled.
03 Make sure you have enough space to
layout the parts before installation.
04 The packaging needs to be disposed
responsibly and carefully.
05 After assembly, remember to check if
the safety systems are working properly.
06 Damaged or worn parts can limit the
lifespan of the table and endanger your
safety. Users must immediately report
all defects or faults and replace worn
or damaged components. The table
should be removed from use until this
has been done.
07 Check bolts, screws etc. regularly
to make sure all parts are in a good
condition.
08 Use only original spare parts for any
necessary repairs.
Viavito assumes no responsibility for
the personal injury or property, and/or
damage sustained by or though the use of
this product.
SAVE THESE INSTRUCTIONS.
R
04
Warnings
www.viavito.com
R
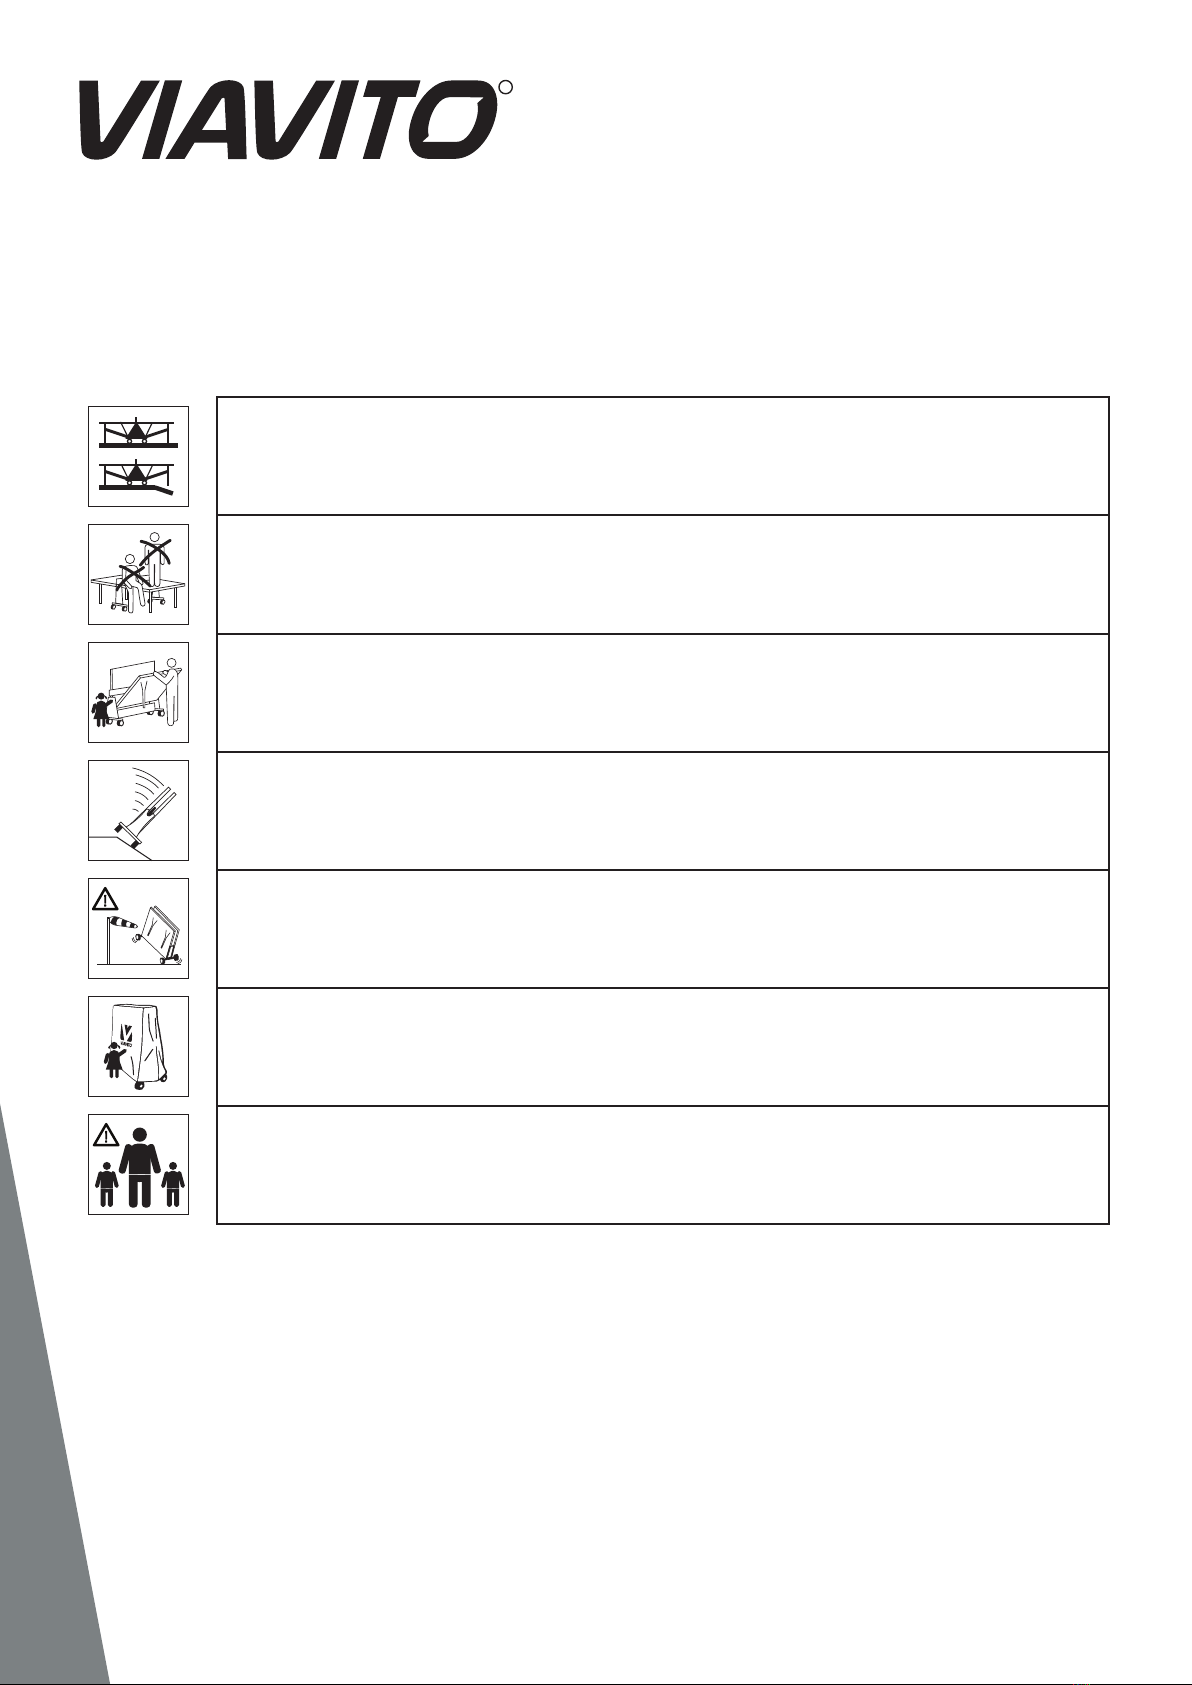
The table must be assembled by at least 2 adults on a clear, level surface.
The table tennis table should only be used for its intended use. All other uses are
prohibited and can be dangerous. Do not sit or stand on the table.
Children shall not play unsupervised on or near the table in the storage
position.
Take the necessary precautions when moving the table tennis table on
uneven or sloping surface as it may cause the table to tip over, damage it or
lead to injury.
Please beware that leaving the table in a closed position under windy
conditions may cause the table to tip over, damage it or lead to injury.
R
To provide additional safety for children and increase the lifespan of the
table, it is recommended to use a protective cover.
Assembly, positioning and moving the table around must be carried out by
an adult or under the direct supervision of an adult person. Children cannot
be left unattended around the table.

~120min
274cm (108”)
152.5cm (60”)
R
R
50kg (110lbs)
R
PLAYBACK
05
Assembly Instructions
Before you Begin
Before commencing assembly, please check all the parts according to the Parts List on
page 15 and make sure that all are present and correct.
Please follow the alphabetical order (ABC references) of the assembly instructions.
To identify all the part marks, check the Contents Checklist on page 6 and the Parts List
on page 15.
Note: The table has adjustable leg levelers to ensure a at playing surface on uneven ground.
Please use the tools recommended for each assembly stage.
Part mark
Tool
Caution: Any defects and faults in the safety systems should be reported. Immediately
replace faulty parts and do not use the table until it has been fully repaired.
www.viavito.com
R

M8X85 M6X90 M6X75 M6X75 M6X60
M12X130
M5X25
11
17
23 24
18 19 20 21 22
12 13 14 15
25
4X 4X 4X 4X 2X 4X
4X 4X 4X 4X 18X 4X
24X 16X 2X
M6X50
26 1X 27 2X 28 1X
27 2X 29 1X
29 29 2X
30 2X
8X10 12X14 13 17X19
Measuring help for hardware (scale 1:1)
Table top
Short link rod
Long link rod
Side Brace
Brake
Wheel frame
Support Beam
Plastic wheel
Side coverWheel frame
06 www.viavito.com
R
Contents Checklist
Make sure you have the following parts:
Tools required for assembly (included)
Hardware
Please Note: The name of each bolt/screw contains its
length in mm (e.g. M12x130 is 130mm long). Use the ruler
below to identify screws and bolts required for assembly.

9
8
12
4
11
7
6
12
9
7
11
6
A1
A2
A3
A5
A4
28 1X 29 1X
29 29 2X
30 2X
27 2X
27 2X
8X10 12X14 13 17X19
The holes in the middle of the bar
should be positioned upwards
to fix the bar correctly.
4
07
www.viavito.com
R
Assembly
Step A
A1 A1 Insert the M8X85 bolt (12) into the wheel (9),
through the wheel frame (8) and another wheel (9).
Then, use the 12x14 wrench (28) and the 13 wrench (29)
together to secure with the M8 nut (20).
Attach the wheel frame (8) to the side
brace (4) using the M12x130 bolt (11),
and use the 17x19 wrench (30) to
secure with the R=12 washer
(22) and the M12 nut (19).
A2 Do not fully tighten the
M12 nut (19) under the
side brace (4) to let the
wheel frame (8) rotate
smoothly.
A3 Do not fully tighten
the M8X85 bolt (12)
to allow for a smooth
wheel rotation.
A4 Connect the brake (6) with
the wheel frame (7) by
inserting the M6X75 bolt
(15) and secure it with the
M6 nut (21) using the 8x10
wrench (27).
A5 Repeat steps A1
and A4 for the other
side.

14
23
21
10
5
4
B1
26 1X 29 2X
30 2X
17X19
08 www.viavito.com
R
Step B
B1 Use two M6X75 screws (14) to attach the side cover (5) to the side brace (4) and the support beam (10). Secure with
two R=6 washers (23) and two M6 nuts (21) using the Phillips screwdriver (26) and the 17x19 wrench (30).
Please Note: To securely tighten the M6X75 screws (14) and the M6 nuts
(21) use the Phillips screwdriver (26) and the 17x19 wrench (30) together.

16
24
23
21
3
C1 C2
C3
C4
17
24
2
23
21
23
26 1X 27 2X
27 2X
8X1
0
09
www.viavito.com
Step C
R
C1 Insert M6X60 bolt (16)
through the R=6 washer (23),
undercarriage, and the rubber
washer (24), and then through
the long link rod (3) and the R=6
washer (23). Secure with the M6
nut (21) using the 8X10 wrench
(27). Repeat for the other side.
C3 Insert M6X50 screw (17)
through the table frame and the
rubber washer (24), and then
through the short link rod (2)
and the R=6 washer (23). Secure
with the M6 nut (21) using the
Phillips screwdriver (26) and the
8X10 wrench (27). Repeat for
the other side.
C4 To securely tighten the M6X50
screw (17) and the M6 nut (21)
use the Phillips screwdriver
(26) and the 8X10 wrench (27)
simultaneously.
C2 To securely tighten the M6X60 bolt (16) and
the M6 nut (21) use two 8X10 wrenches (27)
simultaneously.

D1
25
D2
10 www.viavito.com
R
Step D
D1 Pull the lock pin until you can see two lock pin holes (drawing D1) and insert the
rivet (25) into the hole closest to the table frame.
D2 After inserting the rivet (25) oon
both sides of the table, insert the
table top into the slot in the side
cover (5). Once completed, repeat
the above step for the other side of
the table.
Tabla de contenidos
Otros manuales de Robótica de Viavito

Manuales populares de Robótica de otras marcas

STEMCenter USA
STEMCenter USA Pi-Bot v2.00 Manual de usuario

SunFounder
SunFounder PiDog Manual de usuario

Universal Robots
Universal Robots UR5 Manual de usuario

Universal Robots
Universal Robots E Series Manual de usuario

YASKAWA
YASKAWA MOTOMAN-MPL80 II Manual de usuario

EFORT
EFORT ECR5 Manual de instrucciones


