URC CAM-DC-I Manual de usuario

Owner’s Manual
CAM-DC-
ndoor Network Camera

CAM-DC-I Indoor IP Camera Owners Manual ©2013 Universal Remote Control, Inc.
The information in this Owner’s Manual is copyright protected. No part of this
manual may e copied or reproduced in any form without prior written consent from
Universal Remote Control, Inc.
Universal Remote Control, INC. shall not e lia le for operational, technical or
editorial errors/omissions made in this manual.
The information in this Owner’s Manual may e su ject to change without prior
notice.
Total Control is a registered trademark of Universal Remote Control, Inc.
URC - Control the Experience is a registered trademark of Universal Remote Control,
Inc.
All other rand or product names are trademarks or registered trademarks of their
respective companies or organizations.
500 Mamaroneck Avenue, Harrison, NY 10528
Phone: (914) 835-4484 Fax: (914) 835-4532

TABLE OFCONTENTS
ntroduction 1
Features and Benefits 1
Parts Guide 1
CAM-DC- Description 2
Basic nstallation 3
Communicating with the Camera 4
Navigating the Web nterface - Live View 5
Navigating the Web nterface - Admin 6
Specifications 7
Limited Warranty Statement 8
End User Agreement 11
Regulatory nformation to the user 12
Declaration of Conformity 13

Page 1
CAM-DC- NDOOR NETWORK CAMERA
ntroduction
Congratulations on your purchase of the CAM-DC- ndoor
Surveillance Dome P Camera! The CAM-DC- is an indoor P
camera that allows for seamless viewing over the network with
Total Control interfaces such as the TRC-1280, TKP-2000,
TKP-7000 and future Total Control graphical interfaces. Once
networked, it relays video to these devices or your PC.
Features and Benefits
• Viewable on Total Control’s TRC-1280, TKP-2000, TKP-
7000 and Complete Control™ KP4000 / 4000C
• Viewable on PCs, iPad®, iPhone® and iPod touch®
• Uses a progressive scan CMOS sensor, H.264/MJPEG
dual encoding and transmission with simultaneous dual
streaming capabilities.
• Camera uses a PoE power supply such as the MFSPOE-8.
• The camera has a minimum Lux rating of 4.0 for color.
Parts Guide
The CAM-DC- ndoor Dome Network Camera includes:
1 - CAM-DC- ndoor Mini Dome Camera
1 - Bracket Screws
1 - Quick nstallation Manual

Page 2
CAM-DC- NDOOR NETWORK CAMERA
CAM-DC- Description
Front View
Dome Cover: Mini dome cover twists to open and close.
Open the dome cover to reveal the lens and position it to the
correct viewing angle.
Note: If you need to focus the ens, turn it unti the image is
c ear.
LAN: Plug an Ethernet cable from the camera’s LAN connection
to a PoE router or switch like URC's MFS-POE8. ( f a PoE switch
is not used, you must use a PoE injector to supply power to the
camera.)
Dome
Cover
LAN
connection
CLOSE
OPEN

Page 3
CAM-DC- NDOOR NETWORK CAMERA
Basic nstallation
Follow these basic steps to install the ndoor Network Camera
CAM-DC- .
1. Fasten the camera to your planned location.
2. Plug an ethernet cable to the LAN port of the camera.
Note: No separate power supply is needed as the camera
receives power via a PoE supply or a MFSPOE-8 router.

Page 4
CAM-DC- NDOOR NETWORK CAMERA
Communicating with the Camera
An P address is required to view the camera and modify
surveillance options. Once installed, locate the P address
assigned by your router (which will differ from the default
address below). Your router contains a DHCP table which
displays each connected device and its P address. IP
addresses normally resem le 10.20.30.40 or 192.168.1.xx.
For further information, refer to the router’s documentation.
The camera’s factory default options listed below may have
changed depending upon your router settings made by the
Custom Professional who installed your camera.
1. Enter the camera’s P address into the web browser’s
address bar. URC recommends using Internet Explorer
to view the live surveillance.
2. The P camera’s web interface opens. You now have
access to the Live View and Administration sections
described next.
Factory Default
Admin D root
Admin password root
P address 10.20.30.40
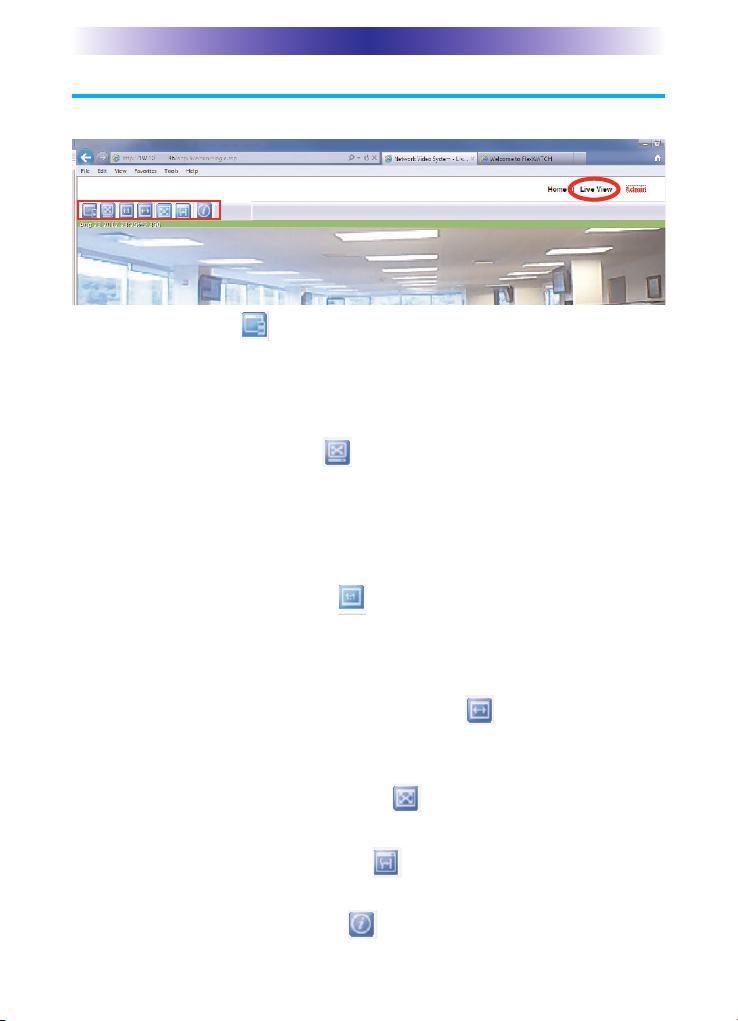
Navigating the Web nterface - Live View
Select from the options below to modify the Live View.
Channel Control
Displays multiple camera streams. t modifies the primary and
secondary streams (frame rate, image size, encoding, camera name,
rate control mode, image quality and group of pictures structure)
from the Admin page (Device Configuration> Camera & Motion).
Show Full/Normal Screen
View live video in either full or normal screen. Also capture images
or video by hovering the mouse cursor over the top left corner to
reveal the Snapshot stream and Video icons. Press the Snapshot icon
to save JPEG images or the video icon to save AV files to your PC.
The maximum AV recording time is 10 minutes. Press ESC to exit.
Show image in original size
Displays image in its original resolution with zooming capability.
Use the mouse button or keys to zoom-in (+), zoom-out (-), and
original size (/).
Draw image by maintaining aspect ratio
Fits video to its original size or to the screen (using the same aspect
ratio). No zooming capability.
Draw image by filling the screen
Resizes the video to fill the entire screen. Zooming is not supported.
Enhanced Draw Mode On/Off
Enhances the image quality of a live video smaller than the original size.
About P CCTV nformation
Shows version information for the CCTV viewer.
Control Bar
Page 5
CAM-DC- NDOOR NETWORK CAMERA

Page 6
CAM-DC- NDOOR NETWORK CAMERA
Navigating the Web nterface - Admin
Use the Admin interface to modify advanced features for the
camera. To gain acccess to the Admin site, enter the default
username and password(root and root).
Quick Configuration: A guided step-by-step walkthrough to
setup your camera’s configuration settings. Setup your Server
Name Setup, Date & Time, Network Configuration and P-CCTV
DNS Setup.
System Configuration: View and/or modify system configuration
settings pertaining to the Server Name, Date & Time, Admin
Password, User Access Control and User Registration.
Network Configuration: Assign the connection network settings
for P, Netmask, Gateway, DNS, Network Ports, Bandwidth
Control, Network Status, P-CCTV DNS and Port Forwarding.
Device Configuration: Setup the connection between the
camera and server, by configuring the Serial Ports, adding
Privacy Zone screens, changing the Motion Detection
sensitivity, as well as modifying the camera name and image
quality for the Primary and Secondary streams.
Utilities: View the System Log file, Save the Configuration,
Reboot the camera, revert to the camera’s Factory Default
state, and update the camera’s firmware from System Update.

Page 7
CAM-DC- NDOOR NETWORK CAMERA
Specifications
Camera Type Plastic Mini Dome P Camera
mage Sensor 1/3" D1 progressive scan
CMOS image sensor
ndoor / Outdoor Use ndoor only
Lens 3.8mm F2.0, aperture, fixed, non-zoom
Min. illumination Color 4 Lux at F2.0
BW 0.1 Lux at F2.0 with DSS
Video Compression H.264/MJPEG dual encoding
and transmission
Video Resolution 720X480 / C F = 352X240 / QC F = 176X112
mage quality Control 6 step quality control
Max Streaming Speed Max 30 fps @ VGA resolution
Motion Detection H/W Motion Detection
Network Bandwdth Control VBR/CBR
(H.264, 32k~12Mbps)
Network Protocol HTTP, RTP/RTSP, TCP/ P, FTP,
Telnet, RARP, PPPoE, SNMP, DHCP,
NTP, SMTP client and etc
Viewer E6 and later, Firefox, Safari, Chrome.
VLC, QuickTime, etc
Remote Admin. Web based administration,
setup, control, and upgrade
Advanced Service E-mail / FTP / Alarm buffering
Event notification
Dynamic P DDNS / uPnP support
Security Channel-based user password protection for
live-cast, alarm output and audio
System H/W 32bit embedded CPU running Linux
128MByte SDRAM
128MByte NAND FLASH
Audio Support N/A
D /DO Support N/A
Serial Port RS-232C
( built-in, Maintenance mode only)
LAN nterface 10/100-base-T
Certification FCC/CE, RoHS
Working Condition 0℃~ +50℃/ 20% ~ 80% RH
Power Supply PoE support (router, switch or injector)
Power Consumption Max 5W, ( 48V, max 100mA )
Size/Weight 3 7/8” Diameter x 2 3/4”H
7oz. ( Camera Only)
Otros manuales para CAM-DC-I
1
Este manual sirve para los siguientes modelos
1
Tabla de contenidos
Otros manuales de Cámara de seguridad de URC


