UfiSpace S9180-32X Manual

Hardware Installation Guide
S9180-32X
100G Data Center Switch
R1.1

S9180-32X Hardware Installation Guide | i
Table of Contents
1Overview.............................................................................................................................1
2Preparation.........................................................................................................................2
Installation Tools......................................................................................................................2
Installation Environment Requirements..................................................................................3
Preparation Check List.............................................................................................................4
3Package Contents................................................................................................................5
Accessory List...........................................................................................................................5
Component Physical Information............................................................................................6
4Identifying Your System.......................................................................................................7
S9180-32X System Overview ...................................................................................................7
DC Version PSU Overview........................................................................................................8
AC Version PSU Overview........................................................................................................9
Fan Overview .........................................................................................................................10
Port Overview ........................................................................................................................10
5Rack Mounting..................................................................................................................11
6Installing Fan Modules.......................................................................................................12
7Installing Power Supply Units ............................................................................................13
8Grounding the Switch........................................................................................................15
9Connecting Power .............................................................................................................16
DC Version..............................................................................................................................16
AC Version..............................................................................................................................17
10 Verifying System Operation...............................................................................................18
Front Panel LED....................................................................................................................18
PSU FRU LED ........................................................................................................................18
Fan FRU LED.........................................................................................................................19
11 Initial System Setup...........................................................................................................20
12 Cable Connections.............................................................................................................21
Connecting the USB Cable ...................................................................................................21
Connecting the Transceivers ...............................................................................................21
13 Cautions and Regulatory Compliance Statements ..............................................................22

S9180-32X Hardware Installation Guide | 1
1Overview
The UfiSpace S9180-32X is a high-performance, versatile open networking white box switch
that is designed to address the fast growing segment of the Ethernet switching market and
the needs to push capacity to the next level.
With 32 x 100G QSFP28 ports, the S9180-32X switch is where computer resources (servers
or blade chassis) are centralized and managed in a structured way utilizing high-efficiency
Ethernet connectivity.
With advanced capabilities, these switches deliver performance and intelligence to the
network edge in a flexible 1RU form factor that helps reduce infrastructure and
administrative costs.
The S9180-32X is the epitome of future networking with a powerful 4-core/8-core processor
and 32 high-speed 100G interfaces. It comes with redundant, hot swappable components
for convenience, increased availability, reliability and lower costs of maintenance.
This document describes the hardware installation process for S9180-32X.

S9180-32X Hardware Installation Guide | 2
2Preparation
Installation Tools
Phillips #2 Screwdriver
18-AWG wire with ring terminal for grounding
•PC with terminal emulation software. Refer to the "Initial System Setup" section for
details.
•Baud rate: 115200 bps
•Data bits: 8
•Parity: None
•Stop bits: 1
•Flow control: None
Illustrations are for reference purposes only. Actual equipment and scenarios
may differ.

S9180-32X Hardware Installation Guide | 3
Installation Environment Requirements
•Power Reserve: The S9180-32X power supply is available with:
1. DC Version: 1+1 active-active -40 to -72V DC power supply field replaceable unit or;
2. AC Version: 1+1 active-active 100 to 240V AC power supply field replaceable unit.
To ensure the active-active feed power design functions properly, a field with dual power
circuit is recommend with a reserve of at least 650 watts on each power circuit.
•Space Clearance: The S9180-32X width is 17.32 inches (44.0cm) and shipped with a rack
mount brackets suitable for 19 inch (43.8cm) wide racks. The depth of the S9180-32X chassis
is 16.9 inches (42.8cm) without the field replaceable units (FRUs) and comes with adjustable
mounting rails suitable for rack depths of 24 inches (60.9cm) to 31 inches (78.7cm). The
handle for the fan units will extend outwards by 1 inch (2.5cm) and the handle for the power
supplies will extend outwards by 1.5 inches (3.8cm). Therefore, to accommodate the fan and
power supply handles, a minimum space clearance of 6 inches (15.24cm) is needed at the
back of the S9180-32X. A total minimum reserve depth of 25.9 inches (65.79cm) is required.
Figure 1.
Figure 2.

S9180-32X Hardware Installation Guide | 4
•
Cooling: The S9180-32X has two options for airflow direction. There is a back-to-front
option (Figure 3. Left) and a front-to-back option (Figure 3. Right). Make sure the
equipment on the same rack have the same airflow direction.
Back-to-Front Airflow
Front-to-Back Airflow
Figure 3.
Figure 4.
Preparation Check List
Task
Check
Date
Power voltage and electric current requirement
DC version: -40 to -72V DC, 16A maximum x2 or;
AC version: 100 to 240V, 7A maximum x2
Installation spacing requirement:
S9180-32X spacing requires a height of 1RU (1.72”/4.5cm), a width
of 19” (48cm) and a depth of 16.9 inches (42.8cm)
Thermal requirement
S9180-32X’s working temperature is 0°C to 45°C (32°F to 113°F)
Installation tools required
#2 Phillips Screwdriver
Accessories required
PC with terminal emulation software, 18-AWG(minimum) wire with
ring terminal for grounding
Rear wall clearance = 6”

S9180-32X Hardware Installation Guide | 5
3Package Contents
Accessory List
Item
Description
Spec. & Dimensions
Qty.
Weight
1
Rubber Foot
4 x Rubber pad
(25 x 25 x 3.0mm)
1 set
0.019lb (8.9g)/set
2
Rack Mount Bracket
1.98” x 1.69” x 0.79”
(19” width rack)
(75x 43 x 20mm)
2 pcs
0.144lb (65.4g)/2pcs
(0.072lb
(32.7g)/pcs)
3
Screw Kit (for Rack
Mount Bracket)
8 x Screws M4.0*L6.5mm
2 set
0.02lb (7g)/set
4-1
Adjustable Mounting
Rail (for 4 posts)
2 x Mounting Rail(Inner)
9.9” x 1.42” x 0.08”
(251.5 x 36 x 2mm)
(for 24” to 31” rack depth)
2 pcs
0.617lb (280g)/2 pcs
(0.308lb (140g)/pcs)
4-2
Adjustable Mounting
Rail (for 4 posts)
2 x Mounting Rail(Outer)
12.34” x 1.69” x 0.74”
(313.5 x 43 x 19mm)
(for 24” to 31” rack depth)
2 pcs
0.70lb (318g)/2 pcs
(0.35lb (159g)/pcs)
5
Screw Kit
(for Adjustable
Mounting Rail)
8 x Screws M4.0*L6.5mm
1 set
0.02lb (7g)/set
6
Power Cord
(AC Version only)
78.74” (6.56’)(2000mm)
2 pcs
1.03lb (470g)/2pcs
0.51lb (235g)/pcs
7
Power Cord
(DC Version only)
118.11”(9.8’) (3000mm)
2 pcs
2.72lb (1234g)/2pcs
1.36lb (617g)/pcs
8
RJ45 to DB9 Female
Cable
95.98” (2438mm)
1 pcs
0.23lb (105g)/pcs

S9180-32X Hardware Installation Guide | 6
Component Physical Information
Specification
Item
Description
Weight
Total package contents
30.2lbs (13.7kg)
Chassis without FRU
13.7lbs (6.22kg)
Power Supply Unit (PSU)
DC PSU: 2.2lbs (1.0kg)
AC PSU: 2.6lbs (1.2kg)
Fan module
0.41lbs (185g)
Adjustable mounting rail
0.66lbs (299g)
DC power cord (DC version only)
1.36lbs (617g)
AC power cord (AC version only)
0.51lbs (235g)
RJ45 to DB9 female cable
0.23lbs (105g)
Dimension
S9180-32X (W x D x H)
17.32” x 16.88” x 1.73”(440 x 428.8 x 44mm)
PSU (W x D x H)
2.89” x 7.28” x 1.57” (73.5 x 185 x 40mm)
Fan module (W x D x H)
2.18” x 4.09” x 1.59” (55.6 x 103.9 x 40.6mm)

S9180-32X Hardware Installation Guide | 7
4Identifying Your System
S9180-32X System Overview
Figure 5.

S9180-32X Hardware Installation Guide | 8
DC Version PSU Overview
1+1, hot swappable power supply unit (PSU) field replaceable unit (FRU). There are two types of DC
PSUs. The picture on the left is the DC PSU with back-to-front airflow, identified with a blue latch.
The picture on the right is the DC PSU for front-to-back airflow, identified with a red latch.
Back-to-Front Airflow PSU
Front-to-Back Airflow PSU
Figure 6.
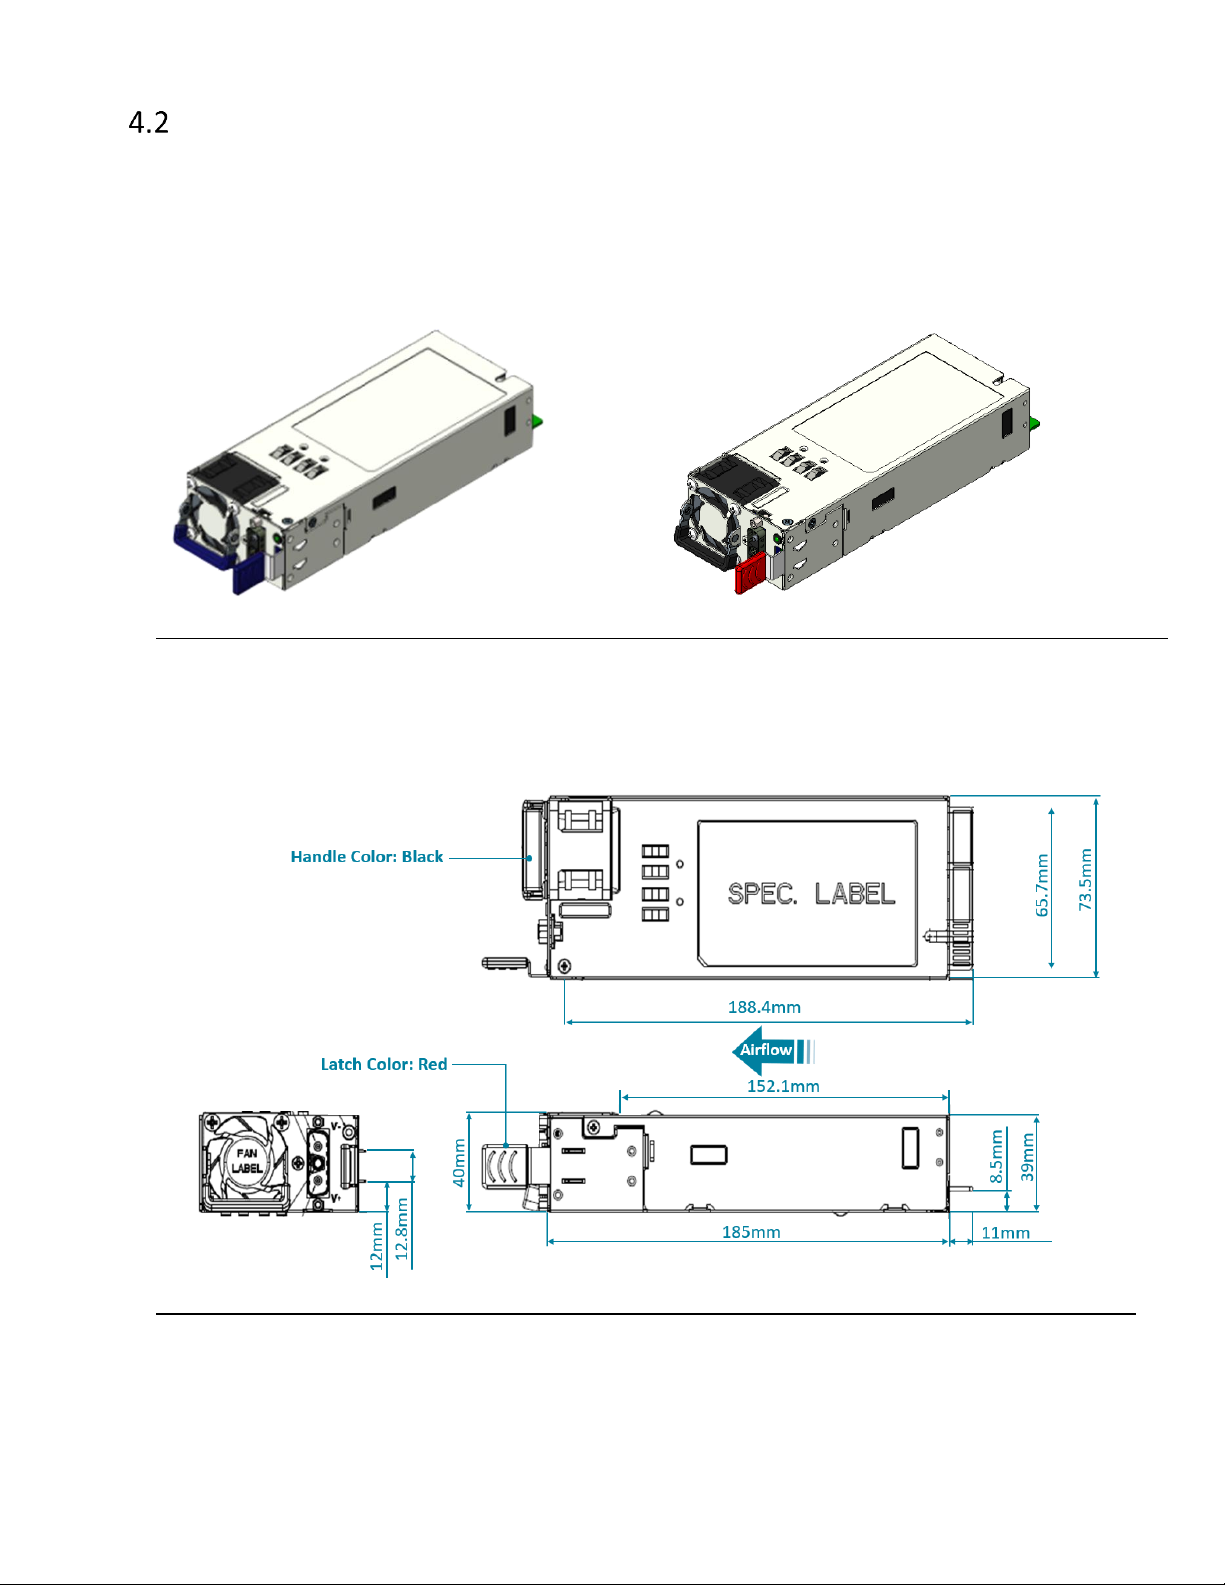
The DC power supply units are the same size for both back-to-front airflow and front-to-back
airflow. Therefore, only the dimensions for front-to-back airflow PSU will be provided in the figure
below.
(Front-to-Back Airflow PSU)
Figure 7.
Tabla de contenidos
Otros manuales de Cambiar de UfiSpace