TOMZON A23 Manual de usuario

User Manual
A23
support.it@tomzontoys.com
support.es@tomzontoys.com
support.jp@tomzontoys.com
support.de@tomzontoys.com
support.fr@tomzontoys.com
support.uk@tomzontoys.com
Email: [email protected]
Web: www.tomzontoys.com
FB: www.facebook.com/tomzonofficial

DE
EN
01 - 11
12 - 22
Catalog
User Manual
Benutzerhandbuch

EN
1. It is forbidden to use all types of drones within a radius of 5,000m
and center point area of airfield runway, in order to guarantee the
electromagnetic environment requirements of the aviation radio. No
Remote control and drone shall be used when radio control
instructions are issued by relevant state authorities.
2. Please use the drone indoors, or in a warm, sunny and windless
weather outdoors. It is forbidden to use it in high temperature, low
temperature, strong wind, thunderstorm and other bad weather
conditions.
3. Please keep a safety distance from people, pets, wires and other
obstacles when using the drone indoors or outdoors, and keep the
drone within your line of sight to avoid accidents.
4. Once the drone is started, do not touch the parts such as
high-speed gears and propellers to avoid injury.
Pack List
Safety Reminder
Drone
Propeller (A / B) USB Charging Cable User Manual
Remote Control Battery
01
User Manual
A23
support.it@tomzontoys.com
support.es@tomzontoys.com
support.jp@tomzontoys.com
support.de@tomzontoys.com
support.fr@tomzontoys.com
support.uk@tomzontoys.com
Email:[email protected]
Web:www.tomzontoys.com
FB:www.facebook.com/tomzonofficial

Tips:
The aircraft has two types of propellers (“A” and “B”) marked A and B.
Please match the Mark “A” or “B” while replacing the propeller.
Product Description
Drone
Power
Switch
Indicator Light
Propeller A
Propeller A
Forward Motor
(Correspond to Propeller A)
Tilt Motor
(Correspond
to Propeller B)
02
Battery
Propeller B
Propeller B

Tips:
The drone supports two control modes: Mode 1 and 2.
Note:
Mode 1 is the default setting. Please press “Set speed” button and turn
on the remote control to switch to Mode 2. Take Mode 1 for example to
introduce the control method of the drone.
Mode 1: Use the left joystick to make the drone fly up / down, rotate
left / right; use the right joystick to make the drone up / down /
left / right.
Mode 2: Use the left joystick to rotate to the front / rear / left / right; use
the right joystick to make the drone fly up / down / left / right.
Remote Control
03
Left
Joystick
Right
Joystick
Speed
Switch
Headless Mode
Emergency
Stop
One-button
Takeoff /
Landing
Power
Calibrate
360° Rotation
Rotation
WASD
Fine-
tuning
Light On / Off
Orbit Flight

Note:
1. Please use the original charger for charging. Do not use other chargers.
2. Keep the battery away from high temperature, open fire or electric
heater; otherwise, damage or explosion may occur.
3. If the product is long idled, please charge it bi-monthly to keep the
battery in active condition.
4. Do not charge the battery on carpets, and other flammable items to
avoid fire.
Battery
Battery Installation and Charging
1. Place the battery in the drone and buckle it as shown in picture below:
2. Recharge the battery as shown in picture below:
USB charger indicator turns red during charging. Once charging is
done, the charger indicator turns off.
04
Step 1 Step 2
Tips:
1. Be sure that the batteries of the drone and remote control are fully
charged before flying. Otherwise, the drone cannot take off in low
battery mode.
2. It is not recommended to have mixed use of acid and alkaline
batteries. Please take out the batteries when drone is long idled.
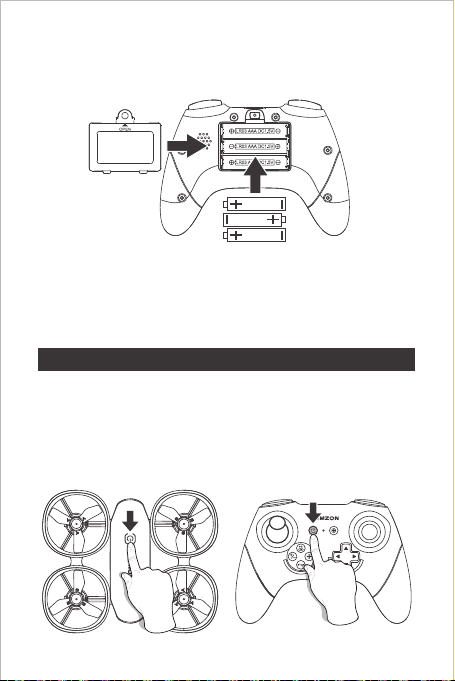
1. Long press the power button on upper cover to turn on the drone
and indicator flashes; then place the drone on a horizontal ground.
2. Turn on the remote control and it pairs the drone automatically. The
pairing is complete when the remote control beeps. At this time, the
Indicator lights of the remote control and the drone are always on.
Quick Start
Battery Installation of Remote control
Frequency Match
1. Open the battery cover of remote control and install 3 AAA batteries
(not included in the packaging) as shown in picture below:
05

Takeoff and Landing
Method 1
Press “ ” (calibrate button) to start calibration. The indicator light
flashes rapidly during calibration and after the calibration is completed,
the indicator light is always on.
When drone falls, please calibrate it again (place the drone on
horizontal ground during calibration).
Calibration
As shown in picture below, press “ ” (one button takeoff / landing)
to take off (when drone takes off, press this button to land).
06

Unlock Takeoff / Landing
Tips:
The motor should only be stopped in case of emergency to
reduce the risk of damage.
Flight
Note: Take remote control Mode 1 for example.
Use the “left joystick” to control the height and rotation of the drone
during flight.
High Speed and Rotation
Emergency Stop
Method 2
In case of emergency, press and hold the "STOP" button for 1 second,
the drone stops working and falls.
As shown in picture below, push both joysticks simultaneously to
unlock the drone, then push the left one upwards to take off (after the
drone takes off, push the right one downwards to land).
07

Tips:
The default is head-on mode, please press “ ” (headless mode
button) to switch to headless mode.
Use “right joystick” to control the left / right direction during flight.
Front / Rear, Left / Right
The drone flies at a fixed direction and does not change with the
direction of the drone, as shown in picture below:
Headless Mode
08
Front Front
Rear Rear
Right Right
Left
Front
Rear
RightLeft
Left
Front
Rear
RightLeft
Tabla de contenidos
Idiomas:
Otros manuales de Zumbido de TOMZON


 Manual de usuario")


