TimeKeeping DL-MODEM Series Manual de usuario

The Modem Downloader
About the Modem Downloader
The Modem Downloader is used to download PIPEs at a remote site such as a
field office at a client's location. The Modem Downloader stores this data in its
memory until it can be sent from the remote site via modem to your office com-
puter (called the host PC). The data can then be processed into reports. In the
event of a power failure or disconnection, an internal battery powers the Modem
Downloader's internal clock and maintains its data in its memory. This internal
battery has an estimated life of 10 years.
The Modem Downloader requires an external modem, which is not included with
the product. You will also need a modem installed in the host PC. You can obtain
modems from local and mail order computer stores, office supply stores, etc.
While most current-model brand-name modems should work with the Modem
Downloader, we recommend using modems from U.S. Robotics (3Com), as these
are commonly available and inexpensive. The Modem Downloader has been
extensively tested with these modems and is generally easy to set up with them.
The Modem Downloader includes a power supply and the cable required for
connection to a modem. Also included is a cable for connecting directly to the
host PC.
A number of steps are necessary to set up the Modem Downloader, the modem
connected to the Modem Downloader, the modem in the host PC, and the settings
for one or more remote sites. If you are using GUARD1 or GUARD1 PLUS you'll find
those setup steps described in the software manual and on-line help.
Recommended Modem
The U.S. Robotics 5686 External Faxmodem is the recommended modem for use
with the Modem Downloader. This modem is available directly from TimeKeeping
Systems or from most suppliers of computer hardware products.

DIP Switch Settings for
U.S. Robotics 5686 External Faxmodem
When using the U.S. Robotics 5686 External Faxmodem with the Modem Downloader,
set DIP switches 1, 3 and 8 to the DOWN position.
Connecting a Modem to the Modem Downloader
The Modem Downloader must be configured for the type of modem you will be
using. Four modem configurations are built in to the Modem Downloader: U.S.
Robotics (3Com), Hayes compatible, MicroCom, and "Other generic". If your
modem is one of these types, or if you aren't sure, you can try to configure the
Modem Downloader using one of these built-in types. TimeKeeping Systems'
GUARD1 and GUARD1 PLUS software can configure a Modem downloader for many
other types of modems. See the software manual or on-line help for instructions.
The Modem Downloader includes the cables necessary to connect it to either a
modem or to a PC.
Switch Setting Description
1Up Data Terminal Ready
Normal
Down Data Terminal Ready
override
2Up Verbal result codes
Down Numeric result codes
3Up Suppress result codes
Down Display result codes
4 Up Echo offline commands
Down No echo, offline commands
Switch Setting Description
5Up Auto answer on first ring,
or higher if specified in
NVRAM
Down Auto answer off
6Up Carrier detected normal
Down Carrier detected override
7Up Load NVRAM defaults
Down Load factory defaults
8Up Dumb mode
Down Smart mode

To connect the modem and configure the Modem Downloader:
1. Locate the modem cable, included with your Modem Downloader. It will have
a 25-pin connector on one end and a modular telephone style connector on
the other. Connect this modular connector to the port marked with the
icon on your Modem Downloader.
2. Connect the other end of the cable to the 25-pin connector on your modem.
3. Connect the telephone line to the appropriate connector on the modem.
Note: the telephone cable is not included with the Modem Downloader. These
are typically included with modems and are also available separately from
computer and electronics supply vendors.
4. Apply power to the modem using the correct power supply, as provided with
the modem.
Note: Modems generally do not work reliably with third-party power supplies.
Be sure to use the supply that was included with the modem, or contact the
modem manufacturer for an exact replacement if necessary.
5. While holding down the push button on the top of the Modem Downloader,
connect its power supply. The Modem Downloader will power up into its self-
test mode. You can confirm this by noting the display on the downloader — it
should show "Modem Downloader" followed by the manufacturing date, ver-
sion number, serial number, etc. Once the self-test mode starts you can
release the push button. If instead the LCD displays "Modem Downloader"
followed by the time and date, the push button was released too soon. Repeat
this step and wait for the self-test to start before releasing the push button.
6. By default, the Modem Downloader is configured at the factory for the U.S.
Robotics 5686 External Faxmodem, which is the recommended modem for
use with the Modem Downloader. If you are using this modem, skip this step.
Continue watching the LCD. Immediately after the "RTC test", the Modem
Downloader will display "U.S. Robotics", which will be followed by the remain-
ing three modem types. When the modem type that matches your modem
appears on the LCD, press the push button. The Modem Downloader will
beep, acknowledging the button press. When it beeps you should release the
push button. If you miss your modem type, disconnect power from the
Modem Downloader and start again with step 5 above.
7. The Modem Downloader will next attempt to automatically initialize the con-
nected modem. If this is successful, the modem will enter auto-answer mode.
An "AA" LED or other display on the modem usually indicates this. Check your
modem's manual for details. The modem must enter AA mode or it will not be
able to answer calls. The Modem Downloader will remember the modem type
even after a power failure or if you intentionally remove and reconnect its
power adapter. You do not have to repeat this procedure after a power failure
as long as you continue to use the same type of modem. If you change
modems in the future you may need to repeat the initialization process.
8. The MODEM LED on the Modem Downloader will light yellow after a modem has
been detected and initialized.
If the modem does not initialize properly, you can repeat this step and try the other
configuration choices. If none of these work with your modem, you will have to
use the direct connection method. TimeKeeping Systems' GUARD1 or GUARD1
PLUS software can configure a Modem Downloader for many other types of
modems. See the software manual or on-line help for instructions.
Connecting the downloader to your computer
Normally a Modem Downloader isn't connected directly to a PC, but if you should
need to configure a Modem Downloader using software such as our GUARD1™ or
GUARD1 PLUS™ product, you must make such a connection.
To connect the downloader to your computer, follow these steps:
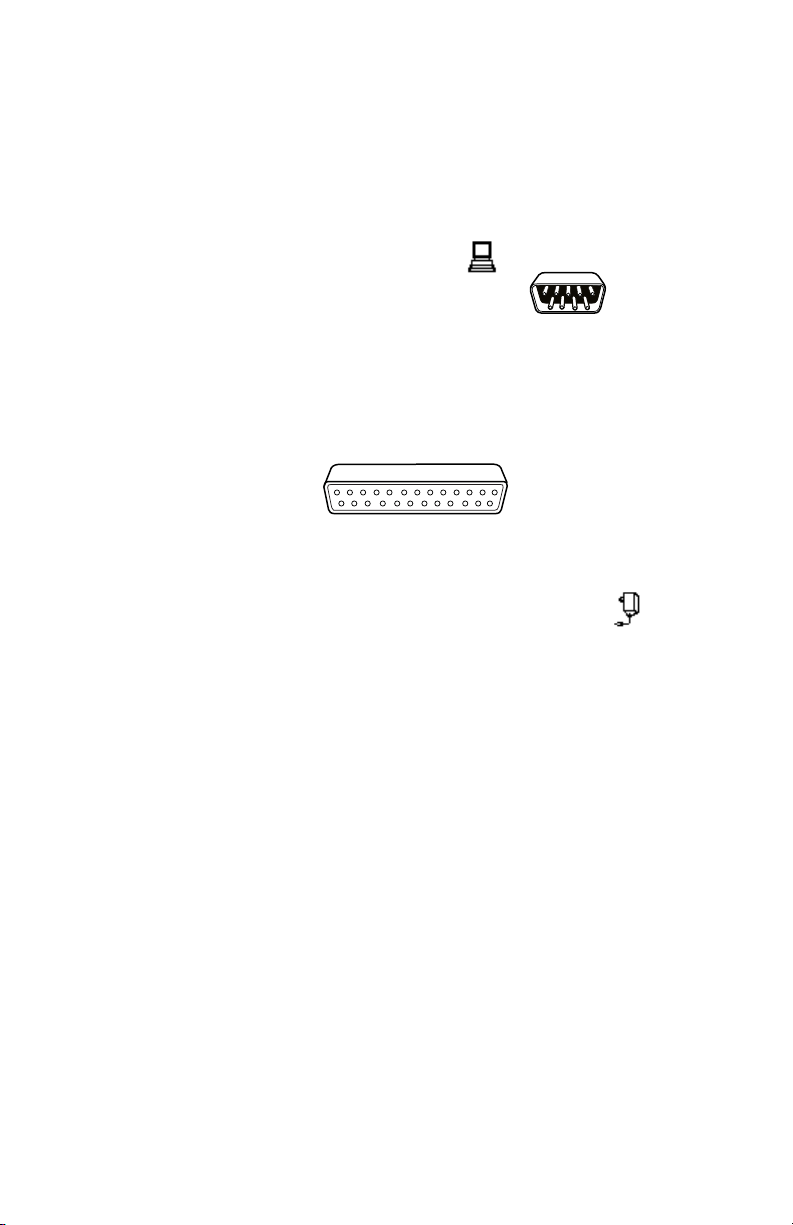
Step1. Connect the provided cable between your computer's serial port and
the downloader port marked with the icon. Most computers have
9-pin serial ports.
Your serial port probably looks like this:
Some older computers have a 25-pin serial port. If you have a 25-pin
serial port, you will need to connect a 9-pin to 25-pin adapter between
your computer and the provided downloader cable. (This adapter can
be ordered from TimeKeeping Systems. Please request part number
ADP-9/25.)
Printer ports have sockets on the PC side and look like this:
Do not try using an adapter to connect your downloader to a printer
port.
Step 2. Plug the power adapter into the downloader port with the icon.
Step 3. See the following pages for more information about using the Modem
Downloader.
Downloading a PIPE with the Modem Downloader
To download data from THE PIPE, connect the Modem Downloader to power, then
place a PIPE in the downloader. The LCD will display downloading status in blocks
(a full PIPE holds 240 blocks). When the download is finished THE PIPE will be
cleared and then beep. You should now remove THE PIPE from the Modem
Downloader. THE PIPE's data is now stored in the Modem Downloader's memory.
LCD and LED Indicators
The Modem Downloader's display (LCD) shows the current date and time. When
you receive a new Modem Downloader its internal clock will be set to U. S.
Eastern Standard time. If you are in a different time zone you should clear the
Modem Downloader before using it for the first time so the time is set to match
your computer's clock. If you are using GUARD1 or GUARD1 PLUS, see the soft-
ware manual or on-line help for instructions.
You can determine the amount of data stored in the Modem Downloader by press-
ing the push button. The number of records stored in memory will be displayed.
Note that if the Modem Downloader is "busy", that is, if a connection is in
progress, the push button will be temporarily ignored. Wait until the DATA LED is a
steady red, then press the push button again. The standard 128K Modem
Downloader can store approximately 7000 records. (A full PIPE holds about 4800
records.)

Limited Warranty
Hardware. The equipment is warranted to be free from defects in materi-
als and workmanship for a period of one year from the date of original
purchase. Manufacturer agrees to repair or, at manufacturer’s option,
replace equipment supplied by manufacturer which proves to be defective
in materials or workmanship. This warranty is limited to defects arising
under normal usage and does not cover malfunctions or failures resulting
from the misuse, abuse, neglect, alteration, modification, or repairs by
other than manufacturer’s authorized service facility.
Software and/or Firmware. Title to software and/or firmware remains with
manufacturer and is licensed to you for use with specific hardware. The
software and/or firmware is warranted to conform to the written specifica-
tions provided by manufacturer. In the event of a warranty claim, manu-
facturer will provide corrective measures which are limited, at manufactur-
er’s option, to the repair, replacement or modification of the software and/or
firmware code, or recommendation of a viable, alternative application that
will enable you to work around the failure.
To obtain warranty service during the warranty period, you must notify man-
ufacturer of your claim and present proof of purchase. REPAIR OR
REPLACEMENT AS PROVIDED UNDER THIS WARRANTY IS THE EXCLU-
SIVE REMEDY OF THE BUYER.
THE LIMITED WARRANTY IN THIS AGREEMENT IS IN LIEU OF ALL
OTHER WARRANTIES, EXPRESSED, IMPLIED OR STATUTORY, INCLUD-
ING (WITHOUT LIMITATION) ANY WARRANTIES OF MERCHANTABILITY
OR FITNESS FOR A PARTICULAR PURPOSE, AND EXTENDS ONLY TO
THE BUYER. IN NO EVENT SHALL MANUFACTURER BE LIABLE FOR
LOST PROFITS OR ANY INCIDENTAL OR CONSEQUENTIAL DAMAGES
CAUSED BY THE EQUIPMENT OR SOFTWARE, REGARDLESS OF
WHETHER MANUFACTURER IS ADVISED OF THE POSSIBILITY OF
DAMAGES.
SOME STATES DO NOT ALLOW THE EXCLUSION OR LIMITATION OF
INCIDENTAL OR CONSEQUENTIAL DAMAGES, OR ALLOW LIMITATIONS
ON HOW LONG AN IMPLIED WARRANTY LASTS, SO THE ABOVE LIMI-
TATIONS OR EXCLUSION MAY NOT APPLY TO YOU. THIS WARRANTY
GIVES YOU SPECIFIC LEGAL RIGHTS, AND YOU MAY ALSO HAVE
OTHER RIGHTS WHICH VARY FROM STATE TO STATE.
There are three LED indicators. The POWER indicator is green when power is
applied. The DATA LED shows if data is being communicated between the modem
and the Modem Downloader: it will be green when data is being received, yellow
when data is being transmitted and red if there is no activity. This LED will flash
green-to-yellow when data is being sent to the host PC. The MODEM LED is yellow
when a modem has been detected and initialized. This LED will be off when no
modem is connected or if the modem is not initialized.

Systems, Incorporated
30700 Bainbrodge Road •Solon, Ohio 44139
© Copyright 2001 TimeKeeping Systems, Inc. •GUARD1 and THE PIPE are registered trademarks of TimeKeeping Systems, Inc.
GUARD1PLUS is a trademark of TimeKeeping Systems, Inc.
Declaration of Conformity
according to ISO/IEC Guide 22 and EN45014
Manufacturer’s Name: TimeKeeping Systems, Inc.
Manufacturer’s Address: 30700 Bainbridge Road
Solon, Ohio 44139
U.S.A.
declares that the product:
Product Name: The Modem Downloader
Model Number: DL-MODEM-[nnn]
conforms to the following Product Specifications:
EMC: IEN 50082-1
IEN 801-2.1984
IEN 801-3.1984
IEN 801-4.1984
IEN 55022.1987
Supplementary Information: None
Barry Markwitz, Vice President
Declaration of Conformity
The following Declaration of Conformity complies with ISO/IEC Guide 22 and
EN45014. It identifies the product, the manufacturer’s name and address, and the
applicable specifications that are recognized in the European community.
ED-99-0011-000
Tabla de contenidos
Manuales populares de Módem de otras marcas


US Robotics
US Robotics 3453C Manual de usuario

MaxTech
MaxTech Plug & Play Internal Voice/FAX/Data/SVD... Manual de usuario

Zte
Zte MF823 Manual de usuario

Four-Faith
Four-Faith F1403 Manual de usuario

Sierra Wireless
Sierra Wireless AIRLINK MP595W Manual de usuario

Gemtek
Gemtek WiMAX WIXFBR-103 Manual de usuario