Tenda A301 Manual de usuario

1
Q1.
N300 Mini WiFi Range ExtenderA301
User Guide

i
Copyright Statement
© 2020 Shenzhen Tenda Technology Co., Ltd. All rights reserved.
is a registered trademark legally held by Shenzhen Tenda Technology Co., Ltd. Other
brand and product names mentioned herein are trademarks or registered trademarks of their
respective holders. Copyright of the whole product as integration, including its accessories and
software, belongs to Shenzhen Tenda Technology Co., Ltd. No part of this publication can be
reproduced, transmitted, transcribed, stored in a retrieval system, or translated into any language
in any form or by any means without the prior written permission of Shenzhen Tenda Technology
Co., Ltd.
Disclaimer
Pictures, images and product specifications herein are for references only. To improve internal
design, operational function, and/or reliability, Tenda reserves the right to make changes to the
products without obligation to notify any person or organization of such revisions or changes.
Tenda does not assume any liability that may occur due to the use or application of the product
described herein. Every effort has been made in the preparation of this document to ensure
accuracy of the contents, but all statements, information and recommendations in this document
do not constitute a warranty of any kind, express or implied.

ii
Preface
Thank you for choosing Tenda! Please read this user guide before you start.
Conventions
This user guide is applicable to A301. The contained images and UI screenshots are subject to the
actual products.
The typographical elements that may be found in this document are defined as follows.
Item
Presentation
Example
Cascading menus
>
Internet Settings > LAN Setup
Parameter and value
Bold
Set SSID to Tom.
Variable
Italic
Format: XX:XX:XX:XX:XX:XX
UI control
Bold
On the Quick Setup page, click the Save button.
The symbols that may be found in this document are defined as follows.
Symbol
Meaning
This format is used to highlight information of importance or special interest. Ignoring
this type of note may result in ineffective configurations, loss of data or damage to
device.
This format is used to highlight a procedure that will save time or resources.

iii
Acronyms and Abbreviations
Acronym or Abbreviation
Full Spelling
MAC
Medium Access Control
SN
Serial Number
RST
Reset
SSID
Service Set Identifier
UI
User Interface
WPA-PSK
WiFi Protected Access-Pre-shared Key
WPS
WiFi Protected Setup
Technical Support
If you need more help, contact us by any of the following means. We will be glad to assist you as
soon as possible.
Hotline
Global: (86) 755-27657180 (China Time Zone)
United States: 1-800-570-5892 (Toll Free: 7 x 24 hours)
Hong Kong: 00852-81931998
Email
support@tenda.cn

iv
Contents
1Get to know your device...............................................................................................................1
1.1 Overview ................................................................................................................................1
1.2 LED indicator, button, and label.............................................................................................1
1.2.1 LED indicators..............................................................................................................1
1.2.2 Buttons........................................................................................................................2
1.2.3 Labels ..........................................................................................................................3
2Quick Setup ...................................................................................................................................4
2.1 Extend your existing WiFi network through the Web UI .......................................................4
2.2 Extend your existing WiFi network with the WPS button......................................................7
3Use a mobile device to manage the extender ..............................................................................9
3.1 Log in to the extender............................................................................................................9
3.2 Check the internet status.....................................................................................................11
3.3 Modify the SSID and password of the extender ..................................................................13
3.4 Hide the WiFi network of the extender ...............................................................................15
3.5 Manage online devices ........................................................................................................20
3.5.1 Check online devices.................................................................................................20
3.5.2 Block online devices..................................................................................................22
3.5.3 Unblock devices ........................................................................................................23
3.6 Extend another WiFi network..............................................................................................24
3.7 Change the operating mode ................................................................................................27
3.7.1 Switch the extender from the repeater mode to the AP mode................................27
3.7.2 Switch the extender from the AP mode to the repeater mode................................30
3.8 Set up a login password .......................................................................................................31
3.9 Reboot the extender ............................................................................................................33
3.10 Reset the extender.............................................................................................................34
3.10.1 Reset the extender through thr Web UI .................................................................34
3.10.2 Reset the extender with the RESET button.............................................................35
4Use a laptop or computer to manage the extender ...................................................................36
4.1 Log in to the extender..........................................................................................................36
4.2 Check the internet status.....................................................................................................38
4.3 Manage online devices ........................................................................................................39
4.3.1 Check online devices.................................................................................................39
4.3.2 Block online devices..................................................................................................40
4.3.3 Unblock devices ........................................................................................................41

v
4.4 Extend another WiFi network..............................................................................................42
4.5 Modify the SSID and password of the extender ...............................................................45
4.6 Hide the WiFi network of the extender ...............................................................................46
4.7 Change the operating mode ................................................................................................47
4.7.1 Switch the extender from the repeater mode to the AP Mode ...............................48
4.7.2 Switch the extender from the AP mode to the repeater mode................................51
4.8 Set up a login password .......................................................................................................52
4.9 Reboot the extender ............................................................................................................53
4.10 Reset the extender.............................................................................................................54
4.10.1 Reset the extender with Web UI.............................................................................54
4.10.2 Reset the extender with the RESET button.............................................................54
4.11 Export logs..........................................................................................................................55
4.12 Upgrade the extender........................................................................................................56
Appendixes.........................................................................................................................................57
A.1 Set your computer to obtain an IP address automatically ..................................................57
A.1.1 Windows 7 ................................................................................................................57
A.1.2 Windows 10 ..............................................................................................................61
A.2 Default Parameter Values ....................................................................................................63

1
1 Get to know your device
1.1 Overview
Tenda A301 is a high-performance WiFi extender operating in the 2.4 GHz band. It helps provide a
larger WiFi coverage. Meanwhile, it can work well with mainstream WiFi routers available on the
market.
1.2 LED indicator, button, and label
1.2.1 LED indicators
LED indicator
Status
Description
Signal
Solid blue
The extender has connected to your WiFi router, and its position is
proper.
Solid red
The extender is too far away from your WiFi router.
Relocate the extender closer to the router.
Off
The extender does not connect to your WiFi router.
Signal
WPS
PWR

2
LED indicator
Status
Description
WPS
Solid on for 2
mins > off
A WPS connection is established.
Blinking
The extender is performing WPS negotiation.
Off
The WPS function is disabled or no WPS connection is in progress.
PWR
Solid on
The extender is connected to a power source properly.
Off
The extender is not powered on.
1.2.2 Buttons
Button/Port
Description
WPS
Press the button of the router, and enable the WPS function of another device within
2 minutes to establish a WPS connection.
When the PWR LED indicator of the extender is solid on, hold down this button using a
needle, and release it when all the LED indicators blink once then turn off. When the
PWR LED indicator turns solid on again, it is reset successfully.
LAN port.
In repeater mode, this port allows a wired device, such as a desktop computer, to be
connected to the repeater to access the internet.
In AP mode, it is used to connect to your upstream device such as a wired router,
enabling the repeater access the internet.
WPS button
RESET button
3
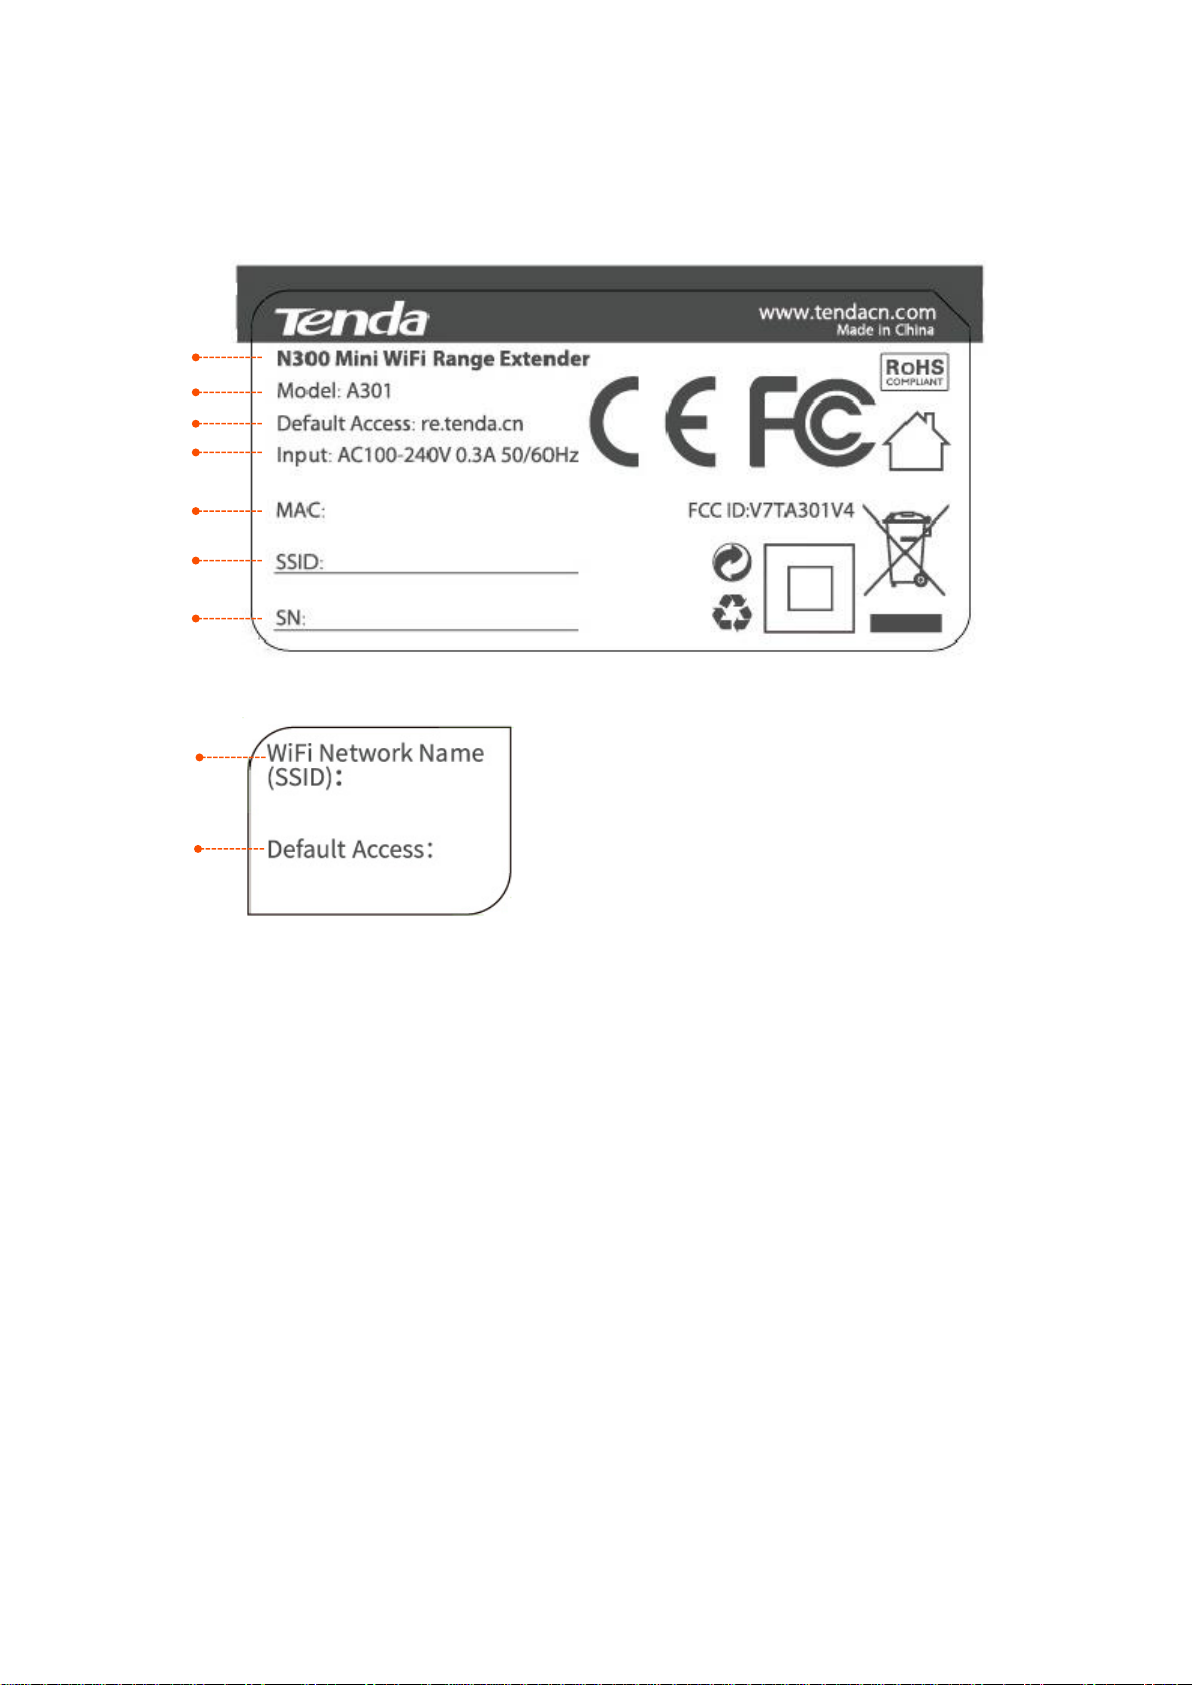
1.2.3 Labels
The labels present WiFi network name (SSID), login address and other information of the extender.
Label on the rear panel of the extender:
Label on the top panel of the extender:
(1) Product name of the extender.
(2) Model: Product model of the extender. You can use this model as a key word for searching related
supporting materials across various channels, such as Tenda official website, or e-commerce
websites.
(3) Default Access: Default domain name for logging in to the web UI of the extender.
(4) Input: Power specification of the extender.
(5) MAC: MAC address of the extender. A MAC address refers to the unique physical address of the
device.
(6) SSID:Default wireless network name of the extender.
(7) SN:The unique serial number of the extender.
(1)
(2)
(3)
(4)
(5)
(6)
(7)
(6)
(3)

4
2 Quick Setup
2.1 Extend your existing WiFi network through the
Web UI
You can use a WiFi-enabled device, such as a smart phone, a laptop or a desktop computer
installed with a wireless adapter, to configure the extender through the web UI.
When using a mobile device for setup, disable its mobile data or cellular network before
configuration. A smart phone for setup is used for illustration here.
Step 1 Plug the extender into a power source near your wireless router in the same room. Wait
until the PWR LED indicator of the extender lights solid on.
Step 2 Connect your smart phone to the open WiFi network named Tenda_EXT of the extender.
Otros manuales para A301
4
Tabla de contenidos
Otros manuales de Extensor de Tenda

Tenda
Tenda A3 Manual de usuario

Tenda
Tenda AH302 Manual de usuario

Tenda
Tenda A27 Manual de usuario

Tenda
Tenda AV1000 Manual de usuario

Tenda
Tenda A300 Manual de usuario

Tenda
Tenda A300 Manual de usuario

Tenda
Tenda A301 Manual de usuario

Tenda
Tenda teg2124t Manual de usuario

Tenda
Tenda PH10 Manual de usuario

Tenda
Tenda AV1000 Manual de usuario


