Techage WiFi Camera System Manual de usuario

WiFi Camera System
User Manual
www.techage.com
Security Expert for Your Home and Business
Smart Network Video Recorder

EseeCloud App

1. First Login - Basic System Settings
3. Camera Advanced Setting
3.1 Video Detection Setting
3.2 IR-CUT Setting
3.3 PTZ Control with Auto Tracking
4. Recording Setting
4.1 Video Record
4.2 Video Playback
4.3 Video Backup
6. Remote Access
6.1 View on Smartphone
6.2 View on PC Software
6.3 View on PC Browser from Lan and Wlan
5. Email Setup
2. Add Camera
06
08
16
19
Table of Contents
11
15
12
13
14
19
23
24
15
15
16

Smart Network Video Recorder
Front of the NVR
Thank you for purchasing Techage wireless security system and WiFi video recorder.
Techage is committed to providing customers with high quality and reliable security
products and solutions.
This quick user guide will help you learn the system fast and make it work easily. For
details and latest user manuals, please find it on our website: www.techage.com
If you meet any troubles when following the manual, please visit our website:
http://techage.com/support.php You can find FAQ answers, videos and documents
needed there.
If you need customer support, email us and we will respond within 24h:
support@techage.com.
This wireless system will require some cabling. It's highly recommended to test all
products and components before installation and cabling.
NVR Overview
Preface
Before Installation
01

DC12V
AUDIO OUT
SUB
VGA HD-port WAN USB
MAIN
OFFON Power
Back of the NVR
Red indicator light: It will be on when the NVR is plugged in power adapter(DC 12V 2.5A).
Green indicator light: When the HDD is not connected to the NVR or the HDD is not
formatted, the light will be off;
When the NVR is recording, the light will flash slowly;
When the HDD is connected to the NVR but the NVR don't record, the light will be always on.
IR: To receive infrared remote control signal.
Audio Out: For a speaker to play the audio.
VGA Port: For viewing on VGA monitor.
HD Port: For viewing on HD monitor.
WAN Port: Connect your NVR to Internet.
USB Ports: For USB mouse and backup.
DC Power Port: For power adapter input 12V 2.5A, the size of the DC plug is 5.5*2.1mm.
Hard Disk Installation
Please install the hard disk first. If not, the video recorder can only monitor normally, but
cannot record or playback video.
02

1. DC Power Port: Power input 12V 1A.
2. Wireless Antenna: Wireless connection with NVR.
3. RJ45 Port(Optional): For matching code and wired connection between IPC and NVR.
There is range limitation for the wireless signal from NVR. When cameras are out of the
range, you can use the port to connect the camera and NVR with network cable. If the
wireless camera works great with wireless NVR, just leave the port without cable.
4. Reset Button(Optional): Press here to reset camera password and configuration.
Notice: Please choose a specialized monitoring hard drive disk to record for a
longer time. The video recorder supports 3.5" or 2.5" SATA hard disk.
Warning: please make sure the power is off before installation.
1 2
3 4
Remove the case Plug in SATA cable
Screw HDD to the bottom Install the case back
Camera Detail
03
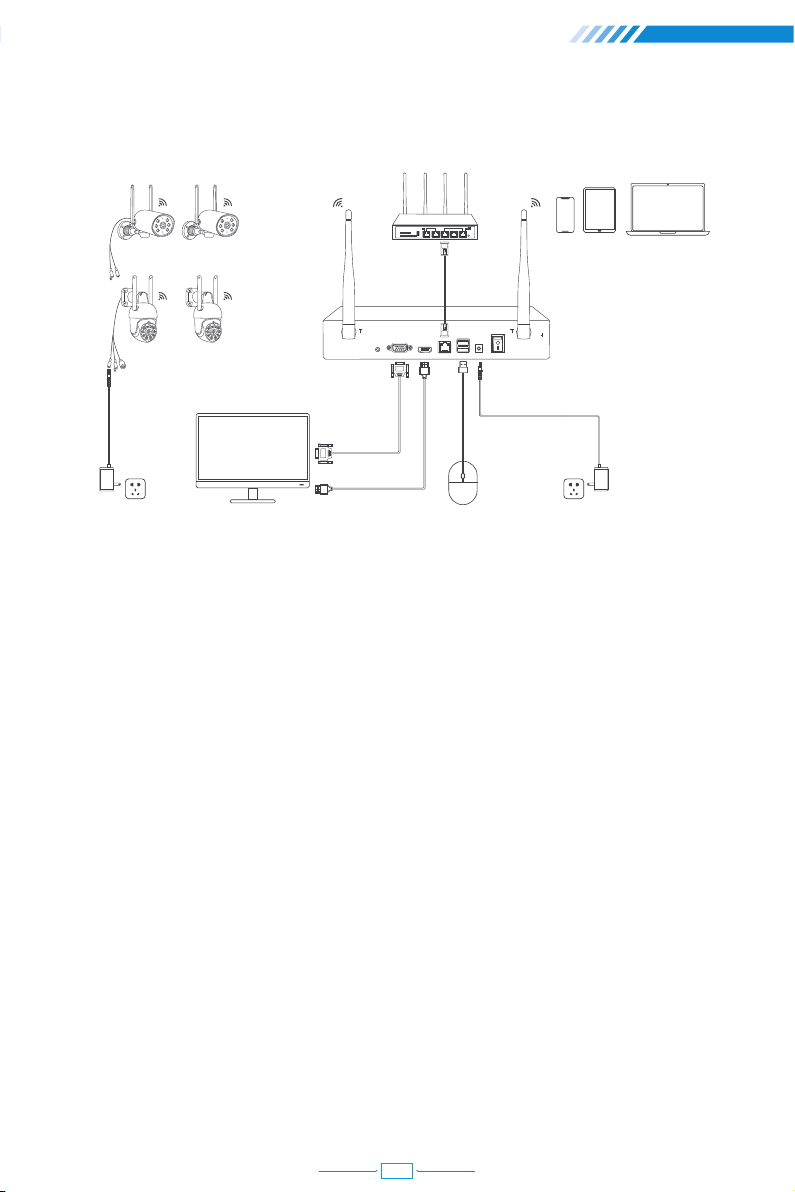
Connect your System
DC12V
AUDIO OUT
SUB
VGA HD-port WAN USB
MAIN
OFFON Power
Router Display Device for Remote ViewWiFi IP Camera
Display Device(TV/Monitor with VGA/HDMI Port)Power Supply Power Supply
HDMI Cable
VGA Cable
WiFi NVR
Mouse
How to install the camera system?
Step 1 : Install antennas for camera if the antennas of camera are split.
Step 2 : Power on the cameras with power adapters (12V 1A) and press reset button if it has.
Step 3 : Connect the NVR to router with an Ethernet cable.
Step 4 : Plug the mouse (included) into the USB port at the rear panel of the NVR.
Step 5 : Power the NVR with its power adapter (12V 2.5A or bigger).
Step 6 : Connect the monitor to the NVR with VGA/HDMI Cable.
Step 7 : Switch on the NVR through the power switch button on the NVR.
How to mount the camera?
Step 1 : Mount the cameras where within the WiFi range and then plug the power adapters
into the camera.
Step 2 : The cameras start to stream videos to NVR within 1 minute.
Step 3 : If display device does not display video, the reasons may be: there are too many
obstacles between the camera and the NVR or the camera is too far from the NVR. Please
try to move the cameras closer to the NVR or try to extend the wireless WiFi range.
04

Connect cameras to same router network as same as your NVR.
When you install the cameras, please make sure to avoid the inaccurate ways of installations.
Wrong Way: The wall will reflect the light from the IR lights to the lens at night if the
camera lens are installed too close to the wall.
Right Way: Adjust the directions of the camera lens and make sure the lens of the camera
are away from the wall.
Wrong Way: There are objects too close to the camera lens. The object will reflect light
from the IR light to the lens.
Right Way: Move the objects away from the camera lens or change the camera's installation
position.
Close Object Reflects
Wrong Viewing Angles
Cameras Installations
Wrong Way: The wire cables of the camera, like power cable or Ethernet cable is too close
to the camera lens. The cables will reflect light from IR light to the lens.
Right Way: Move the power cable or Ethernet cable away from the camera lens and fix it
on the back of the camera.
Close Wire Cable Reflects
05

At your first login to the system, there will be a quick guide to help you set up the basic
information of your NVR recorder.
1.1 The default user name is "admin" and there is no password. Click "Ok".
1.2 All the settings here have already been adjusted in the factory, please click "Next".
1 First Login - Basic System Settings
1.3 [Wireless Setup] All settings have already been adjusted in the factory, please click
"Next".
Notice: The "Sync Time" is defaulted "Enable" so the time and date will automatically
self-adjust. If the "Sync Time" function is not working properly, please check if the
network is connected and if the network cable has been plugged in correctly.
06

1.4 [Wireless Internet] Select your WiFi name and enter the password to connect your
NVR to your router.
1.5 [Fast Network] You can check the network status and NVR's IP address here.
Notice: If the "Network Status" shows other error information in red, please contact us
and send the screenshot. Our customer service team will help you resolve the problem.
07
Tabla de contenidos
Otros manuales de Cámara digital de Techage


