Tactic DRONEVIEW Manual de usuario

The Tactic Droneview Camera is powered by an included
1S 3.7V 350mAh lithium-polymer battery (LiPo).
IMPORTANT: It will be necessary to fully charge the
battery with the included USB charge cable before
use! Follow all safety precautions below before
proceeding. Failure to do so may cause the camera
to lose power prematurely, resulting in a loss of data.
●
NEVER LEAVE BATTERY UNATTENDED WHILE CHARGING.
●
Never allow battery temperature to exceed 140°F (60°C).
●Never place the battery on combustible materials while
charging.
●Never attempt to disassemble or modify the battery.
●Never attempt to charge or to use the battery if it’s
swollen, punctured, or deformed in any way.
●Never attempt to charge the battery with an
incompatible battery charger.
●Follow appropriate disposal instructions when the
battery has reached the end of its useful life.

CHARGE THE CAMERA BATTERY
1. Connect the included USB charge cable to a computer’s
USB Port or to an AC to USB adapter.
2. Connect the LiPo battery to the jack on the opposite
end of the charger.
3. The Battery Charge Meter LEDs will start ashing to
indicate that the charge cycle has started.
4. When the battery is charged, the Battery Charge Meter
LEDs will stop ashing and remain on.
5 The battery will recharge in about 50 minutes if the
camera is turned off and will operate the camera
for about the same time. The USB charge cable can
be used while the camera is operating to extend the
camera’s run time.

QUICK START
When the camera is turned on, it needs 30 seconds to
setup before it can be used.
LED will ash when camera is in use.
Must be steady for 30 seconds before
the camera is turned off.
Insert or remove the
memory card only when
the camera is off.
Tap to turn the
camera on or off.
Tap to take a picture. Hold
for 2 seconds to start video.
Tap to stop video.
Turn the camera
off when just one
LED has been on
for 10 minutes.
If the camera loses Wi-Fi connection and there is
another network that the device can connect to, iOS
users must go into the Wi-Fi settings and select the
Droneview network. Android devices will usually re-
connect automatically and the user should wait about
a minute before going to the Wi-Fi settings page.
If the battery dies while recording a video or the
camera is turned off before the le is saved to the
memory card, the current le may be lost or corrupted.
Always wait 30 seconds before turning the camera
off after recording a video or taking a picture.
Always use a class 10 card in the Droneview camera.
Always insert and remove the memory card when the
camera is turned off.

BATTERY MODULE
The battery module can be easily removed from the
camera and replaced. The module can be charged
without being attached to the camera. To remove the
battery module:
Slide both lock tabs towards the front of the camera.
Carefully pull up on the tab at the back of the camera.

Slowly raise the back of the camera until the tabs are
clear of the battery module.
Push the camera forward and up from the module to
release the front catches.
SPECIFICATIONS
Resolution: 720p
Run time: Approx. 45 minutes with fully charged battery.
Weight: 1oz (27.5g)
Width: 1.34" (34mm)
Length: 3.1" (80mm)
Height: 0.9" (24mm)
Sensor size: 1 megapixel

KIT CONTENTS
CAMERA CONTROLS
Picture/Video
Button
Memory
Card Slot
Battery
Module Lock On/Off
Button
Status LED
Battery
Charge Meter
Receiver
Cable Port
Micro USB
Charge Port
Battery Module
Lock
Power Switch: Tapping the ON/OFF button turns
the camera on and off. When the camera turns on,
the Status LED will be steady (Standby Mode) and the
Battery Charge Meter will be lit. The camera will need
30 seconds to complete initialization of the card and the
Wi-Fi connection before it can be used.
Tap the ON/OFF button to turn off the camera. Before
the camera is turned off, make sure that the camera has

been in standby mode for at least 30 seconds so it can
save any new les that were created.
Picture Mode: A photo will be taken when the P/V button
is tapped. The Status LED will ash rapidly for 3 seconds
while image is captured and stored. The camera cannot
capture another picture until the Status LED stops ashing.
Video Mode: Holding the P/V button for 2 seconds will
start a video recording. The Status LED will ash slowly
while the video is being captured. To stop the video, tap
the P/V button.
NOTE:
The DroneView camera’s maximum video
length is 5 minutes. If video runs longer than 5 minutes
the DroneView camera will automatically close the
video le, save it to the memory card, and start a new
le. There may be a short loss of video footage during
this switch to a new le. The DroneView will continue
to create new video les every 5 minutes of continuous
recording until the memory card is full or the battery
voltage is too low for the camera to operate. Corrupt or
missing video les may result if the camera is stopped
for these reasons. When the camera has been on for
more than 40 minutes or the Battery Charge Meter has
had only one LED on for at least 10 minutes, the video
should be stopped so the le can be saved.
Receiver Cable: A receiver with an open channel that
uses a three position switch, a knob or a stick can be used
to make videos or take a photo. Connect the Receiver
Cable to the Receiver Cable port on the camera and to
the desired channel on the receiver. Insert a memory

card in the camera and turn it on. After the camera has
completed the initialization procedure, use the Status
LED to identify which camera mode is controlled by the
different switch/knob positions.
Video
Standby/Stop Video
Picture
Flashing Slowly
Steady
Flashing Rapidly
(3 seconds)
100%
0%
–100%
The camera control must return to the standby position
to stop a video or after a picture is taken. After taking
a picture, please wait 5 seconds before taking another
photo or starting a video. The camera must be in standby
mode at least 30 seconds to save any les recorded
before it is turned off.
USING THE DRONEVIEW APP
The DroneView app is software for your Wi-Fi-capable
Apple or Android device that allows you to connect to
the DroneView camera. Your device can then use the FPV
(First Person View) function to monitor what the camera is
viewing and take videos or pictures from the app. These
les can then be viewed and stored directly to your device.

1. Install the “DroneView” app from Google Play (Android)
or the App Store (Apple).
2. Insert the memory card into the camera and turn on the
camera. Wait 30 seconds for the camera to complete the
initialization process.
3.
iOS Only: Go to the Wi-Fi
setting options in your device
and select the DroneView
network. The actual name of
the DroneView network will
vary from the photo shown
here. It may take several
seconds for the DroneView
network to appear in the
available network list on
your device. No password
is needed to connect to the
DroneView network.
Open the DroneView
app. It may take several
seconds for the app to
locate and connect
to the DroneView Wi-
Fi network. Android
devices will usually
connect automatically to the DroneView Wi-Fi network when
the DroneView app is opened. If your Android device is not
connected within 30-60 seconds, open the Wi-Fi settings and
manually connect to the Droneview network.
4.
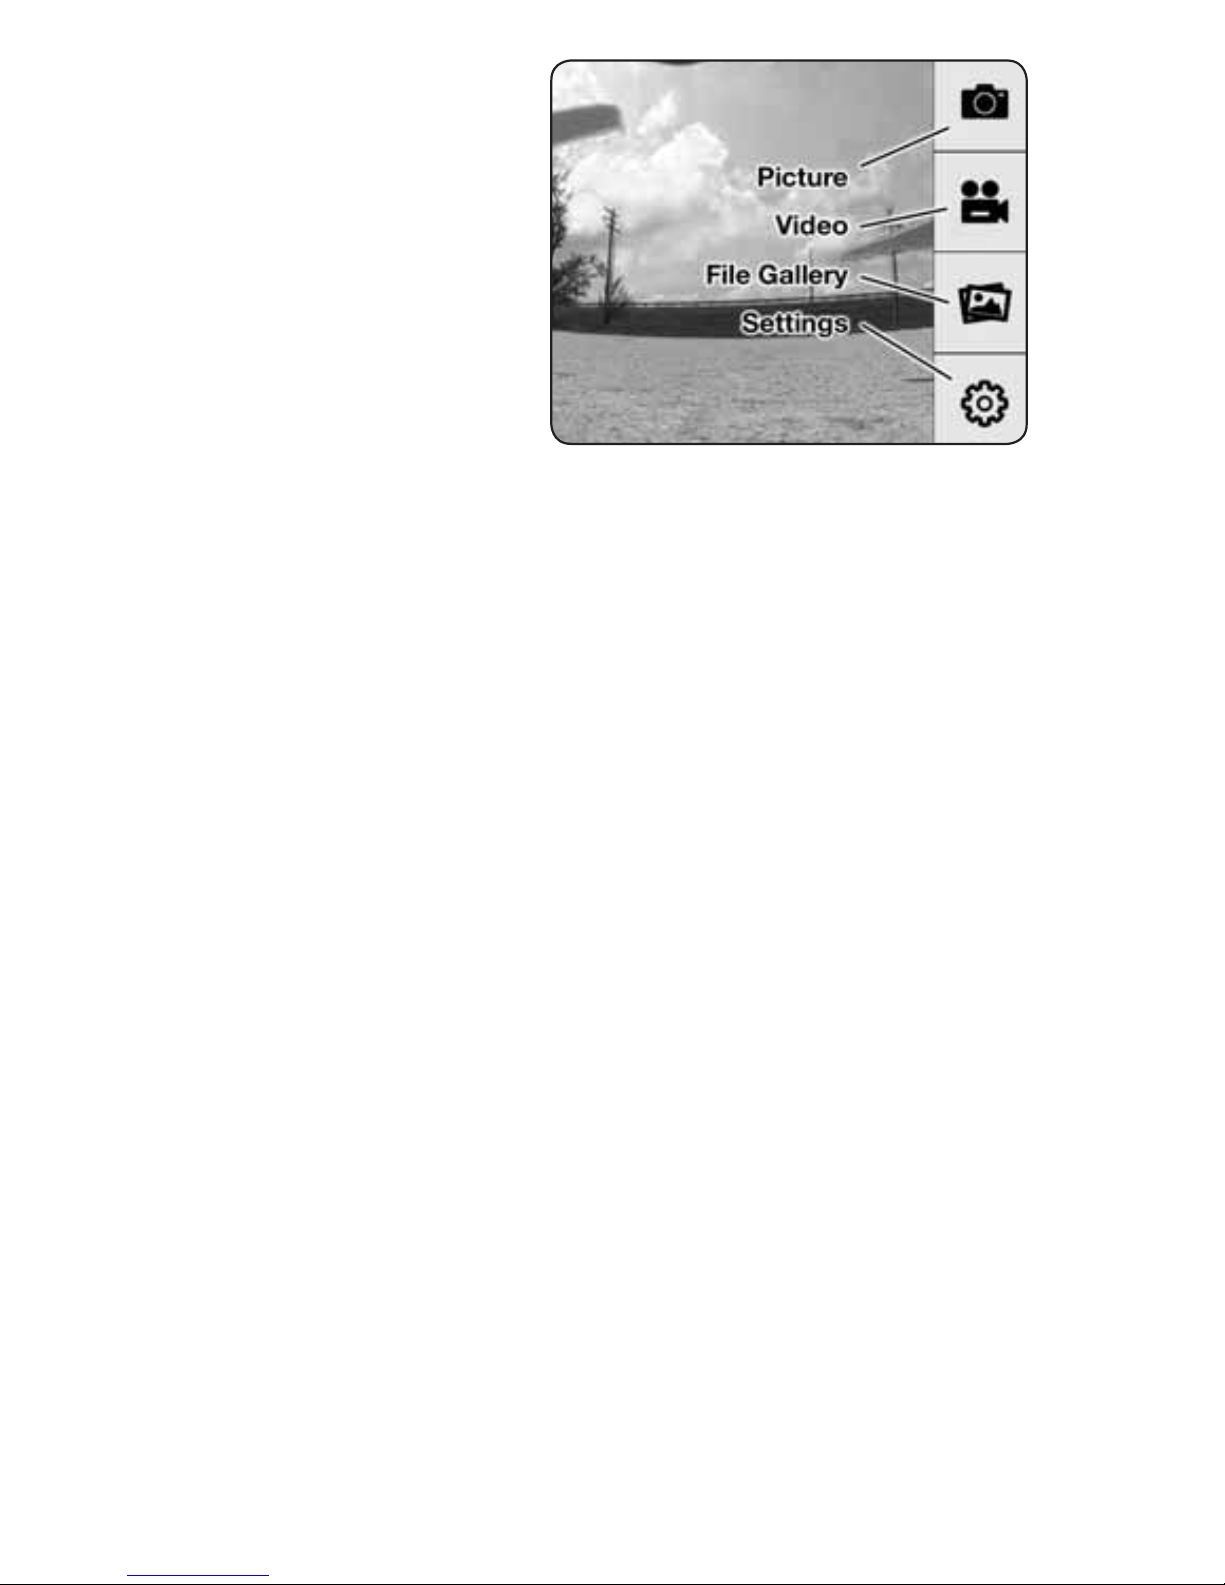
Once connected, you
will see the image seen
by the camera (referred
to in this manual as
the FPV feed). Press
anywhere on the
screen to pull up the
main menu buttons.
The Wi-Fi range will typically be around 100 meters in
an open area and will be reduced when the camera is
operated indoors or where there is electronic interference.
NOTE: The FPV feed is for the purposes of displaying
what the camera is recording to improve the quality
and accuracy of videos and pictures with respect
to the operator’s intended eld of view. We do not
recommend attempting to operate a R/C vehicle
using just the FPV feed. Delays in the FPV feed can
cause the image shown in the app to not represent
the exact current position of the vehicle. Any
interruption of the FPV feed will not be present in
the video les saved to the memory card.
PICTURE
Press this button to take a still image. The screen will
ash while the photo is captured. If the sound on the
mobile device is turned on, the app will also make a
sound like a mechanical camera shutter while the photo
is taken.
Tabla de contenidos


