
Synergy 21 T-DSL Hoja de información del producto

T-DSL LAN 4-Port
Ethernet Router
Easy Start
•Product warranty does not apply to damage caused by lightning, power surges or
wrong voltage usage.
•This product is for use only in UL Listed computers.
Contents
Introduction...............................................................1
Minimum System Requirements..................................1
T-DSL Router Package ...............................................2
T-DSL Router Overview ..............................................2
Typical T-DSL Router Connection ................................4
Step 1: Connecting the T-DSL Router to Your
Computer/Notebook ......................................5
Step 2: Configuring Your Ethernet Network Card .........8
Step 3: Configuring Your Internet Browser..................10
Step 4: Connecting to the Internet.............................11
Easy Start
1of 11
Safety Guidelines
Thank you on your purchase of the T-DSL 4 Port Ethernet Router! The T-DSL 4 Port Router
allows you to share high-speed broadband T-DSL connection with multiple PC using a single
device. With T-DSL, you can use your existing phone line that at the same time allows you to
make phone calls.
The T-DSL 4 Port Ethernet Router can be connected to any computer/notebook with a 10/100
Base-T Ethernet card. The Ethernet port have Auto MDI/MDIX feature which allows both
cross or straight UTP cable to be utilized.
This documentation assumes that you have already installed an Ethernet card on your
computer/notebook.
Minimum System Requirements
•Pentium®MMX 233MHz
•Ethernet card installed with TCP/IP Protocol (Required only if you are connecting to
the ETHERNET port of your T-DSL Router)
•OS independent for Ethernet
•Web Browser support:
Microsoft Internet Explorer 4.0 (or later versions)
Netscape® Navigator 3.02 (or later versions)
T-DSL Router Package
For any missing items, please contact your dealer immediately.
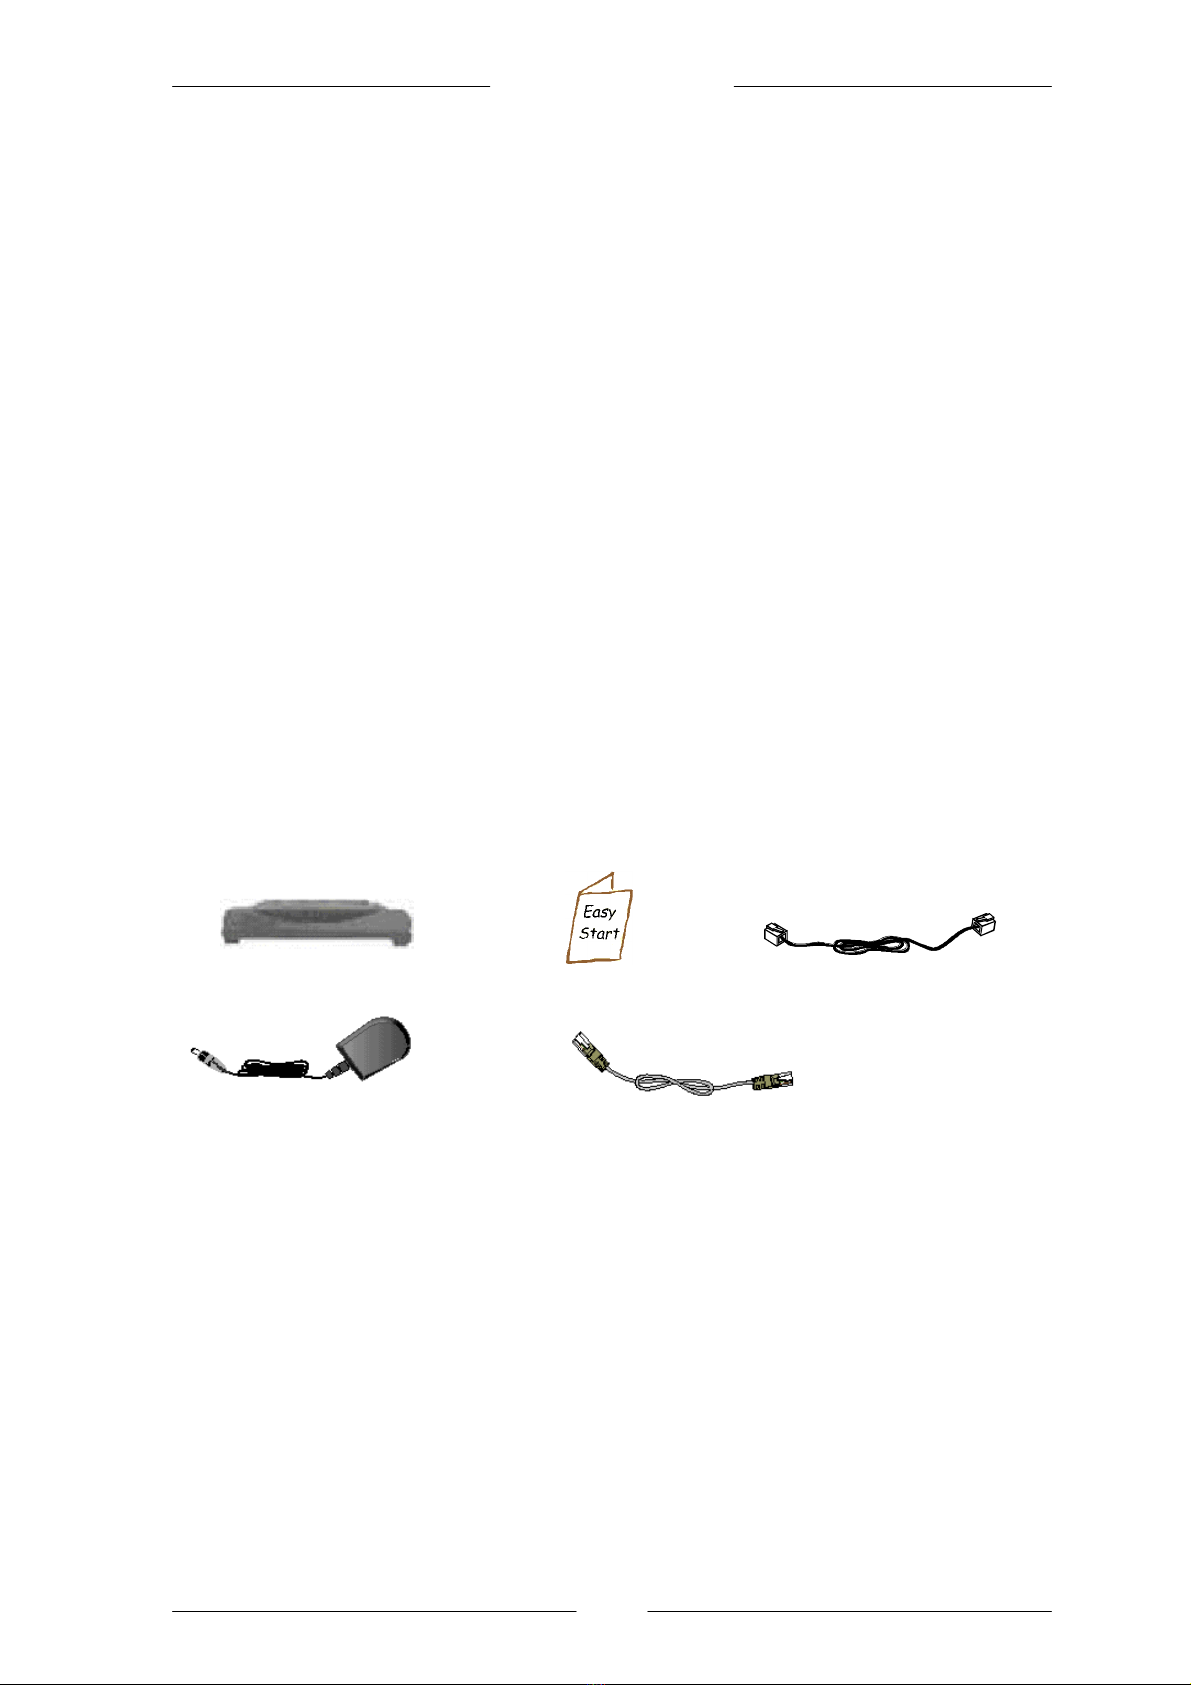
T-DSL Ethernet Router Easy Start Telephone extension cable
Power adapter (DC 12V) CAT-5UTP Straight Ethernet Network cable (RJ-45)

Easy Start
2of 11
T-DSL Router Overview
Front Indicators
¬POWER
Lights up when power is supplied to the T-DSL Router.
-ETH/ACT
Lights up when the Ethernet cable is properly connected from your T-DSL Router to the
Ethernet Card.
Flickers when the T-DSL is transmitting/receiving data.
®DSL
Lights up when the DSL connection is established.
Flickers when the T-DSL Router is trying to establish a connection with the T-DSL
Service Provider.
¯PPP
Lights up when the PPP connection is established.

Easy Start
3of 11
Back Panel
¬Splitter
Telephone jack (RJ-45) to connect to your Telephone Splitter (T-DSL line).
-RESET
To reset your T-DSL Router to factory default settings.(All customised settings that you
have saved will be lost!)Please refer to the below footer2on how to activate the reset
function.
®ETHERNET
10/100 Base-T Ethernet jack (RJ-45) to connect to your Ethernet Network card or
Ethernet Hub / Switch.
¯DC IN
To connect to the Power Adapter that comes with your package.
°POWER SWITCH
To power on or off the modem.
I -indicates ON position
O -indicates OFF position.
.
2To activate the reset function:
-Ensure that your T-DSL Router is powered on.
-Use a paper clip or a pencil tip to depress the reset button and release. At
this point, the DSL indicator light will go off, followed by the ETHERNET indicators.
The reset is in progress.
-When the DSL indicator starts blinking, it means that the reset process is
completed. The default settings are now restored.
-T-DSL line is established once the DSL indicator lights up.

Easy Start
4of 11
Typical T-DSL Router Connections
Up to 4 PCs Connections
For More than 4 PCs Connections
To connect to more than 4 computers/notebooks, you may further expand one of the Ethernet
Ports via an Ethernet Hub/Switch. For details on how to connect to the Ethernet Switch/Hub,
please refer to the documentation that comes with the unit.
With the Auto MDI/MDIX feature, both cross and straight UTP cable can be utilized
Easy Start
5of 11
Step 1: Connecting the T-DSL Router to Your
Computer/Notebook
1.1 Connecting to the Ethernet
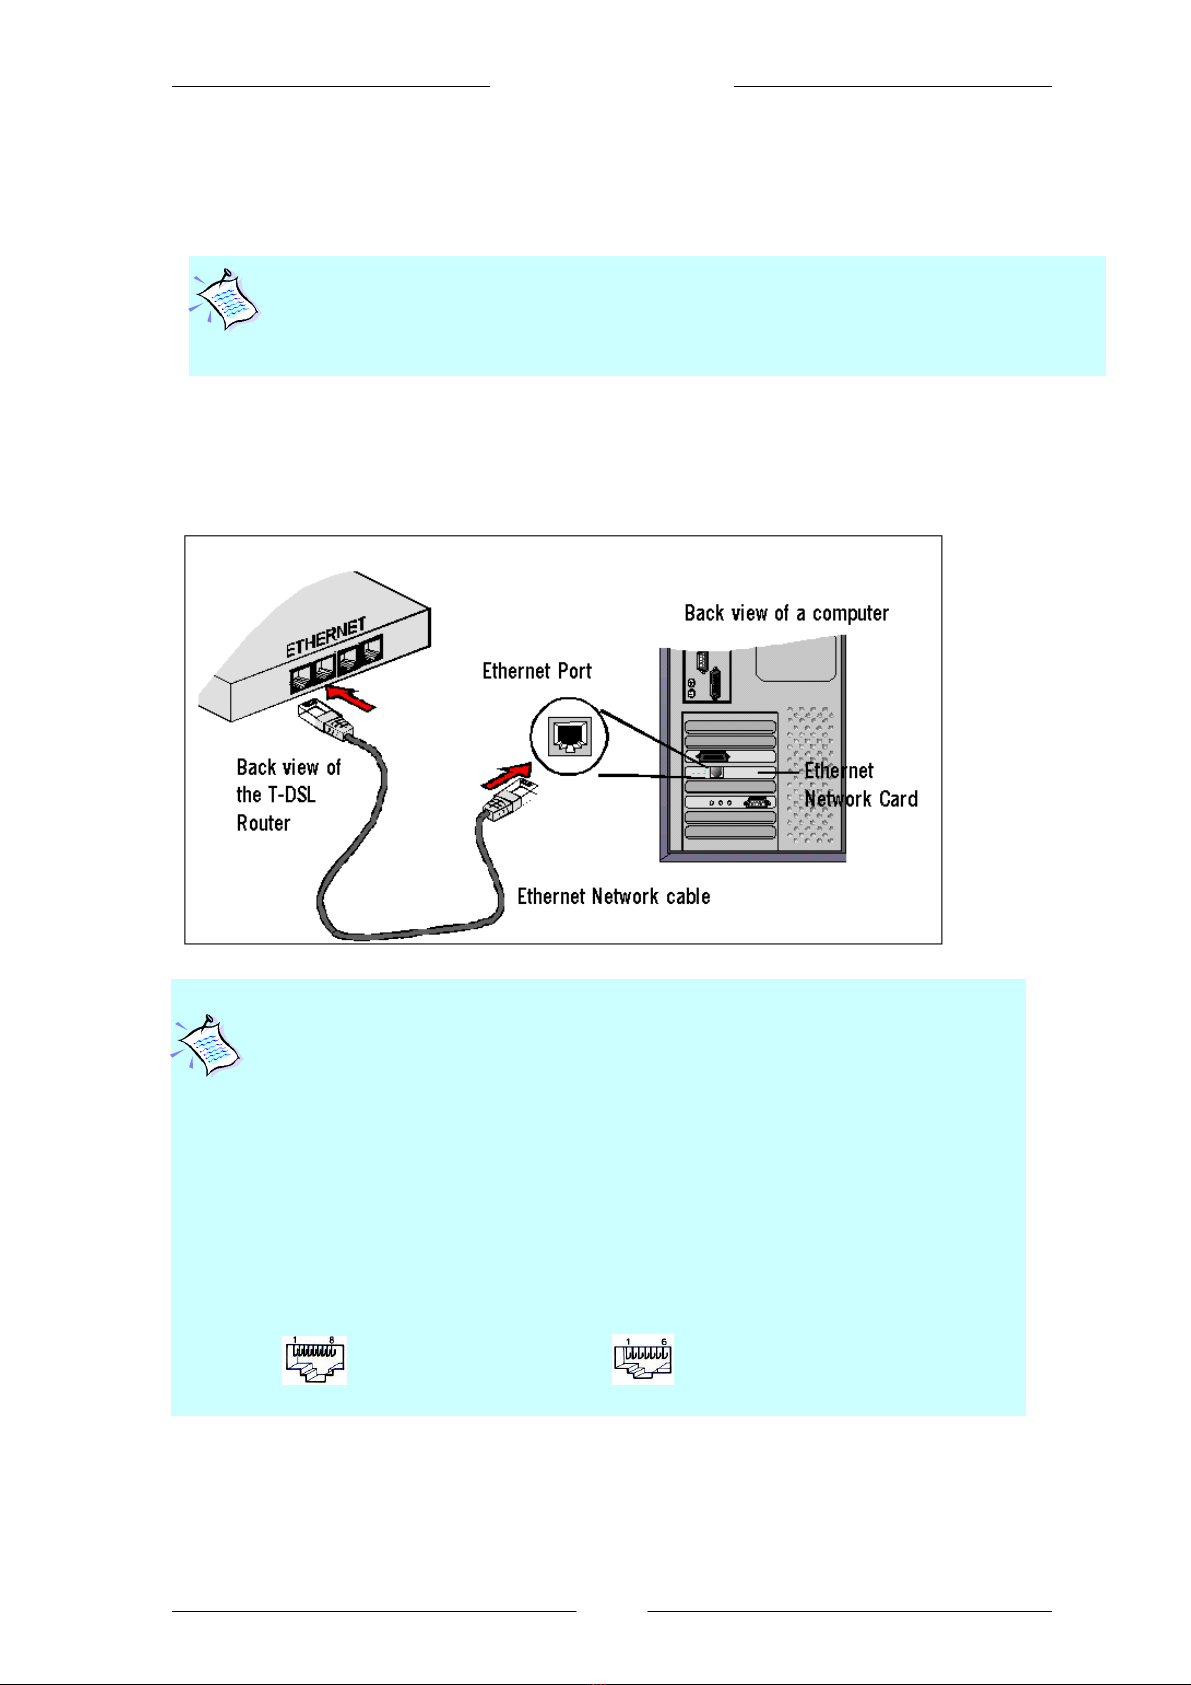
Connect your computer(s)/notebook(s) to the T-DSL 4 Port Router as illustrated. The
following illustration shows the connection of a single computer.
A. ETHERNET B. LINE
Power off your Computer/Notebook or/and any connected devices before
connecting to the T-DSL Router!
NOT SURE HOW THE ETHERNET PORT LOOKS LIKE?
The following are some tips to help you locate your Ethernet Ports
on your
Computer/Notebook. Alternatively, you may refer to the documentation that comes
with your Computer/Notebook.
Locating the Ethernet Port on your Computer/Notebook
Most Computers/Notebooks have labels describing the Ports. For Ethernet Port,
you will see either ETHERNET, ETH or RJ45 labeled near the Port.
If your Computer/Notebook does not have such descriptions, try the following.
-
Picture A gives the illustration of an Ethernet Port. All Ethernet Ports have
8 conductors on it. Do not mistaken w
ith the LINE Port (Picture B) that has only 6
conductors.
-The Ethernet Port is slightly bigger than the LINE Port.

Easy Start
6of 11
1.2 Connecting to the T-DSL Line
i. Connect one end of the T-DSL cable (provided by your T-DSL Service Provider) to
the Amt jack and the other end to the Telephone Wall Socket.
ii. Connect a Telephone set to connector. (This connection is optional)
1.3 Checking Your Connections
Please check your connections before proceeding.

Easy Start
7of 11
1.4 Connecting to the Power Outlet
1.5 Powering On
Power on the Power Outlet that is connected to your T-DSL Router.
Power on your Computer(s)/Notebook(s).
Please proceed to Step 2
Easy Start
8of 11
Step 2: Configuring Your Ethernet Network
Card
2.1 Configuring Your Ethernet Network Card
2.2 For Windows®98 Second Edition / Windows®Me
iFrom your Windows desktop, right-click on the Network Neighborhood icon. Select
Properties.
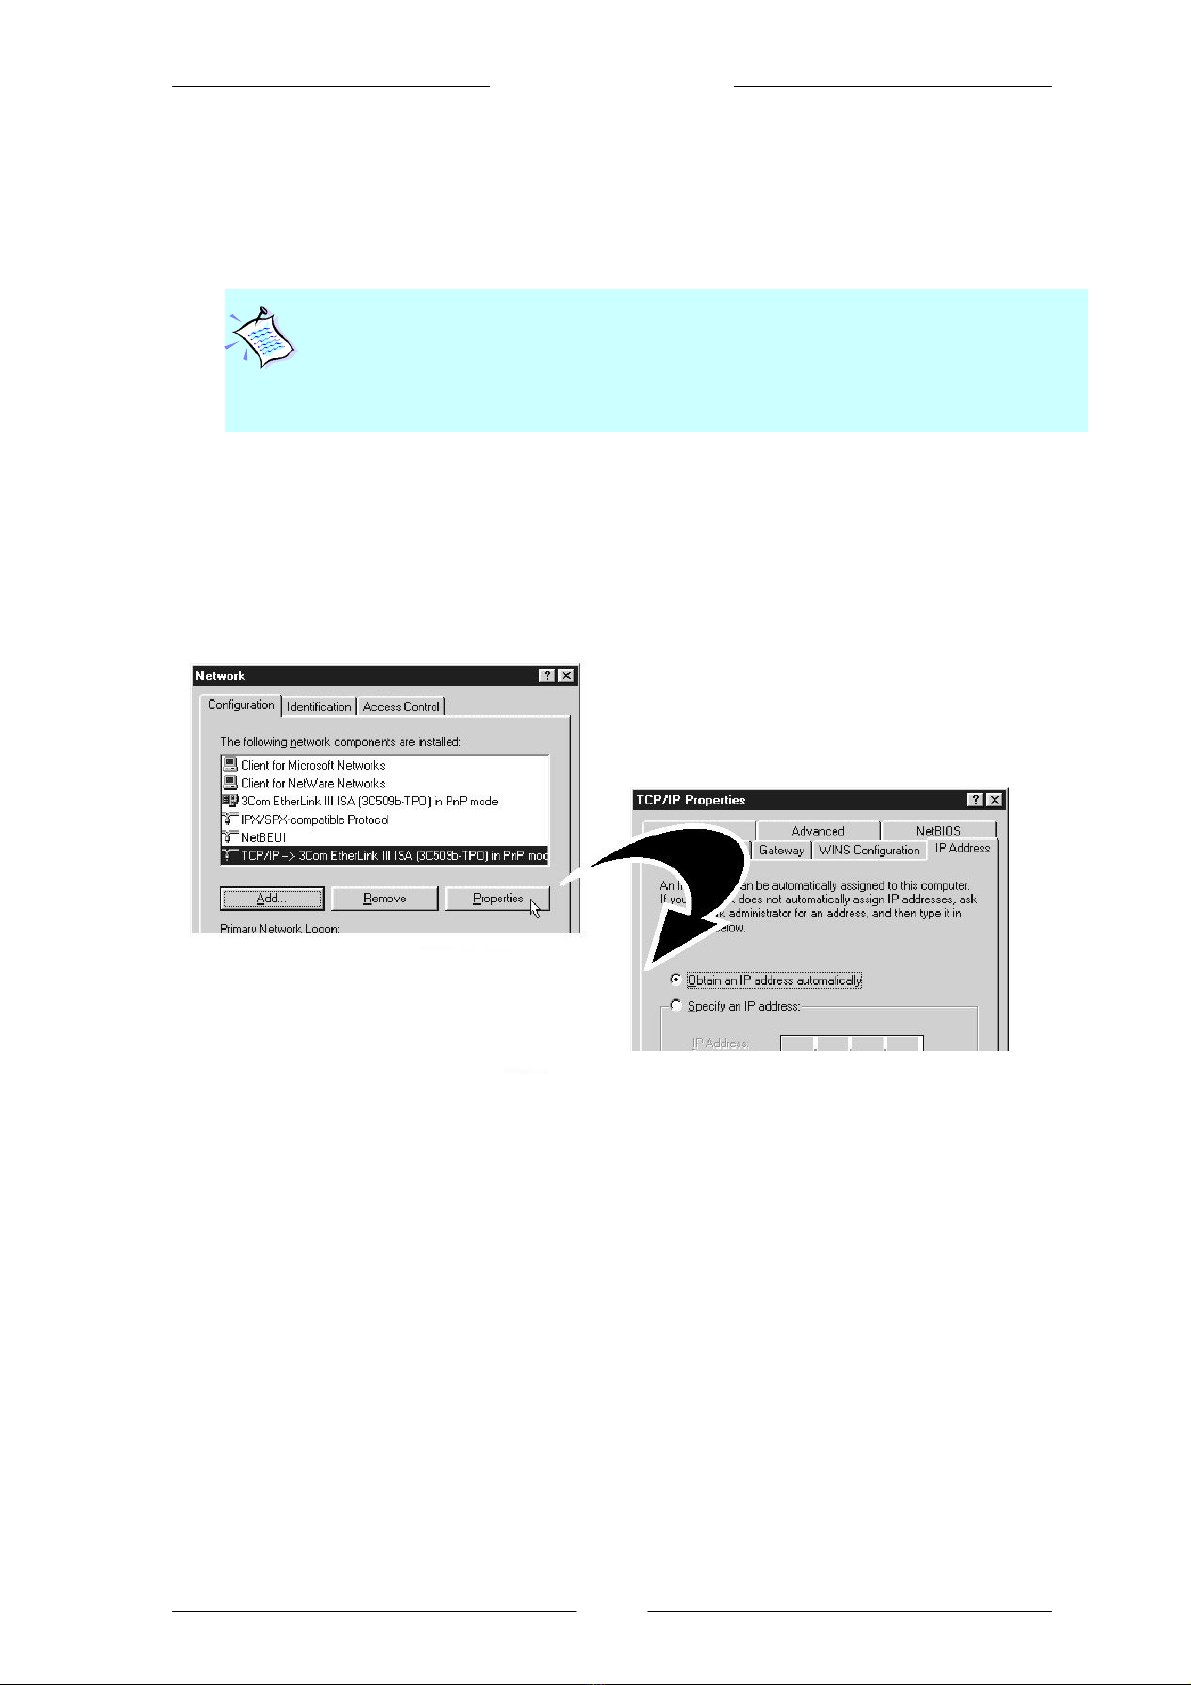
iiii From the Configuration tab, select TCP/IP-> xxx where xxx refers to the model of
your Ethernet Card or wireless adapter that is connected to your T-DSL Router.
Click Properties.
Click the IP Address tab.
Click the option Obtain an IP address automatically and click OK to save the settings.
Ensure that your T-DSL Router is powered on. Restart your system.
Proceed to Step 3.
The following illustrated screen shots serve only as examples. For any
dissimilarities, please follow closely the instructions prompted on your Computer.
For configuring your modem, please refer to the User Manual –
Web Management
Guide on your Installation CD
Easy Start
9of 11
2.3 For Windows®2000 / Windows®XP
iWindows® 2000:
a) From your Windows desktop, right-click on the icon My Network Places and
select Properties.
b) At the Network and Dial-up Connections window, right-click on the Local Area
Connection icon and select Properties.
Windows® XP:
(Instructions are based on default Start menu option)
a) From your Windows desktop, click Start >All Programs > Accessories >
Communications > Network Connections.
b) Right-click on the Local Area Connection icon that reflects the model of your
Ethernet Card or wireless adapter that is connected to your T-DSL Router and click
Properties.
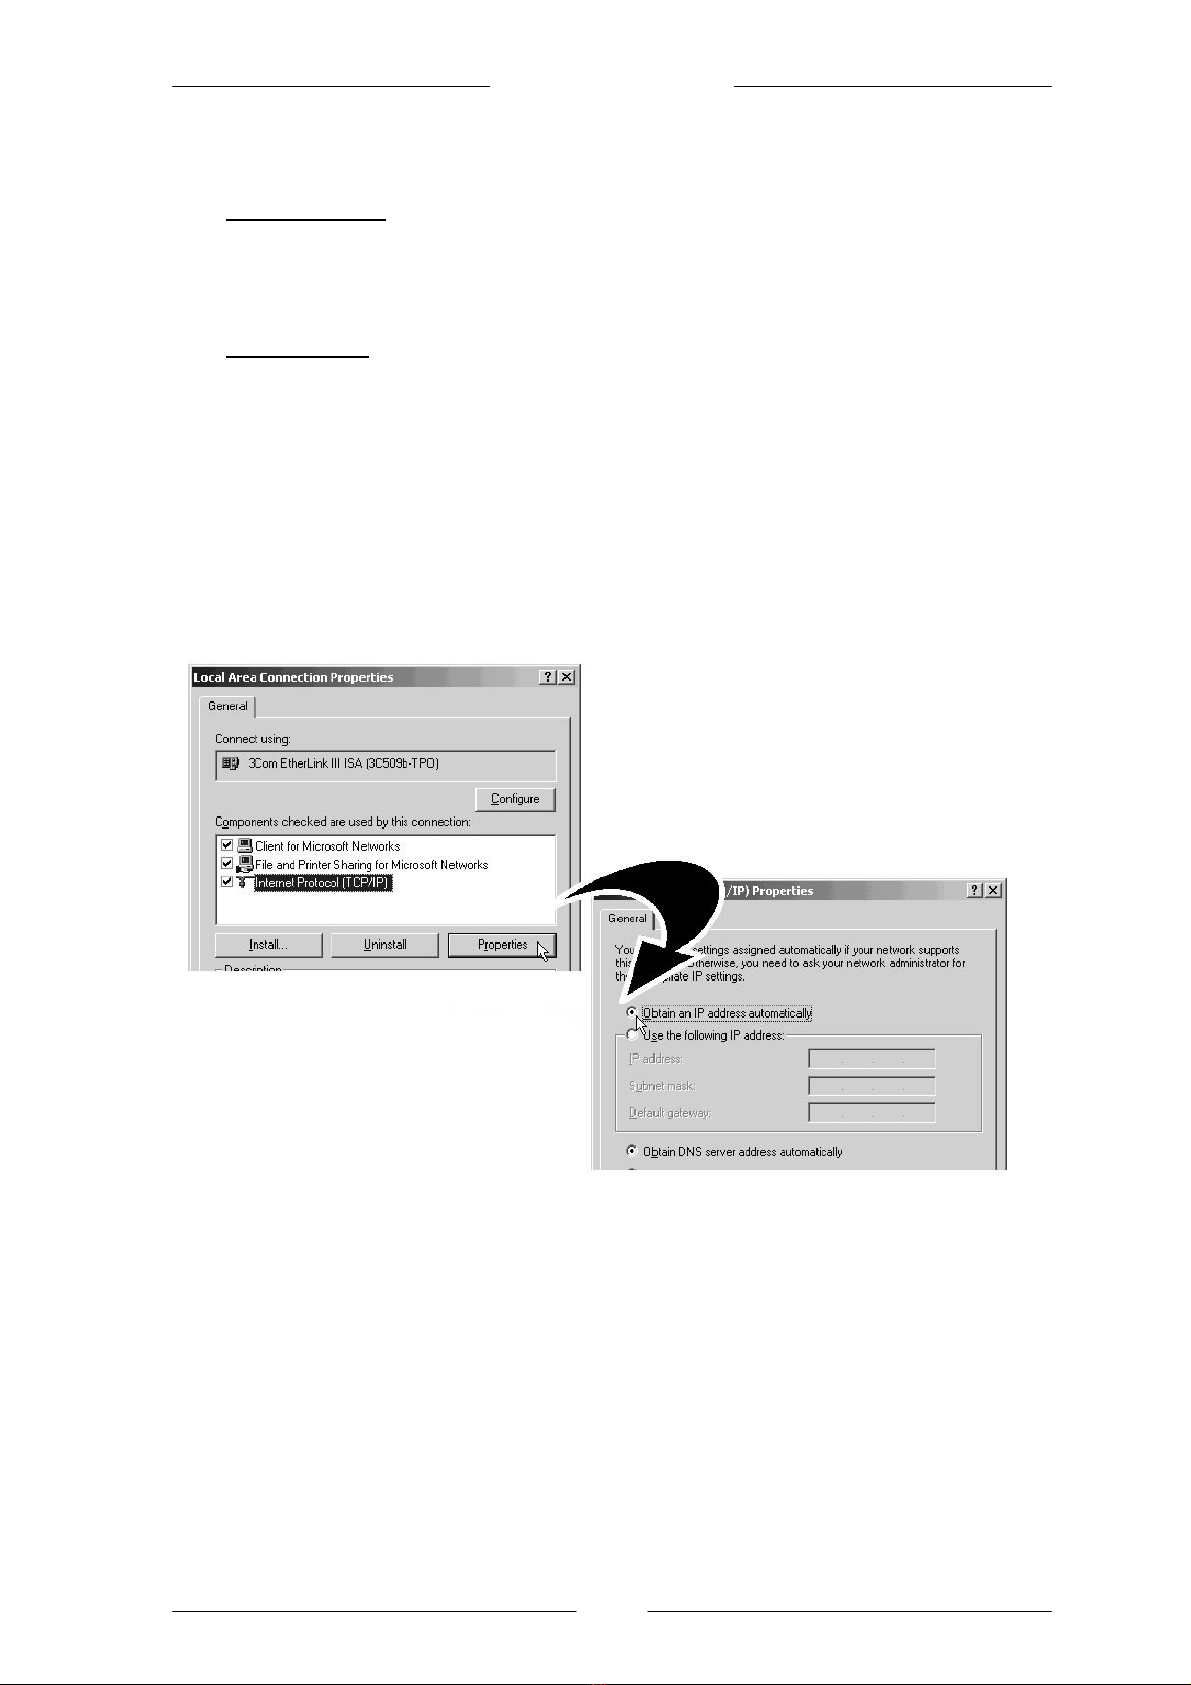
ii Ensure that the field Connect Using indicates the model of your Ethernet Card that is
connected to your T-DSL Router.
(This is important especially if you have more than one Local Area Connection icons displayed at the
Network and Dial-up Connections / Network Connections window. Ensure that you have selected the
correct one.)
Select Internet Protocol (TCP/IP) and click Properties.
iii Select the option Obtain an IP address automatically and click OK.
Click OK again to close.
Ensure that your T-DSL Router is powered on. Restart your system.
Proceed to Step 3
Tabla de contenidos
Manuales populares de Enrutador de red de otras marcas


NETGEAR
NETGEAR FS526T - Switch Manual de usuario

Korenix
Korenix JetNet 5710G Series Manual de usuario

Automated Logic
Automated Logic ZN551 Manual del propietario

Cisco
Cisco ASR 1000 Series Manual del operador

EnGenius
EnGenius ESR-9710 Manual de usuario

Cisco
Cisco 805 Series Instrucciones de funcionamiento y seguridad