SYMA X25W Manual de usuario
USER MANUAL
12+
1
MAIN FEATURES
X
AERIAL PHOTOGRAPHY DRONE 720P CAMERA CAMERA GIMBAL
HEIGHT HOLD OPTICAL FLOW SENSOR
25W
GYRO REMOTE CONTROL SERIES
●Special 4-axis structure - fast and agile. Suitable for flying in
spacious indoor and outdoor areas.
●Built-in 6-axis gyroscope, barometer and optical flow sensor ensures
accurate position hold.
●Capable of doing 360 degrees stunts.
●Headless mode for easy flying.
●Auto take-off and landing - easy and safe flying.
●HD camera - enjoy aerial photography with real-time WiFi video
transmission.
●Trajectory Flying - new smart phone application feature.
Notice: The company will not be held responsibly for any printing
inconsistencies and may or not inform end users regarding any new
potential updates.For further information, please vistit the syma
website.
-1-
Safety Guide
Repair and maintenance
1. Use clean and soft cloth to clean the product.
2. Keep away the product from heat sources.
3. Avoid water exposure to this product. Moisture may cause damages of the
aircraft electronic parts.
4.Transformers used with the aircraft should be examined regularly,such as the
cord,plug,enclosure and other parts,In case of any damages is found, please
stop using it unless it is repaired or replaced.
1. Please, keep the small drone accessories out of reach of children.
2. This drone is very powerful. When flying for the first time, avoid sudden
movements of the throttle. When ascending push the throttle stick slowly up to
avoid unintended damages or injuries.
3. After flying, turn off the transmitter before turning off the drone .
4. Do not keep the batteries in high temperatures areas or near heat sources.
5. It is strongly reccomended to operate the drone at 2-3 meters away from a pilot
and other people or animals. Crashes may cause unintended injuries. When
landing the drone, avoid crashing it into other people.
6. Adult or experienced RC pilot’s supervision is reccomended for children.
7. Non-rechargeable batteries should not be recharged; Batteries should be
inserted with a correct polarity; Different types of batteries, new or used
batteries should not be mixing.
8. Turn off the drone/transmitter and remove the batteries when not in use.
9. The supply terminals are not be short-circuited
10. When not in use for more than 10 days, take measures to pro-long the drone’s
battery life by reducing the drone battery level to 40%-50% of it’s capacity
(fully charge the battery then fly the drone for half of it’s flying time).
11. Keep away from the rotating blades (rotating blades my cause bodily injuries,
or damage to property).
12. To avoid interfering with air traffic control signals avoid flying a drone within
5000 meters of an airport. Avoid operating RC equipment during the periods
set by the local authority.
13. Only use the included charger.
14. Liquids can be used to clean the product. Turn off the equipment and unplug
the charger from the power source before cleaning the drone. Perform routine
inspection of the charger (check: port, shell and other parts) on a regular
basis. If any abnormalities are found, immediately stop using the equipment
until it is fixed.
15. Attention:please assemble the aircraft with the guidance of adults.
16. Do not look directly into the LED lights of the drone as it can damage your
eyes.
17.Open the battery cover of the toy with screwdriver.
18.The packing has to be kept since it contains important information.

-2-
Installing the blades
Installing the Blade Protective Guards
Installing the Blades and the Blade Protective Guards
Installing the Camera
Items included:
Box Contents
●Drone
●Transmitter
●User Manual
●Blades X4
●USB Charger
●Blade Protective Guard X4
●Mobile Phone Mount
1. Plug the camera’s wires into
the drone
2. Install the camera into the drone
camera’s slot. To fix the camera
rotate it counter-clockwise.
To remove the blades, press down on the blade nut and
rotate the blades marked “A” clockwise, and the blades
marked "B" counterclockwise. To tighten the blades, rotate
the blades marked “B” clockwise and the blades marked
“A” counter-clockwise.
Locate the blade guards by placing
them into the slots below the motors.
Refer to the image.
After, insert the plugs into the slots
above the blades protective guards.
Refer to the image.

-3-
Installing the Mobile Phone Mount
Changing and Charging the
Drone’s Batteries
Uninstalling the Camera
1.Rotate the camera clockwise. 2.Gently lift the camera and after
unplug the camera’s wires from the
drone.
1. To remove the mobile
phone mount, pull it
up from the back of
the transmitter.
3. To adjust to phone
holder to the required
size, use phone holder
mount’s clips.
2. To install the mobile
phone mount, insert it
into the mobile phone
mount’s slot at the back
of the transmitter.
1. Gently press the on/off button to turn off the
drone.
2.To remove the battery, press on the release
button and at the same time pull out the battery.

-4-
Understanding the Transmitter
3. Insert the battery into the charging cradle. Plug the
USB into a power outlet. When charging, the charging
light will glow red and the cradle’s light will be green.
Unplug the charger when the lights go off. Charging
time: about 150 minutes.
Warning: only standard 5V chargers are safe to use
(input of 2A).
Note: current flow will affect charging time of the battery.
4. Once charging is completed, install the battery into
the drone.
Important: battery charging information.
- Do not keep the battery in high temperature areas, such as fire or heat
sources. Otherwise, it may damage the battery or even trigger an explosion.
- Do not put the battery into water. Store the battery in a cool and dry
environment.
- Avoid dismantling the batteries.
- During the charging of battery, avoid leaving the charging place.
- Rechargeable batteries should be removed from the toy before being
charged.
- Rechargeable batteries should only be charged under the supervision of adults.
- Exhausted batteries should be removed from the aircraft.
- Caution:Risk of explosion if battery is replaced with incorrect ones,Please
dispose the batteries according to the instructions.
Mobile Phone Mount
ON/OFF Button
Transmitter functions:
Charging time is about 150 minutes. Drone hover time is
about 12 minutes.
Left stick. Press the stick
to enter trim mode, let
the stick to exit trim
mode. To reset trims,
press the stick and turn
on the transmitter.
Right stick. Long press
will cause the drone to
activate headless mode.
Short press will cause
the drone to change
speed mode.

-5-
Preperation for Flight
Camera's Down angle control
(pitch control)
Camera's Up angle control
(pitch control)
3D Stunt
Auto take-off and landing
Picture
Video
Installing transmitter batteries:
Battery cover
4 x AA Batteries
Transmitter battery installation: open the battery cover at the back fo thhe
transmitter. Install 4pcs AA batteries according to the polarity indications
( Note: batteries are not included).
1. When installing the batteries, ensure the polarity of the
batteries match the polarity of the battery compartment.
2. Do not mix old and new batteries.
3. Use only batteries of the same type.
1. Flight preparation
Step1: Turn on the transmitter. Step2 :Install the drone’s battery.

-6-
2.Arming Motors
Method 1:
3.Disarming Motors
Method 1:
Method 2:
BMethod 3:
1. If the drone flies out of control range, the drone indicator lights will
start flashing slowly and after the drone will slowly descend.
2. If the transmitter turns off or the transmitter battery runs low, the
drone will slowly descend. Turn on the transmitter again, re-pair the
unit and continue to fly.
Step 3: Turn on the drone
Step 4: Move the left stick (throttle) fully up and after
fully down. The drone indicator lights will turn
solid (glow) indicating the drone is ready to
fly.
Push both sticks at the same time
(left stick to the bottom-right corner
and the right stick to the bottom-left
corner) and hold for 1 second and the
motors will start spinning.
Place the drone on a flat level surface
and after press the B button. The
drone will take-off, and hover at the
preset height.
Push the left stick (throttle) fully down
and hold it there for 2-3 seconds and
the motors will stop spinning.
Move the left stick (throttle) fully up,
after let it come back to the middle
and the motors will start spinning.

-7-
Operations
Ascend/Descend Forward/Backward
Fly the Drone
B
Method 2:
Front
Method 3:
Left/Right Rotation Left/right
Push both sticks at the same time
(left stick to the bottom-right corner
and the right stick to the bottom-left
corner) and hold for 1 second and the
motors will stop spinning.
After the drone is in stable hovering
position, press the B button and the
drone will slowly land. Motors will be
automatically disarmed.
When the left stick (throttle) is
moved up/down, the drone will
ascend/descend.
When the right stick is moved
up/down the drone will fly
forward/backward..
When the left stick (throttle) is
moved left/right the drone will
rotate to the left/right.
When the right stick is moved
left/right the drone will fly to the
left/right.

-8-
Product Features
1. Low-Voltage Protection:
2. OverflowProtection:
3. Balance Calibration:
When the drone battery voltage is low, the drone
indicator lights will start flashing. After this warning,
return your drone to the desired place and land it.
When the drone is in the air and the propellers collide
with objects or become jammed, the drone overflow
protection will be activated.
Place the drone on a flat level surface and after, push
both sticks to the lowest right corners and hold them
there for 2 to 3 seconds. The drone indicator lights will
start flashing quickly. Wait until the drone indicator lights
stop flashing and turn solid again (glow) indicating
successful balance calibration.
Trimming
Forward/Backward Trim Control
If the drone drifts quickly forward or
backward while hovering, please adjust
forward/backward trim. Press the left
stick and hold it, then move the right stick
forward/backward until the drone starts
hovering as normal.
If the drone drifts quickly to the left/right
while hovering, please adjust left/right
trim. Press the left stick and hold it, after
move the right stick to the left/right until
the drone starts hovering as normal.
Left/Right Trim Contro
Front
-9-
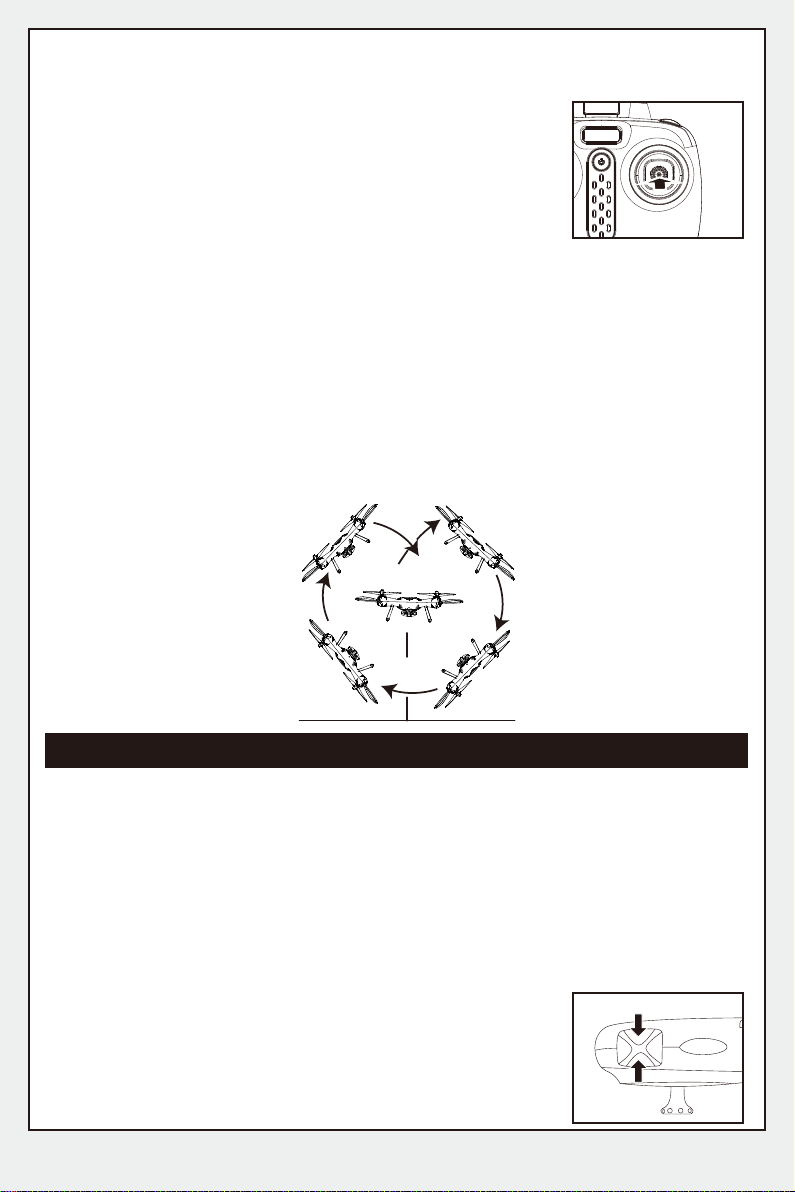
5.3D Stunts:
4. Low/High Speed Mode:
6. Pictures/ Videos:
7.Camera Angle Control (Pitch angle)
To control camera angle press A or B button and the
camera will move up or down. Refer to the image.
Low speed mode is the default mode. To change
the speed mode gently press the right stick once,
the transmitter will emit two beeps indicating high
speed mode. Gently press the right stick again
and the transmitter will emit one beep indicating
low speed mode.
After the basic operational skills are mastered, you can start performing 3D
stunts. The recommended safety height is no lower than 3 meters above
the ground. Press the 3D stunt button (top right button on the transmitter)
and at the same time push the directional stick completely
forward/backward/left/right. The drone will perform
forward/backward/left/right 3D stunt.
①Pictures: press the Picture button on the transmitter. The drone indicator
lights and the camera light (red light) will flash once, indicating that the
picture was taken successfully.
② Videos: press the Video button on the transmitter. The drone indicator
lights and the camera light (red light) will start emitting quick double flashes
followed by one long flash indicating the video is being recorded. Press the
Video button again and the drone indicator lights will turn solid (glow)
indicating that video recording has stopped.
Notice: Fully charged drone battery will ensure the best 3D stunts performance.
3m
A
B
Tabla de contenidos
Otros manuales de Zumbido de SYMA

SYMA
SYMA X200 Manual de usuario

SYMA
SYMA X11 Manual de instrucciones

SYMA
SYMA X800W Manual de usuario

SYMA
SYMA X300 Manual de usuario

SYMA
SYMA X400 Manual de usuario

SYMA
SYMA X1 Manual

SYMA
SYMA X 20 Manual de usuario

SYMA
SYMA X14W Manual de usuario

SYMA
SYMA Z3 Manual de usuario

SYMA
SYMA X5UW-D Manual de usuario

SYMA
SYMA X8PRO Manual de usuario

SYMA
SYMA GYRO REMOTE CONTROL SERIES Manual de usuario

SYMA
SYMA X12S Explorers Manual de usuario

SYMA
SYMA X26 Manual de usuario

SYMA
SYMA X220W Manual de usuario

SYMA
SYMA HD 8500WH Manual de usuario

SYMA
SYMA LOG1628-R2 Manual de usuario

SYMA
SYMA X5SW-V3 Manual de usuario

SYMA
SYMA LOG1612-JR Manual de usuario

SYMA
SYMA GYRO REMOTE CONTROL SERIES Manual de usuario


