SUNBA Network Series Manual de usuario

Performance Series
Dedicated PTZ for Residential and Small Business
Network PTZ Camera
User Guide V1.0
2021/03
Version 1.0
Visit http://performance.sunbatech.com to access the step by step
YouTube video tutorials for setting up Sunba IP PTZ camera.

- 01 -
FCC Verication (U.S.A)
MENU
The device has been tested and complies with with limits set by Part 15 of Federal
Communication Commission (Class B).
The operation of the device is thus limited by the following two conditions:
1) it might not cause harmful interference to any authorized radio communica-
tions, and 2) it must accept any interference it received.
1.Connection and Installtion
2.Login and Live View
3.Network Setting
4.Video and Image Setting
5.Account Management
6.Preset and Patrol
7.Remote Access
8.Third Party Compatibility
9.Video Motion Detection
02
03
06
08
14
14
18
20
21
10.Smart Event Conguration
11.Forget Password
21
25
Audio Monitoring Disclaimer
US Code, Title 18. Sec. 2510 & 2511 (2) (d) prohibits audio monitoring unless there
are public signs posted giving clear indication that the communication is being
monitored. Therefore, it is required to exhibit posting of signage, a disclaimer, on
the public entrances and exits, notifying all that “Audio Monitoring on These Prem-
ises.”
Sunba provides such warning decal along with every IP camera. It is the responsi-
bility of user to clearly post the decal and verify State law to guarantee any deploy-
ment compliance.
2
1
1.2 Micro SD Card Installation
Pan Tilt Zoom Camera
Bullet Camera
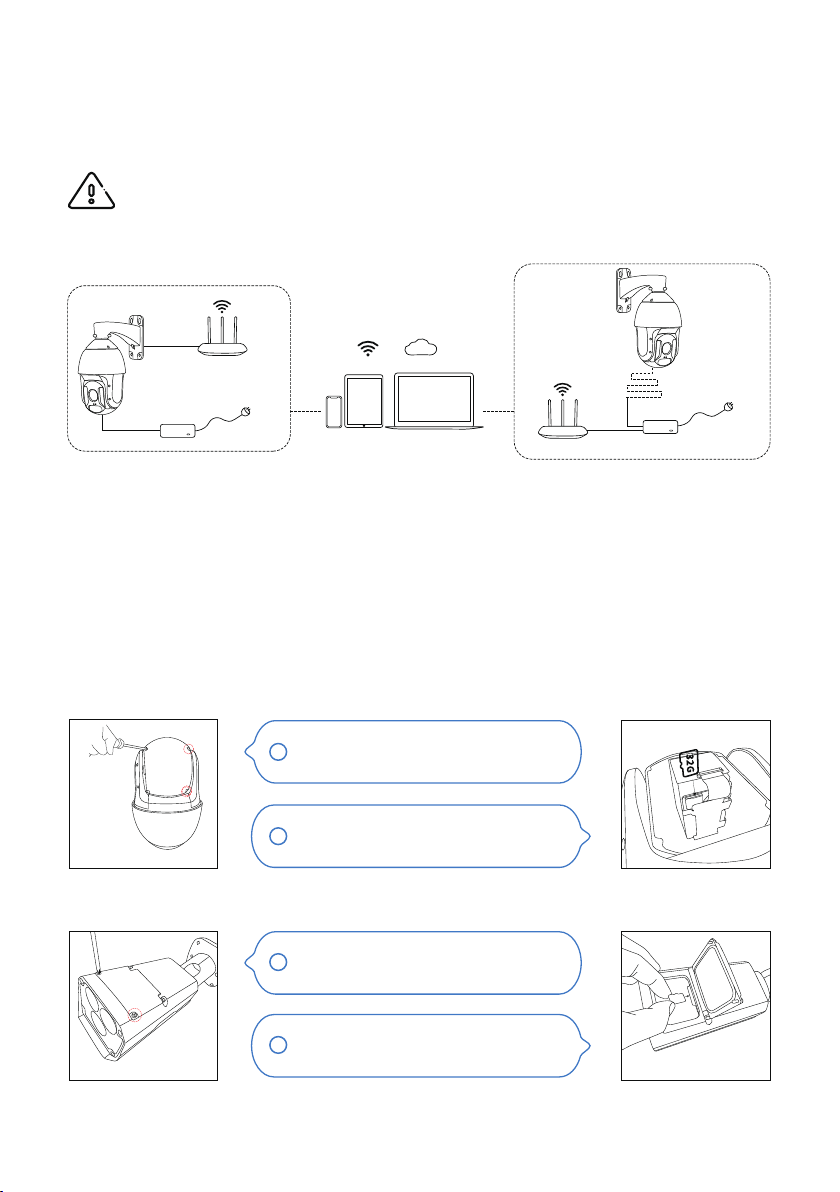
1.Connection and Installation
1.1 Connection
PoE Injector
Router
Router
1. DC Power
2. PoE+ Power
Phone Pad Computer
- 02 -
WARNING! It is important to perform a pre-installation test (bench-test) indoor prior to
outdoor installation.
The camera can be powered by a DC12V power adapter (came with the package) and transmit video data
using a network cable to a router/switch.
The camera can also be connected to a PoE injector/switch which would let the network cable supply both
power and data connection.
Sunba PTZ camera requires the PoE adapter (switch/injector) to support IEEE 802.3at standard, which is
also known as PoE+.
Sunba IP camera comes with a built-in micro SD card slot that can store videos and snapshots.
Insert the TF card as directed by the
arrow.
Remove the 4 screws to take o the
camera back cover.
Remove the 4 screws located on the
top of the camera.
Open the top cover, and insert the TF
card as directed by the arrow.
1
2

2.2 Web Browser
[Windows] Use Guard Tool to identify the IP address of the camera.
[Mac] Use Guard Station (Device Management) to identify the IP address of the camera.
5
6
2.Login and Live View
2.1 Smartphone
Download Guard Viewer App
1
Tap to show the
sidebar, and go to the
Devices option to add
device:
3
Download on
the Google Play
Download on
the App Store
- 03 -
2Sign up a cloud
account. Select
“international” service
4
Note: Auto LAN search only works if the http port of the camera remains unchanged (default 80). If the
http port has been changed, the camera can only be added manually with its corresponding new port.
You can add device by Auto Search in LAN if your smartphone is connected to
the same network as the camera. Select the device that you want to add.
Enter the username and password of the camera.
The default account is admin/123456.
Go back to the Device list from the side bar, tap
the device that was just added and select “Start
Live View”.
2
1
You can control pan tilt zoom, call preset,
check TF card status and playback from the
app. For details on how to use the
smartphone app, please visit:
http://gvapp.sunbatech.com
1

You would be prompted to install the web plugin of the camera if you are using Internet Explorer.
Alternatively, you are able to manually download the web plugin from Sunba website:
https://sunbatech.com/download/
2.3 Guard Station Client Tool (Mac & Windows)
Install Guard Station client.
Default Username: admin
Default password: 123456
Default Username: admin
Default password: 123456
You can login using the credential above and set a customized password later.
2
1
Chrome and Firefox are Plug-in free (in both Mac and Windows system) , but doesn’t currently support
record playback in browser. More browser integration will be supported through future firmware
upgrade.
- 04 -
Then you can go to web browser and input the url address of the camera with the “http://” prefix.
For example, http://192.168.1.89
The client credential is set to protect
unauthorized access to the surveil-
lance soware/data, and is NOT the
same credential for the IP camera.

The camera should show “online” status if it has been successfully connected to the Guard Station
client, otherwise please click the pencil icon to modify values to establish a successful connection.
Double click the device name on the list to enable live viewing:
5
Please go to the Live View section under Control Panel:
2
3
4
- 05 -
1
2
1
Please proceed to the “Device Management” tab to add your IP camera to the client soware:
The IP camera should automatically display under “Online Device” on the lower section. Select the
camera, and click “+Add” to add the camera to the upper section.

The HTTP port has default value of 80, and if you change
the default HTTP port, the url for logging into the camera
must be http://IP:HTTP Port.
Modify the settings as required. The following table describes some major
parameters.
Parameter Description
TLS/SSL
Attach Image
Username/
Password
3.2 Port Conguration
3.3 Email Alert
Click Setup > Network > Port.
Click Setup > Network > E-mail.1
3.Network Setting
3.1 Change IP and x the IP address of the camera
Click Setup > Network > Network.
Click Save.
- 06 -
Select Static from the Obtain IP Address drop-down list.
Enter the IP Address, Subnet Mask, and Defualt Gateway address
you would like to modify. Make sure the IP address of the camera is
unique on the network.
For SUNBA Performance Series IPC, HTTP port is equivalent to the ONVIF port. Please note
all ports must have unique value to each other.
2Aer the configuration of E-mail, when alarms are riggered, the
camera will send messages with alarm snapshots to the specified
E-mail address.
3Configure relevant parameters of the sender and the recipient. You
may end a test email aer setting the recipient address. The following
table describes some major parameters.
When enabled, the e-mail will be encrypted using TLS (Transport Layer Security)
or Secure Socket Layer (SSL) to protect privacy. irst it tries to send through an SSL
connection. If the SMTP server supports SSL, the e-mail will be sent through the
SSL connection; otherwise, it tries to send using STARTTLS.
When enabled, the e-mail will contain 3 instant snapshots as attachment accord-
ing to the number you set via Capture Interval.
Username and password of the registration email address. The password allows
the following special characters \ / : * ? ’ ” < > | % &
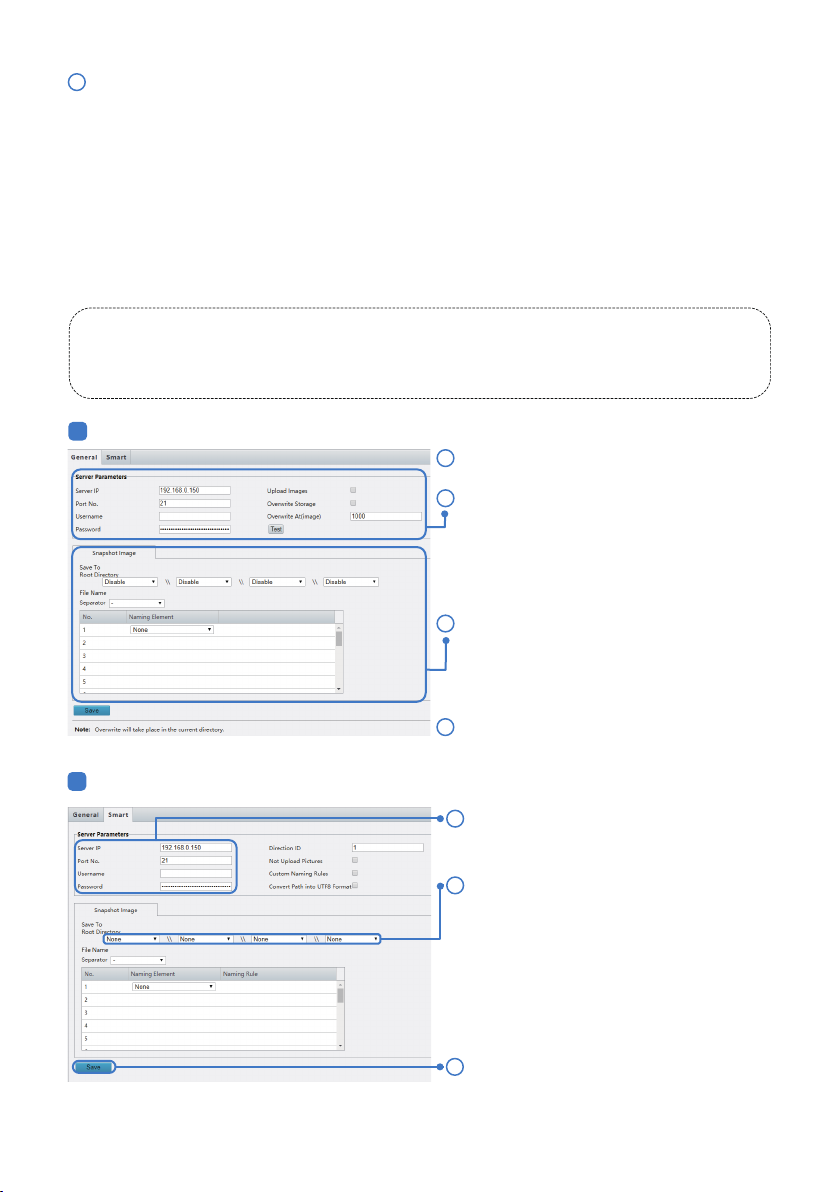
Set the IP address and port for the FTP server,
username and password used to upload
images to the FTP server, select Upload
Images, Overwrite Storage and set Overwrite
At (threshold for overwriting images). Some
camera models support FTP test. You may test
FTP aer completing FTP settings correctly.
2
1
2
General
Smart
1
2
Click Save.
3
Click Save.
4
3.4 FTP Alert
4Click Save.
- 07 -
Aer the configuration of FTP, you will be able to upload snapshots from network cameras to the specified
FTP server.
Restrictions on FTP entries:
1.The FTP server must be in numeric format (IP) and doesn’t support domain as input.
2.The password of FTP doesn’t support special characters.
Click Setup > Storage > FTP.
There are two sections of FTP upload.
The general FTP configuration is for snapshots (except for face detection) saved through the general alarm
events. The smart FTP configuration is for uploading snapshots taken from smart events such as face
capture.
3Set the path for saving snapshots on the FTP
server and the file name format. For example,
set path as Preset No.\\IP Address\\-
Date\\Hour(s), and set file name as Preset
No.-PTZ Zoom-PTZ Latitude-PTZ Longitude.-
jpg.
1Click Setup > Storage > FTP. Go to General tab.
Set the IP address and port of the FTP server,
username and password to upload images to
the FTP server.
Set the path for saving snapshots on the FTP
server and the file name format. For
example, set path as Preset No.\\IP
Address\\Date, and set file name as Preset
No.-PTZ Latitude-PTZ Longitude-PTZ
Zoom.jpg.

Video
Compression
Parameter Configuration
Frame Rate
Bitrate Type
Image Quality
I Frame
Interval
GOP
SVC
Three options: H.265, H.264 and MJPEG.
Note:
The bit rate changes to the default when you change the setting between H.264
and H. 265. The default bit rate for H.265 is half of that for H.264.
Video Image Quality cannot be set when Video Compression is set to H.265 or
H.264. When Compression set to MJPEG, only three frame rates are available: 1, 3
and 5; and Bit Rate, I Frame Interval, Smoothing and U-Code cannot be set.
When Encoding Mode is VBR, you can move the slider to adjust quality
level for images. Moving the slider toward Bit Rate decreases the bit rate and may
aect image quality. Moving the slider toward Quality increases the bit rate and
improves image quality.
Frame rate for encoding images. Unit: FPS (frame per second).
Note:
To ensure image quality, note that the frame rate should not be greater than the
reciprocal of shutter speed.
4.Video and Image Setting
Click Setup > Video & Audio > Video.
4.1 Video Setting
- 08 -
You can set video parameters that your camera supports. If available,
you may also enable sub-stream and third stream as required.
CBR: Constant Bit Rate, which means that the camera transmits data at a constant
data rate.
VBR: Variable Bit Rate, which means that the camera adjusts the bit rate dynami-
cally according to image quality.
Interval at which an I frame is encoded. Normally, a shorter I frame interval oers
better image quality but consumes more bandwidth.
Group Of Pictures in MPEG video encoding. This parameter specifies the order in
which intra-frames (I frame) and inter-frames are arranged.
SVC (Scalable Video Coding) can reduce storage without compromising playback
quality.

2Set the parameters as required. The following table
describes some major parameters.
Exposure
Click Setup > Image > Image and then click
Exposure.
2
1
4.2 Image Setting
1
1
Smoothing
Image Enhancement
Click Setup > Image > Image and then click Image
Enhancement.
Set the extent of smoothing. Choosing Clear means disabling Smoothing. Moving
the slider toward Smooth increases the level of smoothing but will aect image
quality.
Note:
In a poor network environment, you can enable smoothing to get more fluent
video.
Use the sliders to change the settings. You may also
enter values directly. The following table describes
some major parameters.
Item Description
Brightness Set the degree of brightness of
images.
Saturation The amount of a hue contained in a color.
Contrast Set the degree of dierence
between the blackest pixel and
the whitest pixel.
Sharpness Contrast of boundaries of
objects in an image.
2
U-Code
- 09 -
Basic Mode: The actual bit rate is around 3/4 of the set bit rate.
Advanced Mode: The actual bit rate is around 1/2 of the set bit rate.
Note:
When U-Code is enabled, video compression only supports H.264 and H.265.
MJPEG is not supported.
When U-Code is enabled, the capture mode does not support frame rates higher
than 30.
Parameter Description
Exposure Select the correct exposure mode to achieve the desired exposure eect.
Automatic: The camera automatically adjusts exposure according to the
environment.
Otros manuales para Network Series
1
Tabla de contenidos
Otros manuales de Cámara de seguridad de SUNBA

SUNBA
SUNBA 603-D25X 4G Manual de usuario

SUNBA
SUNBA Lite Series Manual de usuario

SUNBA
SUNBA FT-HD Manual de usuario

SUNBA
SUNBA 405-ECO V2 Manual de usuario

SUNBA
SUNBA Analog Series Manual de usuario

SUNBA
SUNBA 502S-AHD Manual de usuario

SUNBA
SUNBA Network Series Manual de usuario

SUNBA
SUNBA Illuminati Manual de usuario

SUNBA
SUNBA 601-D25X 4G/WiFi V2 Manual de usuario

SUNBA
SUNBA 305-D4X Manual de usuario


