Summit OptConnect Manual de usuario

COMPLETE
CONNECT GUIDE
MANAGED WIRELESS SOLUTIONS

Thank you for choosing OptConnect for your wireless
communication needs.
Should you need help installing your new OptConnect Wireless
modem, we oer free technical support 24 hours a day, 7 days
a week, 365 days a year.
To talk to one of our connectivity experts, call the Customer
Care Center at 877-678-3343 ext. 3.
OPTCONNECT’S ONLINE
CUSTOMER PORTAL
SUMMIT PROVIDES:
Summit enables you to access your
wireless portfolio everywhere you go
and is accessible on phones, tablets,
and computers.
To access Summit for the rst time,
contact your sales representative.
Cellular Connectivity Failure
Notications
Connectivity Conrmations
Signal Strength Statuses
Reset Wireless Options
Description Fields for
Device Tracking
https://summit.optconnect.com/login

1.TABLE OF CONTENTS
TABLE OF CONTENTS
Package Contents / Device Details 2
4
7
15
10
18
12
21
6
26
28
29
25
25
Troubleshooting
Warranty Information
Customer Care
Set up Instructions
ATM Programming
Processor Phone #’s
Comm ID #’s
Simple Router
Payment Gateway
Nautilus Hyosung ATMs
Nautilus Hyosung ATMs
Hantle / Genmega ATMs
Hantle / Genmega ATMs
Triton ATMs
Triton ATMs
Payment Gateway Programming is only recommended for use with ATMs that are not
upgraded or capable of using TLS 1.2 security.
If your ATM is TLS 1.2 complaint, you should use ROUTER Programming, as the ROUTER
programming will provide a higher level of security for your ATM.
2.
CAT5 Ethernet Cable Power Supply
* Only use the 5v power supply that
was shipped with your device.
Damage resulting from use with any
other power supply voids warranty
Antenna(s)
An OptConnect Wireless modem
Modem may be a dierent model than shown.
If any of these items are missing or damaged, please contact the
OptConnect Customer Care Center at 877-678-3343 ext. 3.
Please verify your package contents.
PACKAGE CONTENTS
Status
Ethernet 1
Etherent 2
PowerR eset Ethernet 1 Ethernet 2
Cell Strength
Main
Aux
LTE
Cell Mode
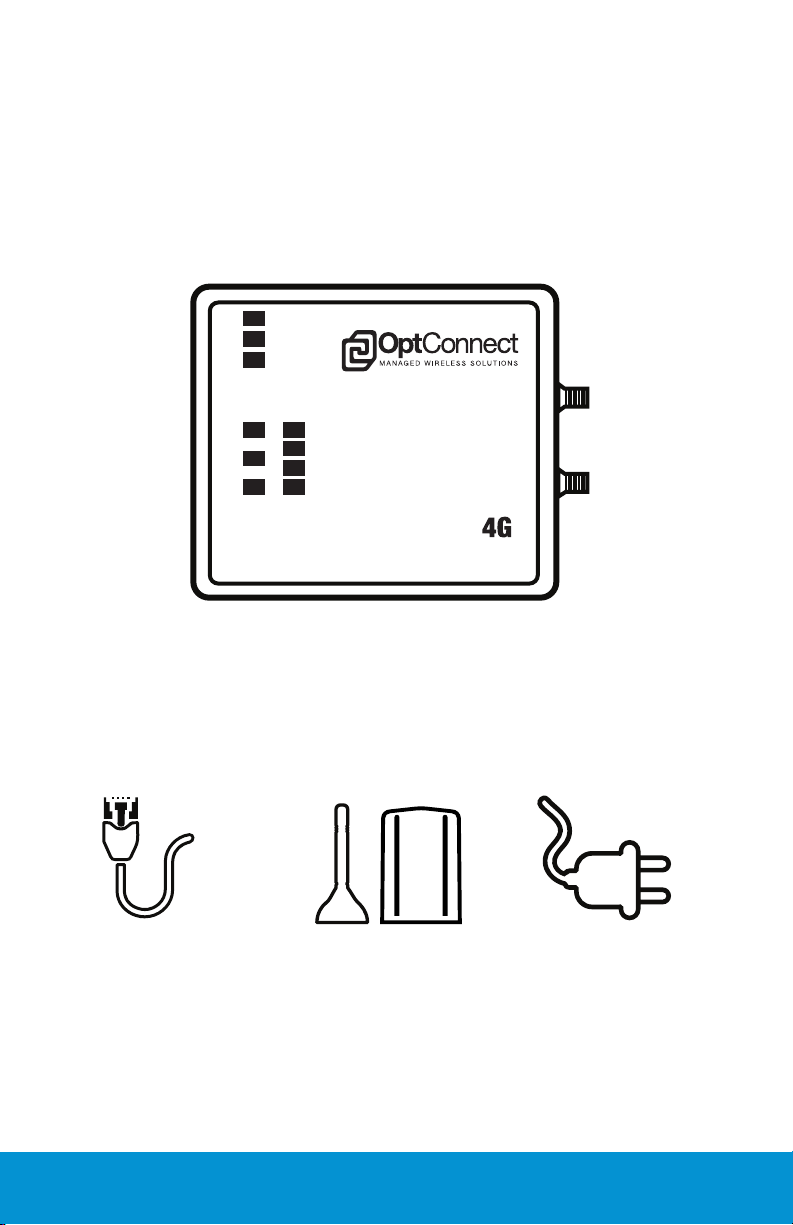
PACKAGE CONTENTS

3.
Power
Reset
Ethernet Port 1
Ethernet Port 2
Auxiliary/
Diversity Antenna
Connection
Main Antenna
Connection
Status Light
Ethernet 1
Ethernet 2
Cell Mode
Signal Strength
DEVICE DETAILS
DEVICE DETAILS
Power: If connections are all secure, the unit will power up with an orange
status light that will soon change to green. The unit is getting proper power once
the status light turns to green and starts to blink.
Reset: Resetting a unit should only be performed when instructed by an
OptConnect Customer Care Associate. Resetting the device will remove necessary
routing tables, rendering the device inoperable if done without a Customer Care
Associate on the phone.
Antenna Connections: Proper installation of your OptConnect unit
requires that both antenna(s) be used (if 2 are provided). Antenna(s) should be
placed outside of any metal enclosures, 6-8” apart, and standing vertically, while
magnetically connected to a metal base when possible.
Cell Mode: The unit has lights indicating the cellular connection mode.
Those lights are labeled as A, B, and C. Each light represents the type of cellular
connection network. Light A represents 4G connectivity. Light B represents 3G
connectivity, and Light C represents 1X connectivity. The illuminated Cell Mode
light(s) indicate the unit is connected to the lights corresponding network.
Cell On: The cell on light is located next to the signal strength in place of the cell
mode lights. The cell on light will be solid or blinking once the unit is connected
to a cellular network. If this light does not illuminate, please contact OptConnect
Customer Care at 877-678-3343 ext. 3.

4.
SET UP INSTRUCTIONS
1.
3.
2.
4.
SET UP INSTRUCTIONS
TWIST AND LOCK POWER SUPPLY INTO PLACE,
SECURELY ATTACH ANTENNAS
INSERT PHONE LINE/ETHERNET CABLE
* Always connect both antenna leads
or dual 4G antennas.
* CAT 5e or higher Patch Cable can
be up to 300’ from your device.

5.
3.
Once the Cell Mode and Signal Strength
lights are solid, your OptConnect unit is
ready to be used.
The Cell Mode and Signal Strength lights
will ash during use or while data is
being transmitted through the unit. If
lights are not ashing while in use or
are not green, please see the reference
chart below to understand what the
lights are indicating.
*Initial connections with the cellular network may take up to 5 minutes.
4.
SET UP INSTRUCTIONS
VERIFY STATUS LIGHTS
USING YOUR DEVICE IN NON-ATM ENVIRONMENT
(Kiosk, Digital Sign, etc. | For ATMs turn the page)
Upon proper installation, the OptConnect unit is designed to
provide a network connection, automatically allowing attached
hardware (such as a Kiosk, Smart-Safe, Digital Sign, etc.) to
communicate through the internet connection provided by the
OptConnect unit. If specic routing rules are required, please call
the OptConnect Customer Care Center at 877-678-3343 ext. 3.
Green Flashing
Orange Flashing
Orange Constant
Red Constant
Green Constant
Slow Green Flashing
Fast Green Flashing
Status is good. Ready for transactions.
Processing boot-up sequence.
Call the OptConnect Customer Care Center.
Conrm power cord is locked into place.
Call the OptConnect Customer Care Center.
Status is good. Ready for transactions.
Connecting with carrier or transmitting data.
Call the OptConnect Customer Care Center.
*STATUS LIGHTS
CELL MODE AND SIGNAL STRENGTH LIGHTS
Red Constant Call the OptConnect Customer Care Center.

6. ATM PROGRAMMING
ATM PROGRAMMING
An OptConnect unit accepts and routes data by using 2 dierent methods (Router
vs. Payment Gateway). To maintain the highest security standards, OptConnect
highly recommends that the ATM be programmed to use the wireless device as
a ROUTER, allowing the ATM to house and perform the security encryption of the
ATM transaction.
OptConnect as a Router:
This is OptConnect’s preferred and strongly recommended programming method
and is the most secure way of routing trac. In Router mode, the OptConnect
unit simply directs trac from attached equipment to a remote host. The
attached equipment is programmed with the required routing settings, performs
the SSL/TLS encryption and decryption, and passes transactional data through the
cellular network provided by the OptConnect unit to the remote host.
In router mode, the OptConnect unit does not participate in the interception,
routing, or the encryption of data required for SSL/TLS, and merely acts as a
method by which the attached equipment can connect to a wireless network. It
is important to note that while using the OptConnect as a router, the equipment
software application must remain up-to-date (according to industry standards) in
order to facilitate the SSL/TLS encryption.
Note: TID Capture cannot be provided with this programming method as the data
containing this information is already encrypted by the ATM as the transaction is sent
to the router for transmission.
OptConnect as a Payment Gateway:
This is not OptConnect’s recommended programming method as it is not as
secure, but we do provide instructions if you choose to congure your device as
a payment gateway. This method of use allows the device to participate in the
interception, routing, and security encryption of data provided by the attached
ATM. The OptConnect receives unencrypted data from the attached equipment,
determines remote host protocols and routing rules, establishes an SSL/TLS
session, encrypts and decrypts data, converts data to original protocols, and
returns the data to the attached equipment.
While note recommended, these are the benets of using the OptConnect
device as a Payment Gateway:
• SSL/TLS encryption facilitated by the OptConnect unit
• SSL/TLS encryption is remotely managed and updated as needed by
OptConnect (as per industry requirements)
• Captures the terminal ID making it available for viewing in the OptConnect
Summit dashboard.
• Higher level troubleshooting and fault triaging with OptConnect Customer
Care. An OptConnect Customer Care Associate has limited access to the
trac of encrypted data and can nd faults in routing rules or terminal
communication settings easily and quickly. Many customers have learned to
depend on our ability to quickly and eectively triage cellular and/or terminal
programming faults.

7.
***ATM IS PERFORMING SSL/TLS ENCRYPTION***
NAUTILUS HYOSUNG ATMS
ROUTER
NAUTILUS HYOSUNG ATMS
Customer Setup >
Select Processor >
Communication >
Select TCP/IP
-1(X) Cancel to Return-
TCP/IP Type:
SSL: Enable
Version: TLS 1.2
SSL CERT: Disable*
-2(x) Cancel to Return-
Customer Setup >
*Standard 3 Options >
Status Monitoring: Enable
Comm Header: Enable
Comm ID: Refer to Page 25
CRC: Disabled
-2(X) Cancel to Return-
Cardtronics
Columbus Data
Data Stream (ASAI)
DNA (Money Tree)
EFX
Elan/Genpass
1st ISO / First Data / Core Data
ITS Systems Integrators Co Inc
Metavante / PAI / FIS
NRT/TNS
Planet Payment
Switch Commerce
Worldpay / RBS Lynk
Visa Framed
Standard
Visa Framed
Standard
Visa Framed
Visa Framed
Standard
Standard
Standard
Visa Framed
Standard
Visa Framed
Standard
PROCESSOR TCP/IP TYPE
*Please verify with processor if set up
on STD1 or STD3
*If your processor has issued, and
you have loaded a specic terminal
certicate on the ATM, then this
option should be ENABLED

8.
NAUTILUS HYOSUNG ATMS
ROUTER
System Setup >
Terminal IP >
DHCP: Disabled*
IP Address: 192.168.1.91
Subnet Mask: 255.255.255.0
Gateway: 192.168.1.90
DNS: 8.8.8.8 or 8.8.4.4
-2(X) Cancel to Return-
Host Setup >
Host Address >
Address 1&2:
NAUTILUS HYOSUNG ATMS
Unless otherwise specied by your processor, all URLs should be entered in lower case
Cardtronics
Columbus Data
Data Stream (ASAI)
DNA (Money Tree)
EFX
Elan/Genpass
1st ISO / First Data / Core Data
ITS Systems Integrators Co Inc
Metavante / PAI / FIS
NRT/TNS
Planet Payment
Switch Commerce
Worldpay / RBS Lynk
pos.tnsi.com
atm.columbusdata.net
asaiatmssl.asaiatm.com
atmssl.dnsatm.com
emv.sibisystems.com
pos.tnsi.com
sslgb.1stiso.com
*tls1.itssystems.com or tls2.itsystems.com
eftdebitatm.fns.com
tls1.nrttech.com
atm.planetpayment.net
atm1.switchcommerce.net
tptrans.lynksystems.com
PROCESSOR URL
*Verify with
the processor,
which URL
AND PORT
is to be used
with the ATM.
*If your ATM will not be setup for
RMS RECEIVE, you can use DHCP
ENABLED
Tabla de contenidos
Otros manuales de Módem de Summit

Manuales populares de Módem de otras marcas


US Robotics
US Robotics 3453C Manual de usuario

MaxTech
MaxTech Plug & Play Internal Voice/FAX/Data/SVD... Manual de usuario

Zte
Zte MF823 Manual de usuario

Four-Faith
Four-Faith F1403 Manual de usuario

Sierra Wireless
Sierra Wireless AIRLINK MP595W Manual de usuario

Gemtek
Gemtek WiMAX WIXFBR-103 Manual de usuario