Stoneridge digipostpro Manual de usuario

CONTENT OVERVIEW
• Assembly and mounting
• Administrative functions
• Interaction with digivu and digifobpro
• Data management and housekeeping
ADMINISTRATIVE GUIDE


Hardware Setup 4-5
digipostpro Controls 6
Configuration 7-14
- Basic Preferences 8-9
- Networking 10-12
- Files & Analysis 12-13
- Other Configuration Options 14
Maintaining and Transferring Files 15-20
-Driver Cards and Driver Card Analysis 15-16
- digivu 17-19
- digifobpro 20
- Archived Files 20
Configuring Your digivu 21-23
Troubleshooting 24-25
Table of contents
Hardware Setup
Page - 4
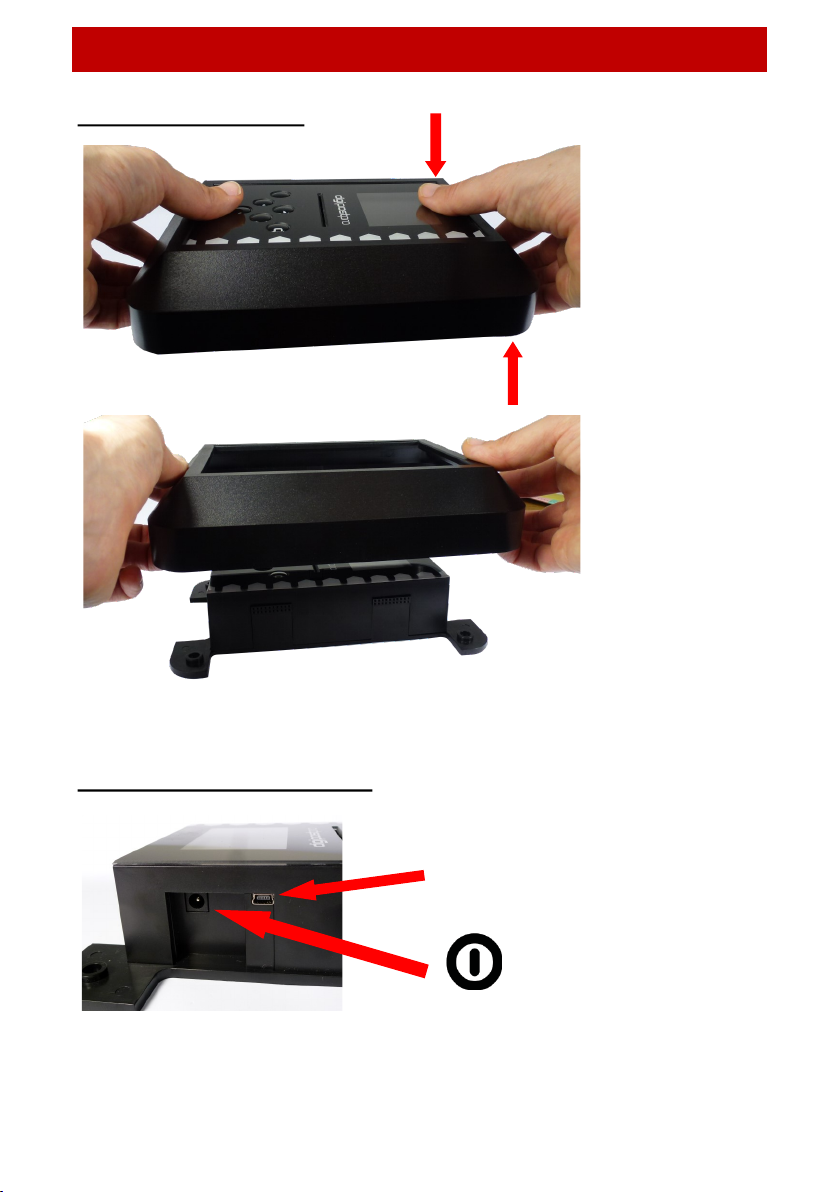
Removing the Frame
Power and USB Connection
Remove the
outer frame to
access the
mounting
plate. Apply
pressure with
your thumbs
on the face
and pull the
frame upwards
with your
fingers.
USB connection for
programming
Power connection
(use included 9V
power supply)

Hardware Setup
Page - 5
Cabling
Inserting the module and fixing to the wall
The outer frame has
four break out tabs
for cabling. Clip the
tabs with pliers (or
similar) and feed the
cables through. It is
also possible to run
the cables behind the
unit.
The digipostpro has a connection module pre-installed in the
device. The digipostpro detects which module is inserted and
displays the appropriate menu options.
There are four screw points
in the base. Use the fixing kit
supplied to attach the
digipostpro to the wall.

digipostpro Controls
Page - 6
digipostpro Controls
Six button
control (Up,
Down, Left,
Right, OK and
Return )
Digivu or
digifobpro
connection
Card slot
Display
Screen
LAN / Modem
MAC Address / Network Name & ID
IP Address / SIM Number
Hostname
Serial Number & Firmware
Pressing right/left from the main screen will change the information
displayed at the bottom of the screen. Listed as right from main screen.
Screen icons Description
Card files
pending
Clocking logs
pending
Screen icons Description
/ Modem Status
/ LAN Status
/ Server Connection
Status

Configuration Menu
Page - 7
Accessing Administration Options
To access the Main Menu ensure the digipostpro is
powered and that the screen displays the insert card
icon. Insert a valid configuration card and when
prompted to do so remove it.
The digipostpro will now display the Main Menu. Use the arrow
buttons to navigate the options.
From within any sub-menu, simply press the return button to
return to the previous menu, and ultimately, the main menu.
As a security feature the unit will exit the Administration Options if it
does not detect any activity for 10 minutes.
If you wish to exit the administration options then navigate to
the ‘Exit’ icon in the main menu and press the OK button.
Access via a configuration code
The Administration Options for configuring the digipostpro can be
accessed via a configuration code. Please contact the reseller of your
device to get supplied with the required configuration code.
In order to enter the code on a digipostpro, from the main screen
press OK. This will bring up a menu prompting you to enter the
activation code, scroll through the numbers by using the up and
down arrows.
Any code generated only lasts for one calendar day.

Configuration Menu
Page - 8
Configuration via USB and digiConnect
Instead of using the device to configure its settings, you can
alternatively use the digiConnect software. To do this, ensure the
device is in the configuration menu and then connect it to a PC via the
USB port on the side of the device (near the power socket). All
configurable options can be configured via digiConnect. The
digiConnect software can be downloaded from www.tachosys.com/
Downloads/Software.
Configuring Basic Preferences
Select the Preferences icon from the main menu and
select one of the follow options:
Language
Scroll through the language options and pressto save
the language selected and return to the preferences menu.
Brightness
Use left/right arrows to alter brightness percentage. Click
to save the setting selected.
Time
Use the left/right arrows to set the time difference from
UTC (Coordinated Universal Time) required. Then choose
whether to use daylight savings by scrolling left/right to
turn on/off. Press to save the settings selected.
Please note that the digipostpro has an internal battery which will
keep the clock accurate if power is removed from the device. Actual
time is set from the server.

Configuration Menu
Page - 9
Sound
Use left/right arrows to turn device sounds on or off. To
save the setting, press the button.
Highlight Colour
Adjust the RGB settings using the right/left arrows) to
choose the required highlight colour. To save the setting,
press the button.
How to type and set configuration options
In order to enter text into any configuration option you must first
highlight the option and press the OK button. This allows you to enter
or change characters by using the Up and Down arrows (holding
down the arrow buttons will enable a faster scroll). To move to the
next character, press the right arrow button (you can scroll through
any existing entry using the left and right arrows).
When you have completed the entry press either or OK. This leads
to a display which allows you to select whether to clear the entire
entry, discard any changes that have been made, or to save it and
exit. Pressing Save and Exit will return you to the previous menu.

Configuration Menu
Page - 10
Configuring for Networking
To navigate to the network configuration settings,
highlight the Connectivity icon in the main menu and
press OK.
To set up server options, select the Server icon. This will
give you three settings: Server Type, Hostname and Port.
Server Type
There are three options to choose from and they determine where
you want the files to be sent.
digiCentral
This forwards any files received by the digipostpro to an account on
digiCentral. The digipostpro must be registered on digiCentral to
enable a connection with the device. Please contact your reseller for
more information on how to set up an account on digiCentral.
digiFFS
digiFFS (File Forwarding System) can be used if you want to forward
the files received by the digipostpro to somewhere other than
digiCentral (therefore it does not require registration). Pressing OK
on Type option (when displaying digiFFS) will then give you the option
of selecting a specific forwarding type. Toggle left/right to select
which option you want. By pressing OK on the option you require, you
will be required to fill in further credentials. For company specific
credentials that are unknown, please contact your reseller.
Please note that this is only for forwarding files; clocking is not
compatible with this option.
Tabla de contenidos
Otros manuales de Registrador de datos de Stoneridge


