sparkfun Gator:UV Documento técnico

SparkFun gator:UV Hookup Guide
Introduction
Do you have a science experiment involving weather or UV light exposure?
The gator:UV is the perfect tool to monitor the UV exposure in your next experiment. With the VEML6070, the
gator:UV can easily be used to measure the levels of UVA (320-400 nm) radiation. This tutorial will show you how
to get started using this UV sensor with the gator:bit (v2) in the micro:bit development environment.
SparkFun gator:UV - micro:bit Accessory Board
SEN-15273
Product Showcase: SparkFun gator:log, gator:RTC, & gator:UVProduct Showcase: SparkFun gator:log, gator:RTC, & gator:UV

Required Materials
To get started, you'll need a micro:bit to control everything. You can purchase one individually on in a kit.
To easily use the gator board ecosystem, a gator:bit (v2) will help breakout the necessary pins and you will also
need alligator and/or banana cables to connect the gator:bit to the gator:UV.
SparkFun Inventor's Kit for micro:bit
KIT-15228
micro:bit Go Bundle
DEV-14336
micro:bit Board
DEV-14208
SparkFun gator:bit v2.0 - micro:bit Carrier Board
DEV-15162
Alligator Test Leads - Multicolored (10 Pack)
PRT-12978

(*These banana cables have a special diameter on the attachment points designed specifically for use with the
micro:bit ecosystem. They may or may not be compatible with the banana cables used on your test equipment.)
You may already have some of these materials, so feel free to modify your cart as necessary.
Suggested Reading
The gator:UV sensor is pretty straight forward to use in application. However, you may find the following concepts
useful along the way.
Banana to Banana Cable - Right Angle
CAB-15368
Light
Light is a useful tool for the electrical engineer.
Understanding how light relates to electronics is a
fundamental skill for many projects.
Logic Levels
Learn the difference between 3.3V and 5V devices and
logic levels.
I2C
An introduction to I2C, one of the main embedded
communications protocols in use today.
micro:climate Kit Experiment Guide
A weather station kit that is built on top of the
inexpensive, easy-to-use micro:bit and Microsoft

If you aren't familiar with the micro:bit, we recommend reading here for an overview.
micro:bit Ecosystem
We would also recommend taking a look at the following tutorials if you aren't familiar with them.
MakeCode.
Product Showcase: micro:bit and SparkFun bitsProduct Showcase: micro:bit and SparkFun bits

Hardware Overview
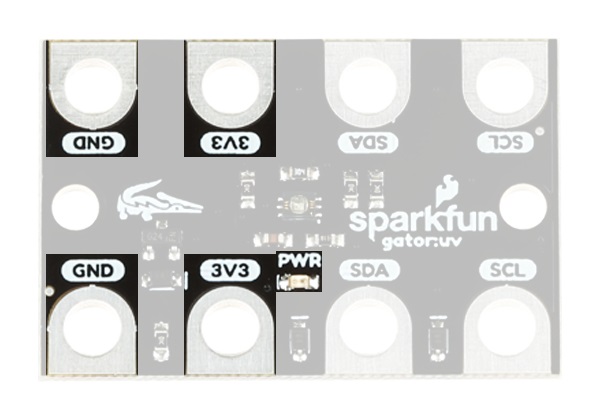
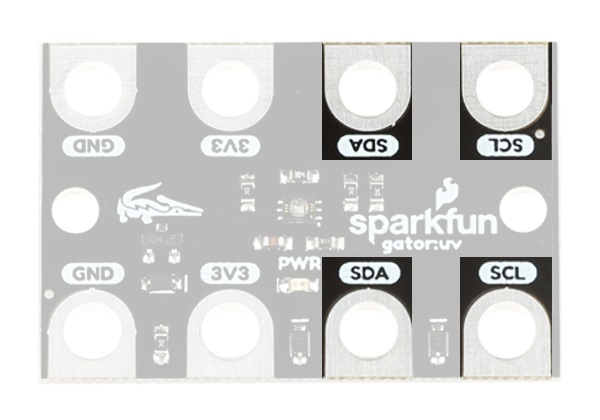
The gator:UV consists of 4 pads for power and data.
Contacts Direction Description
GND N/A Ground: Reference voltage and ground loop.
3.3V In Power: Provides 3.3V to sensor.
SDA Bi-directional Data: Data and commands are transmitted between the sensor and
microcontroller.
SCL In Clock: The microcontroller provides the timing needed to communicate on
the data line.
Power
The specified operating voltage for the VEML6070 is between 2.7V - 5.5V. For use with the gator:bit (v2) and
micro:bit, you should provide 3.3V through the 3V3 and GND pads to keep the logic levels consistent.
Getting Started with the micro:bit
The BBC micro:bit is a compact, powerful programming
tool that requires no software installation. Read on to
learn how to use it YOUR way!
Getting Started with MicroPython and the
SparkFun Inventor's Kit for micro:bit
Learn MicroPython with the micro:bit.
How to Load MicroPython on a Microcontroller
Board
This tutorial will show you how to load the MicroPython
interpreter onto a variety of development boards.
SparkFun gator:bit v2 Hookup Guide
The gator:bit v2 is a breakout board for the BBC
micro:bit. The gator:bit exposes almost every pin on the
micro:bit to clippable pad with circuit protection. It also
has as built-in addressable LEDs and a built-in buzzer.

Power connection pads and power indication LED.
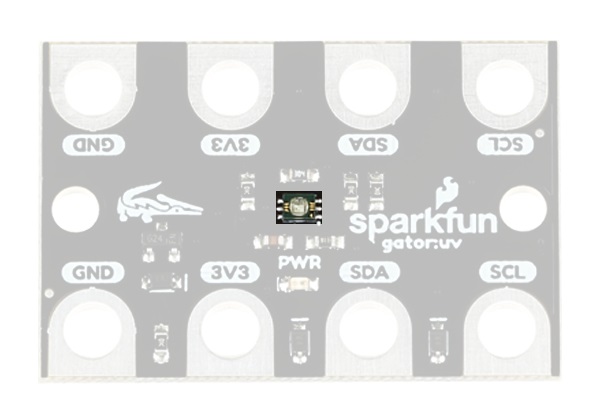
VEML6070
The VEML6070 is a UV sensor that communicates over an I C bus. The VEML6070 detects UVA radiation up to
328 mW/cm with a resolution of 5 µW/cm . For the most part, users will only need to know I C addresses to
prevent address conflicts with other devices or sensors.
VEML6070 UV sensor.
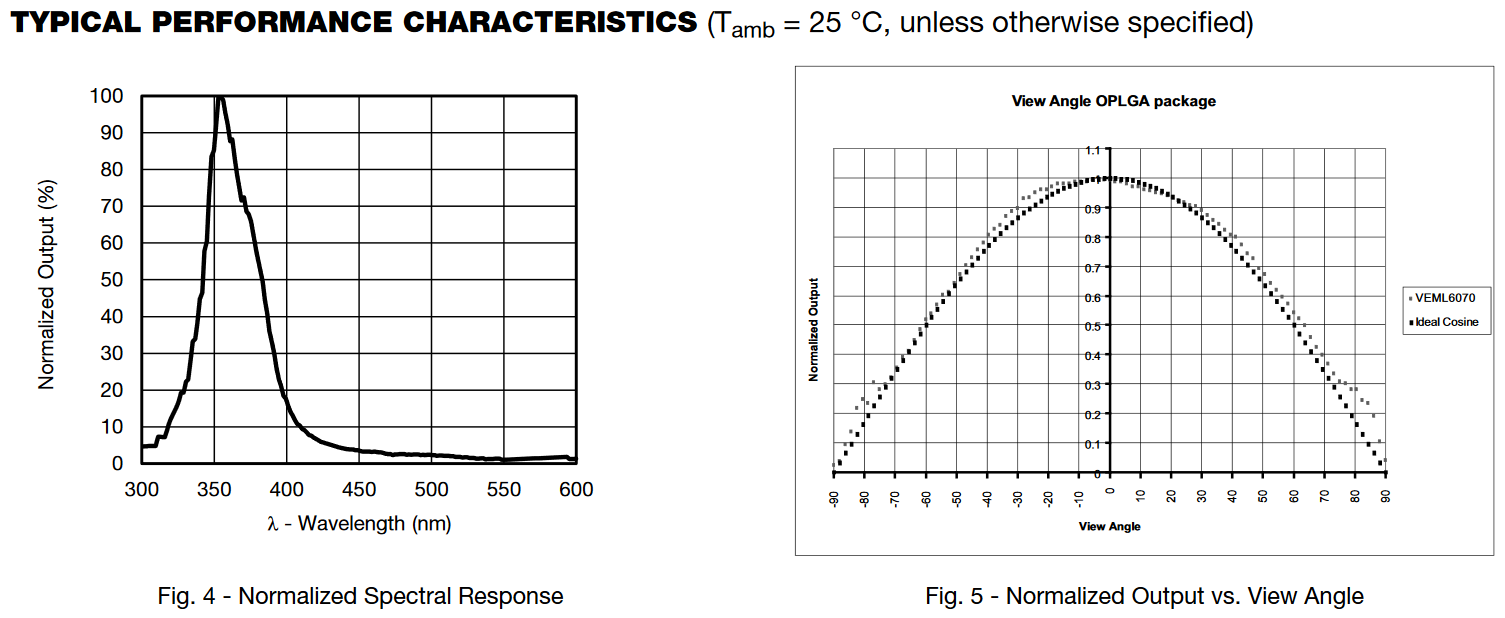
Here are some of the characteristics of the VEML6070 sensor from the datasheet:
Characteristic Range
Operating Voltage 2.7V to 5.5V
Supply Current 240 µA
UVA Detection up to 328 mW/cm
UVA Resolution 5 µW/cm /step
I C Address
0x70 - Write Commands
0x73 - Read MSB of UV Data
0x71 - Read LSB of UV Data
2
2 2 2
2
2
2

Performance characteristics from the datasheet. Click to enlarge.
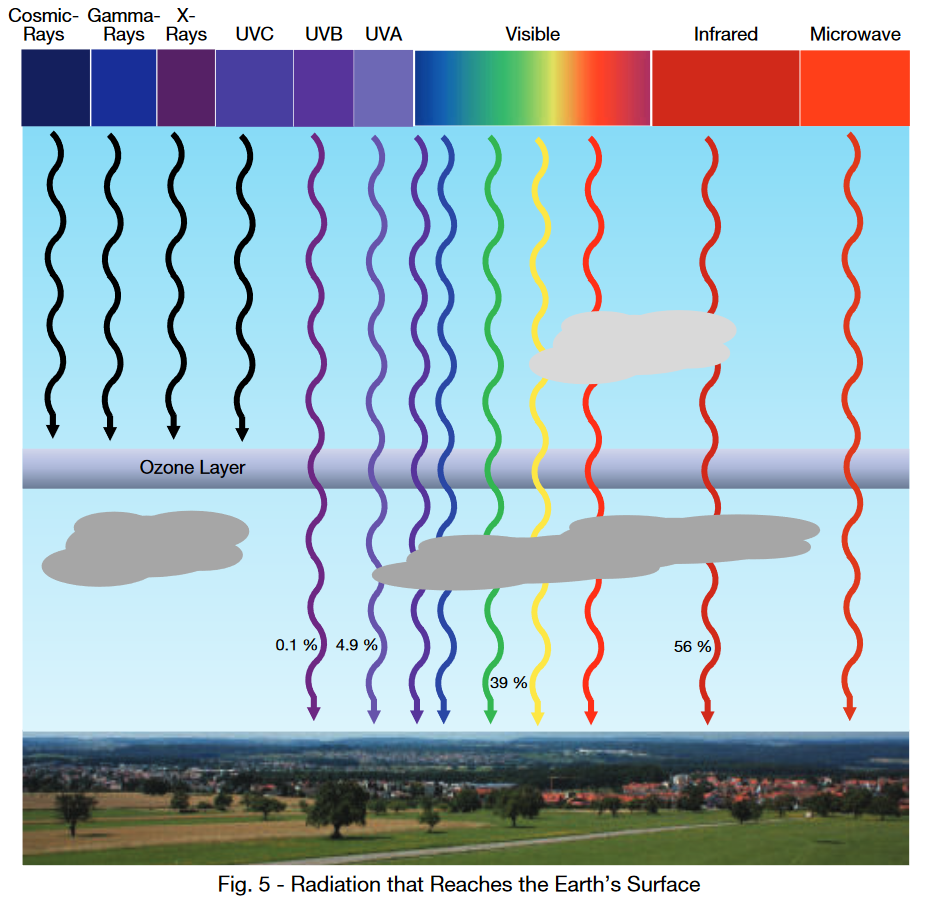
What is UVA Radiation?
UVA radiation is a specific part of the spectrum of the solar radiation from the Sun. UVA light has wavelengths
between 320 nm and 400 nm. Approximately, 4.9% of all solar radiation that makes it to the surface of the Earth is
UVA light. UVA rays are often associated with photoaging and the formation of skin cancer.
Penetration of solar radiation through Earth's atmosphere (from VEML6070 App. Note). Click to enlarge.
For more details on UV radiation, check out these online resources:
NASA Science: Ultraviolet Waves
Stanford Solar Center: UV Light
Some experiments and related topics for UVA radiation:
Absorption and Exposure:
Sunblock
What Is the Most Effective Sunscreen?
U.S. Sunscreens Get Flunking Grade for UVA Protection (pub. 2010)
The truth about sunscreen (pub. 2014)
Photoexposure:
Sun Sensitive Paper
Ben from the Applied Science has a cool video on UV exposure.
Effects on insects (like flies or bees):
UV Radiation as an Attractor for Insects
Insect Vision: Ultraviolet, Color, and LED Light
Image processing helps solve the age-old mystery of “Why do zebras have stripes?”
I C Connection
2

I C is a communication protocol used to transfer data between master and slave devices. It is a 2-wire connection
consisting of SDA (data) and SCL (clock). The protocol is pretty well defined so it can be shared with multiple
devices. This is beneficial for daisy chaining multiple devices together on a single bus. The primary thing users will
need to watch out for is address conflicts (you can't have devices with the same address).
I C connection pads.
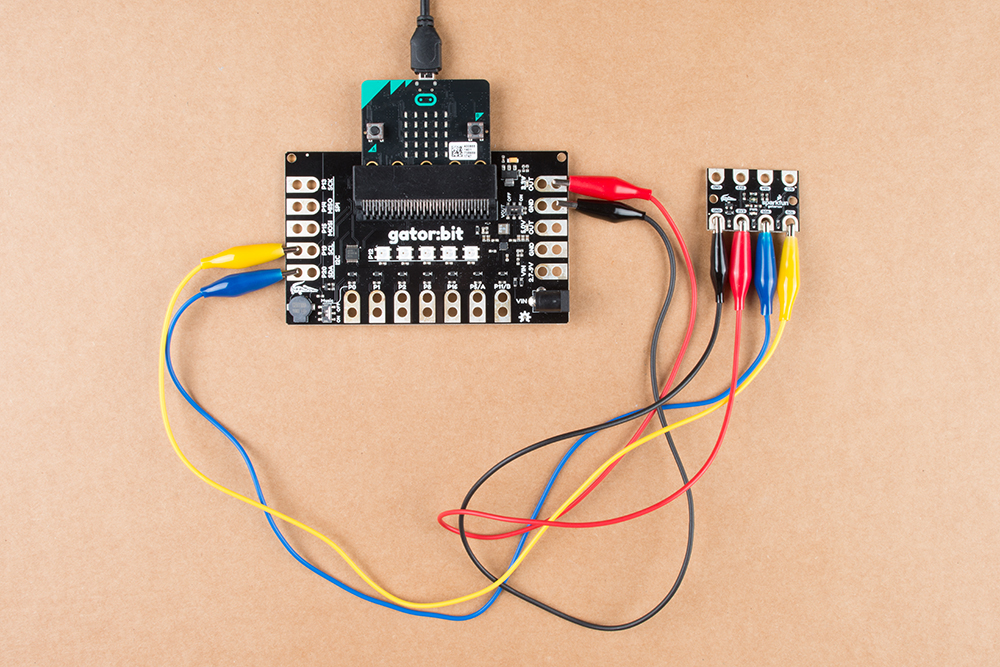
Hardware Assembly
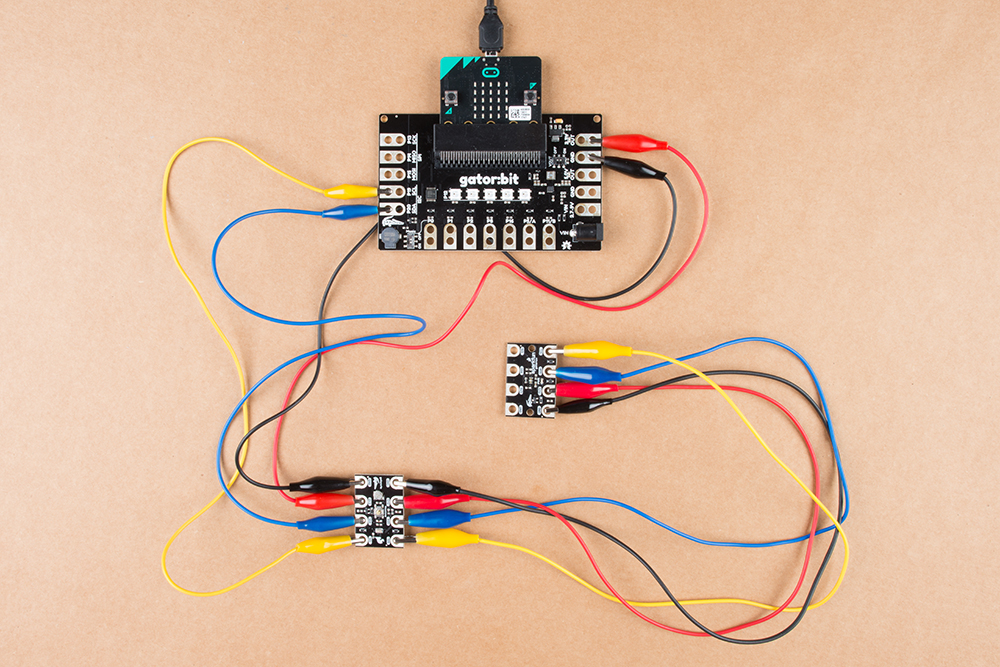
Connecting your gator:UV to the to the gator:bit (v2) is simple. The board can also be daisy-chained with other I C
boards. This can easily be done with alligator cables or these special banana cables.
gator:UV GND 3V3 SDA SCL
gator:bit (v2) GND 3.3V OUT P20 (SDA) P19 (SCL)
Adding the MakeCode Extension
2
2
2
Hardware assembly of connections used in example. Click to enlarge.
Example of daisy chaining multiple I C gator boards. Click to enlarge.
2

Note: This tutorial assumes you are familiar with MakeCode, the gato:bit (v2), and the micro:bit board.
If you have not previously used MakeCode, please check out the Quick Start Guide fro micro:bit.
If this is your first time using a micro:bit, please review our Getting Started with the micro:bit guide.
If this is your first time using the gato:bit (v2), please review our SparkFun gator:bit v2 Hookup Guide.
The easiest way to get started using the gator:UV is to use Microsoft MakeCode, a web-based block editor. This
tutorial assumes you are familiar with the with MakeCode, the gato:bit (v2), and the micro:bit development board. If
this is your first time check out this guides linked in the suggested reading section (above).
Installing Extensions
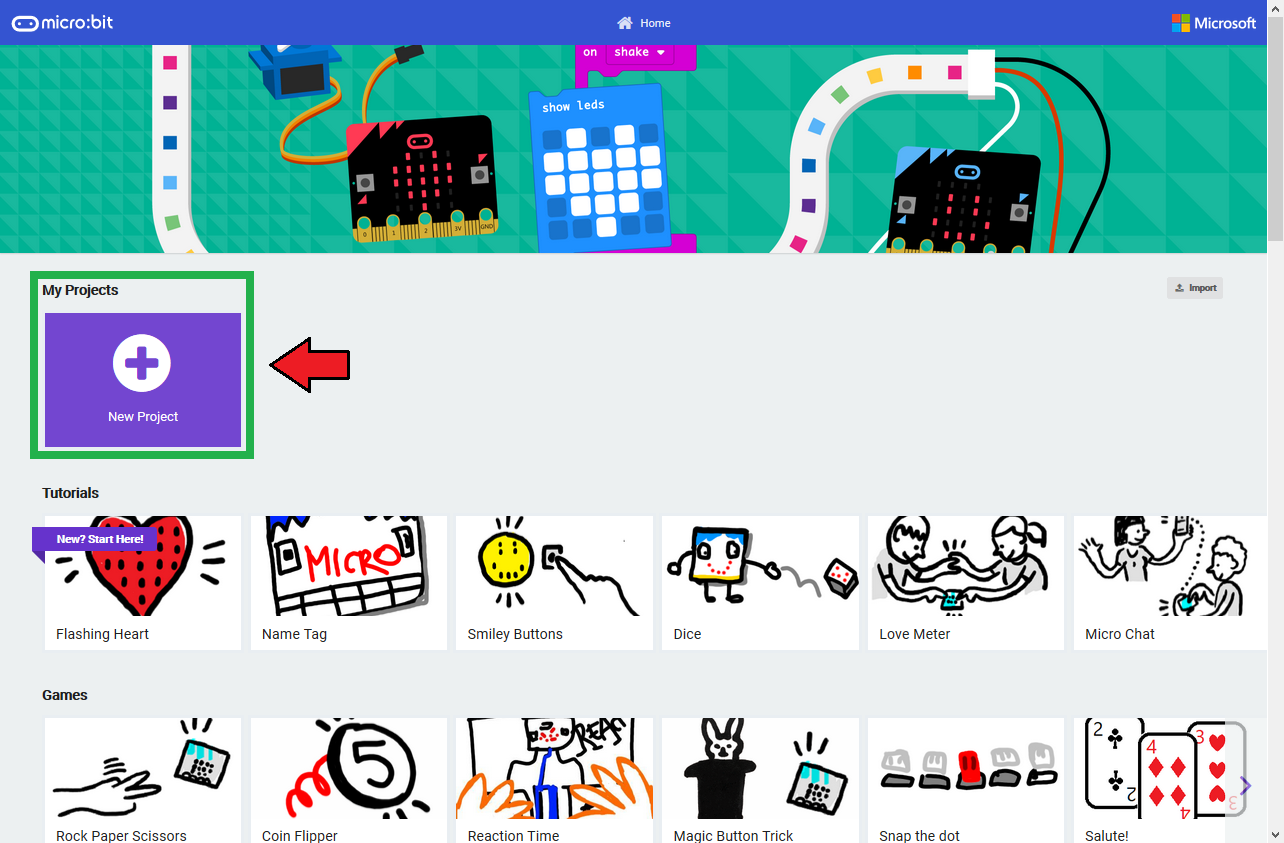
To get started with using MakeCode with the miccro:bit, head over to the MakeCode for micro:bit website by
Microsoft. Then, click the New Project button to start a new project and open the Editor. (*Yes, all you only need
to get start coding is a computer with internet access, an up-to-date web browser, and an available USB port!)
Click the New Project button to start a new project and open the Editor. Click on image to enlarge.
Once you have the editor up, click on the the Advanced block in the block library to reveal the drop down menu.
Click on the the Advanced block in the block library to reveal the drop down menu. Click on image to enlarge.
Finally, click on the Extensions block. This should bring up the extensions page. (*Alternatively, you could also
click on the extensions link from the settings menu.)

Click on the the Extensions block to open the extensions page. Click on image to enlarge.
There are two methods for finding the gator:UV extension:
Search for the name used on the extension .
Use the link to the GitHub repository for the pxt-package as the search term.
Use the search bar to find the extension you want to install. Click on image to enlarge.
Note: Unfortunately, it does take time to get an extension approved by the micro:bit Educational Foundation before it can be searchable
by name. Part of the requirements for the approval process involves a live product page. Therefore, at the time of the launch of this
product, the extension has not been approved yet and the only method of adding the extension is to use the link to the GitHub repository
of the pxt-package. We will update this tutorial as soon as the extension has been approved.↩
Search for the PXT-Package
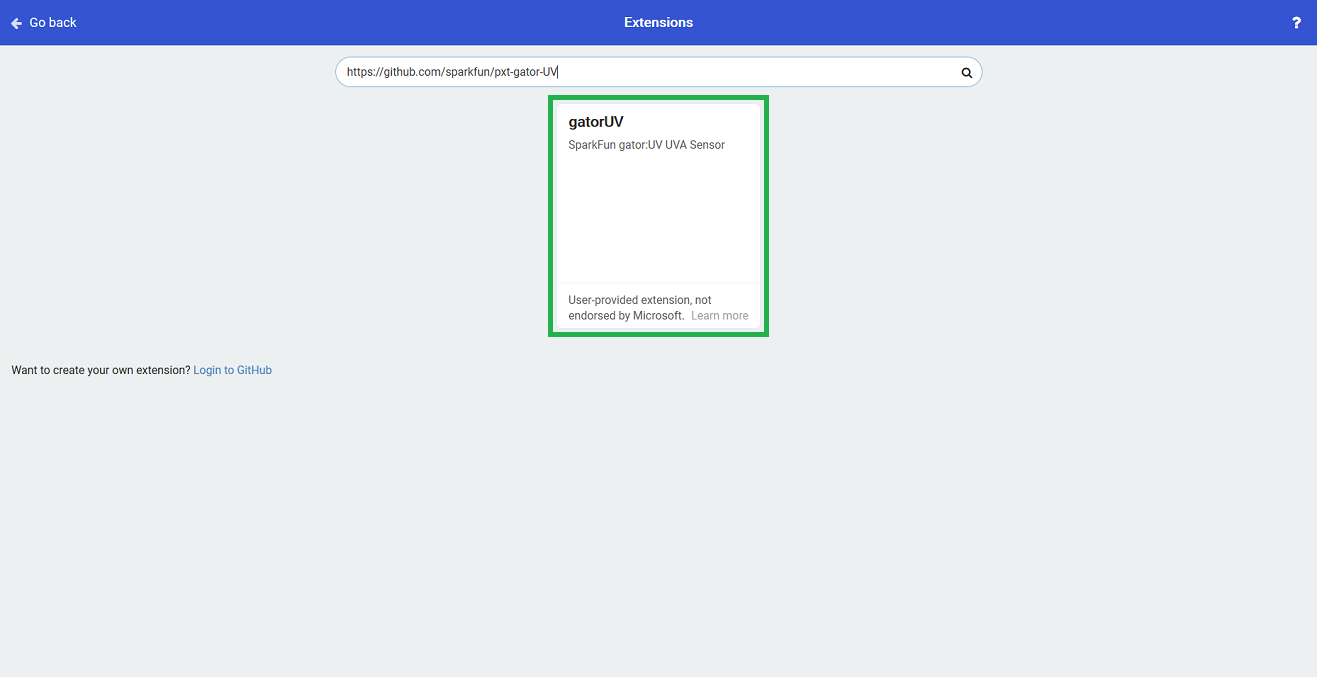
Search for the gator:UV extension using the GitHub repository link to the pxt-package:
https://github.com/sparkfun/pxt-gator-UV
Search for Extension. Then, click on the box to add it to the block library. Click on image to enlarge.
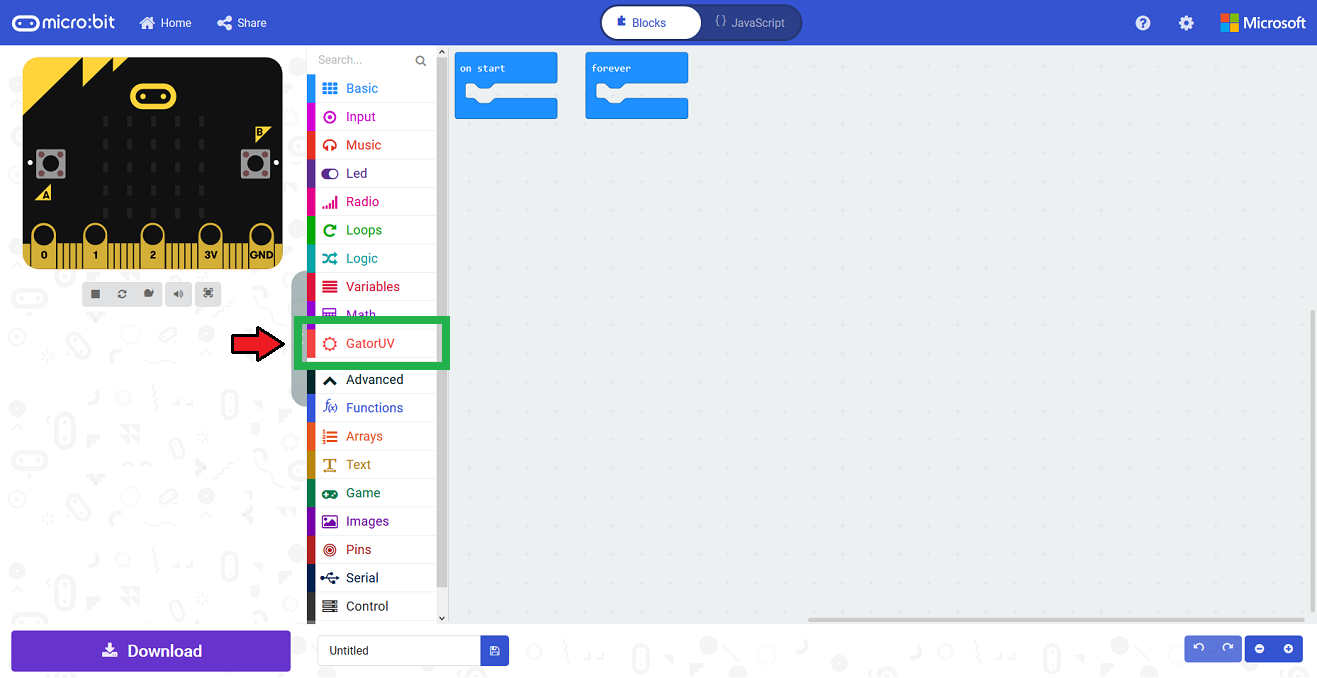
Then, click on the box for the extension to add it to the block library. The gator:UV extension should now appear in
the block library.
Extension in the block library; click on the block to open menu options. Click on image to enlarge.
1
Tabla de contenidos
Manuales populares de Instrumento de medición de otras marcas


Endress+Hauser
Endress+Hauser Proline Promag 50 Especificaciones técnicas

Siemens
Siemens SITRANS F Coriolis FCT030 Manual de lista de piezas

KLINGER
KLINGER CMF V Series Manual de usuario

EXFO
EXFO FTB-2 Manual de operación y mantenimiento

Keysight
Keysight M8290A Manual de usuario

ADTEK
ADTEK MW-5 Manual de usuario