
Sonifex MSF/DCF PC CLOCK CARD Guía

MSF/DCF PC CLOCK CARD
INSTALLATION AND
CONNECTION DETAILS
Sonifex Ltd, 1999.
All Rights Reserved
Revision 2.00c, MSFDCF08, February, 1999
Sonifex Ltd, 61, Station Road, Irthlingborough,
Northants., NN9 5QE, England.
Tel : +44 (0)1933 650 700
Fax : +44 (0)1933 650 726
Website : http://www.sonifex.co.uk
Information in this document is subject to change without notice and does not represent a commitment on the part of the vendor. Sonifex Ltd
shall not be liable for any loss or damage whatsoever arising from the use of information or any error contained in this manual.
No part of this manual may be reproduced or transmitted in any form or by any means, electronic or mechanical, including photocopying,
recording, or information storage and retrieval systems, for any purpose other than the purchaser's personal use, without the express written
permission of Sonifex Ltd.
Unless otherwise noted, all names of companies, products and persons contained herein are part of a completely fictitious adaptation and are
designed solely to document the use of Sonifex products.


MSF/DCF PC Clock Sync Card Installation and Connection Details
Page 2
Contents
1. MSF/DCF PC Sync Clock Card...............................................................1
1.1. Checking the Contents.............................................................................................. 1
1.2. Installation.................................................................................................................. 1
1.3. Installing the Card in your PC .................................................................................. 2
1.4. Positioning the Antenna............................................................................................ 3
1.4.1. Connecting Multiple RTC Cards to One Antenna.....................................................4
1.5. Installing the Software............................................................................................... 5
1.6. DOS Installation......................................................................................................... 6
1.6.1. Running the DOS Programs.....................................................................................6
1.6.2. RTCLOCK.EXE.........................................................................................................6
1.6.3. RTC_TSR.EXE.........................................................................................................7
1.7. Windows 3.x Installation........................................................................................... 8
1.7.1. Installing the HDXARC.DLL Card Driver by Using Control Panel.............................8
1.7.2. Running the Windows Configuration Programs........................................................8
1.7.2.1. Creating a Program Group in Windows 3.x 10
1.7.2.2. Running CONFIG.EXE in Windows 3.x 11
1.7.2.3. Running MSFDCF.EXE in Windows 3.x 12
1.8. Windows 95/98 Installation....................................................................................... 13
1.8.1. Running the Windows Configuration Programs........................................................13
1.8.1.1. Creating a Program Group in Windows 95/98 13
1.8.1.2. Running CONFIG.EXE in Windows 95/98 14
1.8.1.3. Running MSFDCF.EXE in Windows 95/98 15
1.9. Windows NT Installation ........................................................................................... 16
1.9.1. Running the Windows Configuration Programs........................................................16
1.9.1.1. Running CONFIG.EXE in Windows NT 17
1.9.1.2. Running MSFDCF.EXE in Windows NT 18
1.10. Operation of the Clock ............................................................................................ 19
1.11. Summary of Installation.......................................................................................... 19
1.12. PC Card Connection Details................................................................................... 19
1.13. Antenna Connection Details................................................................................... 20
1.14. The PC Card Interface ............................................................................................. 20
1.14.1. Initialising the card ..................................................................................................20
1.14.2. Reading and writing data ........................................................................................20
1.14.2.1. RTC card addresses ( all base 10 ) 20

Page
MSF/DCF PC Clock Sync Card Installation and Connection Details
1
1. MSF/DCF PC Sync Clock Card
This card has been provided to synchronise any IBM compatible PC computer running DOS or Windows to
the reference signals of MSF Rugby ( UK ), or DCF Mainflingen ( Central Europe ). Alternatively, the PC
card can be installed on its own to act as an accurate reference clock in areas where the MSF and DCF
signals are unavailable. The accuracy of the RTC ( real time clock ) without the MSF or DCF signal is 6
seconds per month. During periods where the signal can not be received ( for example, the MSF signal is
shut down for two weeks every Summer ), the RTC will update the DOS clock.
The software programs supplied with the cards run under Microsoft DOS or Microsoft Windows . The
cards were originally designed to work with the Sonifex HDX2000 hard disk system, but can also be run
independently of this.
1.1. Checking the Contents
Before you begin the installation of the card and antenna, please check that you have received all of the
following items :
1. A plug-in PC card.
2. An antenna receiver with 5 metre lead to connect to the PC card ( If you have just purchased the accurate
real time clock card without MSF or DCF receivers, the antenna will not be supplied ).
3. Software disk (3.5 inch)
4. These installation notes.
1.2. Installation
There are three stages to the installation of the units :
1. Install the plug-in card into the ISA back-plane of the motherboard of your PC.
2. Connect and position the antenna so that the MSF/DCF signal can be received.
3. Load the software that synchronises your PC, in DOS, Windows 3.x or Windows 95.
MSF/DCF PC Clock Sync Card Installation and Connection Details
Page 2
1.3. Installing the Card in your PC
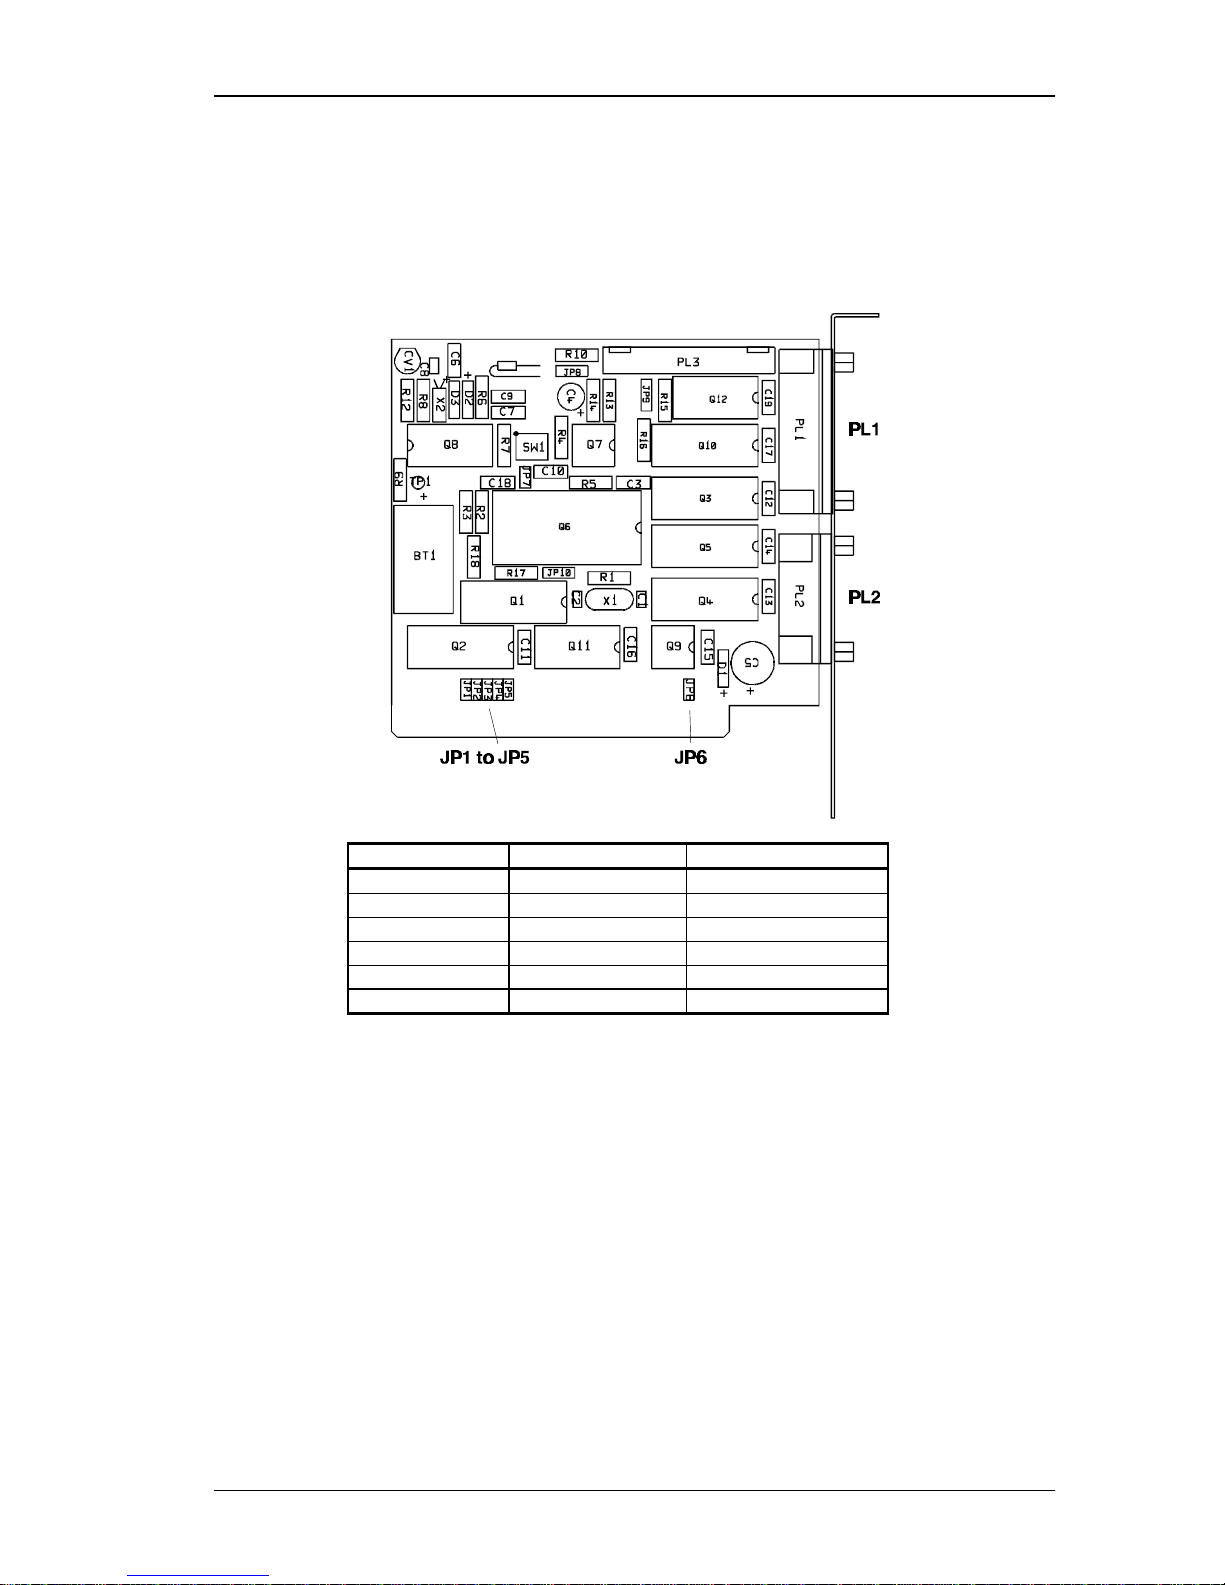
1. Unpack the PC card. If the card is to be installed with Windows 95 software, remove the IRQ jumper
(positioned in any of the settings JP1 to JP6) as interrupts are not used. If the card is to be installed with
Windows 3.x or DOS, check that the jumper setting for the IRQ value ( interrupt value ) is available on
your PC. Available values for the IRQ on the card are 3, 4, 5, 7 & 9 which can be selected by setting the
correct jumper, as in the table below.
Jumper Set IRQ Selected Normal Use
JP1 3COM2, COM4
JP2 4COM1, COM3
JP3 5LPT2
JP4 Not Used Floppy Disk
JP5 7LPT1 Printer
JP6 9Free
Check which of your PC’s IRQ values is free by using the MSD.EXE ( MicroSoft Diagnostics ) program
which is supplied with MS-DOS. Select “Q” to see the interrupt settings. Recommended settings are :
IRQ 5 if you are not using the LPT2 second printer port.
IRQ 3 if you are not using the COM2 and COM4 serial ports ( This is the default ).
Set the jumper to a free value on the card and make a note of this number - you will need it when
installing your software.
2. Switch off your computer and unplug the power supply before removing the cover of your PC (observing
any static/safety precautions ) so that the ISA back-plane of the motherboard is visible.
3. Using a suitable screw-driver, unscrew the back-plate of a spare expansion slot and insert the PC card.
4. Push the card down firmly into the slot so that a good connection is made with the ISA back-plane.
5. Replace the back plate screw, and the lid of your PC.
6. If an antenna is supplied, fit it into PL2 on the back of the plug-in card and screw it in.

Page
MSF/DCF PC Clock Sync Card Installation and Connection Details
3
1.4. Positioning the Antenna
The antenna will have been supplied if you are syncronizing your PC to the MSF or DCF radio clocks. If
you are using just the real time clock card to syncronize your PC, you will not need the antenna.
Ensuring that the antenna is connected to the PC card and that the computer is powered up, hold the
antenna flat and rotate until the red LED is flashing once a second. Each time the LED flashes, it indicates
that part of the MSF/DCF signal has been received. Rotate the antenna until the signal is most consistent.
When the antenna is has received a strong signal for about ten seconds, the LED will start to flash green. If
the green LED flashes consistently the antenna can be fixed into place (The DCF antenna will flash red once
at the start of each minute).
Best reception will be found when the antenna is fixed horizontally and in the direction of Rugby
(approximately in the centre of England ) for MSF or Mainflingen ( close to Frankfurt in Germany ) for
DCF.
In areas surrounded by metal sheeting or larger buildings fabricated with steel frames, or near to sources of
electrical interference, reception of the signal may be poor or erratic . In these cases, it may be necessary to
extend the cable higher up and away from obstructions. Weather conditions may also cause the strength of
the signal to vary. As a guide :
•A green flashing LED indicates a healthy signal.
•A green flashing LED changing to red for a few seconds every few minutes is acceptable.
•A red LED flashing once a second indicates a weak signal.
•An erratic red flashing LED indicates a poor signal.
•LED not flashing indicates no signal.
The MSF Rugby signal is regularly unavailable at the following times : part of the first Tuesday of each
month and for two whole weeks during the Summer ( end of May, beginning of June ). Check with the

MSF/DCF PC Clock Sync Card Installation and Connection Details
Page 4
National Physical Laboratory at Teddington, Middlesex for exact times and dates of signal availability. At
these times the internal RTC will automatically update the PC.
1.4.1. Connecting Multiple RTC Cards to One Antenna
Up to 31 cards can be connected to one antenna, as in the above drawing.

Page
MSF/DCF PC Clock Sync Card Installation and Connection Details
5
1.5. Installing the Software
If you are installing the card to operate under DOS, Windows 3.11, or Windows 95/98, the relevant files
must be copied from the installation disk by using the INSTALL.BAT program. Insert the supplied floppy
disk into the 3.5” disk drive of your PC. The programs can be copied into the \MSFDCF directory of your C
drive by entering :
A:INSTALL from the DOS prompt.
To access the DOS prompt from within Windows 3.x select “MS-DOS Prompt” from the Main Program
Group, or “Start”, “Programs”, “MS-DOS Prompt” in Windows 95.
A menu will appear as follows :
MSF DCF RTC Clock Card Software Installation
A. For Windows 95 Installation
B. For Windows 3.x Installation
C. For DOS Installation
D. to Exit
Type the letter for the installation that you require:
Enter a different letter depending on the operating system which you are using.
For DOS installation, refer to section 1.6
For Windows 3.x installation, refer to section 1.7
For Windows 95/98 installation, refer to section 1.8
For Windows NT installation, refer to section 1.9
MS-Windows NT Installation
If you are installing the card under Windows NT, use the disk labelled 'Installation Disk for Windows NT'.
Select 'Start->Run',and type 'A:\setup.exe' and follow the on-screen instructions. Be sure to read the ReadMe
file displayed during the set-up routine for installation instructions.

MSF/DCF PC Clock Sync Card Installation and Connection Details
Page 6
1.6. DOS Installation
Selecting ‘C’ in the install program creates the directory C:\MSFDCF and copies over the files needed to
run the clock card under DOS :
RTCLOCK.EXE
RTC_TSR.EXE
1.6.1. Running the DOS Programs
There are two programs to run. The RTCLOCK.EXE is run just to configure the PC clock card and assign
time and date values to it. The RTC_TSR.EXE must be run each time the PC is booted, to synchronise the
DOS clock to the clock on the card.
1.6.2. RTCLOCK.EXE
This is the configuration program to set up the time and date for the RTC on the PC card and is run
automatically after the files are copied to the hard disk. The RTCLOCK.EXE program will only need to be
run once and should be run before the RTC_TSR.EXE program. Note that once the RTC card is installed,
you must always alter the time of the PC by using the following method, but not by using the DOS Time and
Date functions. To run it at the DOS prompt, type the following :
C:\
CD\MSFDCF
RTCLOCK
This begins the RTCLOCK.EXE program. Set the time and date on the clock card by using options 2 and 4 :
MSF DCF RTC Configuration v1.0
0 Display Times
1 Get RTC Time
2 Set RTC Time
3 Get RTC Date
4 Set RTC Date
5 Exit
>
Type in a number to display, or enter, the time and date information :
Number Description
0This shows the current settings for the DOS clock and the RTC clock :
CLOCK DATE TIME
RTC 21\02\1995 16:42:05.20
DOS 21\02\1995 16:42:04.06
STATUS :- OK
press return...
1This shows the RTC time :
The RTC time is 16:43:05.20
STATUS :- OK
press return...

Page
MSF/DCF PC Clock Sync Card Installation and Connection Details
7
2This allows you to set the RTC Time and will show the following lines in sequence.
Set RTC Time
Enter Hours > ( 0 - 23 )
Enter Minutes > ( 0 - 59 )
Enter Seconds > ( 0 - 59 )
STATUS :- OK
press return...
Type in the correct hours, minutes and seconds using 2 digits. Using one digit will be
accepted for a duration less than 10. If bad information is entered, such as minutes greater
than 59, the program will display a “User type error !” and you will have to re-enter the
information.
3. This shows the RTC date :
The RTC date is 21\02\1995
STATUS :- OK
press return...
4. This allows you to set the RTC Date and will show the following lines in sequence.
Set RTC Date
Enter DOM > ( 01 - 31 )
Enter Month > ( 01 - 12 )
Enter Year > ( 00 - 99 )
STATUS :- OK
press return...
Type in the correct day, date, month and year using 2 digits. Using one digit will be
accepted for a duration less than 10. If bad information is entered, such as year greater than
99, the program will display a “User type error !” and you will have to re-enter the
information.
5. This will exit the program.
The different Status messages which can be displayed for this program are as follows :
OK The input has been accepted and written to the RTC clock.
RTC comms error ! There is a communication error with the card - check that the card is fitted correctly.
RTC time error ! The time has been read from the card incorrectly.
User type error ! The characters entered for the time and date are incorrect.
Once the time and date have been set-up, the RTC_TSR.EXE program needs to be inserted into the
AUTOEXEC.BAT file in your root directory :
1.6.3. RTC_TSR.EXE
This is a terminate and stay resident program and needs to be added to your AUTOEXEC.BAT so that it
runs each time the PC is switched on. There are 3 parameters which show the card settings, i.e.
C:\MSFDCF\RTC_TSR /s:<0 or 1> /i:<3,4,5,7 or 9> /e:<0 or 1>
where s is the signal source : 0 = RTC card alone, 1 = MSF or DCF signal
where i is the interrupt as set on the card : 3 = IRQ 3, 4 = IRQ 4, 5 = IRQ 5, 7 = IRQ 7, 9 = IRQ 9
where e is to enable the IRQ : 0 = disabled - card will not update the DOS clock.
1 = enabled - card updates the DOS clock.
For example, the line : C:\MSFDCF\RTC_TSR /s:1 /i:5 /e:1
Este manual sirve para los siguientes modelos
2
Tabla de contenidos
Manuales populares de Hardware de computadora de otras marcas

EMC2
EMC2 VNX Series Manual del propietario

Panasonic
Panasonic DV0PM20105 Manual de usuario

Mitsubishi Electric
Mitsubishi Electric Q81BD-J61BT11 Manual de usuario

Gigabyte
Gigabyte B660M DS3H AX DDR4 Manual de usuario

Raidon
Raidon iT2300 Manual de usuario

National Instruments
National Instruments PXI-8186 Manual de usuario


