Simplicity SMF2 Manual de usuario

Milestone AV Technologies
2221 Hwy 36 West
Saint Paul, MN 55113 USA
Customer Service
888-333-1376 • 952-277-3956 • info@simplicityav.com
www.simplicityav.com
©2010 Milestone AV Technologies, a Duchossois Group Company.
All rights reserved. Simplicity is a Milestone brand.
All other brand names or marks are used for identification purposes and are trademarks of their respective owners.
SMF2
(6903-002002 <01>)
5.5 mm
(7/32 in.)
10 mm
(3/8 in.)
Wood Stud
Concrete
13 mm
(1/2 in.)
Installation video available at simplicityav.com

6903-002002 <01>
2
?
Tools required Wood stud walls Concrete/Concrete Block
Walls Choose an Option Do Not
Outils nécessaires Structure de murs en bois Murs en béton coulé ou en
blocs de béton Sélectionnez une option Interdit
Herramientas necesarias Paredes con montantes de
madera
Paredes de hormigón o de
bloques de hormigón Elija una opción Prohibido
English
Français
Español
CAUTION / WARNING WARNING: This product contains small
items that could be a choking hazard. Repeat Step Heavy! Assistance Required.
ATTENTION/AVERTISSEMENT!
Ce produit contient de petites pièces
qui peuvent représenter un risque
d’étouement.
Répétez l’étape
TRÈS LOURD ! Cette étape
requiert deux personnes.
PRECAUCIÓN /ADVERTENCIA!
Este producto contiene piezas pequeñas
que, si fuesen tragadas, podrían producir
asxiA.
Repita este paso ¡PESADO! Necesitará ayuda
para realizar esta operación.
English
Français
Español
This End Up Loosen/Tighten Alternate View
Ce côté vers le haut Dévisser/visser Autre vue
Este extremo hacia arriba Aojar/Ajustar Vista ampliada
English
Français
Español

6903-002002 <01> 3
English
IMPORTANT SAFETY INSTRUCTIONS – SAVE THESE INSTRUCTIONS – PLEASE
READ ENTIRE MANUAL BEFORE USING THIS PRODUCT
For best results, reference both the text and illustrations when using this
manual. Cut along the dashed lines to match your language with the
illustrations.
English Text Pages 4-17.
Français
INFORMATIONS IMPORTANTES CONCERNANT LA SÉCURITÉ – CONSERVEZ
CES INSTRUCTIONS – VEUILLEZ LIRE ATTENTIVEMENT LE MANUEL AVANT
D’UTILISER CE PRODUIT
Pour obtenir de meilleurs résultats, reportez-vous à la fois au texte et aux
illustrations lorsque vous consultez ce manuel. Couper le long de la ligne
pointillée pour faire correspondre les illustrations à votre langue de préférence.
Texte français page 18-20.
Español
INSTRUCCIONES IMPORTANTES DE SEGURIDAD CONSERVE ESTAS
INSTRUCCIONES – LEA TODO EL MANUAL ANTES DE UTILIZAR ESTE
PRODUCTO
Para obtener mejores resultados, consulte el texto y las ilustraciones cuando
utilice este manual. Corte por las líneas punteadas para hacer coincidir su
idioma con las ilustraciones.
Español Páginas de texto 22-24.

6903-002002 <01>
4
IMPORTANT SAFETY INSTRUCTIONS – SAVE THESE INSTRUCTIONS – PLEASE READ ENTIRE MANUAL BEFORE USING THIS PRODUCT
Specications
Weight capacity-DO NOT EXCEED: 27 kg (60 lbs) includes TV and any accessories
Swivel: ±90°
Tilt: +0° to –10°
CAUTION: Avoid potential personal injuries and property damage!
Do not use this product for any purpose not explicitly specied by manufacturer.
The wall must be capable of supporting ve times the weight of the monitor and mount combined.
This product is not designed for use in metal stud walls!
If you do not understand these instructions, or have doubts about the safety of the installation, assembly or use of this product, contact manufacturer
Customer Service or call a qualied contractor.
Manufacturer is not responsible for damage or injury caused by incorrect assembly or use.
CAUTION:
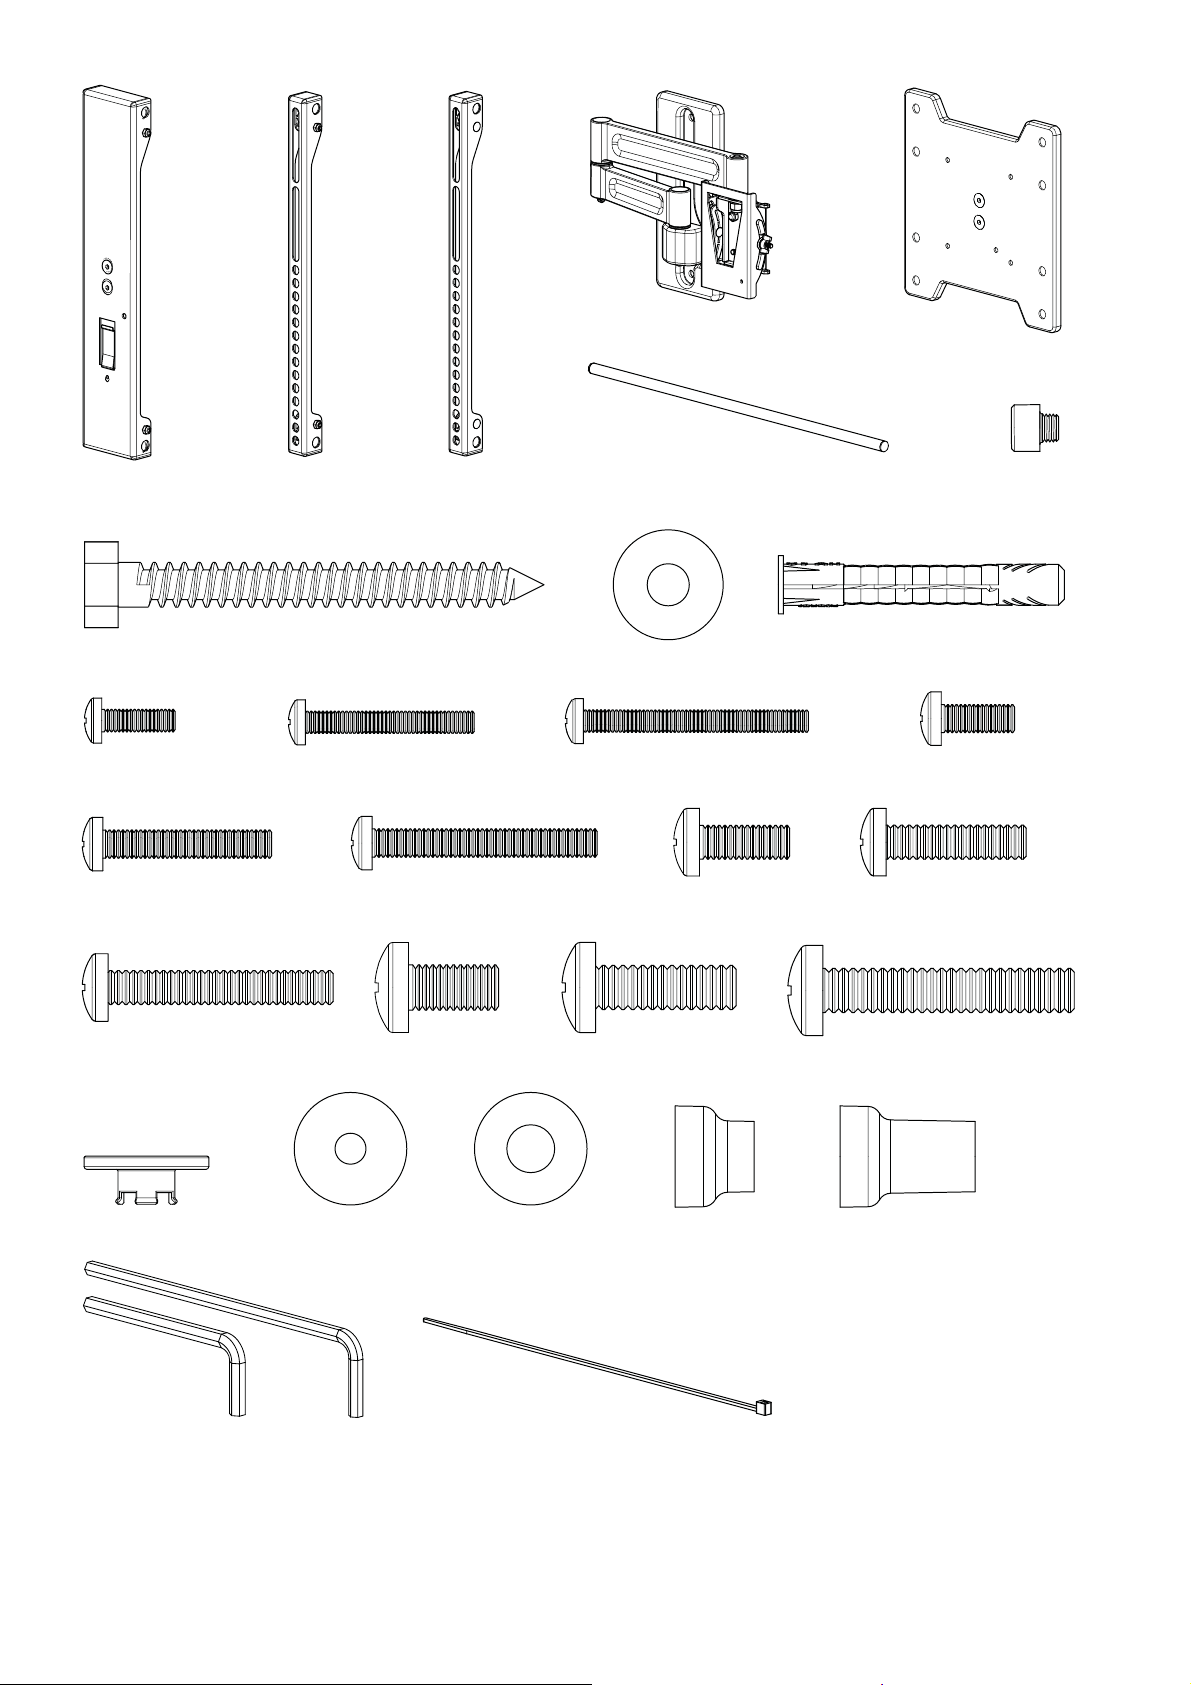
Supplied Parts and Hardware.
Before starting assembly, verify all parts are included and undamaged. If any parts are missing or damaged, do not return the damaged item to your dealer; contact Customer
Service. Never use damaged parts!
NOTE:
Not all hardware included will be used.
English
6903-002002 <01> 5
M4 / M5 M6 / M8
M4 x 12mm
M6 x 14mm
M6 x 40mm
M5 x 30mm M5 x 40mm
M4 x 30mm M4 x 40mm
14mm 24mm
M5 x 12mm
M8 x 16mm
M6 x 25mm
M8 x 45mm
M8 x 25mm
[01] x 1 [02] x 1 [03] x 1 [07] x 1
[08] x 3
[09] x 3
[10] x 3
[04] x 1
[06] x 2
[12] x 4 [13] x 4
[11] x 4 [14] x 4
[15] x 4 [16] x 4 [17] x 4 [18] x 4
[19] x 4 [20] x 4 [21] x 4 [22] x 4
[23] x 4 [27] x 4
[24] x 4 [25] x 4 [26] x 4
[29] x 1 [30] x 3
5/16 x 2.75 in.
[05] x 1
[28] x 1
5/32
3/16

6903-002002 <01>
6
1
CAUTION:
Install TV Brackets
Before you begin, hand thread screws into the threaded inserts on the back of your TV to determine the correct screw diameter (M4, M5, M6, or M8). Verify
that there are adequate threads to secure the brackets to the TV If you encounter resistance, stop immediately and contact customer service.
CAUTION: Avoid potential personal injuries and property damage! Use the shortest screw and spacer combination to accomodate your needs. Using
hardware that is too long may damage your T V’s internal components.

6903-002002 <01> 7
1-1
Select a TV interface based on your TV's hole pattern. Do not begin installation
yet, only determine which interface to use.
A. You will use the smaller interface [05] for 100 or 200mm hole patterns.
B. You will use the larger interface [01, 02, 03] for hole patterns between 200 and
400mm, and up to 450mm wide.
NOTE: The remaining illustrations in this manual feature the large interface,
however they apply to both. Regardless of which interface you choose, follow the
steps as described.
B
200 - 450mm
(8 - 18 in.)
400mm
(16 in.)
A
100 - 200mm
(4 - 8 in.)
100 - 200mm
(4 - 8 in.)
[05]
[03]
[02]
[01]

6903-002002 <01>
8
[24]
[11]
M4
1-2
[03]
[17]
M6
[14]
M5
[20]
M8
First, see step 1.
For TVs with a at/unobstructed back.
A. Ensure that the brackets are level on the back of the TV.
If you need extra space to accommodate cables, recesses, or protrusions, see
an installation option (1-3 or 1-4) that uses spacers.
[02]
[24]
[25]
[02, 03]
[25]
[02, 03]
[02, 03] [02, 03]
?
A

6903-002002 <01> 9
1-3
M4
M6
M5
M8
First, see step 1.
For TVs with an irregular/obstructed back.
A. Push the shoulder washer [23] through the appropriate openings of the brackets
[02] and [03].
B. Snap shoulder washer [23] into the spacer [26].
C. Ensure that the brackets are level on the back of the TV. If more space is required to
accomodate cables, recesses, or protrusions, see 1-4.
[26]
[23]
[12]
[26]
[15]
[18] [21]
[24]
[02, 03] [02, 03]
[02, 03] [02, 03]
[03]
?
[02]
[23]
[24]
[26] [23]
[25]
[26]
[23]
[25]
A B
C
[26]
[23]
[23]
[26]

6903-002002 <01>
10
1-4
M4
M6
M5
M8
[02, 03] [02, 03]
[02, 03] [02, 03]
[03]
[02]
?
[13]
[27] [23]
[24]
[16]
[27] [23]
[24]
[19]
[27] [23]
[25]
[22]
[27]
[23]
[25]
First, see step 1.
For TVs with an irregular/obstructed back.
A. Push the shoulder washer [23] through the appropriate openings of the
brackets [02] and [03].
B. Snap shoulder washer [23] into the spacer [27].
C. Ensure that the brackets are level on the back of the TV.
Standard congurations are shown. For special applications, or if you are uncertain
about your hardware selection, contact Customer Service.
A B
C
[27]
[23]
[23]
[27]
Otros manuales para SMF2
1
Tabla de contenidos
Otros manuales de Rack y soporte de Simplicity


