Sigfox WSSFC-V1A-9-01 Manual de usuario

WSSFC-V1A-MN-EN-01
MAY-2021
SKU
WSSFC-V1A
HW Ver.
1.1
FW Ver.
1.0
Item Code
WSSFC-V1A-9-01
SIGFOX PIEZO-ELECTRIC 10KHZ VIBRATION SENSOR, +/- 25G, INTERNAL ANTENNA, TYPE AA
BATTERY 1.5VDC, IP67, RC2-RC3-RC4-RC5 ZONES
WSSFC-V1A-8-01
SIGFOX PIEZO-ELECTRIC 10KHZ VIBRATION SENSOR, +/- 25G, INTERNAL ANTENNA, TYPE AA
BATTERY 1.5VDC, IP67, RC1-RC6-RC7 ZONES
STEP 1: Select RC
1. Select RC zone using Modbus Configuration Cable
RC zones selection 1, 2, 4 is RCZ1, RCZ2, RCZ4 (refer to register
address 270)
2. Select RC zone using button
Refer to the button configuration
USER GUIDE FOR SIGFOX PIEZO-
ELECTRIC 10KHZ VIBRATION
SENSOR WSSFC-V1A
This document is applied for the following products
0. Configuration Check List

STEP 2: Check ID and PAC
Use Modbus Configuration Cable to read the ID and PAC values
Refer to register address 8 and 10 (DEC)
STEP 3: Configure the sensor's operating parameters
Configure parameters like cycle send data, alarm, a, b,...
Refer to the configuration section using the Modbus Configuration
Cable
STEP 4: Add device to Backend Sigfox
refer to section 5.4 for details
HW Ver.
FW Ver.
Release Date
Functions Change
1.1
1.0
DEC-2020
WSSFC-V1A is a cost effective, Sigfox accelerometer single-axis vibration sensor designed for condition monitoring and
preventive maintenance applications. The piezo-electric accelerometer is available in ranges ±25g or 50g and features
a flat frequency response up to >10kHz. Its accelerometer feature a stable piezo-ceramic crystal in shear mode with
low power electronics, sealed in a fully hermetic package. The Piezo Electric technology incorporated in the WSSCF-V1A
accelerometer has a proven track record for offering the reliable and long-term stable output required for condition
monitoring applications. The accelerometer is designed and qualified for machine health monitoring and has superior
Resolution, Dynamic Range and Bandwidth to MEMS devices. Beside that it can also measure the temperature at
mounting point. With Ultra-low power design and smart firmware allow the complete Wireless and Sensor package run
on 2 x AA battery up to 10 years. It can support all regions of Sigfox network in over the World, RC1, RC2, RC3, RC4,
RC5, RC6, RC7.
SENSOR SPECIFICATION
1. Functions Change Log
2. Introduction
3. Specification

Sensor technology
Hermetically Sealed, Piezo-Ceramic Crystal, Shear Mode
Acceleration Range and Shock Limit (g)
±25 or 50, 10,000
Frequency Response and Resonant Frequency (Hz)
2-10000, >30000
Non-Linearity, Transverse Sensitivity
±2%FSO, < 5%
Temperature measuring and operating range, accuracy & resolution (°C)
-40.. +85, +/- 0.5, 0.125
Sensor Material, mousing protection and mounting
304SUS, IP67, M6 Screw
*Notes
All above values are typical at +24°C, 80Hz
Connector
M12-M 4-pin, Coding A
Extended cable (optional)
2m cable with M12-F and M12-M at two ends
SIGFOX SPECIFICATION
Sigfox zones
select RC2-RC3-RC4-RC5 or RC1-RC6-RC7
Antenna
Internal Antenna 2 dbi
Configuration
via offline USB cable (PC software is supplied at free)
Battery
02 x AA Type 1.5VDC, working time up to 10 years (depends on
configuration)
RF Module complies to
CE, FCC, ARIB
Working temperature
-40oC..+60oC (using Energizer Lithium Ultimate AA battery)
Dimensions
H106xW73xD42
Net-weight
190 grams
Housing
Aluminum+Polycarbonate, IP67
Mounting
Wall mount bracket
4. Dimensions

After that, Sigfox node will send the first message to Base station.
Then during the operation, there are 03 cases of sending data to base station:
1. When the sensor sampling time interval is reached, the Sigfox node will read the data from Input or sensor
and performing the calculation. After that it will check calculated value with alarm thresholds. If the calculated
was out off the threshold values (Lo or Hi), called alarm, and the number of times of alarm did not pass the limit
of number of alarms, then it will send data to Base station immediately;
2. When the sending time interval is reached, it will send data to Base station immediately, regardless of value;
3. By using the magnet key, the Sigfox node can be triggered to send data to base station immediately. There
will be a beep sound from the buzzer meaning the data has been sent.
5. Operation Principle
Upon power on, the Sigfox node has 60 seconds to wait for off-line configuration (via cable with ModbusRTU
protocol).
NOTE:
Once sending the data to base station by this alarm event, the timer of sending time interval will be reset;

Whenever the data is sent to base station, the LED will lit with color codes as below:
RC1: RED colour
RC2: GREEN colour
RC4: BLUE colour
NOTE:
Once sending the data to base station by the magnet key, the timer of sending time interval will be reset;
The shortest time interval between the two manual triggers is 15s. if shorter than 15s, there will be no data
sending and you will not hear the beep sound.
5.1 LED meaning
5.2 Button Function

There are 3 configuration menus: tx_repeat, downlink_flag, radio configuration.
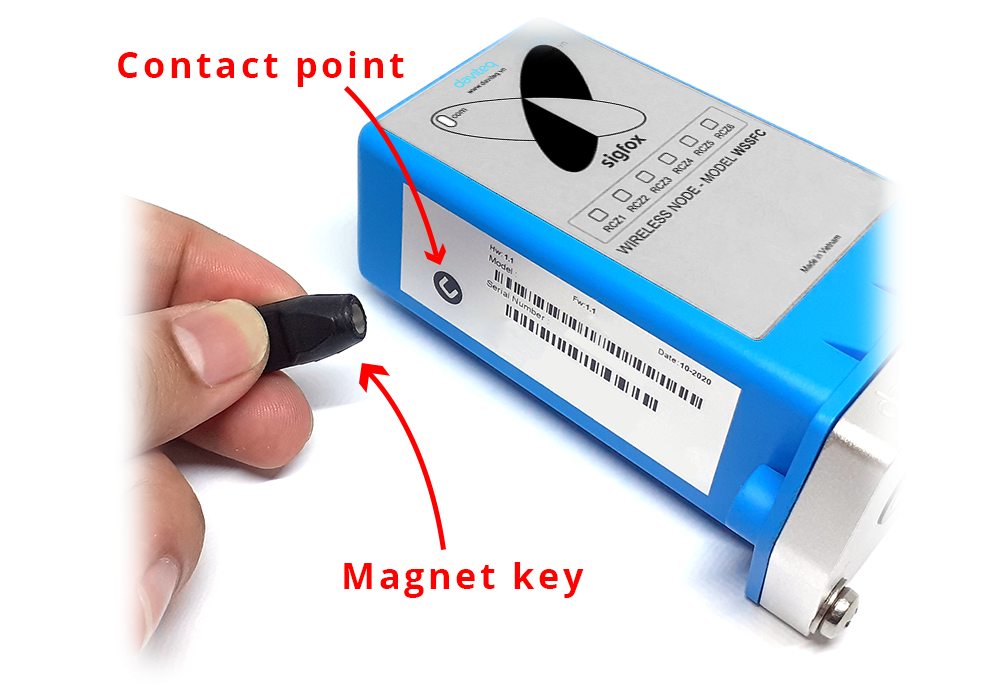
We use the button to enter the menus as follows:
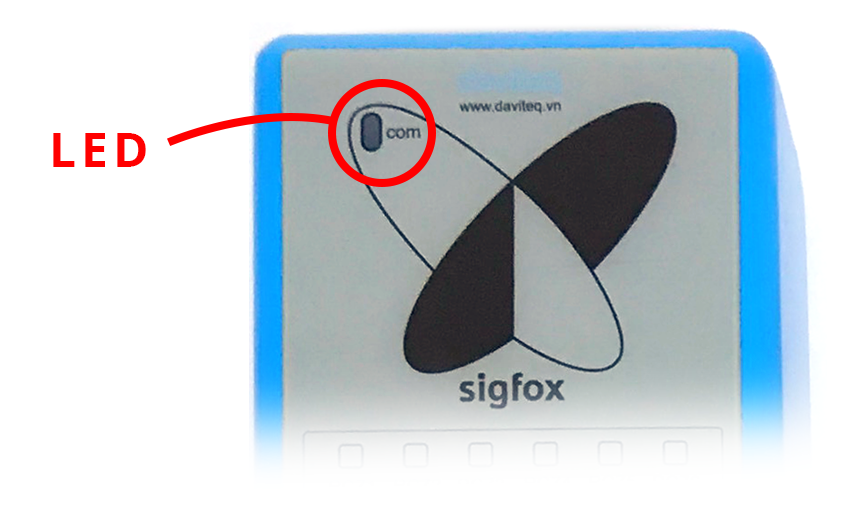
Press and hold the button 2s -> When the Red LED is on, it means entering the tx_repeat configuration menu. Then
release to configure it.
Press to configure. After pressing if the Red LED flashes once, tx_repeat = 0 (send 1 time). After pressing if the Red
LED blinks twice, it is tx_repeat = 1 (send 3 times).
Press and hold the button 5s -> When the Green LED is on, it means entering the downlink_flag configuration
menu. Then release to configure it.
Press to configure. After pressing if the Green LED flashes once, it is downlink_flag = 0 (downlink is not allowed).
After pressing if the Red LED blinks twice, it is downlink_flag = 1 (downlink is allowed).
Press and hold the button 10s -> Blue LED is on, it means entering the Radio Configuration menu. Then release to
configure it.
Press to configure. After pressing if the Blue LED blinks once, it is Radio Configuration = 1. After pressing if the
Blue LED flashes twice, it is Radio Configuration = 2. After pressing if the Blue LED flashes 4 times, it is Radio
Configuration = 4.
There are 3 ways to exit the menu:
Press and hold for 3s, the LED turns off to exit the menu;
Wait 30 seconds, then exit the menu;
Take out the battery, it all starts over (outside the menu)).
The RF transmit power will be automatically set as the max value as allowed by the Zone.
Sigfox Radio Configuration (RC) defines the radio parameters in which the device shall operate: Sigfox operating
frequencies, output power, spectrum access mechanism, throughput, coexistence with other radio technologies, etc.
Each radio configuration includes 4 uplink classes: 0u, 1u, 2u, and 3u.
the push button can only be used for the first 60 seconds after powering up.
5.2.1 Menu configuration
5.2.1.1 tx_repeat
5.2.1.1 downlink_flag
5.2.1.1 radio configuration
5.2.2 Exit the menu:
5.3 RC technical details

The Sigfox network globally works within the ranges from 862 to 928 MHz. But not all RCs require such a wide range of
operation.
RC1
RC2
RC4
Uplink center frequency (MHz)
868.130
902.200
920.800
Downlink center frequency (MHz)
869.525
905.200
922.300
Uplink data rate (bit/s)
100
600
600
Downlink data rate (bit/s)
600
600
600
Sigfox recommended EIRP (dBm)
16
24
24
Specifics
Duty cycle
1% *
Frequency
hopping **
Frequency
hopping **
* Duty cycle is 1% of the time per hour (36 seconds). For an 8 to 12 bytes payload, this means 6 messages per hour,
140 per day.
** Frequency hopping: The device broadcasts each message 3 times on 3 different frequencies. Maximum On time
400 ms per channel. No new emission before 20 s.
*** Listen Before Talk: Devices must verify that the Sigfox-operated 200 kHz channel is free of any signal stronger
than −80 dBm before transmitting.
Sigfox’s high limit EIRP recommendation is included in each column although regulations sometimes allow for more
radiated power than the Sigfox recommendation.
Sigfox’s recommendation is set to comply with the Sigfox technological approach of:
Low current consumption
Balanced link budget between uplink and downlink communication
Step 1: Log in to the sigfox backend website
Step 2: Click on Device
5.4 Add a device to the Backend Sigfox

When the time interval is reached, for example 30 minutes, the Sigfox node will wake up and switch ON the power
supply to supply the energy to vibration sensor module to start the measurement. Depends on the type and
characteristic of external sensor, the sensor will take a certain time to finish the measurement.
With vibration sensor, here are the 8 measurement values:
Acceleration Peak (m/s2)
Acceleration RMS (m/s2)
Velocity Peak (mm/s)
Velocity RMS (mm/s)
Displacement Peak-Peak (um)
Displacement RMS (um)
Base vibration frequency (Hz)
Temperature (oC)
Because the Payload of Sigfox sensor is limited by 12 bytes, we use the first 02 bytes for Sensor information and
status, the rest 10 bytes will store measurement value. With above 8 measurement values, we have to device it into 03
datagrams. Each datagram will be sent each time.
Values to be sent in Datagram 1:
Velocity RMS (mm/s)
Acceleration Peak (mm/s)
Frequency (Hz)
Values to be sent in Datagram 2:
Velocity Peak (mm/s)
Acceleration RMS (m/s2)
Temperature (oC) (Real Temperature value = Temperature value / 10)
Values to be sent in Datagram 3:
5.5 Measurement principle of Sigfox Vibration
Sensor
Este manual sirve para los siguientes modelos
1
Tabla de contenidos
Otros manuales de Accesorios de Sigfox


