Sentinel ELIMINATOR Manual de usuario

1
Eliminator
EN Central Heating Filter Installation Manual 3
FR Filtre pour chauffage central Manuel d’installation 13
IT Filtro per impianti di riscaldamento Manuale d’installazione 23
ES Manual de instalación de filtro para calefacción central 33
V2-CM-03-17
Eliminator Instructions V1-CM (14-03-17) (inc Spanish).indd 1 14/03/2017 14:20

Eliminator V2-CM- 03-172
IMPORTANT
Please retain these instructions for reference during servicing
IMPORTANT
Conservez ce manuel d’utilisation comme référence lors des
opérations de maintenance
IMPORTANTE!
Si prega di conservare queste istruzioni come riferimento durante
le operazioni di manutenzione
IMPORTANTE
Por favor conserve estas instrucciones para referencia durante
trabajos de servicio
Eliminator Instructions V1-CM (14-03-17) (inc Spanish).indd 2 14/03/2017 14:20

Eliminator V2-CM- 03-17
EN
3
SCHEMATIC DIAGRAM
For product demonstration please view on You Tube or via www.sentinelprotects.com/uk/eliminator
Directional T piece
Flow arrow
Dual seals
Bleed valve
Isolation valve
Isolation valve
Collar
Collection bin
Cyclone
cartridge
Magnet tray
Anti tamper drain valve
Washer
Fig. 1
Eliminator Instructions V1-CM (14-03-17) (inc Spanish).indd 3 14/03/2017 14:20

Eliminator V2-CM- 03-17
EN
4
SAFETY CONSIDERATIONS
Caution: Strong magnetic field.
The Sentinel Eliminator® is a vessel under pressure containing a hot fluid. It is
recommended that it is installed by a suitably qualified person.
Always ensure that the system has cooled before attempting installation. Check
very carefully for any leaks after fitting the filter and pressurising the system.
The T-piece collar must be hand tightened only; do not attempt to use a tool as
this could damage the seal.
Care should be taken when flushing a hot system.
SYSTEM DESIGN
The Sentinel Eliminator is suitable for use on all wet central heating systems.
The cyclones are not optimsed for flow rates above 25 litres per minute.
The Sentinel Eliminator is rigorously tested to confirm it meets the temperature
and pressure requirements of a typical domestic system.
The filter should be preferably mounted on the boiler return pipe only.
The Sentinel Eliminator is compatible with the full Sentinel chemical range.
For full system protection it is recommended that the system be cleaned prior
to fitting the filter and Sentinel X100 Inhibitor be added to prevent corrosion
and the formation of limescale.
MOUNTING CONSIDERATIONS
Before fitting the filter, ensure that adequate clearance is available, including
the vertical space required to drain the filter during servicing.
The filter can be fitted to either horizontal or vertical pipe-work by rotating the
T-piece. Regardless of the pipe-work orientation, the filter body must be orientated
vertically. IMPORTANT: Ensure that T-piece is aligned to the direction of flow.
Eliminator Instructions V1-CM (14-03-17) (inc Spanish).indd 4 14/03/2017 14:20
Eliminator V2-CM- 03-17
EN
5
INSTALLATION PROCEDURE
Step 1:
Ensure heating system is turned off and drained.
Step 2:
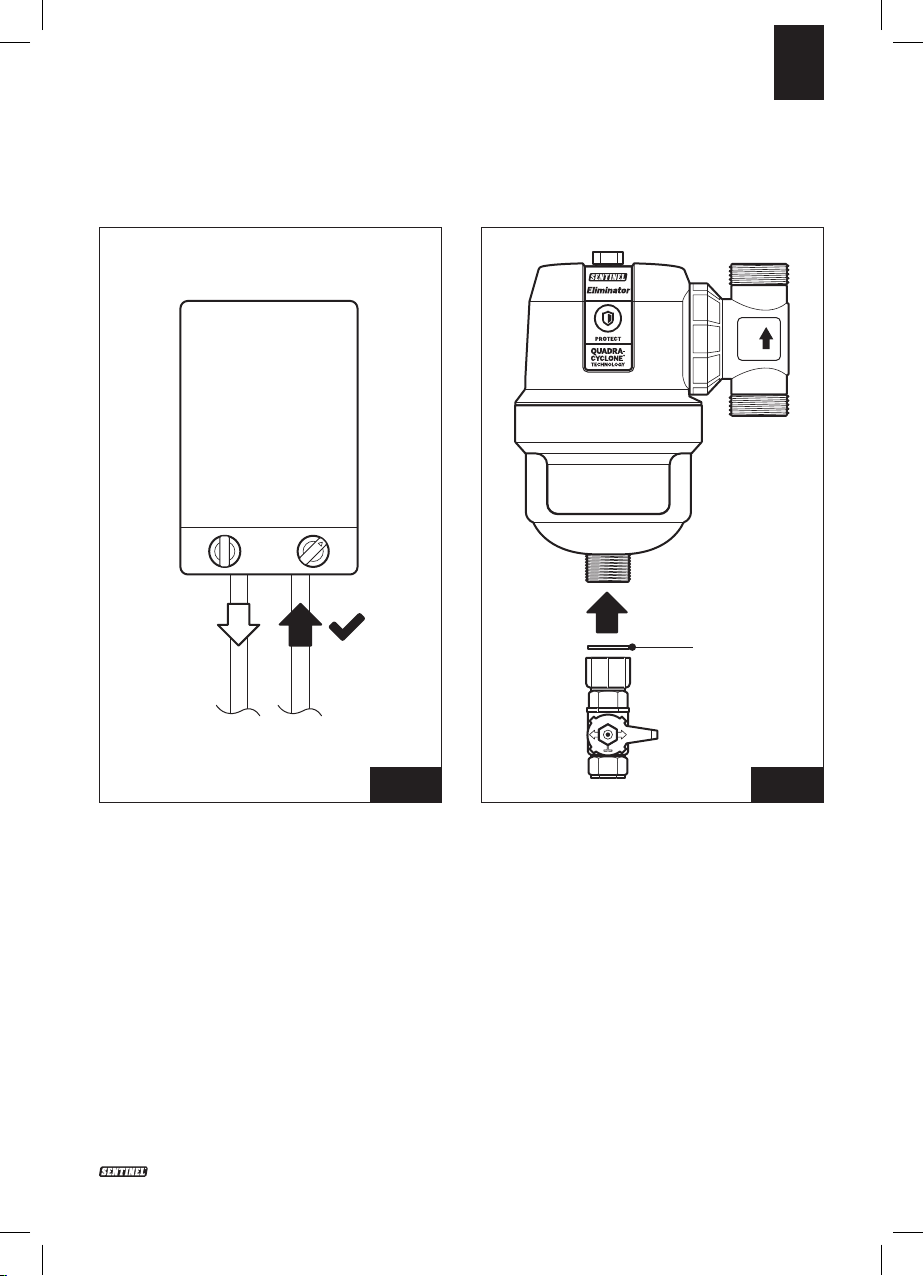
Position filter on return pipe close to boiler, as per Figure 2.
Step 3:
Attach drain valve to filter in closed position, as per Figure 3.
Boiler
Fig. 2
Washer
Fig. 3
Eliminator Instructions V1-CM (14-03-17) (inc Spanish).indd 5 14/03/2017 14:20

Eliminator V2-CM- 03-17
EN
6
Step 4:
Remove 195mm from pipe in chosen location and attach isolation valves to cut
ends as per Figure 4. Note that the pipe can be horizontal or vertical, but the final
filter position must always be vertical.
Step 5:
Attach the filter to pipe work. Ensure that the supplied washers are in place,
sealing the valves to the plastic T-piece. Ensure filter is mounted vertically by
loosening the collar and rotating the filter body as required. Re-tighten the collar
by hand, checking the flow direction on the T-piece, as per Figure 5.
Step 6:
Set Isolation valves to open, as per Figure 6.
Fig. 4 Fig. 5
Eliminator Instructions V1-CM (14-03-17) (inc Spanish).indd 6 14/03/2017 14:20

Eliminator V2-CM- 03-17
EN
7
Step 7:
Refill system and check carefully for
any leaks.
Step 8:
After filling the system with water,
open bleed valve using a suitable
screwdriver to release air trapped in
filter. Once water starts to escape,
close valve. After the system has
been running, repeat if nessesary to
release any trapped air. Check again
for leaks.
Open
Fig. 6
Eliminator Instructions V1-CM (14-03-17) (inc Spanish).indd 7 14/03/2017 14:20
Eliminator V2-CM- 03-17
EN
8
DRAIN VALVE OPERATION
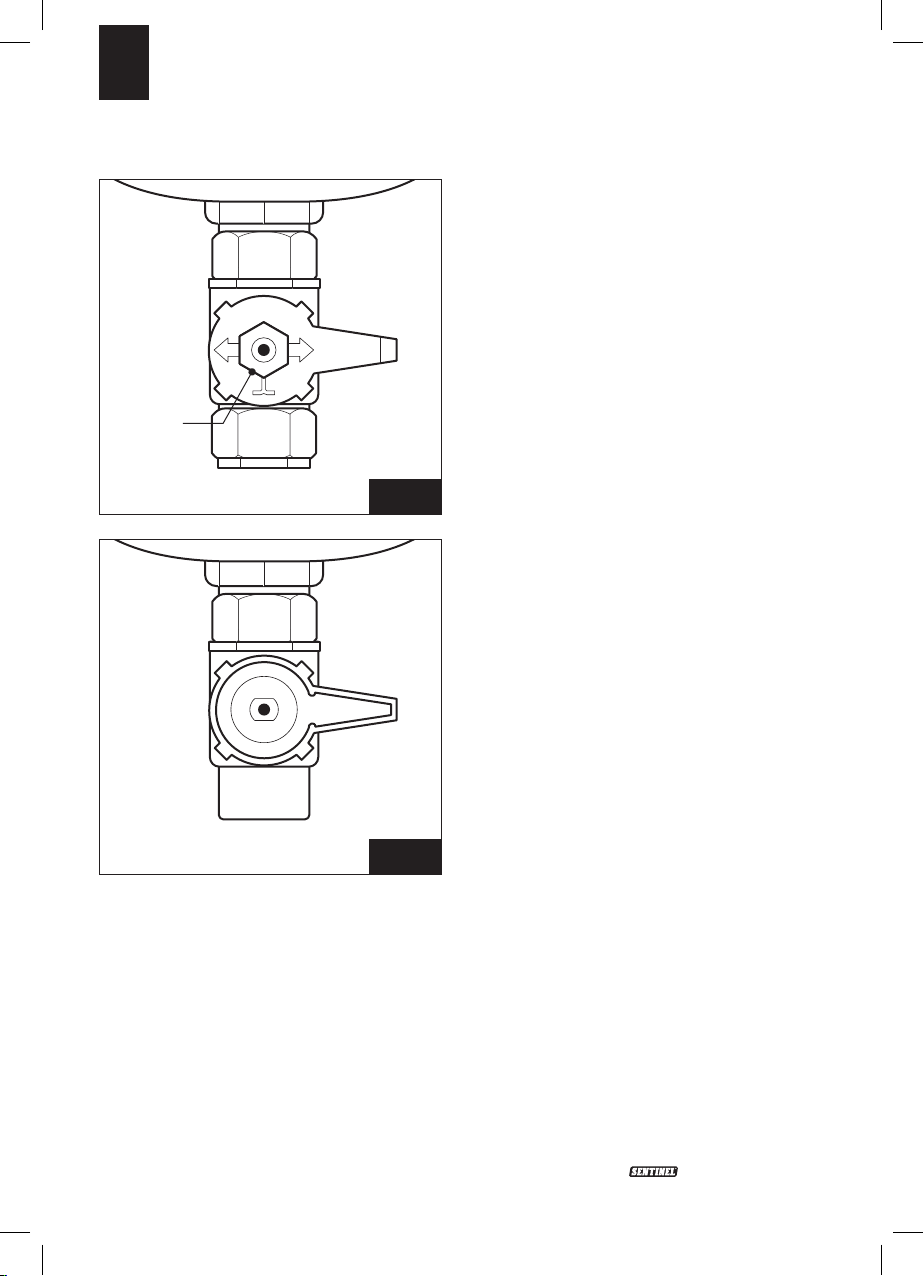
To Open:
Remove end cap from bottom of
valve. Remove retaining nut, take off
handle and flip over. Replace handle
and turn to open valve, as per Figures
7 & 8.
To Close:
Turn valve to closed position, take off
handle, flip over and replace retaining
nut. Replace end cap.
BLEED VALVE OPERATION
After filling the system with water,
open bleed valve using a suitable
screwdriver to release air trapped in
filter. Once water starts to escape,
close valve. After the system has
been running for several hours,
repeat to release any trapped air.
Nut
Fig. 7
Nut
Fig. 8
Eliminator Instructions V1-CM (14-03-17) (inc Spanish).indd 8 14/03/2017 14:20

9Eliminator V2- CM-0 3-17
EN
SERVICING
Sentinel recommend that cleaning is carried out during the annual system
service.
Step 1:
Ensure heating system is turned off and allowed to cool prior to commencing
clean.
Step 2:
Squeeze to disengage magnetic tray, as per Figure 9.
Step 3:
Place suitable container under drain valve, as per Figure 10. Open drain valve
(see page 8). Close drain valve and re-engage magnetic tray. There is also an
option to clean by opening the bin.
Optional Removal of Bin
Close both isolation valves, allow drain water to stop flowing. Unscrew bin
to carry out thorough clean, as per Figure 11. After cleaning, replace bin and
tighten by hand. Close drain valve, re-engage magnetic tray, and open both
isolation valves to fill filter and release any trapped air using the bleed valve
(see page 8).
It is recommended after a filter flush to carry out an inhibitor test such as
Sentinel X100 Quick Test and top up with Sentinel X100 Inhibitor if required.
Eliminator Instructions V1-CM (14-03-17) (inc Spanish).indd 9 14/03/2017 14:20

Eliminator V2-CM- 03-17
EN
10
Fig. 9
Fig. 10
Closed
Fig. 11
Eliminator Instructions V1-CM (14-03-17) (inc Spanish).indd 10 14/03/2017 14:20
Otros manuales para ELIMINATOR
1
Tabla de contenidos
Idiomas:
Otros manuales de Sistema de calefacción de Sentinel


