Senix BLV4QL-M Manual de usuario

8458-A074003001-001
Operator’s manual
Model:BLV4QL-M
For customer support, please call 1-800-261-3981 or send email to:
SAVE THIS MANUAL FOR FUTURE REFERENCE.

2 WWW.SENIXTOOLS.COM
SAFETY & INTERNATIONAL SYMBOLS
This operator’s manual describes safety and international symbols and pictographs that may appear on this
product. Read the operator’s manual for complete safety, assembly, operating and maintenance and repair
information.
SAFETY ALERT SYMBOL
Indicates danger, warning or caution.
May be used in conjunction with other
symbols or pictographs.
ON/OFF STOP CONTROL
ON / START / RUN
ON/OFF STOP CONTROL
OFF or STOP
PRIMER BULB
Push primer bulb, fully and slowly,
10 times.
CHOKE CONTROL
THROWN OBJECTS CAN CAUSE
SEVERE INJURY
WARNING: Small objects
can be propelled at high speed, causing
injury.
KEEP BYSTANDERS AWAY
WARNING: Keep all
bystanders, especially children and pets,
at least 50 feet (15 m) from the operating
area.
HOT SURFACE
WARNING:Do not touch
burned. These parts get extremely hot
from operation. When turned off, they
remain hot for a short time.
BLOWERS - ROTATING IMPELLER
BLADES CAN CAUSE SEVERE
INJURY
WARNING:Stop the unit
and allow the impeller to stop before
changing tubes, cleaning or performing
any maintenance. Keep hands and feet
away from moving parts.
READ OPERATOR’S MANUAL
WARNING: Read the
operator’s manual(s) and follow all
warnings and safety instructions. Failure
to do so can result in serious injury to the
operator and/or bystanders.
WEAR EYE AND HEARING PROTECTION
WARNING:Thrown objects
and loud noise can cause severe eye
injury and hearing loss. Wear eye
protection meeting current ANSI / ISEA
Z87.1 standards and ear protection when
operating this unit. Use a full face shield
when needed.
WEAR HAND PROTECTION
hands.
WEAR FOOT PROTECTION
Wear boots with slip-resistant and
puncture-resistant soles.
UNLEADED FUEL
Always use clean, fresh unleaded fuel.
OIL
Refer to operator’s manual for the proper
type of oil.
DO NOT USE E85 FUEL IN THIS UNIT
WARNING: It has been
proven that fuel containing greater than
engine and void the warranty.
SAFETY

3WWW.SENIXTOOLS.COM
TABLE OF CONTENTS
COMPONENT LOCATION.............................................6
TECHNICAL DATA..........................................................6
OPERATION..................................................................10
MAINTENANCE.............................................................12
TROUBLESHOOTING..................................................13
PARTS...........................................................................14
TABLE OF CONTENTS

4 WWW.SENIXTOOLS.COM
SAFETY
Safety is a combination of common sense, staying
fueling.
2. Always add fuel in a clean, well-ventilated outdoor area
3. Never operate the unit without the fuel cap securely in
place.
4. Avoid creating a source of ignition for spilled fuel. Wipe
up any spilled fuel from the unit immediately, before
starting the unit. Move the unit at least 30 ft. (9.1 m)
from the fueling source and site before starting the
5. Never start or run the unit inside a closed room or
unit only in a well ventilated outdoor area.
to reduce the chance of serious personal injury.
2. Store fuel in a cool, well-ventilated area, safely away
purpose.
5. Add fuel before starting the engine. Never remove
running or when the engine is hot.
fuel from escaping around the cap.
8. Tighten the fuel cap securely after refueling.
9. Wipe spilled fuel from the unit. Move 30 feet away from
refueling site before starting engine.
10.Never attempt to burn off spilled fuel under any
circumstances.
12. If fuel is spilled, do not attempt to start the engine but
move the machine away from the area of spillage and
avoid creating any source of ignition until fuel vapors
have dissipated.
and restrain the unit from moving before transporting in
a vehicle.
storage container in a well-ventilated area.
16.Select bare ground, stop engine, and allow to cool
before refueling.
and use them to instruct others who may use this
tool. If you loan someone this tool, loan them these
instructions also.
Wear safety glasses or goggles that meet current ANSI /
hearing protection when operating this unit. Wear a face
shirt. Do not wear loose clothing, jewelry, short pants,
SAFETY
SAFETY WARNING FOR GAS UNIT
FUELING
WHILE OPERATING
approved for the storage of such materials.
When using the unit, all safety instructions must be
followed. Please read these instructions before operating
the unit in order to ensure the safety of the operator and
use.
WARNING:
WARNING:
WARNING:
1. Read the instructions carefully. Be familiar with the
controls and proper use of the unit.
2. Do not operate this unit when tired, ill or under the
3. Never allow children to operate the unit. Teens must
be trained, accompanied and supervised by an adult.
Never allow adults to operate the unit without proper
instruction.
4. All guards and safety attachments must be installed
properly before operating the unit.
5. Inspect the unit before use. Replace damaged parts.
chipped, or damaged in any way. Do not operate the
unit with loose or damaged parts.
7. Carefully inspect the area before starting the unit.
and other objects that may be thrown or become
entangled with the unit.
them outside a 50-foot (15 m) radius, at a minimum.
Encourage bystanders to wear eye protection. If you
are approached, stop the unit immediately.
or repairs before using the unit.
10. Do not change the engine governor settings or over
speed the engine.
11. This unit is intended for occasional, household use
only.

5WWW.SENIXTOOLS.COM
SAFETY
sandals or go barefoot. Secure hair above shoulder
level.
whenever pulling the starter rope. The operator and
unit must be in a stable position while starting. Refer to
Starting and Stopping.
purpose.
steep slopes or inclines. To avoid serious injury, do not
operate the unit while on a ladder or a roof.
Do not touch or try to stop moving parts.
extremely hot from operation, even after the unit is
turned off.
do the job. Do not run the unit at high speed when not
in use.
used at the intended rate.
engine is off and all moving parts have stopped.
not operate the unit before repairing damage. Do not
operate the unit with loose or damaged parts.
maintenance or repair.
replacement parts and accessories for this unit. Use
of any other parts or accessories could lead to serious
injury to the user, or damage to the unit, and void the
warranty.
leaves, excessive grease or carbon build up.
immediately. Inspect the unit for the cause of the
vibration. Vibration is generally an indicator of trouble.
FOLLOW THESE RULES WHILE OPERATING THE
BLOWER
SPECIFIC RULES FOR THE BLOWER
WARNING:
free from dust, lint, hair and anything else that may
attached.
any other substance that may contain toxic materials.
thrown out the discharge opening, resulting in damage
to the unit or property or causing serious injury to
bystanders or the operator.
people, animals, windows or automobiles. Always direct
blowing debris away from people, animals, windows or
automobiles.
objects, such as trees, walls, fences, etc. When
possible, blow away from such objects, not toward
them.
of the blown air could damage tender plants.
while the unit is running.
moving parts and openings.
SAVE THESE INSTRUCTIONS

6 WWW.SENIXTOOLS.COM
COMPONENT LOCATION
KNOW YOUR BLOWER
COMPONENT LOCATION
1 fuel cap 2 primer bulb
3 4 air cleaner
5 handle 6 throttle trigger
7 ON/OFF switch 8 air tube
9 10
11 lubricating oil cap 12 starter rope grip
13 lower handle 14 vacuum tube
15 bag 16 curved tube
65
8
3
7
4
2
16
14
12 10 1113 9
15
1
TECHNICAL DATA
Model Number BLV4QL-M
Engine Type Air-Cooled, 4-Cycle
Displacement 1.62 cu in. 1.9 cu in. (31 cc)
0.025 in. - 0.30 in. (0.6 - 0.8mm)
Lubrication SAE 30 Oil
Blowing Air Speed
Volume of Air Moved 425 CFM (720 m
3
/h)
Vacuum Air Flow Max 550 CFM (930 m
3
/h)
Mulch Reduction Ratio 10:01
Bag Capacity 1.37 bushel
Blower Weight(no fuel)
Vacuum/Mulcher Weight(no fuel)

7WWW.SENIXTOOLS.COM
Fig. 1
Fig. 2
Fig. 3
ASSEMBLY
INSTALLING/REMOVE THE BLOWER TUBE
ASSEMBLY
Align the slots on the upper end of the upper blower tube
with the bumps on the blower outlet .Insert the upper
blower tube into the blower outlet. While holding the
into place (Fig. 1).
Align the slots on the lower blower tube with the bumps
on the lower end of the upper blower tube. Install the
lower blower tube onto the upper blower tube .
While holding the upper blower tube, twist the lower
tube from the blower outlet (Fig. 3).
While holding the upper blower tube, twist the lower
blower tube. Remove the lower blower tube from the
upper blower tube.
CAUTION:

8 WWW.SENIXTOOLS.COM
Fig. 4
Fig. 5
Fig. 7
Fig. 6
ASSEMBLY
INSTALLING/REMOVE THE VACUUM TUBE
of bag. See complete assembly picture in FIG. 4 for
Velcro strap.
2. Align the slots in the curved tube (C) with the with the
bumps on the blower outlet (D) Slide the tube on and
assembled the tube will curve downward (Fig.5).
wrench ( provided ) vertically into the slot of the air
4. Assemble the lower vacuum tube (E) onto the upper
vacuum tube (F), ,then insert the assembled vacuum
of the machine and turn the E and F parts of the whole
vacuum tube away. (Fig.7)
2. While holding the machine, twist the the curved tube
( Fig.5)
(Fig.4)
A
B
DC
F E

9WWW.SENIXTOOLS.COM
ADDING OIL: INITIAL USE
oil. Failure to use clean oil of the correct type can cause
premature engine wear and failure.
has a four-cycle engine. DO NOT mix oil with gasoline.
oil.
(Fig. 8)
Oil must be added before starting the unit.
Fig. 8
CAUTION:
WARNING:
ASSEMBLY
ASSEMBLY
10 WWW.SENIXTOOLS.COM
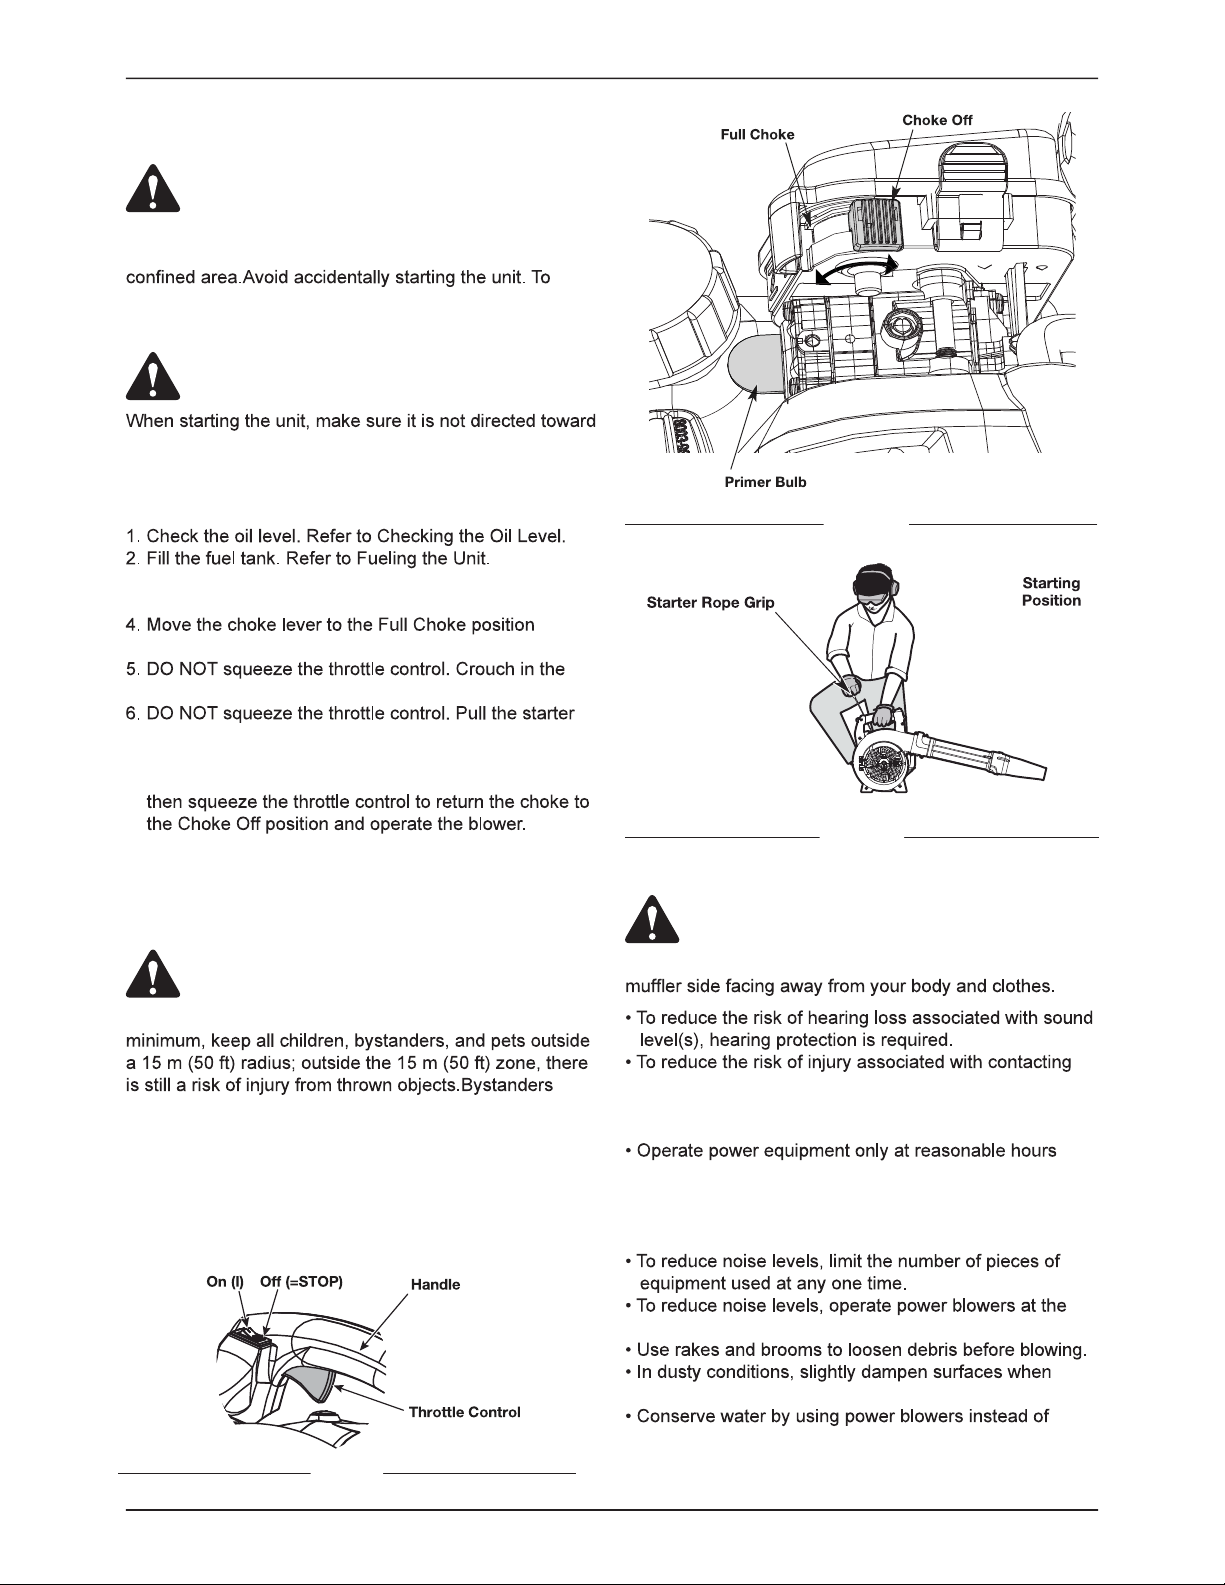
OPERATION
STARTING INSTRUCTIONS
STOPPING INSTRUCTIONS
Operate this unit only in a well-ventilated outdoor area.
Carbon monoxide exhaust fumes can be lethal in a
avoid serious injury, the operator and the unit must be in
a stable position when pulling the starter rope.
Clear the area of children bystanders, and pets. At a
should be encouraged to wear eye protection. If you are
approached, stop the engine.
While vacuuming or blowing debris, hold the unit with the
people, animals, windows, automobiles or loose debris.
Be sure to read the fuel information in the safety rules
before you begin. If you do not understand the safety
rules, do not attempt to fuel your unit.
3. Slowly press and release the primer bulb 10 times
(Fig. 10).
(Fig. 10 ).
starting position (Fig. 11).
rope with a controlled and steady motion 3 to 5 times to
start the engine (Fig. 11).
7. Allow the engine to warm up less than 10 seconds,
Note: There is no need to turn the unit on. The On/Off
switch is in the ON ( I ) position at all times (Fig. 9).
1. Release the throttle control and allow the engine to
idle.
2. Press and hold the On/Off switch in the OFF (STOP)
position until the engine comes to a complete stop.
rotating parts, stop the engine before installing or
removing attachments. Do not operate without guard(s)
in place.
not early in the morning or late at night when people
might be disturbed. Comply with times listed in local
ordinances. Usual recommendations are 9:00 a.m. to
5:00 p.m., Monday through Saturday.
lowest possible throttle speed to do the job.
water is available.
hoses for many lawn and garden applications, including
areas such as gutters, screens, patios, grills, porches,
and gardens.
Fig. 9
Fig. 10
Fig. 11
OPERATING TIPS
STARTING / STOPPING THE BLOWER
CAUTION:
CAUTION:
CAUTION:
CAUTION:
Tabla de contenidos
Idiomas:
Otros manuales de Soplador de Senix


