SecurView DVRSVIEWxV4 Manual de usuario

MODEL: DVRSVIEWxV4
Professional Surveillance System
Digital Video Recorder
‘QUICK INSTALLATION GUIDE’
DVR
-Advanced H.264 Video Compression Technology
-Multiplex Operation
-Real-time recording
-Long Recording Duration
-Intelligent Video Motion Detection Recording
-Remote Network Surveillance & Backup Functions
-Easy to operate with USB Mouse or IR Remote.
-System Auto recovery after power loss (blackout)
N517
www.securview.com.au
V3.2 180214

1

2
DVRSVIEWxV4 Package Contents (Before installation, please ensure you have all the parts listed below).
1 x Digital Video Recorder
● Advanced H.264 Video Compression Technology for High Quality Images
● Easy to Operate
● Can be Connected to a PC Network for Remote Viewing & Backup (Software on Disc)
1 x HDMI Connection Cable
● Connect the DVR to a HDMI ready TV or Monitor
1 x USB Mouse
● To operate the DVR
1 x IR Remote Control with batteries
● To operate the DVR

3
Installation
Before installing this unit, please read through the following points:
•Do not place cords from the AC adapter where they can be pinched or stepped on.
•Leave at least 50mm of space between the DVR and other objects to allow air circulation.
•Do not expose the DVR or Cameras to excessive heat, cold, or moisture.
•Never immerse any component in water, and do not spray cleaners of solvents on the unit. Unplug
units before cleaning. When cleaning, use a damp, lint-free cloth only.
•Do not place heavy objects on cords, or cover cords with rugs or carpet.
•Service should be handled only by qualified technicians.
Rear Panel
1 “Ground” Grounding Point
2 “240V” Connect to 240V power.
3 “POWER” Switch on/off to supply power to the device.
4 “Fan” DVR Cooling
7 “Loop Outputs” Some Models will have Loop outputs
8 “VIDEO INPUT” BNC Analogue Video connection for 8 – 32 cameras.
9 “VIDEO OUTPUT” BNC Analogue Video Output.
10 “Matrix output” Matrix video output
11 “AUDIO OUT” Audio Output.
14 “ALARM INPUT”
Alarm input panel, see User Manual or Included CD for more
information.
15 “VGA” Connect to monitor using VGA cable. (Not Supplied)
16 “HDMI” Connect to Digital Monitor with supplied HDMI cable.
17 “RS232”RS323 connector for optional terminal configuration.
19 “USB PORT” Connect USB Mouse.
20 “LAN PORT” Connect to Network/Internet for remote monitoring.

4
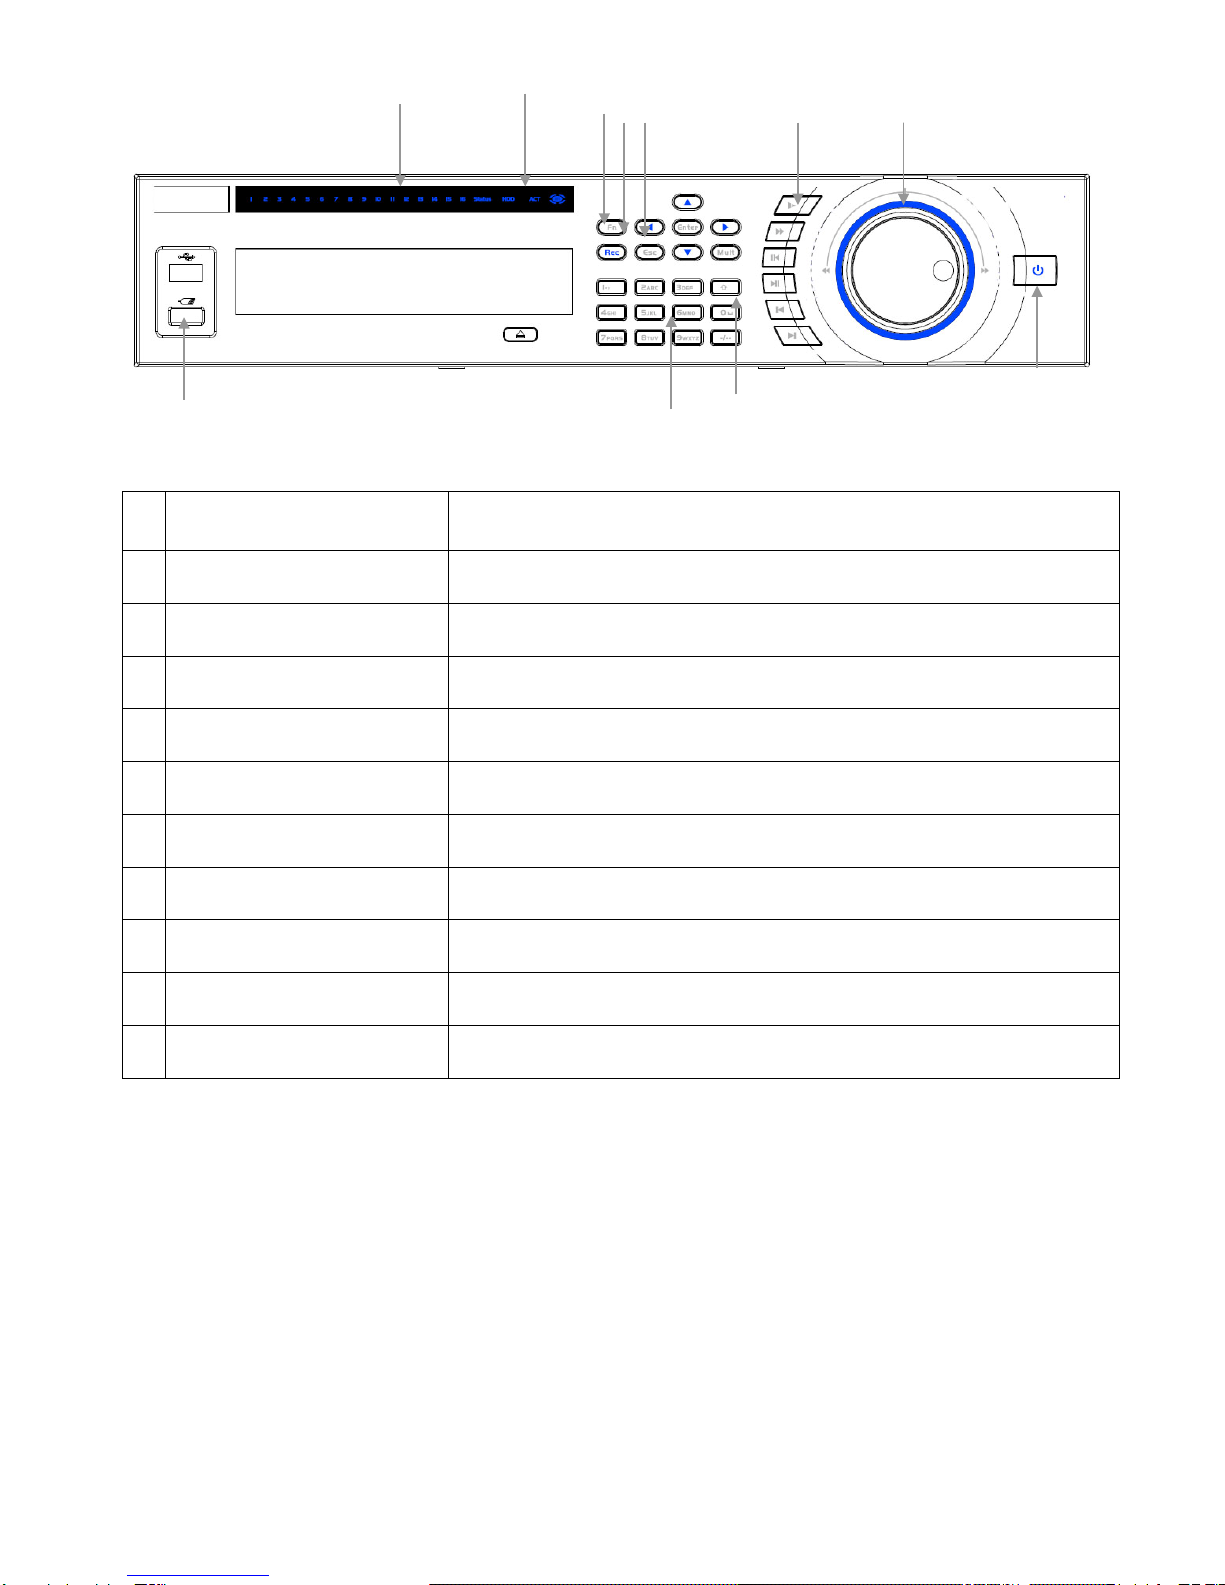
Front Panel
0 “NUMERALS”
Buttons marked with numbers can be used to enter numeric data when
in numeric text entry mode (See “SHIFT”)
1 “PLAYBACK” Playback controls used when viewing recorded footage.
2 “CAMERA LIGHTS” Displays recording cameras. (Unit limited to four maximum)
3 “STATUS LIGHTS” Shows device is powered/reading HDD/connected to network.
4 “REC” Manually start/stop recording.
5 “DIRECTION CONTROLS”
Used to select and enter options in menus.
6 “ESC”Go to previous menu/cancel current operation.
7 “POWER” Hold for three seconds to power on/off device.
8 “FN” Various auxiliary functions.
9 “SHIFT” Switch between text entry modes. (Numerals, English, Capitals, etc.)
10 “USB PORT” Connect USB storage device or USB Mouse.
0
3
2
10
4 1
7
8 5
6
9

5
Main Screen
Once booted, you will be presented with the screen below (camera may only be black if not yet set up).
Each camera view will have one or more symbols from below:
1
Currently Recording
3
Video Loss
2
Motion Detected
4
Camera Lock
System Menu
•Right Clicking will bring up the System Login screen and the onscreen keyboard.
•Once Logged In, right clicking again will bring up a menu.
•Selecting “MAIN MENU” will show the system menu.
•Right click or press the ESC button to return to previous menus, click on the icon to enter menus.
Channel View Menu
Moving the mouse to the top of each channel in the live view screen will show a menu.
From left to right:
•Playback: Show, in live view, the past few minutes of footage.
•Search tag: Turn on search tag.
•Save: Save the currently displayed file to USB device.
•Camera Source:Change the IP Device for this feed.
•Close: Close the channel view menu.
Default:
The default username is admin, the password is also admin.
On the DVR physically, you may also use username of 888888, and the password 888888.
(Users can alter the password later. Please refer to the Advanced set up guide CD)

6
Set the Time and Date
When using your DVR for the first time, you will have to set the SYSTEM TIME.
•Right clicking anywhere on the screen will bring up the password menu.
Use the mouse to enter the DVR admin password with the on-screen keypad.
•Then Right click to open the menu and select “MAIN MENU”.
•Select “SETTING”
•Select “GENERAL”
•Set System Time, Date Format and DST (Daylight Saving Time) for your region.
•Click Save before clicking OK
Important:
If you change the date or time on your DVR after the recording function is activated, the recorded data may be
deleted. After setting the date and time, it’s recommended to clear all HDD data, and start recording again.

7
To Set Up Recording Rates
Right click to open the menu and select MAIN MENU, then select SETTINGS followed by ENCODE.
Here you may can set individual encoding options for Regular, Motion Detect and Alarm Recording.
While any of the cameras may be set higher, please be aware that it will reduce the total recording time
to less than 2 weeks. We recommend:
CIF cameras: Set to H.264 with a 352x288 resolution, 10fps, Bit Rate CBR of 320kbps.
D1 cameras: Set to H.264 with a 704x576 resolution, 10fps, Bit Rate CBR of 768kbps.
Important: The EXTRA STREAM MUST be enabled if you wish to remote access the DVR system. We
recommend that it is always set to CIF resolution, 10fps, Bit Rate CBR of 320kbps
To Begin Recording
Once you have successfully set up the cameras, exit the Menu by right clicking or pressing the CLOSE
button. By default, the DVR will begin recording when it is properly connected to the cameras and has an
installed HDD. If it is recording, the recording icon “ ”will be displayed on screen.
Automatic Overwriting:
When the system is in full, the oldest recorded data will be overwritten automatically. This DVR
System is set to Overwrite by factory default but can be changed in the “GENERAL” Menu.
Record Times:
The DVRSVIEWxV4 system is capable of storing up to 2 week of recorded footage based on 2Tb
of storage and 16 Cameras set to D1 @ 10fps and CBR @ 768kb/s

8
To Set Camera Colour Settings
1. Right click to open the menu and select COLOR SETTINGS
2. Here you can adjust the IP Cameras Colour, Gain, BLC, WDR and Day/Night.
Please ensure that Day/Night is always set to Auto. Failing to do so could mean the
Cameras are unable to see at night, or become stuck in black/white during the day.

9
Motion Detection
Should you wish to use Motion detect recording, it can be set per camera, per time period and
to detect in certain portions of the screen.
•Right click to open the menu and select “MAIN MENU”.
•Select “SETTING”
•Select “DETECT”
•Select ‘Motion Detect’ from Event Type
•Select channel from Channel drop down
•Check the Enable box
•Ensure Record Channel is checked, and a Region has been selected.
•Click Save.
More Settings:
Latch
Time to wait after motion is detected, before checking for motion again.
Region
Select
Select region of feed within which motion detection will occur.
Click and drag with the mouse to arm/disarm areas of the feed.
Motion detected in red areas will cause recording, motion will not be detected in
grey areas. Press “ENTER” to save.
Sensitivity
Select from 1 to 6 the sensitivity of the recording, 6 being the most sensitive to
movement.
•Right click to open the menu and select “MAIN MENU”.
•Select “SETTING”
•Select “SCHEDULE”
•Select a channel.
•Choose a period and set the time options to the period you wish to motion record, bearing in
mind system uses 24 hour time.
•Check MD for this period.
•Click OK to save.
Tabla de contenidos
Otros manuales de DVR de SecurView