RND 355-00006 Manual de usuario

1
RND 355-00006
USER MANUAL – BEDIENUNGSANLEITUNG – ANVÄNDARMANUAL
RND 355-00006

2
RND 355-00006

3
RND 355-00006
ENGLISH
Endoscope Instruction
Manual

4
RND 355-00006
Please read this instruction manual carefully before using the product
MAIN PART LIST
Keypad
1. 2.7”color LCD monitor
2. Power on/off bu on
3. Brightness up bu on (rotation)
4. Camera bu on
5. Brightness down bu on (zoom)
6. Menu/OK
7. Ba ery compartment (4 x 1.5V AA)
8. Flexible tube
9. Camera and LEDS
10. Mini USB port(to PC)
11. SD card slot
ACCESSORIES PART LIST
12. Mirror
13. Hook
14. Magnet
15. USB cable(to PC)
TABLE OF CONTENT
1. Safety instructions
2. In The Package
3. Information About The Product
4. Before First Use
5. Installation
6. Operation
7. Disposal
8. CE Declaration of Conformity
9. Product Specifi cations

5
RND 355-00006
ENGLISH
Safety Instructions
Before fi rst use please familiarise yourself with the proper usage of the
device. Keep these operating instructions for future reference. These
operating instructions contain important details for handling the device.
Please pass it on along with the unit if it is handed over to a third party!
Please read the safety instructions most carefully!
These instructions will make it easier for you to handle the device
appropriately and help prevent mishaps and possible damage to
the device.
Please note the following safety advice to avoid malfunctions,
damage or physical injury:
• Prevent object and liquid entry. Never spill liquid of any kind on the video
display and the main body of the unit.
• The unit is not shock-resistant. Do not use it as a hammer or drop it.
• Do not immerse the camera and monitor in water. Store it in a dry place.
Such measures reduce the risk of electric shock and damage.
The image head and the cable are water resistant when the unit is fully
assembled, but the monitor and camera are not.
• Do not use the camera if condensation forms inside the lens. Let the
water evaporate before using again.
Cautions
• The apparatus should not be exposed to dripping or splashing and that no
objects fi lled with liquids, such as vases, shall be placed on the apparatus.
• Turn off the unit if not in use.
• A ention should be drawn to the environment aspects of the ba ery
disposal.
• Remove the ba eries when cleaning the unit.
• Remove the ba eries before storing the unit for a long time.
• When necessary, REPLACE ALL FOUR BATTERIES in the unit with new ones.
• Use only the size and type of ba ery specifi ed.
• Be sure to install the ba ery with the correct polarity as indicated in the
ba ery compartment.

6
RND 355-00006
• Properly dispose of the ba ery. Exposure to high temperatures which can
cause the ba eries to explode, so do not dispose of in a fi re. Please tape
over the terminals to prevent direct disposal. Please follow all
applicable regulations.
IN THE PACKAGE
Qty
1
1
1
1
1
1
Description
Endoscope Main Unit
Instruction Manual
USB Cables
Mirror
Hook
Magnet
Check all parts for transport damage. In case of damage contact your dealer
immediately. Check the package for completeness. Inform your dealer about
missing parts immediately.

7
RND 355-00006
ENGLISH
Information About The Product
The product is designed as a remote inspection device. It can be used to look
into tight spots and beam back real-time video to its LCD monitor. Typical
applications might include HVAC, termite and other insect or building
inspections, cable routing, automotive/boat/aircra inspections etc.
Before First Use
Installation
Remove all packaging materials and check the scope of delivery for
completeness (IN THE PACKAGE).
Please install the ba eries before using the product, choose the accessory
according to the actual situation. Steps of installation as following:
To Install Ba eries
1. Using a screwdriver, remove screw and cover
2. Remove ba ery compartment and insert 4 new AA (1.5 V) ba eries into
the proper slots in the ba ery compartment. Proper ba ery orientation is
indicated on the ba ery compartment.
3. Reinstall ba ery compartment, ba ery cover and screw.
8
RND 355-00006
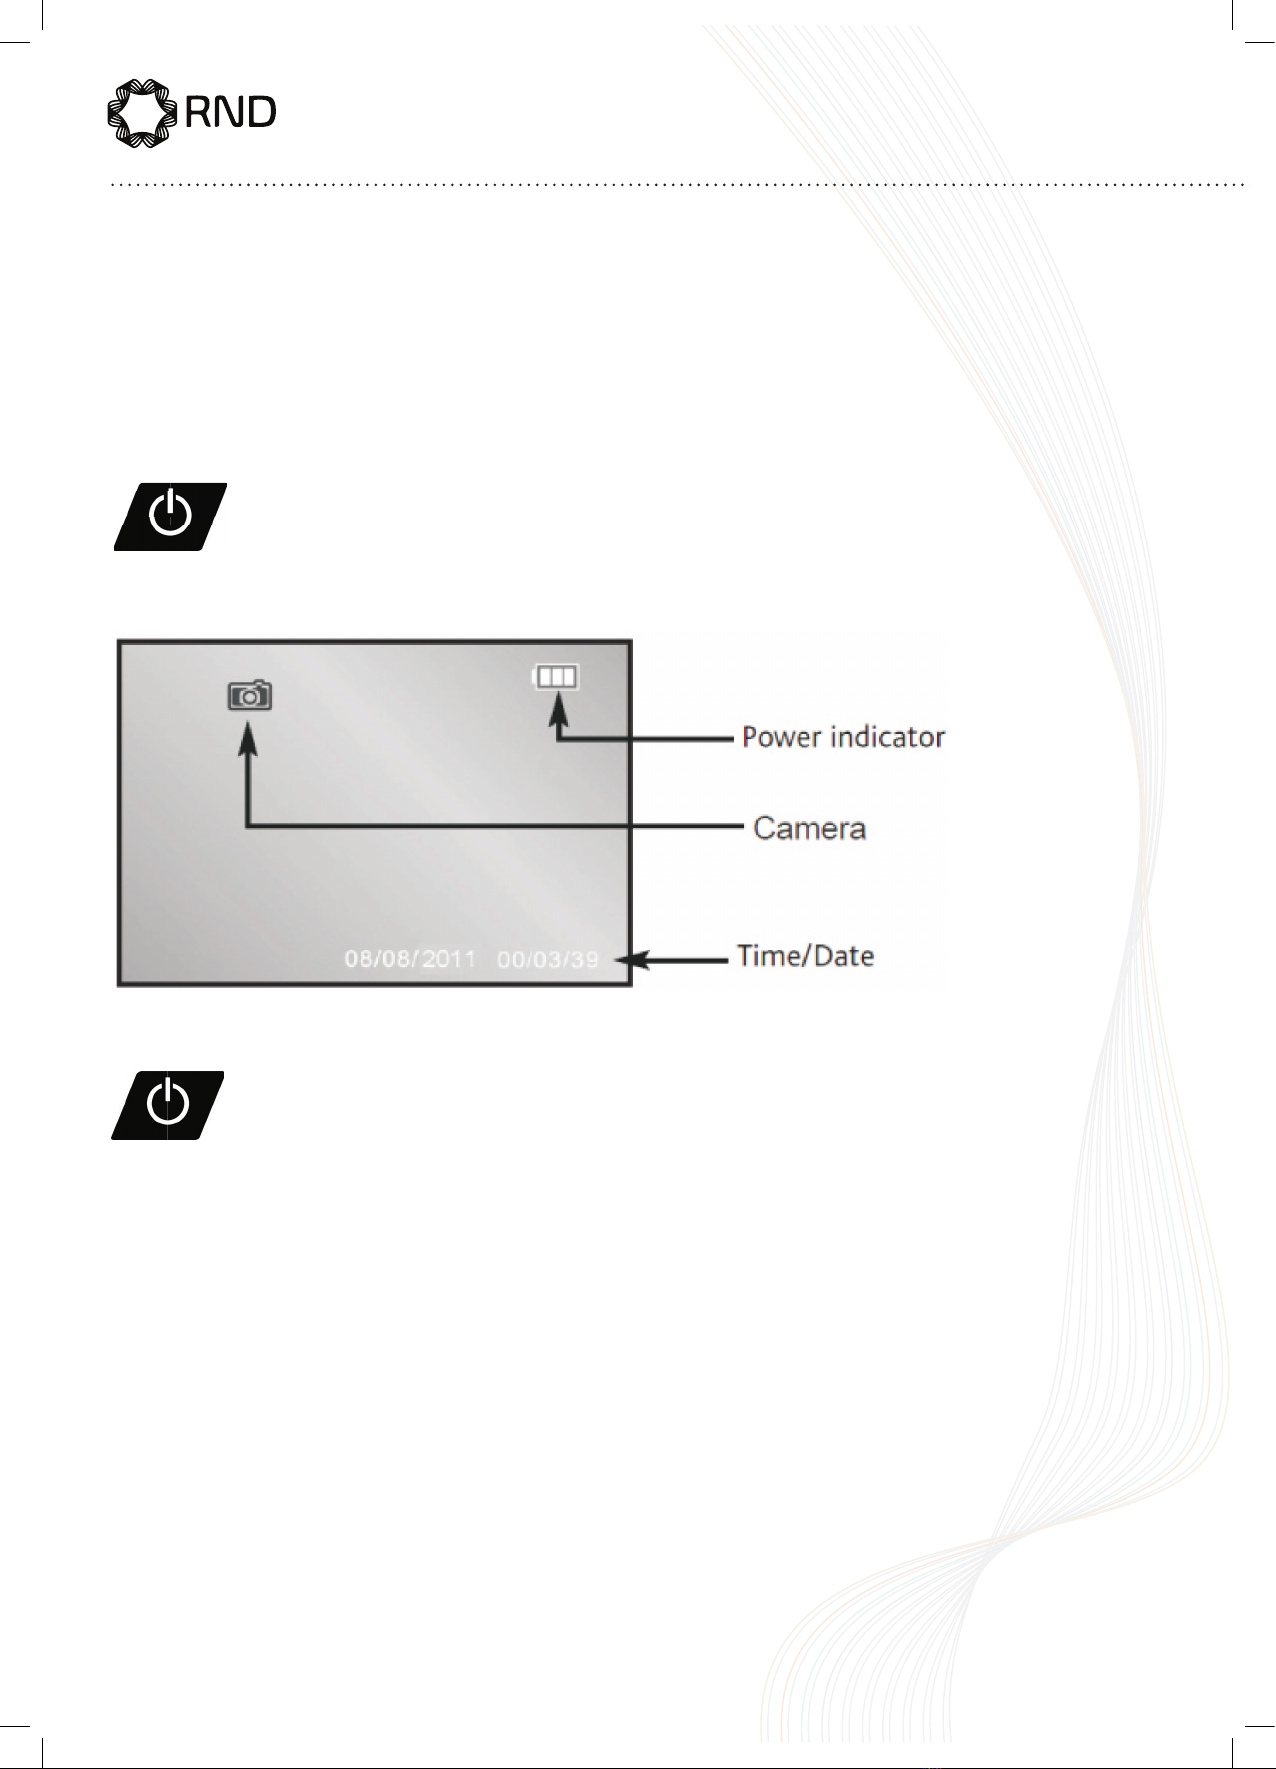
OPERATION
Switching On/Off
BEFORE USING THE UNIT FOR THE FIRST TIME:
• Ensure the time and date have been set
• Ensure the SD card is inserted
Press the ON/OFF bu on (2) to switch the device on.
The camera image will appear on the screen.
Press the ON/OFF bu on (2) to switch the device on.
The camera image will appear on the screen.
To switch the device off press
The ON/OFF bu on

9
RND 355-00006
ENGLISH
Camera Illumination
The inspection camera is equipped with a dimmable LED light in the camera
head, which can be adjusted using the navigation/brightness keys (3 or 5).
Press to increase the brightness
press to reduce the brightness
Rotating the display
Press the bu on for 1.5 seconds to rotate the display by 180˚.
Zoom function
Press the bu on for 1.5 seconds to be increased in size from x1 to x4.
Menu Options
The menu options are accessed by pressing the MENU/OK bu on (6)
To move up/down the menu press keys
press to reduce the brightness
Press to increase the brightness
Press the bu on for 1.5 seconds to rotate the display by 180˚.
Press the bu on for 1.5 seconds to be increased in size from x1 to x4.
To move up/down the menu press keys
To move up/down the menu press keys

10
RND 355-00006
To select a menu item press the camera bu on (4)
Select EXIT to return to the previous menu or exit the menu options
Se ings
Tabla de contenidos
Idiomas:


