
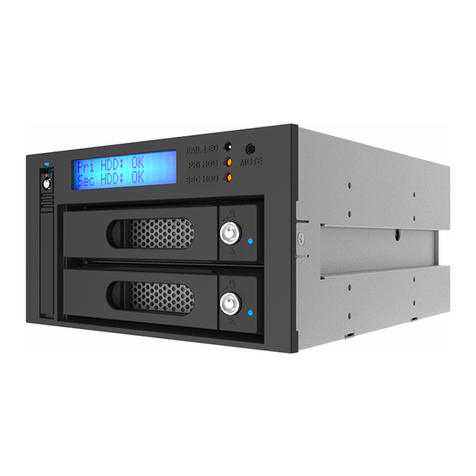
Raidon InTANK iR2624-S3 Series Manual de usuario

iR2624-S3
User Manual
InTANK

iR2624-S3 User Manual
V1.0
» InTANK iR2624-S3 User Manual................................1
1. Environmental Requirements..................................................1
2. Product Appearance and Packaging Content......................1
3. Hardware Requirements and Precautions ............................3
4. Hardware Installation................................................................4
5. How to set the RAID Mode......................................................5
6. Computer Set Up......................................................................6
7. Hard Disk status on LCD screen ............................................7
8. Data Rebuilding Operation ......................................................8
9. GUI Monitoring Software and Firmware Update..................9
10. Frequently Asked Questions.................................................12
» InTANK iR2624-S3 產品使用說明.............................13
1. 產品外觀及包裝內容.................................................................13
2. 環境需求 ...................................................................................15
3. 硬體需求與注意事項 ...............................................................15
4. 硬體安裝.....................................................................................16
5. 設定 RAID 層級 .........................................................................17
6. 電腦安裝.....................................................................................18
7. LCD 訊息顯示............................................................................19
8. 資料重建功能說明.....................................................................20
9. GUI 功能說明與韌體更新.........................................................21
10. 常見問題 ..................................................................................24

iR2624-S3 User Manual
1
2. Product Appearance and Packaging Content
Thank you for purchasing RAIDON products. This manual will introduce the IR2624-S3 Series.
Before using your IR2624-S3, please read this manual thoroughly. Although all information contained
in this user manual has been carefully veried before publishing, however, the actual product
specication will be based on the time of delivery from RAIDON. Any updates to the product
specications or relevant information may be found on www.raidon.com.tw. Products are subject
to change without prior notications.
If you have any questions regarding the products of RAIDON, or you would like to know the latest
product information, user manual update, or rmware update, please contact your local supplier or
visit www.raidon.com.tw for further information.
Copyright © RAIDON TECHNOLOGY, INC. All rights reserved.
Open the package and you should nd the following:
IR2624-S3
IR2624-S3 x 1 ( with removable drive tray enclosed )
SATA Cable x 1
Quick Setup Guide x 1
Screws and keys
» InTANK iR2624-S3 User Manual
• Please check the product and accessories for any defect or missing parts. If you have any questions,
please contact your product supplier.
• Please visit the ocial website (www.raidon.com.tw) to download drivers and other related resources.
About this Manual
1. Environmental Requirements
Operating Temperature : 0 ~ 40 °C (32 ~ 104 °F)
Storage Temperature : -20 ~ 47 °C (-4 ~ 116 °F)
Line Voltage : 5V DC

iR2624-S3 User Manual
2
14 16
19
18
17
15
FAIL LED
PRI HDD MUTE
SEC HDD
2
4
3
5
6
8
9
11
1
10
11
10
7
12
13
Front View
LED Indicators :
1. 2.5" HDD status indicator LED
2. 2.5" HDD tray key lock
3. HDD tray ejection
4. 2.5" HDD tray handle
5. LCD Display
6. LED of failure Alarm
7. Pri HDD status indicator
8. Sec HDD status indicator
9. Mute Button
10. 3.5" Removable drive tray
11. 3.5" HDD tray key lock
12. Pri HDD tray access light
13. Sec HDD tray access light
14. Cooling fan
15. RAID mode switch & RS232 Port
16. 3.5" SATA Port
17. 15 PIN SATA Port
18. 4Pin Power socket
19. 2.5" SATA Port
Status
Panel light 3.5" HDD tray access light 2.5"
HDD tray
access light
Buzzer
Fail LED Pri HDD
status indicator
Sec HDD
status indicator
Pri HDD tray
access light
Sec HDD tray
access light
Power On — — Orange light
always on Blue and Purple light ashing Blue light
always on — —
Stabdby — — Orange light
always on
Blue light
always on
Blue light
always on — —
HDD
Failure
Red light
always on — — Red light
always on
Blue light
always on On
Access — — Orange light
always on Blue and Purple light ashing Blue light
ashing — —
Rebuilding
(Source) — — Orange light
always on
Blue light
always on
Blue light
always on — —
Rebuilding
(Target) — — — — Red light
ashing
Blue light
always on — —
Fan Failure Red light
always on
Orange light
always on
Blue light
always on
Blue light
always on On
Over Heat
(≥50℃)
Red light
always on
Orange light
always on
Blue light
always on
Blue light
always on On

iR2624-S3 User Manual
3
3. Hardware Requirements and Precautions
1. Computers or servers with SATA I & SATA II & SATA III.
2. Hard drive with SATA I & SATA II & SATA III
3. You are strongly advised to set the storage mode (the default is the Independent mode) before
using the IR2624-S3.
4. The product needs to be restarted after adding or changing the RAID mode, and the update is
guaranteed to be the new RAID mode.
5. The product allows the user to simultaneously utilize two hard drives manufactured by dierent
companies. However, if the user expects better eciency, we strongly recommend the users to
use hard drives manufactured by the same manufacturer.
6. Please make sure that the two hard drives are free from bad blocks or defects prior to installation
in order to avoid system crashes or data loss.
7. The actual storage capacity of IR2624-S3 recognized by the system may differ from the total
capacity stated on the hard drives combined once the drives have been formatted.
8. It is highly recommended for users to back up important data contained within the IR2624-S3
unit on a regular basis or whenever the user feels necessary to a remote or a separate storage
device. Stardom will not be responsible for any lost of data caused during the use of the unit or
the recovery of the data lost.
Note :
Once the drive mode conguration has been completed, re-conguration using the same hard
drives to set the drive mode will result in complete data loss. If you must change the drive
mode, make sure to backup all data prior to the mode change.

iR2624-S3 User Manual
4
Lock Unlock Press
4. Hardware Installation
Please follow the instructions below to complete the hardware installation.
2. For 3.5" HDD/SSD, please secure it by
use six the larger screws included in the
accessory kit. For 2.5" HDD/SSD, please
secure it by use four the smaller screws
included in the accessory kit.
3. For the 2.5" HDD tray, please use the key
included in the accessory kit to unlock
the 2.5" HDD tray key lock and push the
HDD eject button to the right, the 2.5"
HDD tray handle will pop up to remove
the tray.
4. When the HDD/SSD installation has been
completed, insert the hard drive tray into
the system horizontally and secure the
latch into place.
5. Properly connect SATA cable and power
cable from your system to the device.
FAIL LED
PRI HDD MUTE
SEC HDD
Lock Unlock
1. For the 3.5" HDD tray, please use the key
included in the accessory kit to unlock
the HDD tray key lock, and then press
the HDD tray key lock. The removable
drive tray will pop open and extract the
removable drive tray.

iR2624-S3 User Manual
5
COM1
COM2
1
2
※ Note :
1. RS232 Port and RS232 Cable: Provides hardware status monitoring to industrial control system or IPC via RS232.
2. We do not recommend users to disassemble the device without proper instructions and authorization. The manufacture warranty
will not cover the damages caused by unauthorized disassembling.
3. To prevent the device from malfunction, please make sure the device is connected with a direct and dedicated power connection of
a stable power input.
4. RS232 Port: For industrial control system or IPC to monitor the hardware status. More information, please contact your sales
5. How to set the RAID Mode
The default is RAID 1 mode. Please set the RAID mode with the jumper at the rear side. For RAID 0
mode, please select the bottom two pins. For RAID 1, please select the top two pins.
iR2624-S3
1. RAID 1 Mode
1). Place two new hard drives into IR2624-S3 and strongly suggest you to use two identical hard
drives to get the equal capacity. If the capacity is dierent, IR2624-S3 is downward to the small
hard drive capacity.
2). Under RAID 1 mode, two hard drives has the identical information as one to mirror to the other
one, therefore each of the hard drive failed is still able to function normally. When you replace
the failed hard disk to the new one the system automatically rebuilding the data to the newly
place hard disk.
2. RAID 0 Mode
1). Place two new hard drives into IR2624-S3 and strongly suggest you to use two identical hard
drives to get the equal capacity. If the capacity is dierent, IR2624-S3 is downward to the small
hard drive capacity.
2). Under RAID 0 mode, capacity is add up to a one big volume, also with the feature of faster
read/write performance ecient.
RAID 0 mode
(R0)
RAID 1 mode
(R1)

iR2624-S3 User Manual
6
6. Computer Set Up
When the hardware setup for IR2624-S3 is complete, you are now ready to turn the machine on.
After the hardware installation is complete, the IR2624-S3 will be treated as one single hard drive.
Set the hard drive to AUTO in the computer’s BIOS. When the computer is turned on, the system will
retrieve the following information:
1. In IR2624-S3, the installed hard drive can be detected by the Device Manager of Computer
Management for Windows.
2. Customers can choose to format the hard drive by using the Disk Management tool of the
operating system before using the IR2624-S3.
At this point, the installation process is completely nished. The user can freely retrieve and save
data to IR2624-S3 just like retrieving and saving data to a regular hard drive. If the user experiences
any abnormality during the operation, please refer to the trouble shooting Q&A section in Appendix.

iR2624-S3 User Manual
7
7. Hard Disk status on LCD screen
2. Over Temperature (≥50°C)
Pri HDD : OK
Sec HDD : OK T
3. Fan Failure.
Pri HDD : OK F
Sec HDD : OK
4. RAID 1 Degraded. Primary hard drive is failure, but secondary hard drive is normal.
RAID-1 degraded
Pri : X Sec : O
5. RAID 1 Failure. Primary and secondary hard drives are failure.
RAID-1 failure
Pri : X Sec : X
6. RAID 1 Failure. (Double Source)
RAID-1 failure
Double Source
7. RAID 0 Failure. Primary hard drive is missing, but secondary hard drive is normal.
RAID-0 failure
Pri : M Sec :O
8. Rebuilding
Rebuilding
Sec →Pri 32%
1. Booting and Normal status.
IR2624
RAID-1 vxxxxxx.x
Pri HDD : OK
Sec HDD : OK

iR2624-S3 User Manual
8
The hard drive Hot Swap and Auto Rebuilding functions are available.
O-line Back up When the data is stored within IR2624-S3, the user can remove one of the hard
drives from IR2624-S3 as back up drive for data such as system operation le, secured les, seldom
modified files or image and music files. The user can periodically insert the hard drive back into
IR2624-S3 to execute automatic backup to protect the system from being hit by computer virus or to
avoid risk of having both hard drives failing at the same time.
When one of the two hard drives fails in the IR2624-S3 system, the system will alarm the hard
drive failure message both on the LCD display screen and in the monitoring software. The user can
remove the failed hard drive from the system while the system is still in operation without shutting
down the machine. If the failed hard drive is replaced shortly, the system will automatically execute
the Auto Rebuilding function without affecting the system operation and without any operation
command from the user.
When the IR2624-S3 detects a hard drive missing or a hard drive failure, the Buzzer will start and the
LCD display screen will display the following messages:
After removing the failed hard drive and replacing with a new hard drive, if the hard drive is properly
installed, the LCD display screen will display the following messages:
After few seconds of installing the new hard drive, the LCD display screen will display the data
rebuilding progress:
When the rebuilding is fully completed, the LCD display screen will again display the following
messages:
8. Data Rebuilding Operation
Pri HDD : OK
Sec HDD : OK T
RAID-1 degraded
Pri : X Sec : O
Pri HDD : OK
Sec HDD : Insert
Rebuilding
Sec →Pri 32%
Pri HDD :Insert
Sec HDD : OK
Rebuilding
Pri →Sec 32%
Este manual sirve para los siguientes modelos
1
Tabla de contenidos
Otros manuales de Sistema de seguridad de Raidon
Manuales populares de Sistema de seguridad de otras marcas


EDM
EDM Solution 6+6 Wireless-AE Manual de usuario

Highway Safety Group
Highway Safety Group EA401 Manual de usuario

Siren
Siren LED GSM Manual de usuario

Detection Systems
Detection Systems 7090i Instrucciones de montaje

Se-Kure Controls
Se-Kure Controls MicroMini SK-4841 Manual de usuario

Siemens
Siemens FDM273 Manual de usuario