QPR 6690 Manual de usuario

QPR$6690$10$Gallon$Melter$Applicator$
ASSEMBLY$INSTRUCTIONS
1$of$18
$7322$Bonnyshire$Drive
Chattanooga,$TN$37416
September$2015
!"#$%&'#%(')"")$*%+,-
If$there$is$exterior$damage$to$the$shipping$box,$please$call$your$sales$representative$to$report.
*Wear$appropriate$personal$proctective$equipment$when$opening$the$box.
*Unstrap$the$box$and$open$the$plywood$crating.
*There$will$be$sharp,$exposed$nails$on$the$box$when$opened.
*Uncrate$and$remove$the$unit$and$parts$from$the$box.
%
(')"")$*%+,-%./$%
'/0#%1'/2"%#3*#14%
#-",1#3%$/)51%/$3%
1"5)$Ø%%71#%%
"#21,$/5%"2,ͺ#%
#:;)"<#$&6%

QPR$6690$10$Gallon$Melter$Applicator$
ASSEMBLY$INSTRUCTIONS
2$of$18
$7322$Bonnyshire$Drive
Chattanooga,$TN$37416
September$2015
=>?@(%=A%>B?%+!C%D!E%F((?@+GH
The$parts$below$will$be$in$the$melter$kit
>/$I%J)&'%2#<,0/K5#%
%D5,J%E#1&2)89,$%(82##$%%=$1)3#%
E#/2%L'##51%
B/$35#%/$3%
B/$35#%?-&#$1),$%
M/50#%F11#<K5N%
O2,"/$#%>/$I%
>2/N%
>,28'%/$3%
E#*;5/&,2PQ/*#%
D2,$&%
L'##5%
.,$&2,5%E,31%
(',#%

QPR$6690$10$Gallon$Melter$Applicator$
ASSEMBLY$INSTRUCTIONS
3$of$18
$7322$Bonnyshire$Drive
Chattanooga,$TN$37416
September$2015
Prior$to$Assembly,$remove$the$flow$restriction$screen$from$the$inside$of$the$tank.
The$screen$can$be$easily$removed$from$its$holder$slot$inside$the$tank$and$saved
for$use$when$needed.
The$flow$screen$is$an%!O>=!AFG$part$that$helps$to$reduce$the$volume$of$liquid$that
can$enter$the$valve$dispenser.$$It$is$helpful$when$working$in$areas$that$require
precise$material$application$and$a$lower$volume$of$material$is$to$be$applied.
It$is$not$generally$used$for$normal$higher$volume$crack$sealing$applications$where
flow$of$material$is$to$be$maximized$out$of$the$tank$through$the$valve.
%%%E#<,0/K5#%D5,J%
%E#1&2)89,$%(82##$%
%%%=$1)3#%&'#%>/$I%

QPR$6690$10$Gallon$Melter$Applicator$
ASSEMBLY$INSTRUCTIONS
4$of$18
$7322$Bonnyshire$Drive
Chattanooga,$TN$37416
September$2015
(&#"%RS F11#<K5#%&'#%"2,"/$#%&/$I%&2/N%&,%&'#%K,3N%,T%&'#%&/$I6
*Lay$the$tank$body$flat$on$the$ground.
*Remove$the$three$attachment$bolts$from$the$tank$body.
*Align$the$three$tray$holes,$with$the$three$bolt$holes.
*Screw$in$bolts$and$tighten$firmly.
*Do$not$over[tighten$the$bolts.$$Check$carefully$for$firm$attachment.
QPR$6690$10$Gallon$Melter$Applicator$
ASSEMBLY$INSTRUCTIONS
5$of$18
$7322$Bonnyshire$Drive
Chattanooga,$TN$37416
September$2015
(&#"%US F11#<K5#%2#/2%J'##51%&,%&'#%/-5#
*Remove$the$cotter[pin$and$washer.
*Slide$wheel$on$to$the$axle.
*Place$washer$on$the$outside$of$the$wheel$between$the$wheel$
and$cotter[pin$slot.
*Re[insert$the$cotter$pin$and$bend$to$lock$in$position.
*Spin$wheel$several$times$to$set$it$and$confirm$ease$of$turning$on$the$axle.
A,&#S$If$the$wheel$does$not$turn$freely$enough,$remove$and$use$a$wire$brush
$or$torch$to$remove$excess$paint$from$the$axle.$
Remove$Cotter$Pin$and$Washer
Place$washer$between
the$cotter[pin$and$wheel

QPR$6690$10$Gallon$Melter$Applicator$
ASSEMBLY$INSTRUCTIONS
6$of$18
$7322$Bonnyshire$Drive
Chattanooga,$TN$37416
September$2015
(&#"%VS F&&/8'%T2,$&%J'##5%&,%&'#%K,&&,<%,T%&'#%&/$I
*Rotate$melter$on$the$ground$to$access$front$wheel$lip.
*$Attach$four$bolts$/$washers$/$nuts$through$the$four$holes$on$the$wheel$lip.
*$Tighten$until$firm$and$secure.
*$Check$that$wheel$axle$bolt$is$secure$and$nut$on$axle$bolt$is$not$loose.
*$Front$wheel$should$spin$easily$and$rotate$360$degrees.

QPR$6690$10$Gallon$Melter$Applicator$
ASSEMBLY$INSTRUCTIONS
7$of$18
$7322$Bonnyshire$Drive
Chattanooga,$TN$37416
September$2015
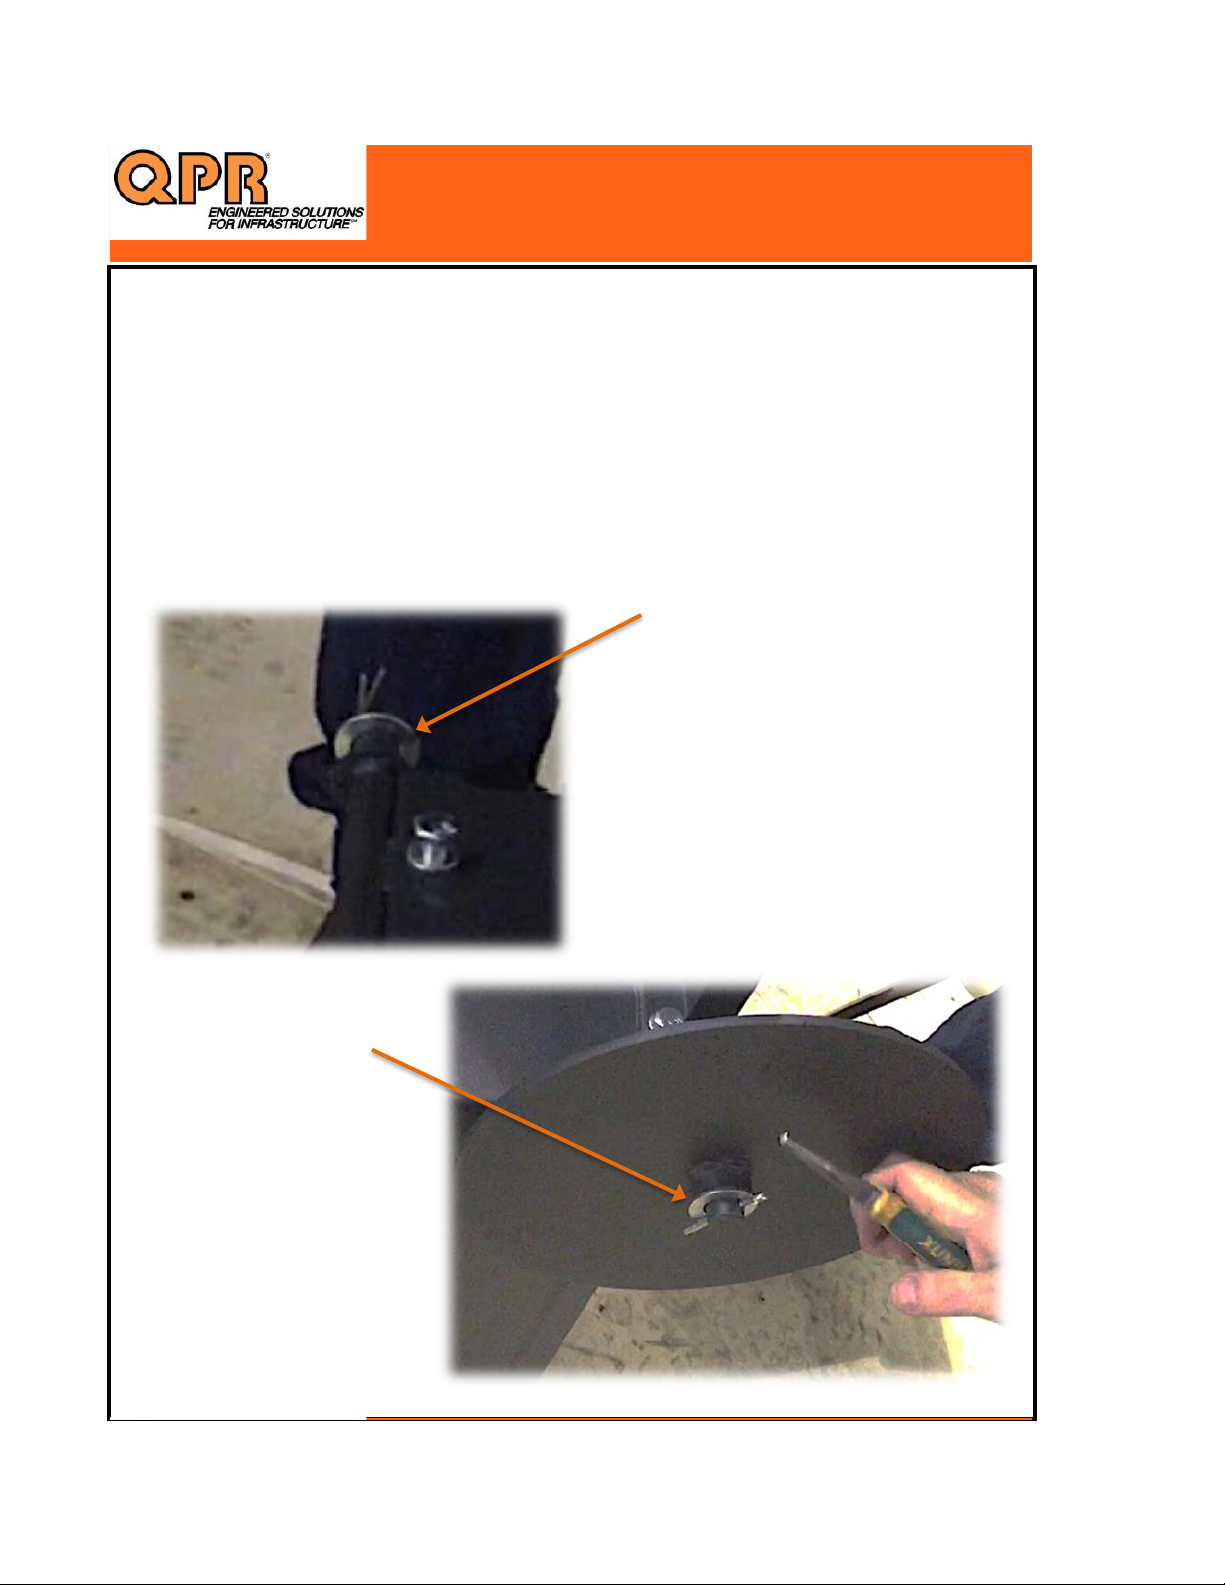
(&#"%WFX F&&/8'%3)1"#$1#2%0/50#%/$3%1',#%/11#<K5N%&,%&/$I%;$)&
*Screw$the$valve$assembly$pipe$into$the$tank.
*Approximately$10[12$rotations$are$needed$to$get$it$into$position.
*Do$not$cross$thread$when$screwing$it$in.
*When$screwed$in,$the$valve$receiver$pipe$does$not$have$to$be
absolutely$tight.$It$will$be$naturally$firm$after$10[12$rotations.$$
*The$final$turns$may$require$some$force$to$as$threads$begin$to$tighten$in.
=$1#2&%/$3%182#J%
0/50#%/11#<K5N%
)$&,%&'#%&/$I%
F5)*$<#$&%15,&%T,2%
/Y/8'<#$&%,T%&'#%1',#%
/11#<K5N%)$%1&#"%W+%

QPR$6690$10$Gallon$Melter$Applicator$
ASSEMBLY$INSTRUCTIONS
8$of$18
$7322$Bonnyshire$Drive
Chattanooga,$TN$37416
September$2015
(&#"%WFX Continued
(G!>%D!E%FG=QA@?A>%%
L=>B%>B?%(B!?%F((?@+GH%
=A%W+6%%(G!>%(B!7GZ%+?%=A%
FOOE!C=@F>?GH%>B=(%O!(=>=!A%
FD>?E%(.E?L=AQ%=A%(!%>B?%
(B!?%F((?@+GH%+!G>%.FA%
(G=Z?%=A>!%=>6%

QPR$6690$10$Gallon$Melter$Applicator$
ASSEMBLY$INSTRUCTIONS
9$of$18
$7322$Bonnyshire$Drive
Chattanooga,$TN$37416
September$2015
(&#"%W+X F5)*$%/$3%/&&/8'%1',#%/11#<K5#%&,%0/50#%/11#<K5N
*Attach$shoe$to$bottom$of$the$tank$using$the$the$bolts.
*Do$not$fully$tighten$the$two$tank$bolts$until$assembly$is$completely$aligned.
*Align$shoe$assembly$with$the$slot$on$the$valve$assembly$post.
*Correct$alignment$will$have$the$bolt$and$washer$in$full$contact$with
the$slot$plate$for$firm$and$secure$contact.
*If$the$slot$and$bolt$do$not$align$correctly:$$screw$in$or$screw$out$the$valve$
assembly$until$it$is$correctly$aligned.
F5)*$<#$&%K,5&%T,2%
/Y/8'<#$&%&,%&'#%
15,&%,$%&'#%0/50#%
/11#<K5N%",1&6%

QPR$6690$10$Gallon$Melter$Applicator$
ASSEMBLY$INSTRUCTIONS
10$of$18
$7322$Bonnyshire$Drive
Chattanooga,$TN$37416
September$2015
(&#"%W+X Attach$shoe$to$the$bottom$of$the$tank$with$the$two$bolts
Align$shoe$with$the$bolt$holes$and$hand$tighten$only$at$this$step
Tabla de contenidos


