PowerTap Joule GPS Manual de usuario

PowerTap Joule™GPS
User Guide
Joule GPS is compatible with any ANT+TM
power meter, speed sensor, cadence
sensor, or heart rate sensor.
WATTS
451 160
21 96
1:06:45
HR
MPH CAD
170 894
AV WATTS MX WATTS
RIDE TIME KJ
9:34
A
71º
380
INT
Supporting FW 19.087

Joule GPS User Guide page 2
© 2012 Saris Cycling Group, Inc.
5253 Verona Road
Madison, WI 53711
All rights reserved. No part of this publication may be copied, photographed, reproduced, translated,
transmitted electronically or placed on digital media without the prior written consent of Saris Cycling
Group, Inc.
Trademarks
Saris Cycling Group, Inc., PowerTap, and PowerTap logo, are all registered trademarks of Saris Cycling Group,
Inc. All other product, brand, or trade names used in this manual may be trademarks or registered trademarks
of their respective owners.
Modifications
Saris Cycling Group, Inc. reserves the right to make improvements and/or updates to the products
described herein at any time without notice.
This device complies with part 15 of FCC Rules and Rss-210 of IC Rules. Operation is subjected to the following two conditions:
(1) This device may not cause harmful interference, and (2) This device must accept any interference received, including
interference that may cause undesired operation. The manufacturer is not responsible for any radio or tv interference caused
by unauthorized modifications to this equipment. Such modifications could void the user authority to operate the equipment.

CHAPTER
7. Training ___________________ 36
Workouts
Auto Lap
Countdown
8. DEVICE____________________ 41
Date & Time
Display
Record Control
Memory
Altimeter
About
9. DATA & DOWNLOADS________ 48
Download
PowerAgent
10. FAQ & TROUBLESHOOTING __ 48
11. PRECAUTIONS ______________ 49
12. FEATURES LIST _____________ 50
TECHNICAL SPECIFICATIONS____ 51
13. WARRANTY ________________ 52
Appendix A, History Reports_______ 53
Appendix B, Error messages ______ 59
Appendix C, Metrics ____________ 62
Appendix D, GPS Signals _________ 64
Appendix E, Short cuts, quick links__ 67
TABLE OF CONTENTS
Joule GPS User Guide page 3
CHAPTER
1. STARTING OUT _____________ 4
Unpacking
Compatibility
Installation
Charging
2. OVERVIEW & SETUP _________ 6
Dashboards
Buttons and Screen
Main Menu
User
Sensor and Pairing
3. DASHBOARDS ______________ 11
Dashboard 1,2,3: Metrics
Dashboard 4: Intervals
Dashboard 5: GPS Map
4. SENSORS __________________ 17
Sensors Overview
Dene a Bike
Associating Sensors
Sensor Details
Calibration
5. NAVIGATION _______________ 23
Navigation Overview
Routes
Waypoints
GPS Status
Compass
6. HISTORY REPORTS __________ 32
Overview
Reports

Joule GPS User Guide page 4
Thank you for purchasing the PowerTap Joule GPS. This user guide is just one of the resources to help
you understand all the features the Joule GPS has to offer.
Please visit www.PowerTap.com to:
• Learn more about the Joule GPS and the PowerTap system of products
• Register all PowerTap products and activate warranty
• View instructional videos
• Sign up for the PowerTap newsletter-your source for the latest news and technical updates from
PowerTap
PACKAGE CONTENTS:
PART QTY
Joule GPS computer 1
Heart rate strap (select models) 1
Stem/Handlebar mount 1
Out-Front mount 1
Mount o-rings (2 sm, 2 lg) 4
Micro USB cable 1
CHAPTER 1: STARTING OUT
UNPACKING JOULE GPS
Joule GPS is compatible with any ANT+TM
power meter, heart rate sensor, cadence
sensor, speed sensor, or combination
speed/cadence sensor.
COMPATIBILITY

CHARGING
The Joule GPS is powered by a high-capacity rechargeable
battery. To charge the battery, plug into a computer or AC wall
adapter (#7060 not included). Typical battery charge lasts
approximately 20 hours of operation.
Should the battery become completely discharged (no partial
charge remaining), plug the Joule GPS into a computer or AC wall
adapter, press the reset button on the back panel of the Joule
GPS, and the charging process will begin.
Joule GPS User Guide page 5
Micro-USB
USB
INT
INSTALLATION
Installing the PowerTap Joule GPS
OUT-FRONT MOUNT
INT
INT
O-Rings: Crisscross under
stem/handlebar, latch on hooks OR Zip tie around stem,
through slots
STEM/HANDLEBAR MOUNT
INT
INT
CHAPTER 1: STARTING OUT
INT

Main Menu
Ride
History
Sensors
Training
Navigation
User
Device
Back to Dashboard
9:34A71º
[ENTER]
Press & Hold 3 sec.
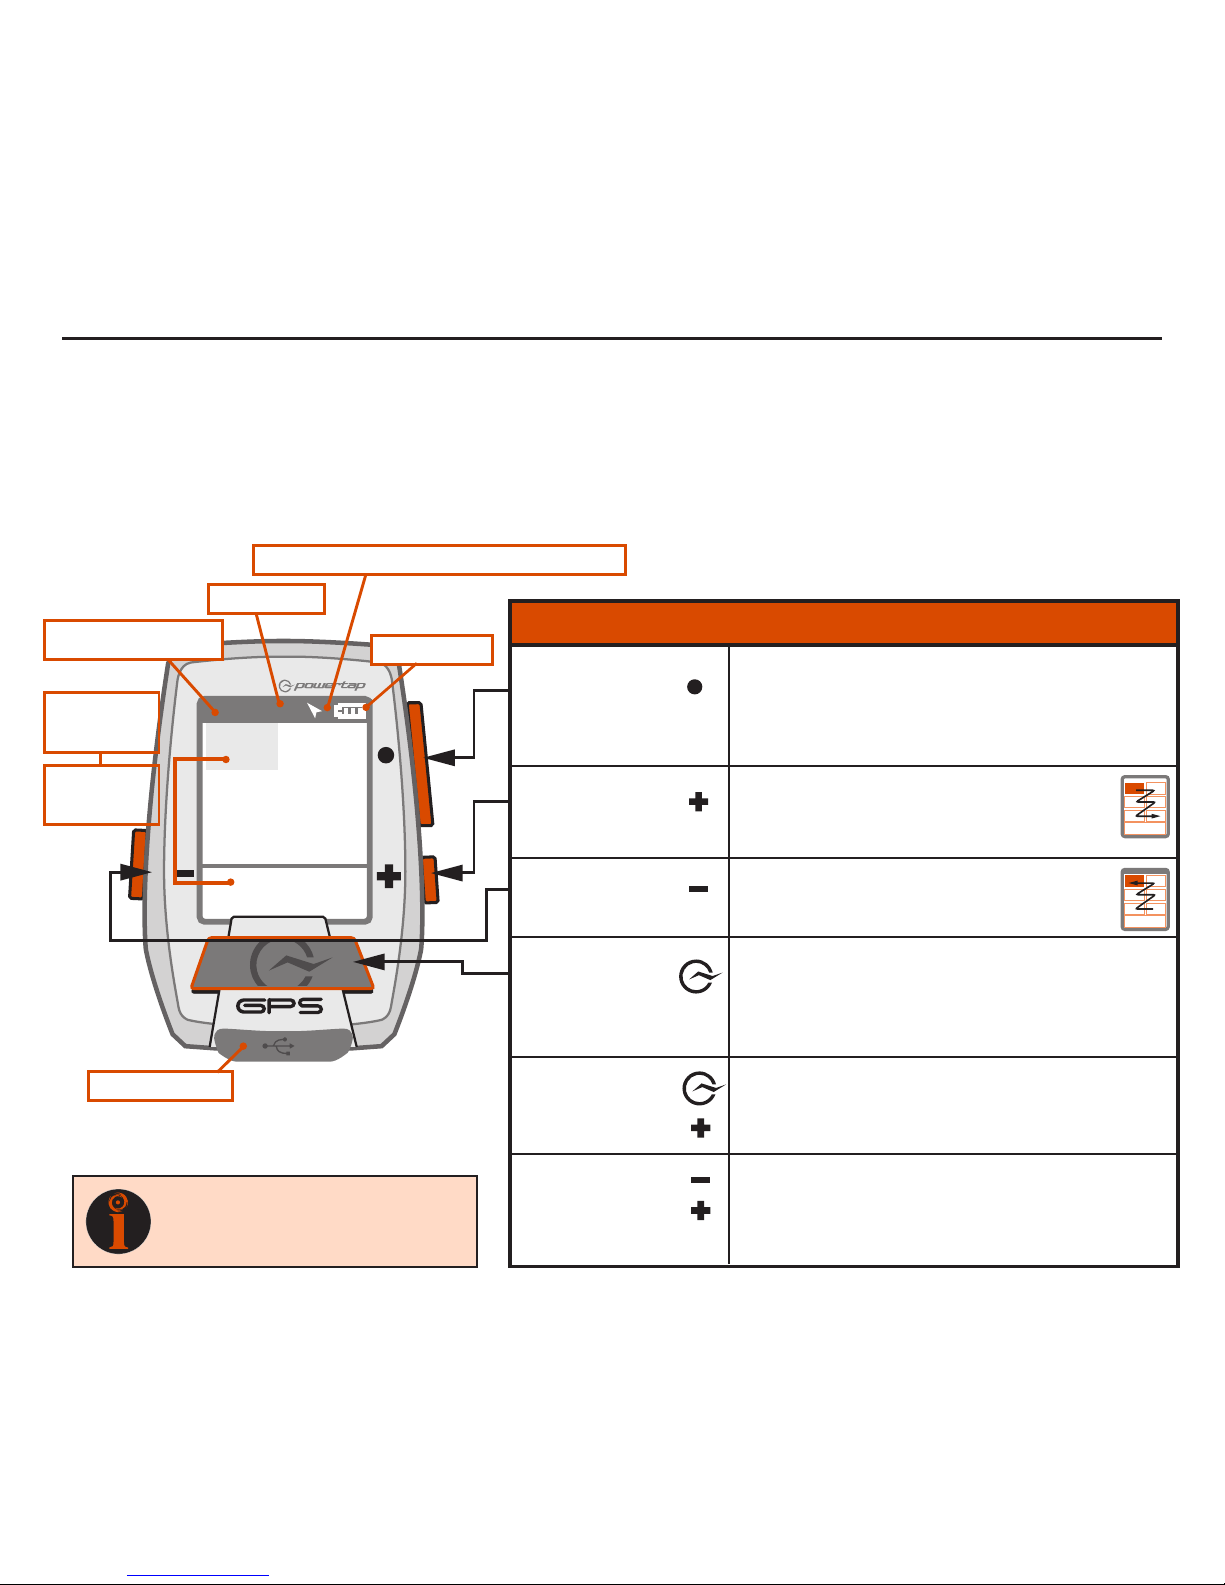
CHAPTER 2: JOULE GPS OVERVIEW & SETUP
DASHBOARDS and BUTTONS
Press any button on the Joule GPS to turn the unit on. The display will briefly show the date, time, some
user totals and the firmware version, then begin acquiring the GPS fix on your current location. One of 5
Dashboard screens will be displayed at this time. By default, there are 3 dashboards displaying various
Metrics, 1 dashboard displaying completed intervals, and 1 dashboard displaying the GPS map. Pressing
the ENTER button will advance the display to the next of the 5 Dashboard screens. Dashboard 1, by default,
is initially set to display 6 metric windows in the configurable area. Other screens can appear between the
Metric Dashboards and the Navigation dashboard, depending on which features you are using (e.g. Screens
related to Training and Workouts, Navigating to a Waypoint, Following a Route, etc.).
• To view the Main Menu from any Dashboard, press and hold the ENTER button for 3 seconds.
• To return to the Dashboard from any Menu press and hold the ENTER button for 3 seconds.
Press any of the 4 buttons to turn the unit on
WATTS
--- ---
--- ---
0:00:00
HR
MPH CAD
0.0 0.0
AV WATTS MX WATTS
RIDE TIME KJ
9:34
A
71º
0
INT
Displays the Main Menu
Joule GPS User Guide page 6
WATTS
451 160
21 96
1:06:45
HR
MPH CAD
170 894
AV WATTS MX WATTS
RIDE TIME KJ
9:34
A
71º
380
INT
Joule GPS User Guide page 7
more BUTTON and DASHBOARD DETAIL
There are three buttons on the sides of the Joule GPS and one large button below the screen. The
screen is divided into 3 display areas. The Title Bar, displays time, temperature, compass, and battery
level. The large middle section displays user-selected metrics and can be configured to show 3 to 6
windows. The lower section shows complimentary metrics associated with the highlighted metric.
CHAPTER 2: JOULE GPS OVERVIEW & SETUP
Highlighted
Metric
Complimentary
Metrics
Micro-USB port
Ride Time or Clock
Temperature
North Arrow and GPS Signal Lock Indicator
Battery Level
[ENTER] button * Press once to advance through Dashboards
* Hold for 2 seconds - Go to Main Menu
* In Menus, press once to select menu item
* In Menus, hold 2 seconds to return to Dashboard
* Shifts selected metric or “highlight box”
to the right and down
* Hold for 3 seconds to begin metric rotation
* Shifts selected metric or “highlight box”
to the left and up
* Press to mark intervals
* Hold for 2 seconds to display Interval view
* Hold for 2 seconds to display Ride view
* In Menus, press once to return to previous screen
* Press together and hold for 3 seconds to put the
Joule GPS to sleep
* Press together and hold for 2 seconds to “find”
sensors that may have been lost or were not
awake when the Joule powered up.
[PLUS] button
[MINUS] button
[PLUS] button
[MINUS] button
[INTERVAL] button
[INTERVAL] button
BUTTONS FUNCTION
TIP
: See Appendix E for all button
combinations, short cuts and quick
links.
[PLUS] button
CHAPTER 2: JOULE GPS OVERVIEW & SETUP
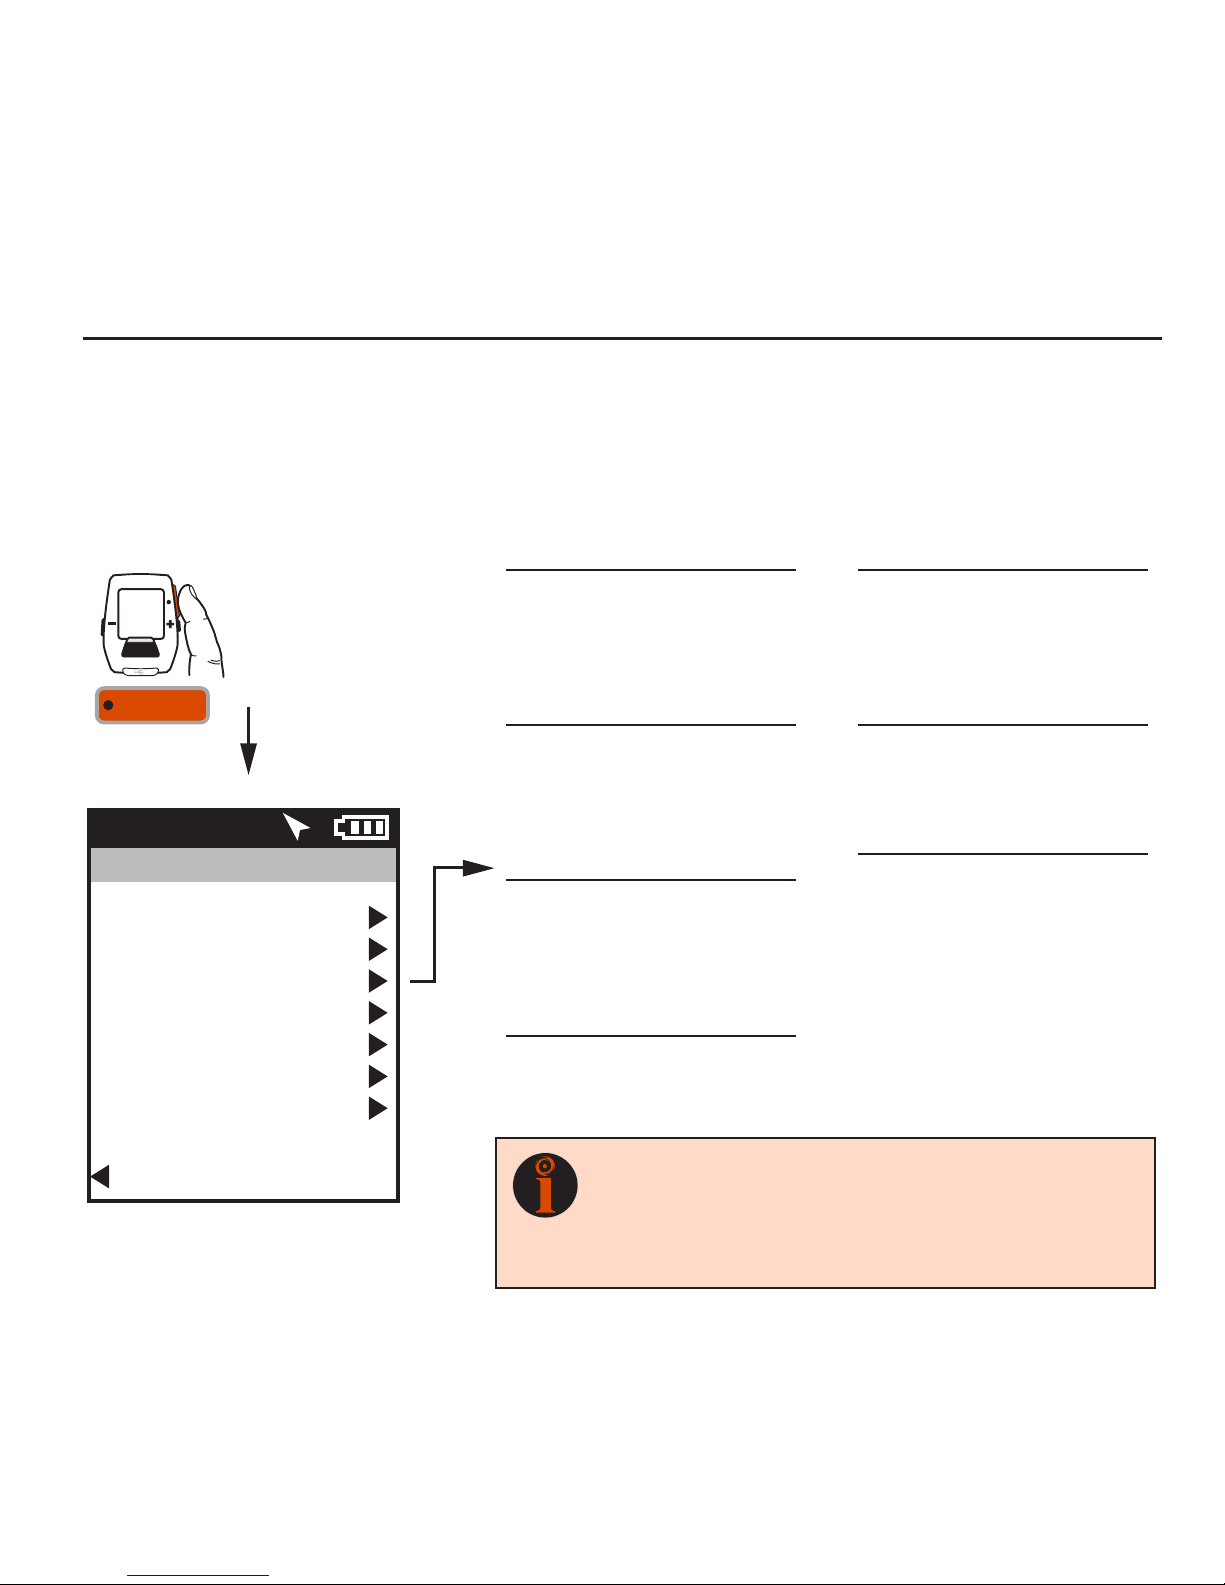
MAIN MENU
The Main Menu is your home base. Enter the Main Menu to stop and save rides; review ride history;
create, edit, select, and pair Sensors; activate Training features; define individual Users; and configure the
Device. Access to the Main Menu can be gained while viewing any Dashboard by pressing and holding the
ENTER button. Use the (+) and (-) buttons to advance through the options to your selection.
Joule GPS User Guide page 8
Main Menu
Ride
History
Sensors
Training
Navigation
User
Device
Back to Dashboard
9:34A71º
INT
[ENTER]
Press
& Hold 2 sec.
FROM DASHBOARD
TIP: Once you have entered the Menu system (by holding ENTER button
down for 2 seconds) the INTERVAL button will act as the “back” button. Each
button press will return to the previous screen. Additionally, there is a “Back
to...” choice at the bottom of every Menu screen, which will also return the
display to the previous screen.
RIDE
Resume Ride
Stop and Save
Stop and Delete
Reset Pacer
HISTORY
Last Ride
Select a Ride
Report - Max
Report - Totals
SENSOR
Select a Bike
NEW BIKE
Add a Bike
Manual Zero
TRAINING
Workouts
Auto Lap
Countdown
NAVIGATION
Routes
Waypoints
GPS Status
Compass
USER
Select a User
NEW USER
Add a User
DEVICE
Date and Time
Display
Record Control
Memory
Averages
Altimeter
About Joule

USER Multiple users can be stored
on each Joule GPS. (e.g. Jim, Bob,
Rachel can all share same device with
unique information). To add another user,
select Add a User, enter the name,
weight, height and date of birth for the
new user. If the training data is known
for this particular user it can be entered
now or enter it later, after a few rides.
CHAPTER 2: JOULE GPS OVERVIEW & SETUP
USER
Because the Joule GPS is multi-user compatible, it's easy to share the device among several riders (e.g.
Rachel, Jim, Bob). Each user can have multiple bikes (e.g. TT bike, Road bike, MTB); each bike can have
multiple sensors associated with it (e.g. PowerTap, Cadence, HR strap, Speed). A default User is already
defined within the Joule GPS. You can either edit the settings associated with that User or create a new user
by selecting Add a User.
Main Menu
Ride
History
Sensors
Training
Navigation
User
Device
Back to Dashboard
9:34A71º
User
Select a User
USER
Add a User
Back to Main Menu
9:34A
INT
FROM MAIN MENU
[ENTER]
Press
to scroll to User.
Press Name
Weight, lb
Height, in
Date of Birth
Gender
FTP
Power Zones
Heart Rate Zones
Joule GPS User Guide page 9
TIP: When editing within a data field, the ENTER button allows you to enter, then
move forward in the field; the INTERVAL button allows you to move backward;
the PLUS/MINUS buttons allow you to pick a letter or number. Moving to the end
of the field and pressing ENTER twice exits the field.

CHAPTER 2: JOULE GPS OVERVIEW & SETUP
SENSORS & PAIRING
Pairing is a term used to describe the association of your Joule GPS with a particular sensor that is broadcasting an
ANT+TM signal (e.g. a PowerTap hub, a Heart Rate strap, a remote cadence sensor, a remote speed sensor, etc.).
Sensors can be shared between bikes (e.g. a heart rate strap). Each User can define multiple bikes. Each bike may
have one or more sensors associated with it. Use unique names when creating additional bikes. For example: Jim’s
Racing Bike, Jim’s MTB, My TT Bike, etc.
To add another bike:
· Select “Add a Bike,” enter a unique name and the weight of the bike.
· Associate the sensors with the bike. Make sure all the sensors are awake and
broadcasting (briefly spin PowerTap wheel, wear HR strap).
· Select “Pair All” to pair all awake sensors in broadcast range (PowerTap hub, Heart
Rate strap). Sensors can also be paired individually by selecting it within the
Sensors menu.
Joule GPS User Guide page 10
TIP: The Joule GPS pairs to the sensor(s) closest to the
device first. Hold the Joule within 12” of PowerTap hub
when pairing in the presence of other sensors.
For more information on Sensors, see chapter 4
12” or 30cm
other sensors
INT
[ENTER]
Press & Hold
2 sec. to enter
Menus. Scroll
to Sensors;
Press •[ENTER];
Select “Add a Bike,”
Press •[ENTER] ;
FROM DASHBOARD
Main Menu
Ride
History
Sensors
Training
Navigation
User
Device
Back to Dashboard
9:34A71º
Sensors
Select a Bike
Jims RB
Add a Bike
Manual Zero
Back to Main Menu
9:34A
NewBike2
Name
NewBike2
Weight
0.0
Pair All
Power Sensor
None
Cadence Sensor
None
Speed/Combo
None
Heart Rate Sensor
None
RU Sensor
None
Delete Bike
Back to Sensors
9:34A
Otros manuales para Joule GPS
3
Este manual sirve para los siguientes modelos
1
Tabla de contenidos
Otros manuales de GPS de PowerTap


